
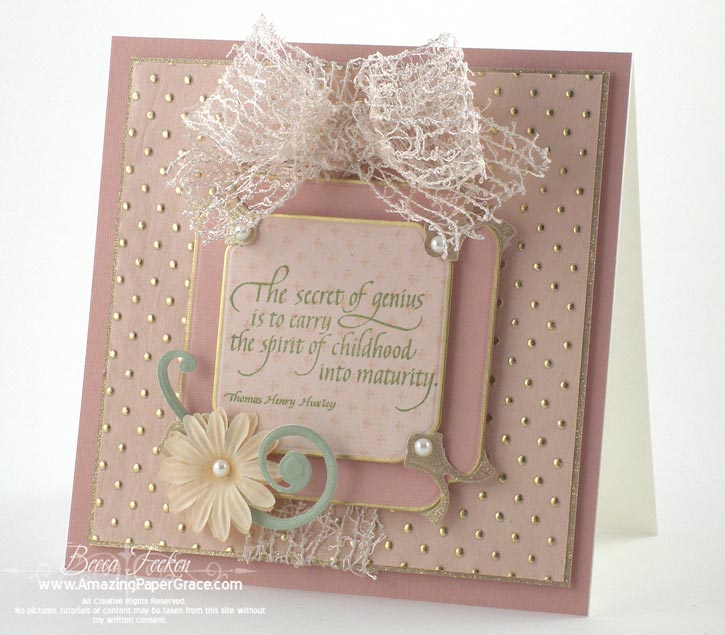
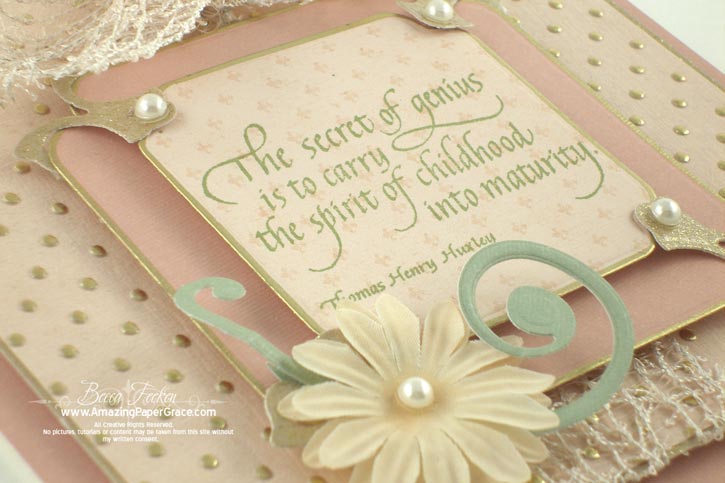
Today I’m sharing another sweet sentiment from Quietfire Design called The Secret of Genius. I just can’t bear to put the sentiment on the inside of the card because I think they are drop dead gorgeous for center stage on the front.
One of my favorite new shapes is Spellbinders™ Labels Twelve; the curved edges remind me of a vintage shape. My card is simple, but I stacked the shapes and used one of the throw away pieces from Spellbinders™ Lattice Borderabilities® Petite as corner pieces. For the curly tendril on my flower I used Spellbinders™ Doodleparts. The unique lacy ribbon is Mays Art – it’s totally wired and posable ;-)
Card Recipe:
Stamps: Quietfire Design – The Secret of Genius
Paper: DCWV – Mariposa, The Paper Company – Pink with Gold Dots
Ink: Green Dye Based Ink
Accessories: Spellbinders™ Labels Twelve, Spellbinders™ Doodle Parts, Spellbinders™ Lattice Borderabilities® Petite, Pearls, Mays Art Ribbon
Thanks for stopping by today!!

.jpg)

.jpg)


Thank you for sharing your wonderful vidio with us. Your work is so inspirational. All the cards and items you make are all so beautiful.
This is one I am deffinately going to try. Take care God Bless. xChrisB
Thank you for the great video! I think maybe now I might try this out but I know I wouldn’t have attempted it without the visual. :o) I really like that it fits on a 12×12 sheet as well. That is so useful for those of us with limited access to supplies.
Thanks Becca, I love this box and adore your work! I will definitely try this box!
Oh Becky. This is one darling box you’ve made. And your videa is perfect. I to would have never of attempted to make this with out the video. Your cards and projects are just inspiring to me and I look forward to your posts. I did make my first box and it didn’t come out. I don’t have a score pal so I had to figure out the dimentions on my ruler. But I did and I want to say thank you thank you thank you!!!! You are AWESOM!!!
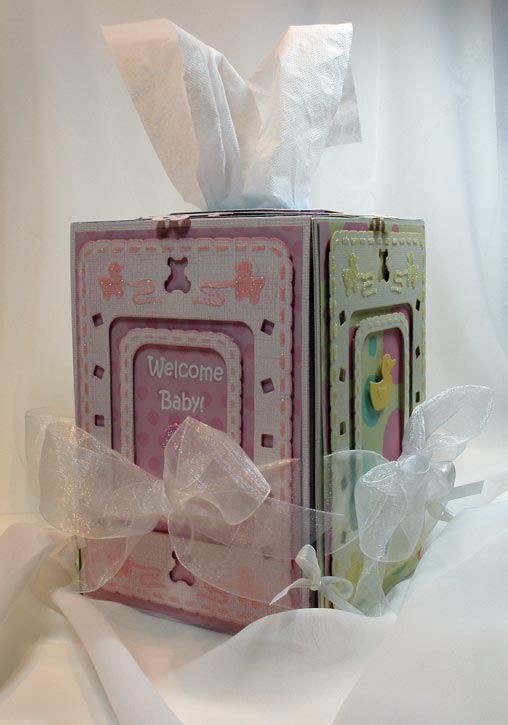
Wow this is amazing!! Thanks so much for taking the time to post your tutorial video!! One question I have for you though…. How do you put the windows in when your paper is that big?
TFS!!
Beth Greco
(SCS Scrappin Beth)
Thank you for such a great video, it’s all very clear. I would like to ask if you could post a picture of the template with all the folds and cuts – perhaps marked with a pen so they’re easier to see. Many thanks again ;)
Love the video and your work is beautiful. Would love the templates. Thanks
Hi Becca. Thanks for a wonderful tutorial. I know I will be trying this one. I’ve written it out and it’s now in my to do book.
Hi Becca, Thank you so MUCH for sharing with us how to make this beautiful box ! I fell in love with this box the first time I saw it on your blog. Thank you for the video, it really helped. Could you share with us the best way to cut out the windows in the box?
Thank you so much for sharing with us all your hard work. I love your blog!!
Becca,
Thank you, thank you, thank you!
Continued Blessings,
~~Diane~~
Thanks for the great video tutorial.
Thanks so much Becca!!! This is such an unusual box…and I love all the ways it could be decorated!! I am making a special gift for a friend and I just found the perfect special box to put it in!!! Thank you for your help!
Thanks Becca. You make it look so easy. This is a great idea. A written tutorial would also be very helpful and much appreciated. That way those of us that don’t have a computer in our work area would have something to refer to.
Thank you for doing the tutorial on this box. We truly do appreciate the time you take on making your website such a wonderful place to visit!
This is darling, Becca! I am grateful for your video cos I would never have figured out all those angles by myself :)
I, too wondered how to cut the windows with such a large paper, but I may use my Fiskars shaper tools for that.
Where there’s a will, there’s a way :-D
Thanks for sharing your gorgeous artwork! I’m glad to see you working with Claire’s designs – aren’t they scrumptious?!
Thank you so much for showing us how it is done. Wonderful gift boxes – I’m going to have to make several!
Smiles~
Marilyn
You always take us down new, interesting, and very worthwhile paths with your ideas. Thank you!!
Hello, I normally do not comment, but I had to thank you for such a wonderful tutorial. I would have never adventured to make one without a video. You did an excellent job. Thank you so much!!! Your work is exquisite!
What a lovely lovely box, AMAZING! …it is so elegant.
now I was wondering how can I do all the scoring lines if I don’t have a scor-pal.
Thanks so much for sharing.
How in the world do you uber-talented ladies ever think up something like this? To do all those score lines & get them perfect would be beyond my comprehension! I can only imagine the piles of runied sheets of paper I’d go through — LOL!!! This is just beyond gorgeous & I cannot wait to own Claire’s fantabulous stamps — she & you, Becca, make an unbelievably-talented combo!!! ;~) WOW!!!
Thank you for the great video!
thanks Becca for the tutorial!!!!! I was at CHA …..and your NAME was being spoken EVERYWHERE on the floor….you were greatly missed….guess I will have to come to CHA in ChiTown!!!!!!! Thanks for your inspiration!!!!!!
Thank you for the great tutorial — am going to have to check back tomorrow for the advice on cutting the windows! I am going to have to go back to figure out your scoring measurements so that I can use my Scor-it. What size of paper did you use on your original box?
oh wow… awesome.. thanks!
Becca, thank you so much for creating new dimensions to fit w/in 12 x 12 paper and for the video tutorial. Now, I can do one too. You’re the best and your creations are truly amazing. God bless!
Thank you very much for taking the time to make the video for us!! The box will make a beautiful presentation for small gifts and will be very versatile.
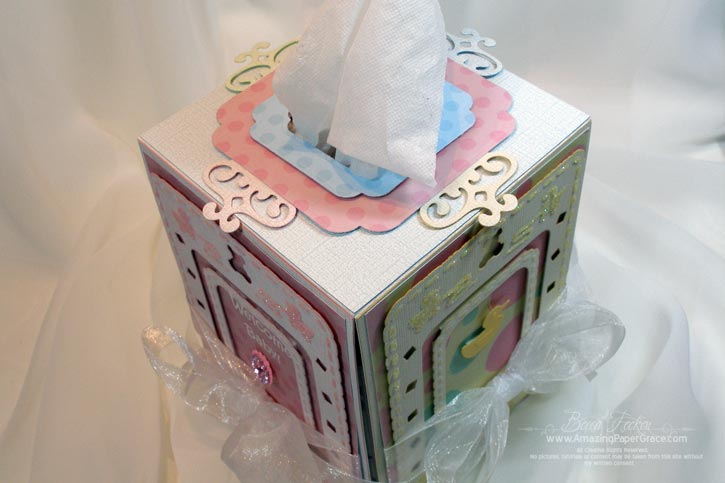
Thanks for the video. This will be fun to make. Question: can you show us again how to fold the top? The top of the box was not in the video when you were folding the top and I need a visual. Thanks so much if you can do that!!!
Your box is gorgeous! I enjoy your work…thanks for taking time to share with us!
This box is so beautiful, thanks for this tutorial!
Thanks for the tutorial. I do best when I can “see” how things are done, as I’m a visual learner. Thanks for sizing this for the 12×12 size paper. I’m going to have to try this one.
Thanks so much for sharing how to make this box. It’s truly so different from all the others I’ve seen. Could you please add more information about how you folded the top? Do some of the pieces tuck into the slits that you cut? I couldn’t quite see it from the angle of the camera on the video.
Awesome video! I’ll have to ‘play along’ and try to do one myself! You’re a great teacher, demonstrator, and a total inspiration! You ROCK, Becca!
Awesome video. Thanks for sharing.
Awesome Becca, I will have to get paper and my score pal together and follower along with you next time……
Fantastic video, Becca. You make it look so easy. Eager to see how you made the outside tomorrow. Have a lovely week.
Great tutorial Becca! I can’t wait to give it a try.
Well done Becca! These video things are tough to make
Thanks, Becca! Would have never tried this from written directions! Also great that it will fit on a 12 x 12 paper. I know doing this takes time and it’s appreciated!
R/
[…] mat, an oval Spellbinders die cut, tape and lastly the same cardstock I cut for the Twist Top Box HERE. […]
Becca your box is so beautiful as is your voice. It is so much easier to understand how to make the box, with your careful instruction. Thanks for sharing.
Becca
I’ve enjoyed your tutorials very much.
I will have to watch it several times to be able to absorb it.
Your work is so beautiful and original and your colors are fantastic.
Thank you so much for sharing your knowledge with all of us.
I really enjoy your blog and I’m learning a lot from you.
pat
Becca,
I appreciate that you made us all the video to share your beautiful box! Just like others said, I’ll have to watch it a few times to take notes and really understand the process. I can’t wait to put one (or more!) together!
Thanks again for sharing your talents with us!
-Sue
Awesome tutorial Becca. Your directions were very clear. TFS!!! your how to of your elegant box. :D
Becca, this tutorial is awesome. Thanks for sharing.
WOW that is beautiful. you should make templates and sell them!! thanks for the tutorial. i might just try it ha ha…. cause its not easy peasy for me. but with your teaching i might can do it. man!!! the emb. is just tooooooooo much, u really work hard and i admire so much of your stuff. sorry i dont leave a comment as often as i should . i will try and do better. but i just love this box. and i miss seeing you.!!
hugs
kay
Thank you so much! Loved to watch this! Now I have to get a scorpal too… :)
Hi Becca: I always check out your creations when I go to the Spellbinders site. The twist top boxes are very nice. The video helped me to understand how it was made. Being as how I didn’t write down the instructions as the video was playing and I’m prone to forgetfulness, I’m wondering if you have further instructions on how to make the box? If so, where on your site would I find them.
Love your designs, they are always so pretty and must take you hours.
Wonderful video! BUT I can’t figure out the top fold. I don’t know if it’s just me but your camera did not pan out enough at times to see all of how you folded the top. Since I am a visual person I am stuck. The results was gorgeous. Is there somewhere else I can go to see how it’s done?
Thanks so much for sharing all of your wonderful talent,
Phillis
Wow! What a wonderful box. thanks for the video. I can hardly wait to decorate it.
WOW!! I admire your hard work. Thank you very much. It is very nice of you to share this with us all. looking forward to more videos :)
Becca
Great Idea. I tried just scoring mine using my paper trimmer since I don’t have a scorepal. It was a little difficult and the first try was just not perfect, but I got the general idea and with a little practice, it will come out great.
Thanks for sharing!
[…] Better late than never right? So many of you asked to see the Twist Top Box put down on paper and I am more than happy to oblige. I have to admit that I was a little bit […]
[…] time. Both colour schemes couldnt be anywhere as different ..here is my twist box. I came across this post which inspired my box. She also has a template for it […]