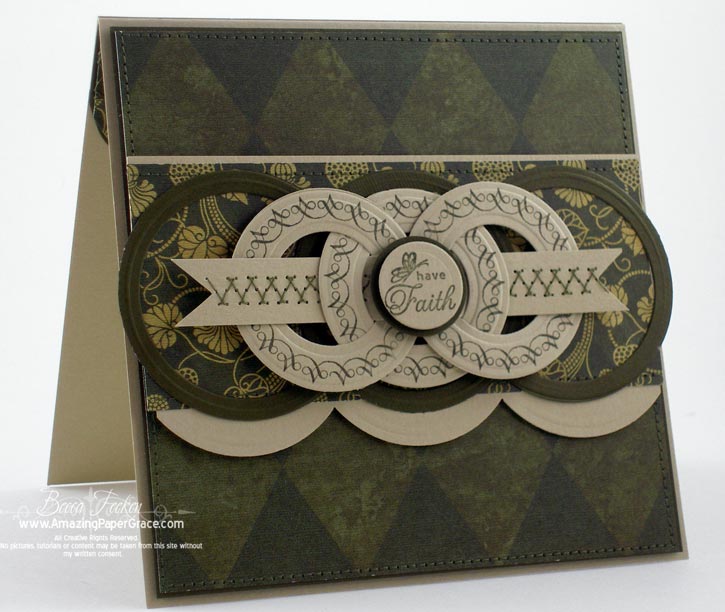
I know, finally, right?  Here is a guide for making the base of the Lattice basket.  If you’re not familiar with the basket, you can click HERE to see my product list as well as a step by step tutorial on how to weave the side panels.

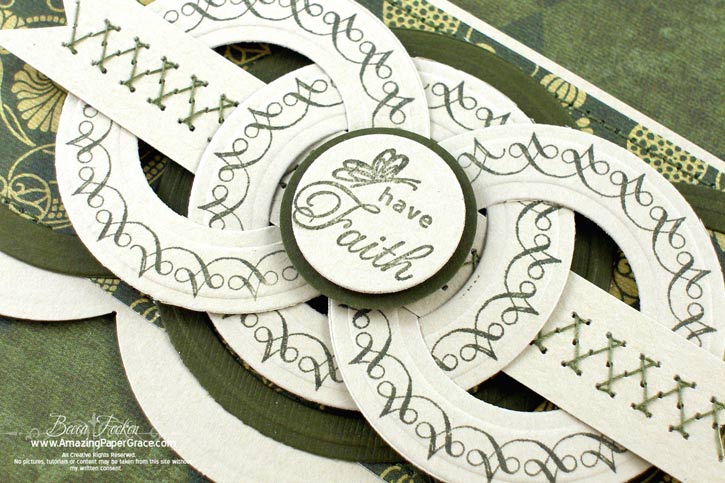
I did not do a separate video because trust me this basket base is very easy.  For the Cliff Notes, all you need is two pieces of cards stock.  Score as indicated on the template, then take a round object like Spellbinders Standard Circles LG or a template of a circle that you make and trace the basket flaps.  Then cut everywhere the red lines indicate.

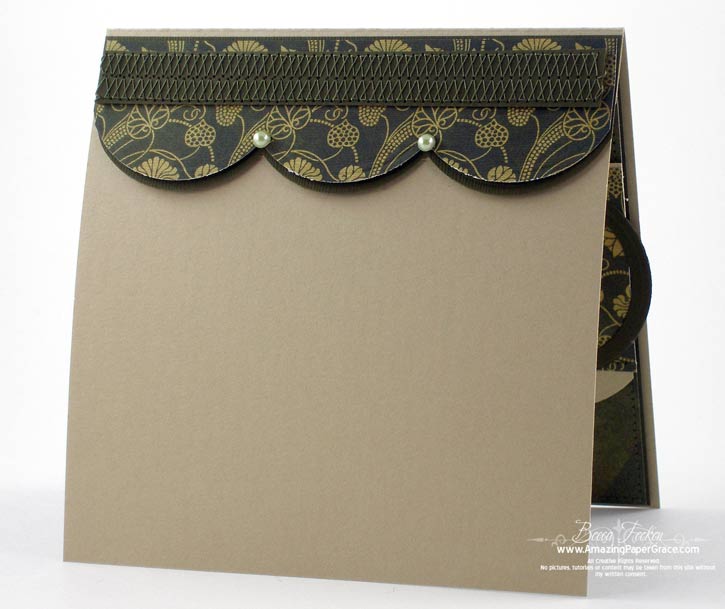
To assemble, place glue on both of the areas called Side Tab.  Lay both pieces of paper side by side and overlap on one of the side tabs to combine both pieces.  Then adhere the remaining Side Tab to the remaining open straight edge.  Fold in all the bottom tabs and glue generously for a sturdy basket bottom.  Fold out each of the rounded basket flaps.

At whatever length you prefer, fashion a handle using a strip of cardstock and border punches of your choice.   I’ve used a Martha Stewart border punch for mine; ribbon is another alternative.  Secure to using glue or brads to opposite sides of the basket.

If you have done lace panels they are simply adhered to each side of the basket to decorate!!  In addition under each flap on the basket I gued a Spellbinders Petite Scalloped Circle LG just to add a little interest!!

Tip for downloading:  This form is an Adobe PDF.  Adobe Reader is a free version of the program that will allow you to view the file and it can be downloaded HERE.  Several people have contacted me to say they get an error that the file is not there.  You have to have a .pdf reader first before you can download the file.  I’ve retested all my downloads and am able to get them with no problem using Firefox.  I’ll keep trying to find a fix for the 404 error that several are receiving.

pinTHIS SHAREthis TWEETTHIS EMAILthis
  • Elaine AllenMarch 11, 2010 - 7:21 am

    Becca –

    Thank you so much for this template. You are a sweetie!

    Elaine AllenReplyCancel

  • chrisdMarch 11, 2010 - 7:44 am

    What a lovely project. Thank you so much for sharing it with us.ReplyCancel

  • BettyBeeMarch 11, 2010 - 7:44 am

    Becca, thank you for all you do to inspire us! Your creations are so beautiful, and you are so sweet to share the patterns. Bless you!!ReplyCancel

  • ColleenB.March 11, 2010 - 7:48 am

    Awesome! Thank you.
    This will be very useful being I’m not able to watch the video’s you make. :{
    Thanks Becca
    ColleenB.ReplyCancel

  • DeniseMarch 11, 2010 - 7:49 am

    absolutely gorgeous.. .thanks so much!ReplyCancel

  • Beth SMarch 11, 2010 - 7:56 am

    This basket is beautiful Becca.ReplyCancel

  • Mary GuikemaMarch 11, 2010 - 8:07 am

    This is perfect. Just in time for Easter. I love your creativity.ReplyCancel

  • Maryann LaursenMarch 11, 2010 - 8:17 am

    Thanks soooo much for this template. It´s just gorgeous, and I´ll sooo love to give this a try sometime soon I hope. It´s just soo wonderful. Thanks sooo much for sharing it.
    Biiiig hugs MaryannReplyCancel

  • KathyMarch 11, 2010 - 8:22 am

    Becca
    This design is amazing! Thank you for your inspiring designs and for taking the time to share tutorials and templates with the world. God Bless you for your talent and your joy in sharing so much of yourself with all of us! May your life continue to be blessed! kReplyCancel

  • DianeMarch 11, 2010 - 8:22 am

    Becca,
    God bless you. Thanks so much.

    Hugs,
    ~~Diane~~ReplyCancel

  • Gloria WestermanMarch 11, 2010 - 8:24 am

    Thank you Becca……so beautiful…………..ReplyCancel

  • Kelly MassmanMarch 11, 2010 - 8:39 am

    Thanks so much for sharing!ReplyCancel

  • BonnieMarch 11, 2010 - 9:01 am

    Oh Becca , Thank you, you are an “Angel”. Thanks for sharing all your wonderful talent.

    Hope you have a Great Day!!!ReplyCancel

  • NanMarch 11, 2010 - 9:25 am

    WOW, you have explained it so well. I can’t wait to create my version – first I have to purchase that nestabilitie and then take your wonderful directions and see what I can do. Thank you, thank you for sharing with us how to do it.ReplyCancel

  • WillowMarch 11, 2010 - 9:37 am

    Thanks so much for the template Becca!! I just figured it was way too difficult to attempt but now I see that it isn’t. You are the greatest!!!ReplyCancel

  • Marge R.March 11, 2010 - 9:54 am

    Thank you so much, Becca! Cannot wait to finish my first basket. I already have 2 sets of panels finished, so I’m definitely making a 2nd one (& likely more). This is just the most beautiful any-occasion basket I’ve ever seen — LOVE it!! Thank you so much for all your kindness in sharing these amazingly gorgeous projects & directions with all of us, Becca! You are truly amazing & a blessing to all!!!ReplyCancel

  • LynetteMarch 11, 2010 - 10:01 am

    I would love to have the lattice directions for this basket. I have gone back to Feb 14th and tried to print it out but I get the error that it is unavailable – I even tried Firefox.

    Got any other ideas?

    Thanks so much,
    LynetteReplyCancel

  • Leslie GerhardtMarch 11, 2010 - 10:04 am

    This is just too sweet! Thanks for the templateReplyCancel

  • Michele JohnsonMarch 11, 2010 - 10:17 am

    I absolutely love this project and can’t wait to try and make it. I recently purchased the frame and was just waiting for your instructions on the basket.

    Thanks Becca!!!!ReplyCancel

  • wandathomasMarch 11, 2010 - 10:33 am

    I also got the error trying to view the full size image of the panels for the ribbon; think the link is broken, Becca. I think I can work from the thumbnail, but it would be nice to have the big one. Thanks for the followup on this; just love it.ReplyCancel

  • Maria L. (Canada)March 11, 2010 - 10:35 am

    Thanks Becca !
    I totally love this project. thanks for the tamplate.ReplyCancel

  • Vickie DoswellMarch 11, 2010 - 10:42 am

    Becca you are awesome! This basket is so cute! I printed off the pattern and I am going to try and make a lattice basket for my new granddaughter for her first Easter. Thank you for sharing with us!ReplyCancel

  • ConniecrafterMarch 11, 2010 - 10:43 am

    Just Gorgeous, thank you!ReplyCancel

  • Janet CastleMarch 11, 2010 - 12:01 pm

    Beautifully done Becca!
    Jan CastleReplyCancel

  • kraftychicMarch 11, 2010 - 12:56 pm

    Truly awesome! TFS!ReplyCancel

  • Catherine KraftMarch 11, 2010 - 1:54 pm

    Your basket is so beautiful!!! I absolutely love your work and I not only want to thank you for this tutorial, but for all the ideas you share with us. You truly have a God given talent. Blessings!ReplyCancel

  • lois skiathitisMarch 11, 2010 - 2:02 pm

    Thanks for the file Becca it makes it so much easier. TFS!!! :-DReplyCancel

  • DebiMarch 11, 2010 - 4:24 pm

    THANK YOU SO MUCH for this template and the tutorial on the weaving of the ribbon. Just got my Spellbinder frame so I can try this out. Appreciate all that you do and how much you inspire us!ReplyCancel

  • LoriMarch 11, 2010 - 4:37 pm

    You never cease to “Amaze” me.That is just beautiful. The name of your blog is certainly appropriate. God Bless and thank you.ReplyCancel

  • Judy DunavenMarch 11, 2010 - 4:38 pm

    What a beautiful basket. I am sure that we would all like to own one. I am going to try this. But first it’s off to buy a new die.
    Thanks, JudyReplyCancel

  • Candy MillsMarch 11, 2010 - 5:11 pm

    Thank you so much Becca !!! You’re a doll :o)
    Hugs, CandyReplyCancel

  • Jen MonteiroMarch 11, 2010 - 5:22 pm

    That’s a beautiful basket and thank you so much for sharing your template with us, you are a gem :)

    Jen
    xReplyCancel

  • VeltaMarch 11, 2010 - 5:35 pm

    If you ever get to my comment…I just want to say thank you Becca for all of your inspiration…this basket tutorial is going to make a lot of your fans (including me) very happy come Easter time!ReplyCancel

  • VivienMarch 11, 2010 - 5:37 pm

    Thank you so much Becca for a beautiful project. Can’t wait to get started.

    Vivien xReplyCancel

  • Sandy MilnesMarch 11, 2010 - 10:27 pm

    Thanks Becca !!ReplyCancel

  • Carolyn McElroyMarch 12, 2010 - 12:42 am

    Oh, Becca! I was just thinking of this again today or yesterday and wondering about the pattern! Thank you so very much! It is such a beautiful basket!!! Have a wonderful day!!!! Hugs, Carolyn :o)ReplyCancel

  • Carolyn McElroyMarch 12, 2010 - 12:50 am

    404 – Not Found
    Server on Mar 12th 2010 01:47 am

    The Server was unable to find the post / page that you are looking for.

    You can try browsing through the archives / searching with a different keyword.

    Not Found

    This is, I’m sure, the error you were mentioning. What’s odd is, I received it on the weaving of the Spellbinders frame; but not on the pattern of the basket itself. Just an fyi in case it would help you determine the problem. Thank you so much for all of your work!!! C:o)ReplyCancel

  • Linda wMarch 12, 2010 - 12:57 am

    Does the error have anything to do with the dash between the words weaving and guide? The gif has it and when I get the error it does not. I don’t know anything about errors but I was a proof reader. :O)

    stamp on…ReplyCancel

  • NancyMarch 12, 2010 - 4:02 am

    Thanks Becca for the template awesome! I have my panels all ready and just waiting for this your the greatest! I want to make this special basket for my grand daughter for Easter. Thank you so much for all your hard work! You are a awesome designer!
    Hugs,
    NancyReplyCancel

  • CharleneMarch 12, 2010 - 8:24 am

    Thanks,Becca!! No issue with the download here.ReplyCancel

  • RufusMarch 12, 2010 - 7:04 pm

    Thank you, Becca.
    R/ReplyCancel

  • RobertaMarch 13, 2010 - 5:01 pm

    Thank you for ALL your projects and then the patterns!!!!!!! What more could anyone ask!! Your skills are fabulous!!!ReplyCancel

  • mollyMarch 14, 2010 - 9:12 am

    Becca, thank you so much for sharing your amazing talent and also for making it so easy to leave comments. This is the blog I find I return to most often.ReplyCancel

  • LucindaMarch 31, 2010 - 11:26 am

    Thanks so much for sharing such a beautiful project!!!ReplyCancel

Hello there.  This week JustRite Stampers is the host for the CPS Sketch Challenge; this one is CPS-157.  The sketch is perfect so I couldn’t wait to play along. I hope you join us and submit your take on the sketch challenge as well. 

For my card I am using the border from JustRite 2" Decorative 2" Wide Borders that I cut with Spellbinders™ Standard Circles SM #2 and #4.  For my bottom layer I cut circles with Spellbinders™ Standard Circles LG #4 and #5.  For the sentiment on top I used JustRite Tiny Words Borders and Centers 1 3/16" which is cut with Spellbinders™ Standard Circles LG #1 and backed with EK Success 1" Punch.

Today I even decorated the inside.  I sure wish I would do this more, it’s such a special touch, but sometimes I’m just so eager to get done with the card.

Card Recipe:
Stamps:  JustRite 2: Decorative 2" Wide Borders, JustRite Tiny Words Borders and Centers 1 3/16"
Paper:  Bazzill,  Graphic 45 – Florentine
Ink:  Green Dye Based Inks
Accessories:  Spellbinders™ Standard Circles SM, Spellbinders™ Standard Circles LG, EK Success 1" Punch, EK Success Scallop Punch,Pearls

Be sure you stop by the JustRite site for their March Madness sale – check it out HERE

Other News

Be sure you stop by the ODBD Blog today.  This month ODBD will be celebrating their second anniversary and it’s gonna blow last years celebration out of the water.  Anniversary challenges were announced today on the blog so you can be ready — festivities start on March 13th with a very special reveal on March 17th.

Special hugs friends!  Thank you for making my week so special with your dreamy travel memories!  I’ll be back tomorrow with a winner!!

pinTHIS SHAREthis TWEETTHIS EMAILthis
  • Linda EMarch 7, 2010 - 4:34 pm

    Absolutely beautiful…inside and out.ReplyCancel

  • KathyMarch 7, 2010 - 4:38 pm

    OOOOH! PRETTY! I like how you decorated the inside as well!ReplyCancel

  • Grace NyweningMarch 7, 2010 - 4:45 pm

    Oooooh… absolutely beautiful Becca… as always! You have the most clever layouts ever!!! Love the inside too! Hugs!ReplyCancel

  • MarianneMarch 7, 2010 - 4:46 pm

    Yet another beautiful card!ReplyCancel

  • Elaine MooreMarch 7, 2010 - 4:48 pm

    What an amazing card – almost takes my breath away!!ReplyCancel

  • MarisaMarch 7, 2010 - 4:50 pm

    Simply gorgeous!! Love the rings and the rich DP.ReplyCancel

  • Diane LMarch 7, 2010 - 4:53 pm

    Wow! What a fabulous card Becca!!! Your work is always oh so beautiful!!!!ReplyCancel

  • DoodlebugMarch 7, 2010 - 4:54 pm

    Your work is always so elegant! Thanks again for the chance to win cool stuff!ReplyCancel

  • PaulaMarch 7, 2010 - 4:57 pm

    how lovely you went the extra mile and did the inside – really adds a special touch. However, your cards are stunning enough on the outside – they don’t need anymore!!!

    Paula x x xReplyCancel

  • NevaMarch 7, 2010 - 4:57 pm

    I haven’t tried sewing on my cards yet. But you inspire me to get out the old machine and set it up to be handy! My craft space needs more space!ReplyCancel

  • DarsiMarch 7, 2010 - 4:58 pm

    Great card–I like how you did the inside too!ReplyCancel

  • LindaMarch 7, 2010 - 4:58 pm

    not only are your cards beautiful on the outside but on the inside-love that you do that and that you show it to us.ReplyCancel

  • TamiMarch 7, 2010 - 4:58 pm

    Wow simply beautiful and elegant.. Love every piece of work you create..ReplyCancel

  • Marion (Australia)March 7, 2010 - 5:01 pm

    Another gorgeous card Becca. I love that rich colour and a reminder to keep my faith. I needed to hear that today.
    I love the machine stitching. I have just brought myself a baby sewing machine especially for this. (haven’t used it yet).
    Hugs MarionReplyCancel

  • VeldaMarch 7, 2010 - 5:03 pm

    I love it! Great card. I love the way you wove through the circles.
    VeldaReplyCancel

  • lois skiathitisMarch 7, 2010 - 5:11 pm

    Gorgeous card Becca, I love the all over look. I have to get that punch, it makes for a wonderful finishing touch. TFS!!! :-DReplyCancel

  • sandyhMarch 7, 2010 - 5:20 pm

    i love how the paper banner is woven in and out of the circles!
    and such a rich color!
    sandyh
    ReplyCancel

  • Penny WessenauerMarch 7, 2010 - 5:23 pm

    Oh Becca, this is just beautiful! The color would work equally well for a man as for a woman.. Can’t get any better than the cards you make!!!

    Oh, and if you’ve never been to Yosemite National Park in California, it’s really one of those must-see kind of places..
    xxooxx PennyReplyCancel

  • MoniqueMarch 7, 2010 - 5:40 pm

    Wow WoW WoW..how beautiful !!!ReplyCancel

  • BarbaraMarch 7, 2010 - 5:46 pm

    Gorgeous Layout!! Are the 3 scallops on the outside and on the inside done with a punch? Or is it the new Spellbinders border die? I have never seen a punch with such large scallops . I must get it

    Thanks for sharing this outstanding idea !!ReplyCancel

  • Shirley LeeMarch 7, 2010 - 5:50 pm

    Gorgeous, clever, and awesome!
    Shirley L.
    Roseville, CAReplyCancel

  • Karen WMarch 7, 2010 - 5:54 pm

    Just gorgeous, what a cool card!ReplyCancel

  • DianeMarch 7, 2010 - 5:57 pm

    Becca,
    Very elegant. I love the color combination.
    Once again a beautiful creation.

    ~~Diane~~ReplyCancel

  • Bev J.March 7, 2010 - 6:38 pm

    What a wonderful touch the stitching is on your pretty card. tfsReplyCancel

  • Sylvia JohnsonMarch 7, 2010 - 6:44 pm

    Stunning! Your card is just beautiful.ReplyCancel

  • SandraMarch 7, 2010 - 6:52 pm

    very nice!
    Thanks for the inspiration!
    SandraReplyCancel

  • Sylvia/GeorgiaMarch 7, 2010 - 7:12 pm

    The stitching was a wonderful addition to an already exquisite card!ReplyCancel

  • Kelly MassmanMarch 7, 2010 - 7:43 pm

    Wow! You put so much love into your cards–it shows! I participated in last week’s challenge. I may try it again. It is kind of fun!ReplyCancel

  • SuziMarch 7, 2010 - 7:53 pm

    I’m always amazed at the way you put your cards together with different spellbinders and stamps, but this has to be a favorite! Thanks for sharing!ReplyCancel

  • Marzee CarnesMarch 7, 2010 - 8:01 pm

    I am always in awe of your talent and creativity. This is SO beautiful. I often come to your blog just to stare in amazement. Thank you for sharing with us.ReplyCancel

  • TeelaMarch 7, 2010 - 8:28 pm

    Love the card and how you decorated the inside as well.ReplyCancel

  • Val WMarch 7, 2010 - 8:42 pm

    My first reaction to this card was, “Ooooh, cool, kinda Celtic.” My second reaction was to dissect it, to see how you put those circles together. Clever!ReplyCancel

  • Linda C.March 7, 2010 - 10:21 pm

    Truly unique!ReplyCancel

  • Janet CastleMarch 8, 2010 - 12:00 am

    What a card!!!!! Very different for you, but I rellllllllly like it…great job Becca!!!
    Jan CastleReplyCancel

  • pam barkerMarch 8, 2010 - 2:36 am

    Love it!! The green and gold together make it look so rich. Totally beautiful!! Thanks for sharing
    God Bless
    Pam
    ReplyCancel

  • HeatherMarch 8, 2010 - 3:37 am

    Becca – this is so effective. The DP is gorgeous and your use of stamps/punches ..well…… more punches/spellbinders on my wishlist!!!! TFS
    Hugs
    HW(UK)
    xReplyCancel

  • Diane HovMarch 8, 2010 - 3:54 am

    Gorgeous and elegant!!! I am with you, I love the inside decorated, but usually forget to do it!!!ReplyCancel

  • emilyMarch 8, 2010 - 4:50 am

    Your brown card is amazing Becca! I love the way you wove the circles together and all the details you used! Thank you so much for sharing!!! :o)ReplyCancel

  • ny DebbieMarch 8, 2010 - 5:05 am

    Absolutely GORGEOUS!!!! both inside and outReplyCancel

  • bonnie weissMarch 8, 2010 - 5:39 am

    Wish I could think of something different to say … but it’s all been said … your card is STUNNING. And no ribbon?!!ReplyCancel

  • TeresaMarch 8, 2010 - 6:41 am

    Beautiful! So regal I love it!ReplyCancel

  • Joyce HessenMarch 8, 2010 - 7:28 am

    Dear Becca
    What an amazing card with the circles — very striking.
    Like the colours also.
    Best Wishes Joyce from SAReplyCancel

  • debMarch 8, 2010 - 7:35 am

    This card is so beautiful, Becca. I wish I had one tenth of your talent! Wow!ReplyCancel

  • Shelly SchmidtMarch 8, 2010 - 8:12 am

    Absolutely gorgeous!!! What do you do with all of the cards that you make? Just curious!ReplyCancel

  • VeltaMarch 8, 2010 - 8:38 am

    Wow! That is the effect this card had on me…My first word!! Your art is absolutely inspiring! Thank you for all you do!!ReplyCancel

  • Cindy H.March 8, 2010 - 10:24 am

    What an awesome card!! You nailed that challenge! Love the design, the dp and the stitching all fabulous! tfsReplyCancel

  • Betty GoodsonMarch 8, 2010 - 10:54 am

    Stunning! You are just so inovative! I’m just Amazed by your creativity.ReplyCancel

  • ChristinaMarch 8, 2010 - 1:32 pm

    Stunning Card!ReplyCancel

  • BarbaraMarch 8, 2010 - 2:08 pm

    another stunner!ReplyCancel

  • Linda BMarch 8, 2010 - 4:00 pm

    Love this card! You really outdid yourself. I also love the deeper colors.ReplyCancel

  • DebbieMarch 8, 2010 - 6:14 pm

    Gorgeous as usual. I don’t know how you come up with so many wonderful ideas but keep em coming. Thank you for the inspiration.ReplyCancel

  • Sandy MilnesMarch 8, 2010 - 11:11 pm

    Neat card , just a little diff than usual. I can see you decorated the inside. I would like to see it too. Love your cards.ReplyCancel

  • Jen MonteiroMarch 9, 2010 - 3:21 am

    A beautiful card, I love the colours and papers used as well :)

    Thanks for sharing once again.

    Jen
    xReplyCancel

  • jamiMarch 9, 2010 - 5:52 am

    Oh the things you do with those spellbinders….so creative!! And so beautiful!!ReplyCancel

  • LatishaMarch 9, 2010 - 6:59 am

    So beautiful! I love how you did the inside!!ReplyCancel

  • Mindy BaxterMarch 9, 2010 - 3:21 pm

    WOW! This is amazing I love all the circles you have created such a unique look. Very creative. Hugs!ReplyCancel

  • MarissaMarch 11, 2010 - 5:38 am

    Very cool. Thanks for sharing!ReplyCancel


Hi there – Sharing a quick bit about my system of storing JustRite Stamps.  I’ve received many emails asking about this so I thought I would include a couple of pictures here.  There are a lot of good ideas floating around out there; I’ve tried a couple over the last year and this one works for me.  Through that journey I’ve found that it really depends on your style and environment.    I’m such a visual person and no matter how I might try to escape the fact, reality for me is that if I can’t see it – I won’t use it.  So I decided to lay out all my JustRite Stamps so that I could browse through them.  Because of that I’m more likely to mix and match elements between sets and believe me, that interchangeability is one of the best benefits of using JustRite Stamps. (Click on any of the pictures to make them larger).

All of my JustRite Stamps are stored in vertical binders that can be flipped through like a book.
Each set is stored in a sleeve along with a reference copy of the images.
The stamps are secured to a clear vinyl insert that fits into the page sleeve.  They are secured with double sided tape.
I put tape just long enough to accommodate the stamps.  If it extends past the stamps the excess tape will stick to the sleeve.

Here are the supplies I used to make my system.  I purchased a stamp binder from Hobby Lobby.  A similar item is available through Ranger/Tim Holtz

I purchased transparent tabs from Office Depot.  (I also use these for my cling mount stamps).
The plastic sleeves came with my binder. I cut the transparent tab to a usable size then I lay down lines of double stick tape for the area needed by the stamps.
I either stamp an index, photocopy the packaging or take a photocopy from the catalog.  Once cut down to size it’s easy to slip this reference into the same sleeve.
I’m just starting on a new binder, so here’s the finished system – ready to flip through!

Thanks for the question and thanks for letting me share another Becca Bit!

pinTHIS SHAREthis TWEETTHIS EMAILthis
  • KathyMarch 7, 2010 - 4:40 pm

    GREAT idea! Thanks for sharing!ReplyCancel

  • Pam HeroldMarch 7, 2010 - 4:54 pm

    I absolutely adore this idea! I really don’t have a good method of storing any of my stamps and the JRS that I have are still in the boxes. I don’t think I have to say how much room these take up and like you, outta sight outta mind for me too. Never thought about double sided sticky tape to adhere them. I gotta try this! Thanks Becca!ReplyCancel

  • PaulaMarch 7, 2010 - 5:01 pm

    this is something I want to have a go at – I’m not a massive stamper and have only just started collecting but I want to theme what I have got so i too can make better use of them. Thanks for sharing how you do it. It makes me feel confident that I was on the right track with my idea.

    Paula x x xReplyCancel

  • lois skiathitisMarch 7, 2010 - 5:06 pm

    I’ve been keeping mine in the original box, this seems so much more organized and uses less space. Your always thinking Becca. Another great Becca Bit. TFS!!! :-DReplyCancel

  • JoanMarch 7, 2010 - 5:44 pm

    I have two of these albums for clear stamps, but this is a great idea for a third!! ThanksReplyCancel

  • DianeMarch 7, 2010 - 5:48 pm

    Becca,
    Great bit. I keep mine in stacking bins from Target’s. I think
    I got that “bit” from you as well.

    Hugs,
    ~~Diane~~ReplyCancel

  • Vickie DoswellMarch 7, 2010 - 5:55 pm

    Another thing I have done with my JustRite and Studio G(I know but I luv them!!) is I store them in binders but I store them in sleeves specifically used for baseball cards. There are 9 to a sleeve and it seems to fit most of the stamps except the new bigger ones. I am going to have to try this cause it will fit right in!ReplyCancel

  • Gloria R.March 7, 2010 - 6:26 pm

    Wonderful idea Becca! I also like Vickie Doswell’s idea of the baseball card sleeves.
    Thanks for sharing.ReplyCancel

  • SandraMarch 7, 2010 - 6:54 pm

    neat idea!
    sandraReplyCancel

  • Judy McMullenMarch 7, 2010 - 7:09 pm

    Thank you, Becca, for sharing this terrific storage system with us!ReplyCancel

  • JuliMarch 7, 2010 - 8:11 pm

    GReat tip! thanks for sharing.. i will need to looking into this as my JR stamps are growing!

    hugs
    juliReplyCancel

  • SuziMarch 7, 2010 - 8:14 pm

    Perfect! Just what I need! Thanks so much for sharing this great idea!ReplyCancel

  • Val WMarch 7, 2010 - 8:35 pm

    Hi Becca,
    This seems like a good system. I have been looking for some way to store my Justrite stamps, something that will contain what I have, let me see what I have, and still easily allow room for the inevitable future additions to my collection of them. This seems to fit those criteria. Right now, I have them in a plastic container, but it’s just not working the way I’d like it to. Perhaps I’ll give this a try.ReplyCancel

  • Mary Ann TMarch 8, 2010 - 3:33 am

    Thanks so much for the storage tip. I just recently began purchasing some of the Just-Rite stamps, inspired by some of your card creations, and right now I just have them in a box. This would be so much better for the stamps and would insure I don’t forget what I have to use. Since I keep all my other stamps mounted on cling and in binders too, it is a great solution.

    By the way, I really appreciate the changes you’ve made to your approach to blogging, love your Becca Bits, and sincerely appreciate all the inspiration. If I’m stuck on what I want to do, your blog is one of the first places I go…..ReplyCancel

  • janeyMarch 8, 2010 - 12:33 pm

    What a great idea and explanation! Thank you for sharing this with us, Becca.ReplyCancel

  • Teresa CMarch 8, 2010 - 1:52 pm

    Thank you so much for the storage tip. I really appreciate all the work you do on your blog. I have been keeping mine in the original boxes, but this would be a lot more convenient and take up less space. Thank you for sharing.ReplyCancel

  • Kathy M.March 8, 2010 - 3:43 pm

    I, too, store my JR stamps in a binder…….I have mine in the baseball card sleeves just like Vickie Doswell mentioned. I stamped the image on cardstock and placed it in the compartment with the stamp. This system is working really well……I can now see each stamp and what they look like.ReplyCancel

  • NevaMarch 8, 2010 - 7:07 pm

    I’m tossing out old floppy disks and guess what? Notebook sleeves that will fit some of my stamps. I’m recycling the notebooks too. After all these years, I’m pretty sure I won’t be referencing software on floppy discs any longer. (chuckle).

    I think I have some extra pages that I used to store 35mm slides in as well… hmmmm. now something should fit in those little squares.ReplyCancel

  • patriciacc123March 8, 2010 - 7:14 pm

    Hi Becca,

    Beautiful card. Great ideas for storage, neat, easily seen and doesn’t take alot of space. I will be trying this myself.

    Thanks for all you share so freely. Pattyc.ReplyCancel

  • Gloria WestermanMarch 8, 2010 - 9:54 pm

    How Clever!!!!!!!!!you could use this for other stamps as well……thank you for sharing this awesome idea……ReplyCancel

  • Sharon J.March 9, 2010 - 9:34 am

    Thanks for sharing. I am also a visual person and this sounds just like what I need. Thanks for all your inspirations.ReplyCancel

  • mumtomanyukMay 9, 2010 - 12:39 pm

    Have you thought of using re-positional spray glue on the back of your stamps instead of double-sided tape. Here in the UK we have Crafters Companion ‘Stick and Spray’ I use it for all my stamps. One spray will let you place and replace your stamp up to 50 times. It will not make your block sticky but it will hold your stamp onto the acrylic sheet. Less messy than double-sided tape. Hope this helps someone.ReplyCancel

  • janiceNovember 29, 2010 - 2:09 pm

    Thank you. This was perfect for me. I only have a few of these sets, so I was able to use a notebook I picked up at Target on clearance for 50 cents. The notebook included the exact number of transparent tabs that I needed for my project. I’m so excited to have my sets neatly stored as well as to have used my “bargain” notebook.ReplyCancel

I N F O