Hello there.  While I had it on my mind I wanted to go ahead and do the video for how I made the small Layered Arches Borders on a recent card.  There’s no way I could simply explain this, so thank goodness there’s an easy way to show it.  The technique that I’m using can be used with some but not all of the Martha Stewart Punches – you simply have to try.  The video is brief  and as I like to say, blink and you’ll have to rewind.

While I’m talking about the same card, let me say that the paper used was K & Company.  I’ve noticed that they have brought back many of their gorgeous papers through their “Best of” collections – maybe we’ll get lucky with this one:-).  Several asked about the paper – it is indeed embossed and I did not add any additional coloring to the roses.

Thanks for stopping by today!!

pinTHIS SHAREthis TWEETTHIS EMAILthis
  • CherylMay 16, 2010 - 4:29 am

    Thank you so much Becca. I tried to follow your card yesterday.(my first) and had a very difficult time with the punch. You made it so much clearer. I love your cards. Cheryl :)ReplyCancel

  • MaryMay 16, 2010 - 4:31 am

    Another helpful Becca Bit, thank you for taking the time to explain these with videos. This adaptation is just so pretty and I can’t wait to try it. Martha should be paying you for all the punches I’m buying because of your video’s!ReplyCancel

  • DebbieMay 16, 2010 - 4:39 am

    Thank you for always sharing your discoveries with us. That is a great tip.ReplyCancel

  • LizetteMay 16, 2010 - 4:45 am

    Oh my goodness! You never stop to amaze me. Thanks for sharing.ReplyCancel

  • Karen WMay 16, 2010 - 4:54 am

    Thanks so much for doing these “bits” they are so helpful!!!ReplyCancel

  • shortscrapperMay 16, 2010 - 5:09 am

    Thanks Becca. I just found your blog. Your talent is amazing! tfsReplyCancel

  • bonnie weissMay 16, 2010 - 5:45 am

    Thanks for another Becca Bit … guess I should not have disposed of the paper that came with the M/S punches! I know you have heard this a million times before, but you truely are an inspiration and truth be told, almost all of my recent creations have been inspired by your work, creativity and the fact that you are willing to share this with us. Thanks.ReplyCancel

  • PaulaMay 16, 2010 - 5:55 am

    thanks for the tutorial Becca – I only have one ‘around the page’ punch set and couldn’t figure out the instructions so haven’t made full use of it… you taught me something else today – so thank you very much.

    Paula x xxReplyCancel

  • Teresa CMay 16, 2010 - 6:00 am

    I love your Becca Bits. I learn so much from them. Thank you so much.ReplyCancel

  • Donna RinckelMay 16, 2010 - 6:45 am

    I don’t always leave a comment but I love your blog and so appreciate you taking the time for Becca’s bits. Love to watch them and you always have a great tip. May you have a blessed Sunday!ReplyCancel

  • Bev J.May 16, 2010 - 6:55 am

    Thanks for the info on the K&Company papers. I really love their dp lines. Enjoy all the many cards and projects you create-beautiful!ReplyCancel

  • Lynnor aka icensheba on SCSMay 16, 2010 - 7:15 am

    Thanks so much for taking the time to make this video. I have played with odd sizes for these punches and have a couple of successes, but far more failures and ruined paper. Your tips for matching up the edges and finding the possibilities are very encouraging!!!ReplyCancel

  • MaryMay 16, 2010 - 8:42 am

    Thanks for explaining things Becca :) I played all day yesterday to work out how to make things layer and was so pleased when I worked out how to do it. I was using a different around the page punch but it worked out ok too. My method of arriving at a measurement that works was a little more complicated I ended up drawing a template from a 3.25″ cut out and then adding an arch into the drawing and then measuring the outside of the completed drawing to get the basic size to punch. Dont know if that makes sense but it works :)ReplyCancel

  • MargMay 16, 2010 - 8:48 am

    Thank for the instructions. You made it very clear.ReplyCancel

  • GayleMay 16, 2010 - 8:48 am

    Thank you for the video. It has never occurred to me that I could do this with the punches and I just knew that the top layer in your recent card had to be smaller than the bottom one. Thanks for sharing a great tip!
    Gayle

    PS…how do you make the video from overhead?ReplyCancel

  • DonnaMay 16, 2010 - 9:02 am

    How kind that you share so many tidbits with the rest of us! Thanks for helping us create pretty cards, too!ReplyCancel

  • Gloria WestermanMay 16, 2010 - 9:06 am

    Thank you Becca now I can do it…..ReplyCancel

  • TinaHMay 16, 2010 - 9:21 am

    Thank you Becca for your dedication to sharing with all of us! Your tutorials are fabulous, and your creativity is absolutely AMAZING – I really appreciate your blog and all of your creations. Thanks – you are Amazing.ReplyCancel

  • JeanneMay 16, 2010 - 9:41 am

    Thank you so much. Can’t wait to get downstairs and try out these measurements with some other punches of Martha’s!ReplyCancel

  • PatMay 16, 2010 - 9:56 am

    I love this…was wondering can you put the measurments that you showed on your website. Love listening to your video’s nice calm tone in your voice…and your so creative…ReplyCancel

  • Louise FoxMay 16, 2010 - 10:03 am

    Becca, Great tutorial. Thanks so much. Blessings on your week. LouiseReplyCancel

  • RubyMay 16, 2010 - 11:27 am

    The MS punches are great to work with, but I’m running out of space to store them. Between those and embossing folders, I will have to get another craft room…. haha! Tks for sharing. Now when I see a corner punch I check that I can remove the corner piece so I can do a border around a circle or square.ReplyCancel

  • SueMay 16, 2010 - 11:29 am

    Thanks so much Becca for taking the time to explain how you did the squares! You always make it look so easy!ReplyCancel

  • RebekkaMay 16, 2010 - 12:13 pm

    I am just loving this “Becca’s bit”..:) I am learning so much. Thank you for sharing.ReplyCancel

  • Susan GMay 16, 2010 - 12:47 pm

    Another great Becca Bit. Thanks so much for sharing these little tips.ReplyCancel

  • MareMay 16, 2010 - 1:27 pm

    Becca, This was a great video. I’ve had problems getting my borders all around and although it looks so easy with the video I’ve never been able to get it right so I just use the card sizes they say. This will be wonderful. Thanks for showing us your talent. You cards are outstanding!ReplyCancel

  • ConniecrafterMay 16, 2010 - 3:48 pm

    thanks for sharing, will have to check out the ones I haveReplyCancel

  • pat poskMay 16, 2010 - 5:39 pm

    Thanks Becca for explaining how you got those punch outs to work.
    I love your Becca Bits..thank you for the lessons.

    patReplyCancel

  • SuziMay 16, 2010 - 5:49 pm

    I am really enjoying these punch around the page punches, that is, once I found out the secret measurements necessary. They weren’t included in my punches. But I would never have even tried to make it smaller. Thank you for teaching me something new. . .again!ReplyCancel

  • lois skiathitisMay 16, 2010 - 6:33 pm

    Clever girl you. Thanks for showing us how Becca. Just love it when you do the Becca Bits. Just looking at the card always makes one wonder, now how did she do that. Now we know how. As always Becca, TFS!!! :-DReplyCancel

  • Sabine EdelmannMay 16, 2010 - 6:53 pm

    I love your Becca Bits!That explains it so well ……can’t wait to try with different punches!Have a blessed Sunday!ReplyCancel

  • mary stuartMay 16, 2010 - 6:59 pm

    Oh Becca, you are just full of wonderful tips and so very kind to share!
    thank you for this informative bit. although i have one of the 2-part punches, i don’t remember that paper coming with it. i had to buy them as 2 separate punches since they were out of the two sold as a set.
    i love your creations, Becca. Thank you so much for sharing your gift with us!ReplyCancel

  • RufusMay 16, 2010 - 9:05 pm

    Thanks, Becca, for being so willing to answer questions and sharing all of your discoveries! You should be getting a commission from Martha and from Spellbinders! I’ve bought, or put on my wish list, a number of things that originally I thought, nah I don’t need that one. Then I see something you’ve done with it and think, hummmm ~ maybe I DO want that one after all!
    R/ReplyCancel

  • RosieMay 16, 2010 - 10:19 pm

    Love your “Becca Bits!” You are one terrific and creative teacher. I really love your cards! This is a great idea and I’ll be trying it! Thank YOU!ReplyCancel

  • LindaMay 17, 2010 - 2:02 am

    Great border/corner punch tip…thanks Becca for always being so open and sharing of your beautiful ideas….much appreciated! xLReplyCancel

  • HeatherMay 17, 2010 - 2:18 am

    Thank you for your’ Becca Bits’ – having a visual demonstration certainly helps and I am sure we all appreciate you taking the time out to show us.
    HW(UK)ReplyCancel

  • Alison JMay 17, 2010 - 6:07 am

    Thank you so much for the Becca Bits, tips, techniques, tutorials and awesome art you share with us. Your blog is the first I visit every day.ReplyCancel

  • Deebi27May 17, 2010 - 6:08 pm

    I just love your Becca Bits. Your delivery is so very real…like I was sitting in your studio getting these tips live. I get so frustrated using the stamps…not getting them lined up drive me nuts. Thanks so very much for your tips and are such life savers!ReplyCancel

  • BeckyMay 17, 2010 - 6:21 pm

    Your work is truely amazing. I am blown away by your projects and can’t wait to see what you have next. You are one of the most talented and crative person. Have you ever considered making a DVD of all of your cards? I think you should. I am sure you would have a lot of people interested in purchasing one.ReplyCancel

  • janeyMay 17, 2010 - 8:13 pm

    So, it’s practice, practice, practice! I have an edge and border punch set, so now I just need to play around with them. It’s just paper!

    Thank you, Becca, for sharing this with us.ReplyCancel

  • kraftychicMay 17, 2010 - 8:44 pm

    Becca, Thanks for sharing the Becca Bits about the punches. I’m sure MS stock has gone up because of your website! :) Thanks again!ReplyCancel

  • Gayle TaylorMay 19, 2010 - 10:04 am

    Your Becca Bits are always so wonderful! Thank you for the time you spend doing this for us. This is another reason I love following your blog.

    Gayle Taylor
    ReplyCancel

  • BetsyMay 20, 2010 - 7:27 am

    What a beautiful border and these videos sure do help alot!ReplyCancel

  • MarcieMay 20, 2010 - 7:42 am

    Becca,

    Thanks. These tutorials are great.
    MarcieReplyCancel

  • […] This is one of the punches that works with the "fudging" technique I showed you HERE.  I topped the next layer with Spellbinders™ Classic Rectangles […]ReplyCancel

  • […] This is a clean and simple card for me.  I used a MS punch that needed some fudging to make the layers work.  If you’re curious what I mean about fudging, I have a tutorial HERE. […]ReplyCancel

  • Nicole KMay 31, 2010 - 10:55 am

    I NEVER thought to look on the bottom to see what you are punching on a border punch. Genius!ReplyCancel

  • CindyMay 31, 2010 - 3:51 pm

    Thank you, thank you, thank you. I had been doing this, but as you’ve indicated it didn’t work with all of them. I thought it was me. Thanks for clarifying, and again, for a wonderful tutorial. Bought two more sets today (the seashells and the raindrop [after seeing your recent card with the raindrop I had to have it).ReplyCancel


Howdy all!!  Today is the second birthday/anniversary of the Magnolia Yahoo Group!!!  Diana and all the Design Team Members at Magnolia-licious  want to say congratulations!  There are lots of festivities planned, so stop in at the Magnolia-licious Highlites blog for the details.  In the mean time, every month the design team does a blog hop/challenge and this month our challenge was to make an Explosion Box to celebrate.  If you made your way here from Sharon Caudle’s blog then you are in the right place, otherwise the hop begins with Cheryl Rowley. 

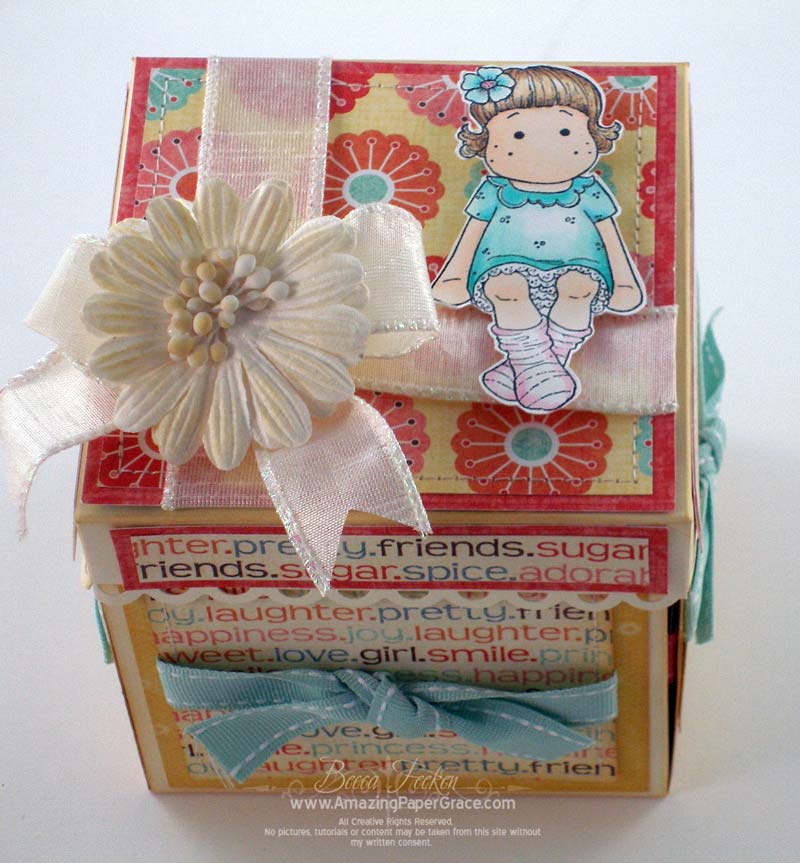
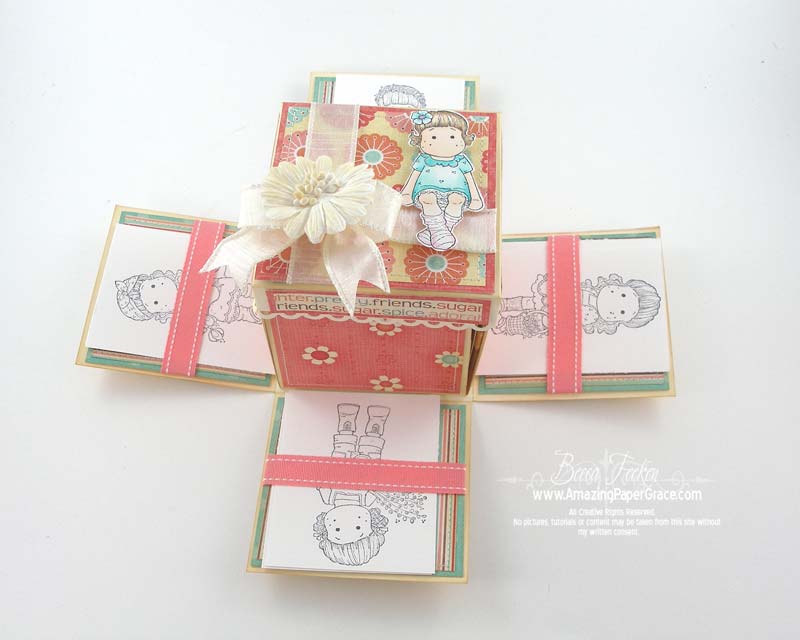
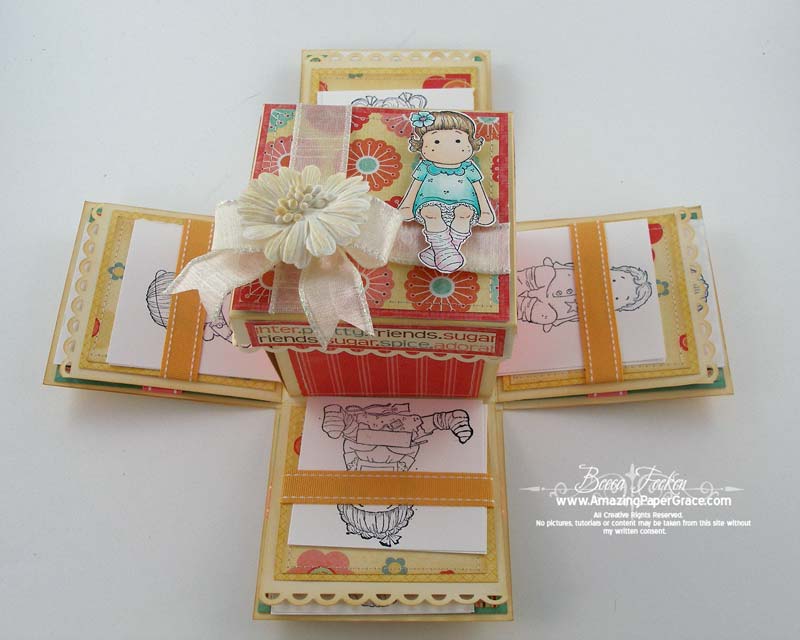
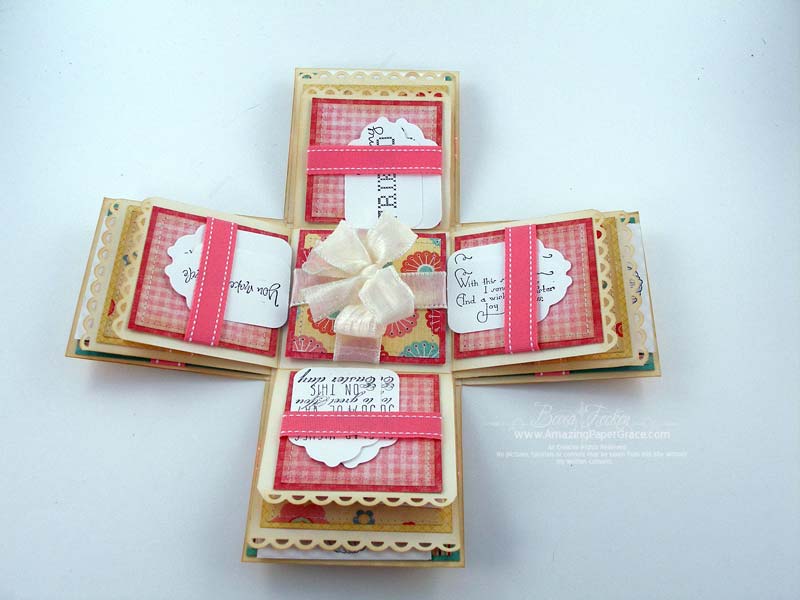
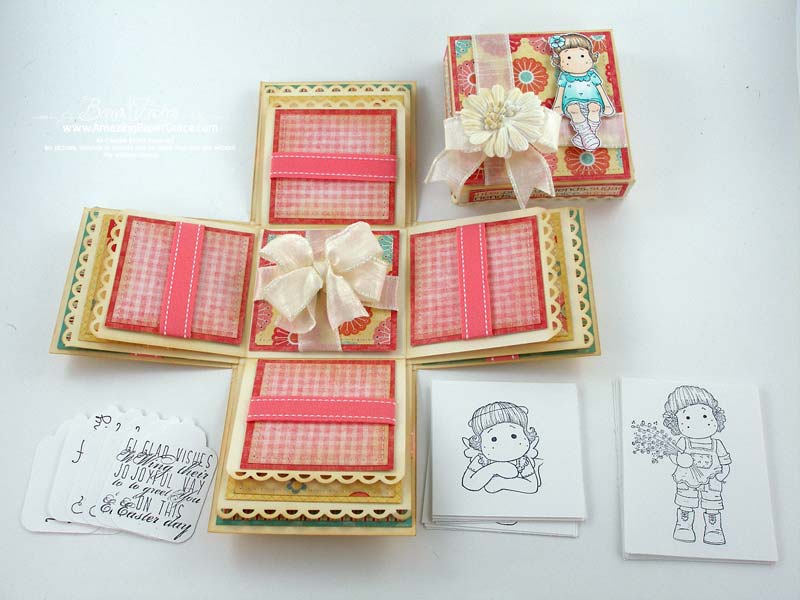
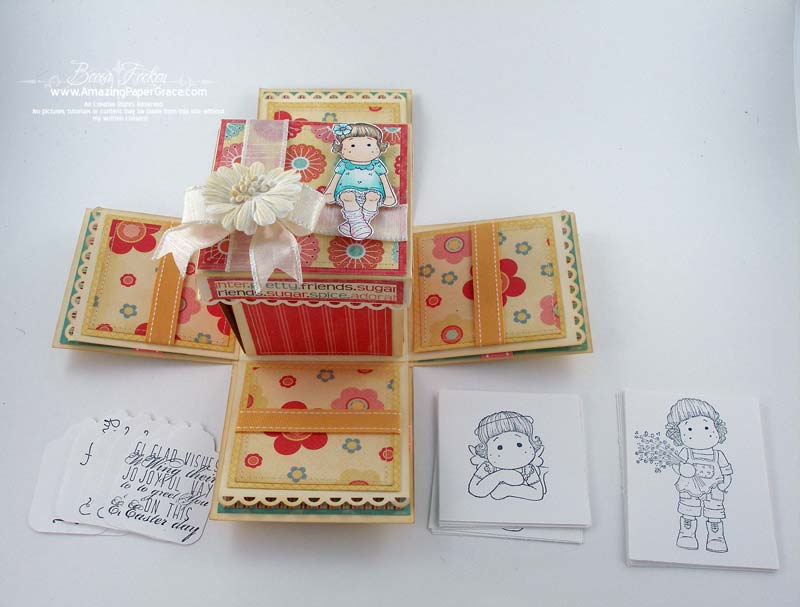
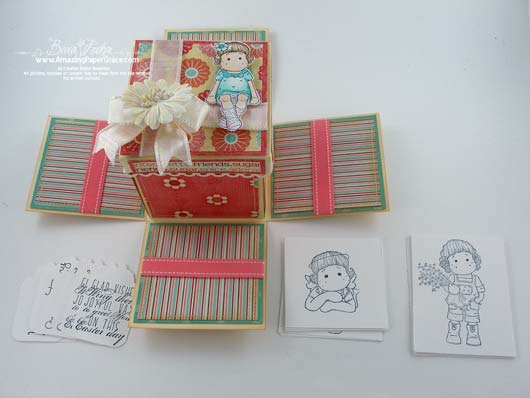
Well, I guess explosion boxes have changed, they’ve gotten fancy!  As you hop around, you’ll see!!  I wanted to make a gift that would have a purpose so I made a box to house stamped images of Tilda for a little friend of mine to color.  My box has three tiers in the explosion and on the inside of each tier I have a ribbon that’s designed to hold in a collection.  The tiers get smaller so the size of the prestamped images get smaller too.  At the bottom I have full sized Tildas, on the middle layer I have sitting Tildas and on the upper layer I have sentiments.

A little Tilda sits on top of the box, she is #362 Berry Tilda.   I picked her because the flower in her hair was easy to color to match the flower on the design paper.  I was lucky to find this fabulous paper collection in my stash.  I’m using My Minds Eye – Dreamy 2 and it’s perfect.  There were so many choices and it’s such a girly print.  I love the "girl" words and there were so many colors it was no problem finding ribbon to match!

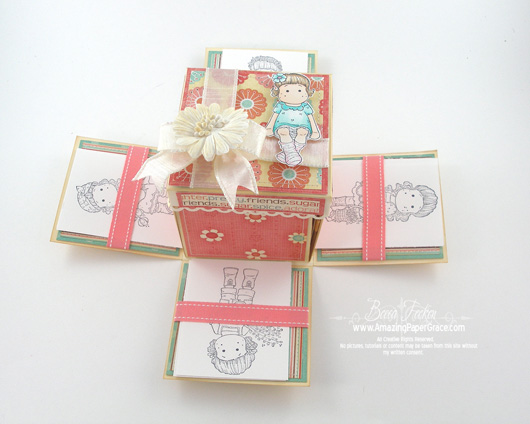
This is box open, slots filled – first layer.

This is box open and slots filled – second  layer.

This is box open and slots filled – third layer

This is empty box – third layer

This is empty box – second layer.

This is empty box – first layer.

There, now that was far easier to show than to explain :-)   Thanks for joining us today  –  I’m at the end of the blog hop list, but you can always cycle back to the Magnolia Highlites Blog for a listing on the order and to go again.  Thanks for helping us celebrate and be sure to check out all the Birthday Bash challenges planned.
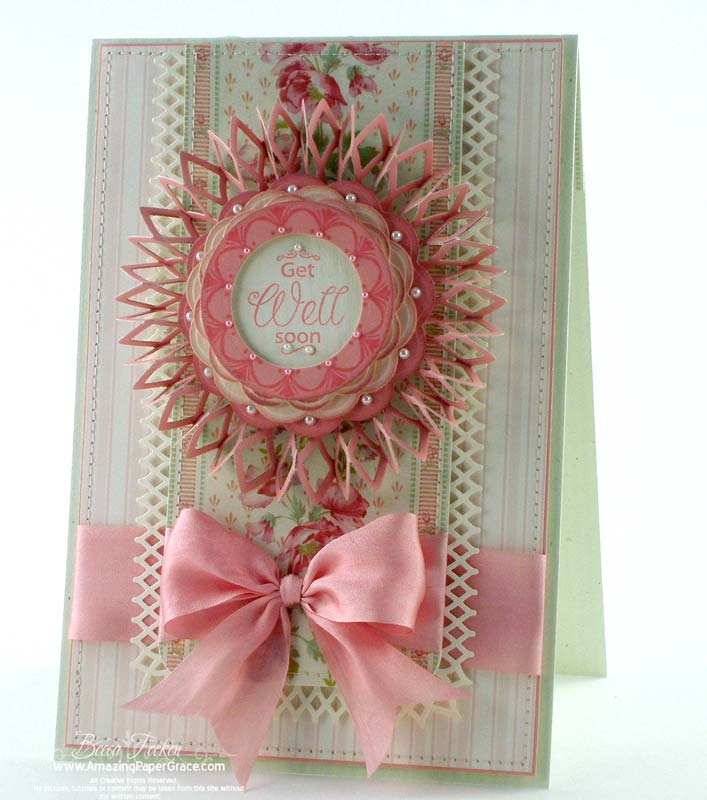
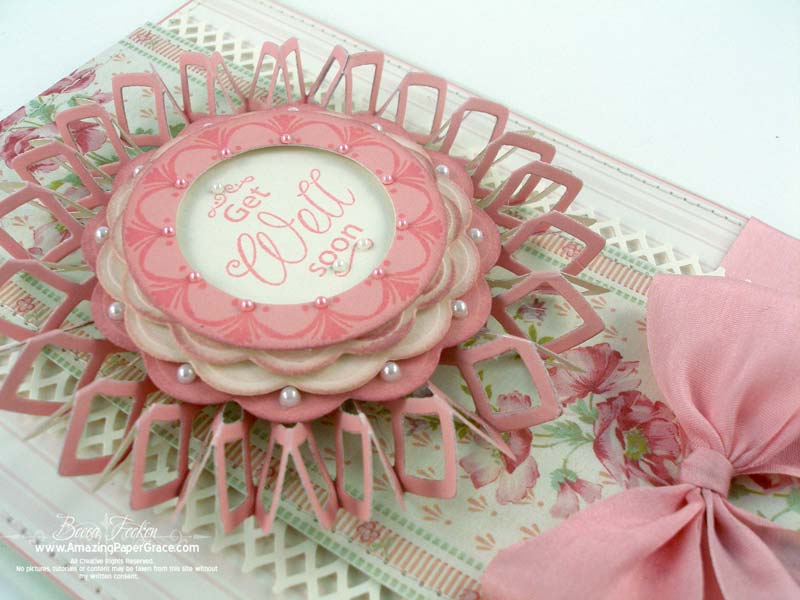
Project Recipe:
Stamps:  Magnolia courtesy of Magnolia-licous – #362 Berry Tilda
Paper:  The Paper Company – Cream White, My Minds Eye – Dreamy 2
Ink:  Memento – Tuxedo Black
Accessories:  Prima Flower, Ribbon, Tag Punch, Fiskars Apron Lace Punch

Have a fabulous weekend!!

pinTHIS SHAREthis TWEETTHIS EMAILthis
  • Linda StandartMay 15, 2010 - 9:38 am

    Beautifully done, Becca. Did you know that your little explosion box has a very long history? They were origianlly made as gifts to ladies for holding sewing and fancywork tools and were called ‘Etui’ boxes. The earliest one I know of is from the 1700’s. I don’t remember for sure where I saw it, but I think it was in the lace museum in Olney, EnglandReplyCancel

  • RebekkaMay 15, 2010 - 10:23 am

    This is a gorgeous box, I love how you made it so useful.ReplyCancel

  • Paola LeviMay 15, 2010 - 10:33 am

    Now i know hwat they mean when they say “saving the best for last” You are the last to have your box up on your blog and can i be your friend? I mean the friend that you sending your box to, he he. I love it Becca, fab job, i am gonna get mine done tonight te enter the challenge, thanks for the inspiration
    smiles
    PaolaReplyCancel

  • Destinae WaddingtonMay 15, 2010 - 10:55 am

    Becca, that is the cutest, best idea explosion box I have ever seen!! I am so going to have to scraplift this for my niece. LOVE IT LOVE IT!!ReplyCancel

  • Wendy AMay 15, 2010 - 11:07 am

    Hi Becca, My friend and I used to make these boxes to sell at a craft fair but they were the etui boxes made from fabric and batting and embellishments. They held all kinds of sewing needs and had a little box in the middle for the thimble. They were a lot of work but the results were beautiful. I have never thought of making one like this, it would be great for photos as well. I have lots of the frameworks left from our fabric ones and I will now put them to good use. I think I will make a box for each of my grandchildren using photos, one from each month of the year. Thanks for all you ideas and inspiration.ReplyCancel

  • Rhonda MillerMay 15, 2010 - 11:29 am

    Wow, this is such a great explosion box with a very nice surprise inside. TFS.ReplyCancel

  • CabioMay 15, 2010 - 11:36 am

    What a clever idea to use each panel dor holding the stamped images. Love the colorful DP and the cute Tilda looks so cute by the flower :o)
    Hugs,
    CabioReplyCancel

  • Lynne PhelpsMay 15, 2010 - 11:57 am

    What a charming gift – many hours of coloring pleasure for the recipient! So clever – I had not seen the box done with tiers before! I have seen these made as sewing gifts – a boxed etui made from fabric covered chipboard and patches of wool felt to hold needles and pins, elastic loops or fabric sheaths for emboidery snips, a loop or pocket for a thimble and an embroidered pin cushion in the very center!ReplyCancel

  • PamMay 15, 2010 - 12:16 pm

    Becca, Now I know why everone says you are so awesome! You come up with some of the cutest ideas and with so many at a time. Can’t believe how many great posts you have done this week. Thanks for all you do.ReplyCancel

  • Sherry BMay 15, 2010 - 12:39 pm

    What a wonderful box you created!ReplyCancel

  • JuliepMay 15, 2010 - 12:53 pm

    Love your idea of putting the stamped images in there. It really makes it a fun surprise to open up all the different layers to see what fun surprise is in store for you. Your explosion box is adorable. Thanks so much for sharing.ReplyCancel

  • SuMay 15, 2010 - 1:18 pm

    WOW!! That is so beautiful! Love everything about it – the colors, paper, images to color.ReplyCancel

  • MickieMay 15, 2010 - 1:21 pm

    Becca, that is stunning. I have to try this.ReplyCancel

  • Barb HardemanMay 15, 2010 - 1:36 pm

    Wow, Becca, WOW WOW WOW! This is so absolutely stunning! I love all the layers you put into your box and the ribbons holding those sweet images. What a beautiful job you did on this box! I love every single detail on this box!ReplyCancel

  • JanielMay 15, 2010 - 1:56 pm

    Well NOW aren’t you CLEVER!!!!!! I love what you have done with this little box!!! BEAUTIFUL!!!!!!!!!!!!!!!
    Happy weekend..hugs, JanielReplyCancel

  • Tammy D.May 15, 2010 - 1:59 pm

    Becca, I have been meaning to send you a reply for a while now, I just have to tell you that I am one of your biggest fans. I love everything you do! I am a new stamper and card maker and you always give me great ideas. I have yet to get a Magnolia stamp but I want to and will soon . I just love your explosion box!!!ReplyCancel

  • bevbMay 15, 2010 - 2:20 pm

    I am lost for words. Absolutey beautiful. Wonderful idea and anyone would so lucky to receive this.
    You done a wonderful job. Happy 2nd birthday/anniversary to Magnolia-lious.ReplyCancel

  • Corinne SheremataMay 15, 2010 - 2:24 pm

    Love your idea of making an “Explosion Box” with layers. What a great gift idea of a stamping friend or even to put other items such as recipes, your imagination is your limit.

    Very beautiful….thank you for the inspiring idea.ReplyCancel

  • lois skiathitisMay 15, 2010 - 2:32 pm

    This is so super sweet Becca, it’s so interesting to see all the layers. I’ve never made an explosion box, but yours has certainly inspired me to a least give it a try. I love the papers and of course Tilda is always just so sweet. As always Becca, TFS!!! :-DReplyCancel

  • peggy biggsMay 15, 2010 - 2:40 pm

    So beautifully done Becca….. I’ve never made one of these, but the layers are just so neat…… I love your choice of pp’s and your coloring ROCKS!
    Thanks for sharing the details.
    PeggyReplyCancel

  • Linda PalmerMay 15, 2010 - 3:04 pm

    All these layers really are stunning. I’m not sure I have the imagination to create something like this but yours is fabulous. Love it all.ReplyCancel

  • Theresa HarrisMay 15, 2010 - 3:26 pm

    Love it, love it, love it!!!!!! TFS such a wonderful and beautiful idea.ReplyCancel

  • Kelli B.May 15, 2010 - 4:17 pm

    Amazing creation Becca- you are simply AWESOME! I’m so glad I found your blog last week and subscribed. I am always blown away by your talent. Take care and God Bless!ReplyCancel

  • Sharon CaudleMay 15, 2010 - 4:42 pm

    Becca, this is soooo pretty! You’ve used some of my very favorite papers and I really love how you did the inside! Fabulous ribbon and flower treatment too!! Your work is ALWAYS beautiful!
    hugs!
    SharonReplyCancel

  • Tracy PayneMay 15, 2010 - 4:45 pm

    What an absolutely wonderful idea and god your freind is going to be so pleased to receive such a gift. I would be overwhelmed. There is an awful lot of work gone into this, but will be so rewarding when you see your freinds reaction. Totally gorgeous! Hugs Tracy xReplyCancel

  • Barb FMay 15, 2010 - 4:48 pm

    I love, love your box! Wish I was that lucky friend! It is just gorgeous!!! I am going to give it a shot since I have never made one – never even heard of it or thought of it! I am really excited after looking at all of them! Hugs, Barb FReplyCancel

  • Marion (Australia)May 15, 2010 - 5:02 pm

    Super idea on your explosion box Becca. I love the idea of having all the layers to put images or sentiments. Beautiful.
    Hugs marionReplyCancel

  • Carol RMay 15, 2010 - 5:02 pm

    How adorable is this box! So imaginative and I just love that little girl!ReplyCancel

  • Cheryl RowleyMay 15, 2010 - 5:07 pm

    OMGoodness, Becca! This is wonderful! Love all the layers and papers and what a great way to share with a friend!ReplyCancel

  • EdnaMay 15, 2010 - 5:24 pm

    This is so very cute and I love the Tilda. EdnaReplyCancel

  • Lori AragonMay 15, 2010 - 5:32 pm

    FANTASTIC idea, Becca! I know that I can always count on you for fresh and new ideas : ) Even if they aren’t new to you, they are to me! Beautiful papers and wonderful detail. Thanks for all your hard work!

    Love and hugs ~
    LoriReplyCancel

  • Monica MerkelMay 15, 2010 - 6:10 pm

    Becca, Oh my goodness–this is just awesome. All the details on the outside, then when you open it–a double wow!! Truly wonderful and your coloring is super too. What a wonderful gift for someone. You did a fantastic job as always.
    Hugs
    Monica MReplyCancel

  • Jean HempelMay 15, 2010 - 6:16 pm

    Becca You did an astonishing job on this box and I know it takes a long time to do… love your papers and love your idea of putting the images to be colored… makes everyone want to work harder to win your wonderful gift box… well you have a great idea for a gift and now I am going to work my butty off to try to win (but you gotta remember you and me is bestest friends (LOL).. Seriously there is gonna be some serious competition… We think everyone we have seen is beautiful… boy can’t wait until we start seeing what comes in… Glad To have been able to see yours last… now I will rest sweetly tonight..
    Hugs, JeanReplyCancel

  • Marcia LuisaMay 15, 2010 - 6:36 pm

    WOW WOW and Duble WOW.
    What an extraordinary rendition. It is a box that steps outside the proverbial box, takes it notch up and produces an examplery work or art.
    I am one of your fans and I am never dispointed when I visit your site. Card, Becca’s bits craft creation…you jus seem to take it to the top.
    thank you so very much for sharing your gift of creating, and willingly passing along your “bits.”ReplyCancel

  • NancyMay 15, 2010 - 6:39 pm

    Hi Becca,
    I love your take on the explosion box how very clever. I like that it is useful you are so very creative! Awesome job!
    Hugs,
    NancyReplyCancel

  • Peggy AllenMay 15, 2010 - 6:44 pm

    Becca, love your explosion box. Fabulous!
    God bless!ReplyCancel

  • LindaMay 15, 2010 - 6:52 pm

    Love your box! Thank you so much for sharing and all the tips besides.ReplyCancel

  • Suzanne J DeanMay 15, 2010 - 7:15 pm

    This is FABULOUS Becca–I love the insides that you and Sharon have done, so multi-purpose and FUN! What a great present and anyone would be lucky to receive it! Love the cheery colors and beautiful decorations too!

    hugz,
    SuzanneReplyCancel

  • Janice H.May 15, 2010 - 7:26 pm

    Wow!! Now I would love to receive this as a gift! What a wonderful idea for sharing your images. You did a beautiful job and I love your beautiful dp’s!ReplyCancel

  • Judy S.May 15, 2010 - 8:06 pm

    Hi Becca- absolutely luv this explosive box…..every layer is a beautiful suprise. How long did it take you to put this together- great ideas and full of fun stamps to color – great gift for another kindred spirit- who luvs Maggies like you…Hint,Hint!!! Awesome job.TFS.ReplyCancel

  • RufusMay 15, 2010 - 8:20 pm

    Becca, I really don’t know how you do it, but you continue to top yourself! This exploding box is incredible. What a great idea to make it for stamped images. Whoever your little friend is they are going to be getting a real treasure! I’m sure that they will be stunned. Amazing.
    R/ReplyCancel

  • EarlineMay 15, 2010 - 8:34 pm

    What a beautiful box you made love your color to thanks so much for all you do.ReplyCancel

  • carrieMay 15, 2010 - 8:51 pm

    What a wonderful explosion box you have created! The child receiving this gift is going to be so lucky to have such a great gift.ReplyCancel

  • Mary LouMay 15, 2010 - 9:50 pm

    Becca this is Beyond Magnificent~~ I would love a gift like this!!! What a truly great idea dear!! A treasured keepsake and images to play with—Brilliant!!
    Thanks darling
    BlessingsReplyCancel

  • JulieMay 15, 2010 - 10:34 pm

    Adorable! What a great give that would make for a stamper.ReplyCancel

  • TrishMay 15, 2010 - 10:39 pm

    Wow Becca, another gorgeous creation. I have made exploding boxes in the past, but they just had a gift in the middle. I never thought of doing it on every layer. What a great gift idea TFS
    Hugs,
    TrishReplyCancel

  • katydidMay 15, 2010 - 11:13 pm

    How cute & how clever!!! I have an adult friend that would love to get one of these. Your little friend is lucky to have you for a friend!!!ReplyCancel

  • AutumnMay 16, 2010 - 1:06 am

    This is so pretty and what a wonderful way to use the box! I’m sure your friend will love this, she is a lucky girl!ReplyCancel

  • Patti JoMay 16, 2010 - 2:29 am

    What a clever way to do the box! So creative and will be cherished by the lucky little girl that gets it! Beautiful work Becca! All the pictures were great to see all the wonderful details! Just amazing!!!ReplyCancel

  • TASMay 16, 2010 - 2:40 am

    What a wonderful idea for a gift explosion box! Love everything about it!ReplyCancel

  • amanda boldyMay 16, 2010 - 3:47 am

    this is gorgeous i love the idea of putting stamped images in the boxReplyCancel

  • Mary StowersMay 16, 2010 - 5:34 am

    WoW! What a great idea…………to use the explosion box as a gift like that! I like this! And I for one would love a gift of stamped Magnolia friends to color! I’m impressed.ReplyCancel

  • Anita MMay 16, 2010 - 7:37 am

    Your explosion box is just amazing! It’s so pretty and I love the fact that you can include the little stamped images as a gift for someone. Your little friend that receives this box is one lucky person, for sure!ReplyCancel

  • Lisa VMay 16, 2010 - 8:08 am

    so cool, love it!!ReplyCancel

  • Diane WhitehouseMay 16, 2010 - 8:20 am

    This is a lovely box, Becca and such a good idea to use it in this way as a gift!
    Diane xReplyCancel

  • RubyMay 16, 2010 - 11:19 am

    You have introduced me to the Magnolia stamps and I have now collected quite a few and love them so much. I especially love how you have used them in your creations, and this box is perfect for hiding a small gift in a big box. Tku!ReplyCancel

  • Rhonda ZamoraMay 16, 2010 - 12:14 pm

    Your box is absolutely adorable. Thank you for sharing your talents every day.ReplyCancel

  • PamMay 16, 2010 - 2:02 pm

    Becca this is fabulous. What a great gift item for a stamping friend. And you have done this up so beautifully!
    Hugs,
    PamReplyCancel

  • Peggie WilkinsMay 16, 2010 - 3:13 pm

    Great job. Love how you made this useful.ReplyCancel

  • Carolyn OrgarMay 16, 2010 - 7:22 pm

    Wow Becca, just as I expected, a fabulous box from you. Yours is stunning. I love all the goodies tucked away in it. What a fantastic job.
    Hugs xx
    CarolynReplyCancel

  • Deebi27May 16, 2010 - 8:49 pm

    Another amazing Explosion Box. Luck the lady who receives this gift. WOW, what a treat…that means you are a very thoughtful lady Ms Becca. Oh what am I saying…I have seen that thoughtfulness ever since I started seeing you blog. You cards are full of amazement, each and everyone! Another star for Becca!!!!!ReplyCancel

  • KathyMay 17, 2010 - 11:04 am

    Wow, Becca, what a lovely gift idea. Your friend will be thrilled and the three tier box is just so cool. I’ll have to try this for a little gift!ReplyCancel

  • janeyMay 17, 2010 - 8:08 pm

    I’m just getting caught up on what I missed this weekend…..my goodness, I missed a lot!! What a treat for your little friend!! Just so creative, Becca, and such an inspiration. Thank you.ReplyCancel

  • MelanieMay 17, 2010 - 9:29 pm

    Oh my this is fantastic!! What a lovely gift…I’m sure your little friend will be thrilled! Thanks for sharing your creativity…just stunning!

    Blessings,

    MelanieReplyCancel

  • natalieMay 18, 2010 - 7:54 pm

    That’s beautiful, Becca! I just heard about the exploding boxes but had never seen one until this week! Looks like fun.ReplyCancel

  • peggysueMay 18, 2010 - 9:44 pm

    A three layer explosion box, wow, looks fabulous!ReplyCancel

  • Kona JamieMay 19, 2010 - 5:24 pm

    So cute & great idea with the blank stamps inside!ReplyCancel

  • BetsyMay 20, 2010 - 7:28 am

    What an adorable project. So cute for a little girl’s birthday!ReplyCancel

  • Leslie KrochtaMay 20, 2010 - 10:43 pm

    Amazing project! I love your work.

    LeslieReplyCancel


Hello there!  Thanks so much for your wonderful comments on my latest Becca Bit.  I know I’m not able to tackle every single email but when you all ask questions it sure gives me material to cover :-)  So I’m back with a card, and this one I’ve had floating around in my head and now finally to paper.  When I was thinking of what to do with the Spellbinders Lotus Pendant, I knew it would have a round center and I knew that JustRite had something to fit the bill!!  By the way, talking about fitting the bill – JustRite Stampers is having a smashing sale in May on many of your favorite sets – if you’ll just take a peek HERE – you’ll see which sets they have on special and several would be fab for the center of this flower . . . hint, hint ;-).  So first let me tell you the stamps I used.  I simply love the Decorative 2" Round Wide Borders (on sale right now) – they go with almost any sentiment that JustRite offers.  I paired it up with the Custom Design Cardmaking Kit – a set that takes you through almost any occasion.

Okay, so now I’ll tell you how this medallion stacks up.  The base of the flower is made with Spellbinders Lotus Pendant – I used three of them and frilled them (my word for folding back and forth) and glued them together.  If you haven’t seen me do this before, check out this tutorial I did on a ruffled flower HERE.  Then I stacked (beginning at the bottom) the following Spellbinders sets,  Big Scalloped Circles SM #5,  Big Scalloped Circles LG #4, Big Scalloped Circles SM #4, Standard Circles SM #4 and Standard Circles LG #2.  Of course you can stack with the sets that you have in your stash, but people always ask exactly what I used and it keeps them from having to reinvent the stack.

I separated each layer with foam tape and it fits nicely in the center of the flower which I also had to build up with foam tape.  This is the type of card I would mail off in a bubble wrap envelope but I would take something like an large empty ribbon spool and seat it over the head of the flower to protect it from getting smooshed.  If a ribbon spool is not handy then I’ll take and empty container like perhaps one that held margarine and cut it to a low profile and seat it over the flower head.  More likely however, this would be the kind of card I’d hand deliver to a friend in the hospital where it could sit out to be enjoyed.  This is a question you ask often, I hope my explanation helps!

Card Recipe:
Stamps: 
JustRite Decorative 2" Round Wide BordersJustRite Custom Design Cardmaking Kit
Paper:  The Paper Company, Anna Griffin
Ink:  Colorbox Chalk Ink – Rose Coral, Tim Holtz Distress Ink – Victorian Velvet
Accessories:  Spellbinders™ Big Scalloped Circles LG, Spellbinders™ Big Scalloped Circles SM, Spellbinders™ Standard Circles LG, Spellbinders™ Standard Circles SMSpellbinders™ Lotus Pendant, Pearls, Ribbon, Martha Stewart Border and Corner Punch – Gothic Arches

I have the best readers!!  Thanks for being so darn sweet!!

pinTHIS SHAREthis TWEETTHIS EMAILthis
  • Kelly MassmanMay 12, 2010 - 7:31 am

    This is just gorgeous!!!ReplyCancel

  • SherryMay 12, 2010 - 7:50 am

    As always, you never disappoint….this card is breathtaking. If I got sick could you send me one? LOL Someday, I’d love to see all of your ribbons and how you store them. You must have the most amazinf ribbons in the world.ReplyCancel

  • Gloria WestermanMay 12, 2010 - 7:53 am

    Absolutely gorgeous….. I will have to go and check out spellbinders again…..your creativity is unbelievable…..thank Becca for always sharing your creation and on how to make them…..ReplyCancel

  • MelanieMay 12, 2010 - 7:53 am

    Becca, your cards are just simply works of art!ReplyCancel

  • janeyMay 12, 2010 - 7:55 am

    Stunning – and, as usual, very clear explanations. Thank you, Becca!ReplyCancel

  • ShawnaMay 12, 2010 - 8:08 am

    Gorgeous Becca. Your stuff is always gorgeous! One of these days I am hoping you will share with us how you mail your lovely creations without crushing your designs. Hugs to you!ReplyCancel

  • Sabrina aka okimom2girlzMay 12, 2010 - 8:15 am

    OMGosh, Becca, this is so beautiful!!! You are the Queen of awesome…the way you have done the Lotus pendant in combination with the flowers…..so stunning! Another beauty ready for a frame! Hugs and blessings, SabrinaReplyCancel

  • RosieMay 12, 2010 - 8:19 am

    Becca, this is one SHOWSTOPPER of a card. This will certainly cheer (and cure) the recipient! I too, was wondering how to mail these cards and now I know. Good advice all around. Please keep the inspiration coming!ReplyCancel

  • kraftychicMay 12, 2010 - 8:21 am

    Becca, Your card is just so very stunning! Thanks for sharing your wonderful creativity with us!ReplyCancel

  • ChinnuMay 12, 2010 - 8:24 am

    Oh, Becca! What a card. I hope the recipients of your cards TRULY appreciate all the work that goes into your cards. I wish I could peek into your mind to see how the “wheels” turn! Your talent and creativity is amazing.ReplyCancel

  • Karen WMay 12, 2010 - 8:35 am

    Just beautiful and I love how many different ways you use the spellbinders, loved the video on making them a tiny bit larger also. Thanks so much for the time it takes to help the rest of us.ReplyCancel

  • Amy HadleyMay 12, 2010 - 9:46 am

    breathtaking! Lovely layering and that floral print is gorgeous. Superb!ReplyCancel

  • Valerie MatinMay 12, 2010 - 9:53 am

    OH…MY…WORD!!! This is BEAUTIFUL!!! I CAN’T WAIT for a video on this one (HINT, HINT)
    ValerieReplyCancel

  • Susan NelMay 12, 2010 - 9:55 am

    Becca you’re driving me CRAZY with your beautiful cards. absolutely fantastic work, your site is really everyday the highlight when i open my mail. wish i could win some candy too sometime,,,,, i made one of these ruffled up cards the other day when you showed us to do it with the fleur de lis pendant, my gf b/day is tomorrow then i’ll give this card to her. Greetings from South Africa.ReplyCancel

  • Debbi ClouserMay 12, 2010 - 9:57 am

    What gorgeousness! You are the Queen of Cardmaking, that’s for sure.ReplyCancel

  • BettyMay 12, 2010 - 10:30 am

    This is just gorgeous Becca!!! Thank you also for sharing your tips! : )ReplyCancel

  • Jan D.May 12, 2010 - 10:38 am

    Oh my goodness…this is beautiful and I just bought the Lotus die…yippee…can’t wait to try this. Thanks so much for sharing your talent.ReplyCancel

  • RebekkaMay 12, 2010 - 10:39 am

    Girl this is fabulicious…I love what you do with these dies.ReplyCancel

  • Sylvia/LittleTreasuresMay 12, 2010 - 10:42 am

    Wow..Simply Amazing..this is sooooooooo beautiful. You made this dreary day full of sunshine. Thanks so much for sharing your special talents.ReplyCancel

  • lois skiathitisMay 12, 2010 - 10:58 am

    WOW! Becca, the focal image just pops right out at you. Just so pretty in pink. Love the all over look. You have such a way with paper that is such a delight to the eyes. As always Becca, TFS!!! :-DReplyCancel

  • Allison PhillipsMay 12, 2010 - 10:59 am

    Really very beautiful, Becca! You never seem to run out of ideas
    and I think that its really a gift. I love learning how to use
    various stacking combinations to always be changing it up a bit.
    Thanks for sharingReplyCancel

  • Judi MarkelMay 12, 2010 - 11:00 am

    Love it, Love it, Love it. Your card is fabalous. Thanks for sharing Becca.ReplyCancel

  • DebraKMay 12, 2010 - 11:12 am

    ‘took my breath away! Most beautiful! I just LOVE these colors–they were my wedding colors 2 years ago. Fabulous bow, too! You are SO artsy!!ReplyCancel

  • Diane LMay 12, 2010 - 11:59 am

    Oh My Gawd!!!!! This is beyond stunning Becca!!!! I also went back to check your tutorial wow all the folding and work is so worth it!!
    Don’t know if mine would turn out as gorgeous but will def try it one day!!! TFS your skills Becca!ReplyCancel

  • AnneMay 12, 2010 - 12:06 pm

    Absolutely beautiful, Becca! Love the card!

    Hugs
    Anne (UK)ReplyCancel

  • Janna SmithMay 12, 2010 - 12:11 pm

    You always come up with something beautiful! I love how you think “outside the box” and find new ways to use our tools!ReplyCancel

  • Carol (Craftingranny)May 12, 2010 - 12:17 pm

    Thanks for the link to the tutorial. I’m loving this card! It is so elegant and awesome. But then, most of your cards are awe inspiring. I’m going to try one soon and hope it turns out just half as beautiful as this one.
    “Hugs” Granny (Carol)ReplyCancel

  • Susan BugalskiMay 12, 2010 - 12:24 pm

    This is one beautiful card once again. You have undoubtedly THE BEST cards I have ever seen.

    I couldn’t leave you a comment about cutting around a Spellbinders but that was awesome – why didn’t I think of that?

    Your tutorials are fantastic.

    Thanks so very much.ReplyCancel

  • DarsiMay 12, 2010 - 12:38 pm

    Wow! Wow! Gorgeous!!ReplyCancel

  • Jean McGeeMay 12, 2010 - 1:40 pm

    W O W ! ! ! B -U -T- FUUUUUUUUULLLLLL!!!!!
    I have that Lotus Pendant coming in the mail any day now and will have to try this flower. Thanks soooooooo much for the tutorial.
    The last few days I have been spending hours going through your archives. It has been soooooo much fun. The ideas are grrreaaaaaaat. Last night I got as far as Aug. 2008. I have notes alllll over my desk (I hope I can read them). Thanks again for sharing your God given talent with us.
    Jean McGeeReplyCancel

  • MicheleMay 12, 2010 - 1:48 pm

    Absolutely gorgeous!!!Do you ever get tired of hearing how talented you are? Cuz you have serious talent!!! : )ReplyCancel

  • ConniecrafterMay 12, 2010 - 2:05 pm

    OH WOW!!!! Stunning, sure to be a pick me up! I just love the layering and such pretty papers and perfect bow!ReplyCancel

  • MarilynMay 12, 2010 - 2:06 pm

    Beautiful card, as always!ReplyCancel

  • Chris R.May 12, 2010 - 2:25 pm

    Amazing as always! I have been wanting the lotus pendant. Now I know I have to get it!ReplyCancel

  • Sabine EdelmannMay 12, 2010 - 2:33 pm

    You are amazing,Becca!!!ReplyCancel

  • Val WMay 12, 2010 - 3:22 pm

    Beautiful card! I always like to see how you layer up your creations. This one is stunning. Love your little tips for mailing a card with a high profile embellishment that you don’t want to get crushed. It’s always nice to know these things in case hand-delivery is not an option.ReplyCancel

  • Marilyn ClarkMay 12, 2010 - 4:07 pm

    I got a banged up twisted knee and am on crutches and I want to thank you for the beautiful card….I am taking this card personally! Your talent is amazing and is such a blessing for all of us readers.

    We appreciate you giving us the details to copy your cards. God bless and have a great day.ReplyCancel

  • Marianne AdamMay 12, 2010 - 4:14 pm

    Another stunning card!ReplyCancel

  • JudyIMay 12, 2010 - 5:19 pm

    Gorgeous as always. Love those JustRites, but now the Lotus pendant is on my must have list.ReplyCancel

  • Donna G.May 12, 2010 - 5:20 pm

    Becca, this is absolutely beautiful!! You are so super talented! This card will be much appreciated by someone who needs a “pick-me-up”!
    Donna GReplyCancel

  • TeresaMay 12, 2010 - 5:49 pm

    I always enjoy visiting your blog, but sometimes you have a creation that is really special. This is one of those. Love this card. You are great!!ReplyCancel

  • Kay G.May 12, 2010 - 6:35 pm

    Becca, I love this card. I always look forward to your cards. Thank you.ReplyCancel

  • Carol FroehlichMay 12, 2010 - 7:08 pm

    I just bought the 2″ circle wide borders. Haven’t received them yet, but now I have a gorgeous card to use for inspiration. I don’t have the Lotus Spellbinders yet, but plan on buying that one soon. I have seen so many cards that use it and it is on my wish list. :)

    Thank you SO MUCH for continuing to inspire me with your BEAUTIFUL creations!!ReplyCancel

  • RufusMay 12, 2010 - 7:49 pm

    I’ve got, and LOVE, the Lotus Pendant. I use it a lot. For some reason I never that to ruffle it. I’ve done it with some of the borders, why didn’t I think of it with this?? Oh, well, I don’t need to ~ since you ALWAYS come up with great ideas! This is gorgeous! I’m loving your Becca Bits too.
    Thanks for being you and sharing with the rest of us!
    R/ReplyCancel

  • Deebi27May 12, 2010 - 9:56 pm

    You have given me plenty of reason to get the medallion Spellbinder now…thank you! I love that outside edge. The inside stuff, I have that covered. GREAT card Becca. You seem to make some the absolutely coolest cards. And them seem so easy to do…when You do them! Thanks!ReplyCancel

  • Deebi27May 12, 2010 - 9:58 pm

    I meant Lotus Pendant not the medallion…no wonder why my creations sometimes look sooo different?ReplyCancel

  • LindaMay 13, 2010 - 1:28 am

    Oh my, drop dead gorgeous as usual! xLReplyCancel

  • emilyMay 13, 2010 - 7:34 am

    This is so beautiful! You always see things a little bit different and more decorative than the rest. I love it!
    Thanks for sharing! :o)ReplyCancel

  • CharletteMay 13, 2010 - 12:49 pm

    Wow! Becca this card is just unbelievable. You always design such beautiful cards and they are so creative. I wish I was your neighbor! To sit and make cards with you would be such a joy! But I gues I’ll just have to keep visiting your blog daily like I always do! As always thanks so much for sharing!ReplyCancel

  • Chris BiljanMay 13, 2010 - 4:07 pm

    How do you come up with these???? I am so in awe of what you’re able to do – thanks for the wonderful inspitarion!!!ReplyCancel

  • SuziMay 13, 2010 - 6:02 pm

    I just got the lotus spellbinder this week! What timing! Can’t wait to try to “frill” it! Thanks for sharing all your great ideas!ReplyCancel

  • Karen LinarezMay 13, 2010 - 11:55 pm

    Thank you so much for sharing the tutorial for that awesome medallion. Love the feminine design and colors of the paper, and paired with that stunning medallion adds the perfect elegance. Even the white punched border is perfect, and I love the layout. What a gorgeous card! You have the perfect touch!ReplyCancel

  • Karen LinarezMay 14, 2010 - 12:00 am

    . . and, I love the bow . . and the pearls . . . and that cute pink circle frame with the cute border stamp . . . and. . .ReplyCancel

  • RubyM:)May 14, 2010 - 1:37 am

    UTTERLY STUNNING!!!!!!! BEST CARD EVER WOW!!!!!!!!RubyM:)ReplyCancel

  • MarcieMay 14, 2010 - 9:20 pm

    Becca,

    What beautiful cards. Luv the use of the lotus pendant. It made such a lovely flower petal look. Never would of thought of accordian pleating it. Absolutely stunning. Thanks for the idea and the tutorial. Your the best.
    MarcieReplyCancel

  • MargMay 15, 2010 - 8:05 am

    This card is beautiful as you always do them. Thanks so much for the tip on how to mail the cards that have high embellishments. Never would have thought of the ribbon spool.ReplyCancel

  • Peggy AllenMay 15, 2010 - 6:43 pm

    Wow, I absolutely love everthing about this card. The paper, SB die, ribbon, pearls and punches. Well done. God bless!ReplyCancel

I N F O