Hi there!  Today was quite the whirlwind!!   I went out of town with my daughter and was fortunate enough to be able to hit a couple of stores that I don’t normally get to hit.  Score!!  First of all, I was sad to find that the nearest scrapbook store to me – and hour and a half away – closed last Saturday.  {Insert pouty face here}.  Don’t feel sad for me yet though, I did get to go to AC Moore!! 

Since I was away, I’ve not been the craft room, but I wanted to take this opportunity to provide some info that you’ve asked in your questions you email to me.   Generally if a question shows up more than 5 or 6 times I try to add an editors note to the original post but sometimes people don’t backtrack.  For some of the questions – I don’t know the answers and over time I learn the answer.  I’ve picked six of the questions that show up in my box weekly.  So okay, enough of the blah, blah, blah, maybe that burning question of yours is answered here ;-)  (Click on any of the pictures to go to original post).

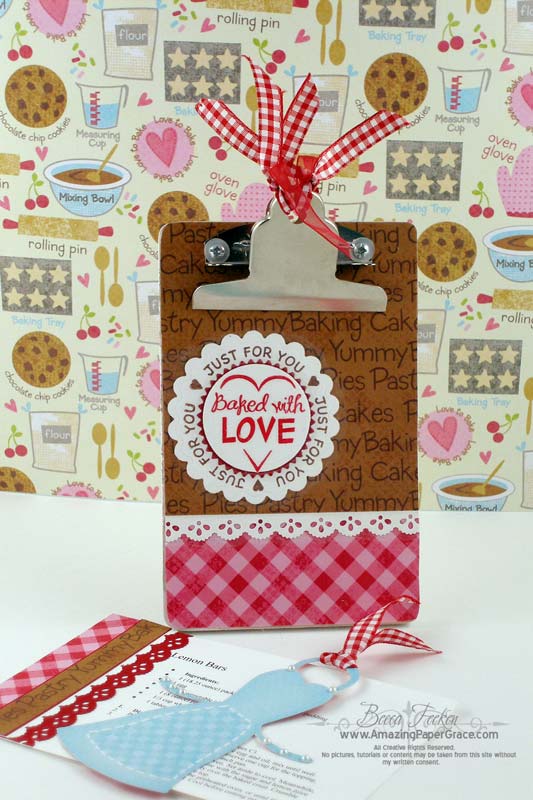
  When I used this little clipboard it had been in my stash for more than a year.  Many asked where to get them and today I found out that they are a regular $1.00 item at AC Moore.
  I made this project last year and received so many emails asking where to get the clips.  Today I found out that they are a regular $1.00 item at AC Moore.  Yay!!
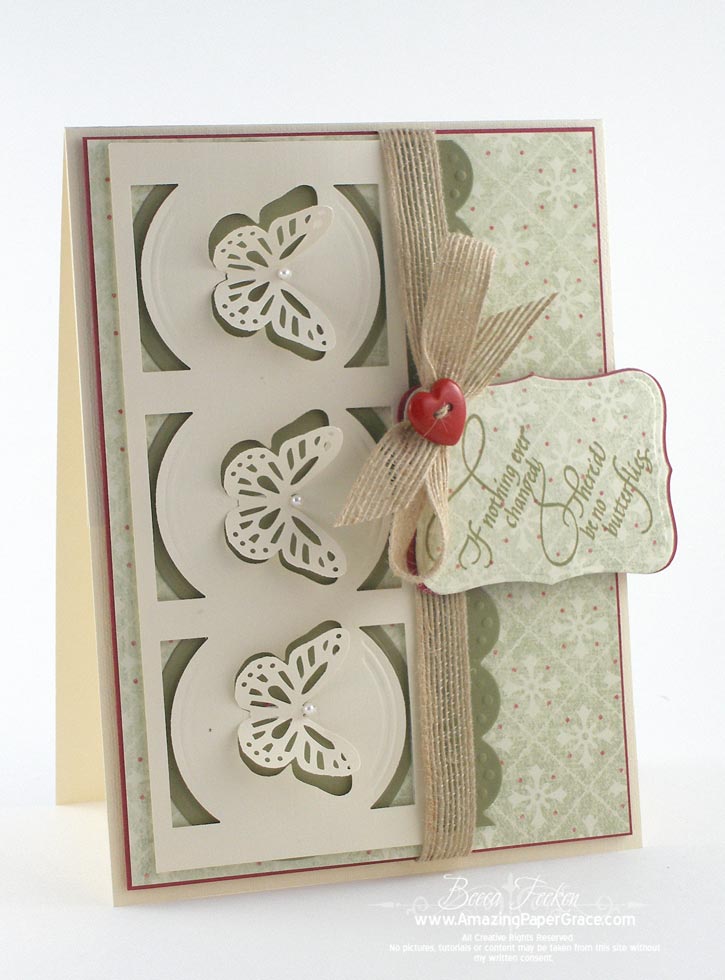
  Recently I made this card and at the time I did not know the name of the punch.  I’ve since edited the post, but I get at least one email a week asking for the name of the punch.  No worries – I hope this catches the attention of those who are still in need of the info. The punch is called Embossed Curve and the product number is EK-EKPL8030
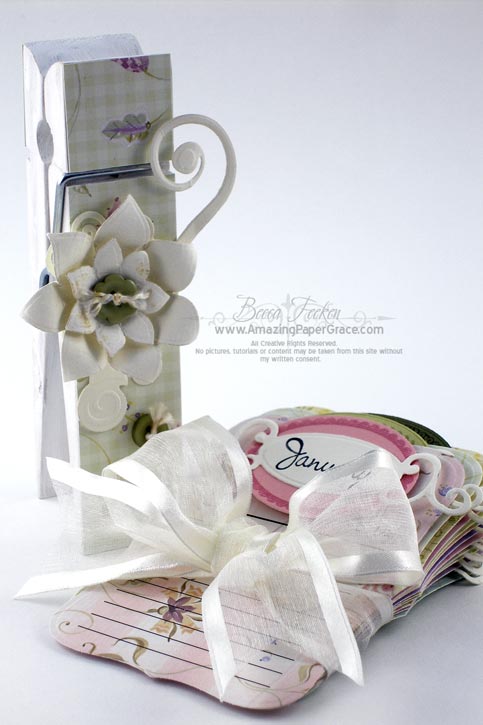
  I’ve received quite a few questions about the lace used in this project.  If you are lucky and have a small hometown Walmart near you (not a supercenter) . . . that’s where this lace can be found. 
  The paper for this card had been in my stash for quite some time.  I purchased multiple sheets because I knew I would use it.  Several of you asked where I purchased it, and I did not remember, however I saw it today at AC Moore.  It’s American Crafts.
        For tips on how to successfully cut and easily release paper from intricate Spellbinders dies there is an extensive thread on this subject  HERE.  This is my most asked question and if you read this thread, you’ll learn several best practices!!

Thanks for stopping by.  My trip left me so inspired and I’m busily sketching ideas into my creative journal!! I’m in the studio tomorrow so I should have something to share pretty soon.

pinTHIS SHAREthis TWEETTHIS EMAILthis
  • MaryannMay 7, 2010 - 2:11 am

    Thank you soo sooo much for this Becca. I think, most of us have had these troubles with the dies from time to time, so it´s really nice to see, that we can do something about it, as they´re just some of the most beautiful things for making great cards, and I just love my dies, so I was sure very pleased with these informations from you today again.
    Biiig hugs MaryannReplyCancel

  • GinnyMay 7, 2010 - 4:15 am

    Becca, this is wonderful! I have more of your blog bookmarked than anything else — and today I added a few more. Thanks so much!ReplyCancel

  • lois skiathitisMay 7, 2010 - 4:30 am

    Thanks for all the info Becca, I’m going to AC Moore this weekend hopefully they will have these things in my local store. You would think that they would carry more than they do since I live in a large city and if they don’t I’ll just have to have a talk with the buyer. As always Becca, TFS!!! :-DReplyCancel

  • chrisdMay 7, 2010 - 4:54 am

    Ah … wish there was a AC Moore near me but thanks for all of the great information as usual Becca! Hugs to you.ReplyCancel

  • emilyMay 7, 2010 - 5:01 am

    Thank you for all your answers! ( And probably AC Moore should be thanking you too!) I love that you take the time to go back over all the comments and care enough to add the answers. It shows just how kind and thoughtful you are!
    Glad you had a fun day out and thanks for sharing all beautiful cards and craftiness with everyone!!! :o)ReplyCancel

  • JanMay 7, 2010 - 5:51 am

    Thank you so much for these tidbits. The only Spellbinders die I have that is difficult to remove the cardstock from after cutting is the scalloped frame one (I’ve made quite a few of your ribbon weave baskets using this die), so I’ll try using the wax paper and see if that helps. I’ve never had a die that didn’t cut all the way through, but at least now I know what to do if that happens. Honestly, if I purchased one that wouldn’t cut all the way through, I would return it to the store for a refund or exchange.ReplyCancel

  • michelleMay 7, 2010 - 6:38 am

    thanks for the info becca..ReplyCancel

  • EdnaMay 7, 2010 - 6:56 am

    We don’t have an AC store around Michigan. At least I’ve never heard of it. But did find some clip boards in the right size at Office Max for $1.49 and got it. But had a hard time doing the decoupage on it. Ended up just gluing the paper to the board and then spraying clear lacquer on it.
    EdnaReplyCancel

  • kraftychicMay 7, 2010 - 6:57 am

    Becca, Thanks so much for sharing all of this great info with us! You are such a wonderful artist!ReplyCancel

  • Pam (PeeJay)May 7, 2010 - 7:27 am

    Thought I’d let you know that your fleur-de-lis pendant/medallion was used as a demo on a shopping channel that was selling Spellbinders stuff in the UK. The demonstrator did say it wasn’t her design but she didn’t name you, unfortunately, but a lot of us would have known where she got it from – lol!!ReplyCancel

  • Shelly CameronMay 7, 2010 - 8:13 am

    Thank you so much for all the details! Glad you had fun with your daughter! Blessings for a great mothers day!ReplyCancel

  • Carol FMay 7, 2010 - 8:18 am

    Thank you for the tips. I searched and the closest AC Moore store to me is in Pennsylvania. I live in Wisconsin. :) I plan on checking out their website. The internet can be a blessing.

    Have a WONDERFUL Mother’s Day!!ReplyCancel

  • MarianMay 7, 2010 - 8:41 am

    Thanks so very much. I have been having a terrible time with the intricate spellbinders and felt as though I have wasted money as well. I’m sure that all the tips are going to be very helpful! I have purchased several, and have been quite discouraged with some.
    Thanks again and
    Happy Mother’s Day :)
    TFS
    MarianReplyCancel

  • Amy A. MontrealMay 7, 2010 - 9:21 am

    We, in Montreal, don’t even have Michaels, so forget the A.C.Moore store. Since my daughter moved to Ottawa, I do get a chance to shop at Michaels and my family laugh at me cos thats my first stop!!ReplyCancel

  • HelenMay 7, 2010 - 9:26 am

    Thank you I’m off to find some waxed paper and have another go!!
    HelenReplyCancel

  • DawnllMay 7, 2010 - 10:12 am

    How sweet of you to go back and answer all those questions.ReplyCancel

  • RebekkaMay 7, 2010 - 10:36 am

    Thanks Becca :)ReplyCancel

  • MichelleMay 7, 2010 - 4:09 pm

    Wow! Fabulous projects. AC Moore sounds like a great store. Do you think its like Hobby Lobby? We have a new Hobby Lobby in Boise.ReplyCancel

  • DianeMay 7, 2010 - 6:16 pm

    Becca,
    Thanks

    ~~Diane~~ReplyCancel

  • MaryMay 7, 2010 - 6:56 pm

    Thank you, thank you!! I was one that asked about that punch and I’m going to order it asap! I appreciate the info. MaryReplyCancel

  • Marilyn N.May 7, 2010 - 7:03 pm

    Thanks for answering all those questions. Checking out the spellbinders info now. Thanks!ReplyCancel

  • FranMay 9, 2010 - 4:54 pm

    Hi Becca,

    I absolutely love everything that you produce! Your projects are gorgeous and your videos are really easy to follow. I can add a tip for the ladies experiencing difficulty with some of the Spellbinders dies. Before using any of them, I always scrunch up a piece of wax paper and rub it all over the cutting side of the die. The more intricate dies (tags, pendants, borders, etc.) have many tiny holes that when waxed, seem to release the paper more readily. If you are doing multiple cuts, simply rewax your die when the cardstock starts sticking again. To remove the leftover cardstock from those tiny holes in the die, I use something sharp like a piercing tool.

    Fran
    Montreal, CanadaReplyCancel

So I have something new to show you.  I’m snickering just a little bit like a mischevious little girl.  I sneaked this out on you last month just so I could see who would catch it.  Sure enough, some of you had your eyes peeled and said “Wait a minute! How do you do that double bow.”   Geez Louise – I can’t get anything past you guys.  So all right – this is my new favorite bow.  It’s a little bit fussy and not as easy as a regular bow but let’s face it, if you can tie a regular bow, you just have to do this twice.  Come on now – none of this “I can’t tie a bow stuff”.  Take a deep breath and let’s get started.  By the way, so many have emailed me to ask if I had a tutorial on how to make bows.  Well, in fact I have several.  I put a new tab at the top of my blog called Becca Bows . . . enjoy.   Just a word of warning . . . on this video I’m not on caffeine, I have to talk fast to get everything in under 10 minutes, lol!

pinTHIS SHAREthis TWEETTHIS EMAILthis
  • Theresa HarrisMay 3, 2010 - 6:15 pm

    Thank you so much for sharing this tutorial. Your spirit is as beautiful as your creations!ReplyCancel

  • bonnie weissMay 3, 2010 - 6:23 pm

    You are the Bow Queen, Becca! Thanks for another terrific and informative tutorial.ReplyCancel

  • Linda CMay 3, 2010 - 6:29 pm

    Amazing!! I love the way you take the time to show each step. I do believe that after watching this video I could learn to make a double bow! Thank you so much for sharing your talents.ReplyCancel

  • EdnaMay 3, 2010 - 6:39 pm

    Very pretty and will try it after I’ve watched this a couple of times. And let me say, you have a very nice speaking voice. Easy to understand. Thanks for sharing. EdnaReplyCancel

  • CheriMay 3, 2010 - 6:57 pm

    Becca, you truly are talented~~The Queen of bows! BTW, I agree with the last comment, you have a lovely speaking voice: Also, I LOVE the ring you have on your right hand, LOL!ReplyCancel

  • DawnllMay 3, 2010 - 7:16 pm

    Thank you so much for sharing this tutorial.I appreciate the extra time to show us how you make those beautiful bows step by step.ReplyCancel

  • CYNTHIA BEYNONMay 3, 2010 - 7:32 pm

    BECCA BECCA THERE IS THAT CLEVER BECCA NOW SHE IS TRYING
    TO CONFUSE US WITH DOUBLE BOWS. BUT WE CAUGHT HER.ReplyCancel

  • JeanMay 3, 2010 - 7:51 pm

    Becca,
    Absolutely beautiful presentation!!!! The bows are wonderful and your teaching is so clear and precise…..Thanks so much for sharing this terrific project.ReplyCancel

  • RosieBMay 3, 2010 - 8:01 pm

    Beautiful! thanks for sharing this :)ReplyCancel

  • CarokenMay 3, 2010 - 8:18 pm

    Great demo Becca!ReplyCancel

  • RebekkaMay 3, 2010 - 8:21 pm

    You do the best tutorials, you explain everything so well, thank you for sharing, these bow’s are gorgeous.ReplyCancel

  • JannaMay 3, 2010 - 9:12 pm

    You make bow tying look so easy! I will have to give the double bow a try. Thank you for taking the time to do this video~!ReplyCancel

  • TrishMay 3, 2010 - 9:22 pm

    Hi Becca,

    Just wanted to thank you for teaching me how to make your beautiful bows. You’re the best!ReplyCancel

  • Pat JandacekMay 3, 2010 - 9:47 pm

    I do believe I’ll try this….and succeed…thanks to your explicit and wonderful tutorial. TFSReplyCancel

  • NancyMay 3, 2010 - 10:21 pm

    Gorgeous bows-thanks for teaching me a new way to tie bows. I think I will be playing around with technique for a couple of days. Thanks again.ReplyCancel

  • Mary R.May 3, 2010 - 10:30 pm

    That is one of the best tutorials I have watched. I believe I can do this now. At the very least, I am going to give it a try, lol. Thanks, Becca.ReplyCancel

  • Gloria WestermanMay 3, 2010 - 10:41 pm

    I think I can make this…..I completely understand HOW TO now….thank you so much……and I do like the idea having a tab on your blog just on bows…….lolReplyCancel

  • MarisaMay 3, 2010 - 10:42 pm

    Fabulous tutorial, Becca. Thanks for sharing some of your secrets with us :DReplyCancel

  • MaryannMay 3, 2010 - 11:16 pm

    Thank you sooo much for this little tutorial becca. I think, it´s always been one of the hardest things for many of us, so make a prfect bow, and these just looks wonderful, so I´m definately also going to try this, that´s for sure. Thanks sooo much for always sharing all your great tips with us, and I too like the idea about a bowtab, this way, it´ll always be easy to find it again, if we can´t quite remember all the first times. Thanks soooo much hun.ReplyCancel

  • Patti JoMay 4, 2010 - 12:28 am

    You do such terrific instructions! Easy to follow along! Thanks for sharing how you make your beautiful bows!ReplyCancel

  • pat poskMay 4, 2010 - 12:47 am

    Thank you Becca for this Becca Bit. What pretty bows…and I too will give this a try.

    patReplyCancel

  • LindaMay 4, 2010 - 12:53 am

    Oh those bows are adorable Becca…TFS your ideas so freely. xLReplyCancel

  • Carolyn McElroyMay 4, 2010 - 1:45 am

    Becca :o)
    I love your tutorials so very much! Like the others have said, you speak so clearly and beautiful and describe everything so well! One question I do have is: after you take the paper out, what do you do w/the extra ribbon? Anything special? Oh, I’m thinking you probably put it around a mat on the card?? Thanks again so very much!!! C:o)ReplyCancel

  • Marion (Australia)May 4, 2010 - 2:40 am

    Thank you very much Becca. Your bows are terrific. with the bow easy the second bow is inside the other one. I love that the bows are separate. after about one hundred times I may remember how to do it.
    I had noticed that beautiful bow on the little box and now I will be determined to make it.
    Hugs MarionReplyCancel

  • Glenda BrooksMay 4, 2010 - 2:54 am

    Becca, your tutorial is wonderful! I will be watching it over and over again….I’m a slow learner! I purchased a bow easy but you have given me the knowledge…so I plan to learn to tie a bow on my own! Thanks so much!!ReplyCancel

  • Sylvia YeomansonMay 4, 2010 - 4:41 am

    Thank you once again for a brilliant tutorial. You make this look so
    simple – bet I’ll be all fingers and thumbs.

    SylviaReplyCancel

  • DanishaMay 4, 2010 - 5:27 am

    Can’t wait to try this! Thanks for making the tutorial!!!ReplyCancel

  • Becky GreenMay 4, 2010 - 6:24 am

    GORGEOUS!!!! Thank you SO MUCH for sharing! AND without the bow-easy product!!!! That’s GREAT!!! I’d much rather spend my $ on stamps!!!! :)ReplyCancel

  • jamiMay 4, 2010 - 6:34 am

    Brilliant! You make it looks so easy too! I have always loved your bows!ReplyCancel

  • lois skiathitisMay 4, 2010 - 6:44 am

    I think B is is your favorite letter. “Beccas’ Bow Bits” say that three times fast. Thanks Becca, for doing another great video. The end results are lovely. As always Becca, TFS!!! and for letting me tease you a little today. :-DReplyCancel

  • Amy A. MonrtrealMay 4, 2010 - 6:55 am

    TFS this clear video of the double bow which I am definitely going to try out….you are the BEST!ReplyCancel

  • MargMay 4, 2010 - 8:04 am

    Wonderful tutorial. Thank you.ReplyCancel

  • ConniecrafterMay 4, 2010 - 8:07 am

    Beautiful and you make it look like even I could do it….I don’t generally use big ribbon on my cards, just can’t make it look right, but I may just have to give this a try on packaging, tfs!ReplyCancel

  • HeatherMay 4, 2010 - 10:17 am

    Thanks for the tute, Becca! I’ve been making these on my Christmas gifts for a few years now. Hadn’t seen them anywhere else. I always conserve my ribbons annually and am often left with these long tails, so I started making the double (and triple – even 4 loops!) when I had the long pieces and didn’t want to cut the ribbon. I find it works best with wired ribbon, but that is just my preference.
    They make such a luscious bow – and really topper for a wonderful gift!ReplyCancel

  • Marilyn ClarkMay 4, 2010 - 12:06 pm

    Thanks for the tutorial and you have a great speaking voice.
    Your instructions are so clear that I will give this a try and I am bow challenged.
    Thanks again and God bless. Have a great day.ReplyCancel

  • Ree DonnellyMay 4, 2010 - 2:14 pm

    Becca,
    Can’t thank you enough… this was a great video. It really helps when you are is visual learner like I am.
    WOW, awesome! XOReplyCancel

  • LuAnn in AZMay 4, 2010 - 2:32 pm

    You make it seem so easy… thanks for the tip! More beautiful Becca bows. We feel so lucky to share in your amazing grace.ReplyCancel

  • ToshMay 4, 2010 - 4:12 pm

    Gorgeous Bow Becca, and a wonderfully explained tutorial!!ReplyCancel

  • VikiMay 4, 2010 - 5:05 pm

    Wonderful and easy! Thank you for taking the time to make the video.ReplyCancel

  • KathyMay 4, 2010 - 5:55 pm

    Thanks for the tip. Love the bows you make. Can’t wait to see more tips.ReplyCancel

  • lorraine krywyMay 4, 2010 - 6:04 pm

    thanks for the great tutorial….if i play it over and over and over..I just might get it. great teacher…thanks for everythingReplyCancel

  • Connie NealMay 4, 2010 - 6:39 pm

    You make it look so easy! How beautiful. Thanks for sharing.ReplyCancel

  • AndreaAMay 4, 2010 - 8:25 pm

    Becca, your bows are beautiful.
    This single bow is exactly how I tie my bows.
    But my Daddy taught me as a little girl learning how to tie my shoes how to tie a bow. I must try this double bow, they are so pretty.
    You always have the prettiest ribbon.
    Thanks so much for your ” Becca Bits”ReplyCancel

  • LizetteMay 5, 2010 - 12:59 am

    Stunning Becca! You are amazing!ReplyCancel

  • MarcieMay 5, 2010 - 1:48 am

    Becca,
    You rock !!!!! Once again your tutorial was fabulously informative. Thanks.
    MarcieReplyCancel

  • Pam SpradlinMay 5, 2010 - 6:01 am

    Thank you for the video. I do appreciate all the help that you have given us followers.ReplyCancel

  • Deebi27May 5, 2010 - 5:21 pm

    Bows I can tie, but I shy away from the wider ribbons. You have now given reason to not shy away from wide ribbon…as long as I have wired I think I can do this! Your bows are just so professional looking. Thanks for the video, esp on the double and triple layers. You are the “Bow Easy” w/o the “Bow Easy”…Lol!!ReplyCancel

  • TammiMay 6, 2010 - 7:25 am

    Thank you so much for posting this bow video. I will keep watching and practicing until I get it right. Your beautiful bows are the perfect touch on all of your creative cards, boxes, envelopes, etc.
    xoxoxox
    TammiReplyCancel

  • Mary LizMay 15, 2010 - 9:28 pm

    Love the bows! Also, really like the ring on your right hand – would like to own one….any information on where I might find one?

    Thanks,
    Mary LizReplyCancel

  • BernieMay 19, 2010 - 1:47 pm

    Was looking for a new way to tie bows and found you on Youtube. Awesome! Can’t wait to try it. I’m off to poke around your blog. Thanks for the tutorial.
    Blessings
    BernieReplyCancel

  • Janet LarsonMay 27, 2010 - 11:23 am

    Becca such a great tip, I hope you don’t mind that I share this idea with one of my card swap groups. I have recently been put in charge of finding a tip for each Thursday and I would love to show off some of your different tips. If there is a problem with my doing this please let me know and I won’t do any more.ReplyCancel

Hello there!!!  Many of you asked that I share how to make the ID Tag Box and I promised I would.  Of course it has many, many uses and I have a project planned again next week with the box.  Please join me in a short video that shows how to make this quick and simple box.  If you make one, I hope you’ll link to my Becca Bit or my original post HERE.  Betcha’ can’t make just one!!

You are simply amazing!!  See you soon!

ETA:  Arrgh, after Youtube compressed my video I noticed that it obsured some of the typing in the last frame . . . in case you cannot see it here are the numbers.  I may reupload later tonight.

Score your lines starting at left
with short side at top:
1″, 1 1/2″, 4 1/2″, 5″

Score your lines starting at left
with long side at top:
4 1/2″, 5″, 9 1/2″, 10″

pinTHIS SHAREthis TWEETTHIS EMAILthis
  • lois skiathitisMay 2, 2010 - 5:26 pm

    This is so wonderful. You made it look so easy i think that i will try and make one myself. I just love it when you do the Becca Bits, Becca. Thank you so much. As always Becca. TFS!!! :-DReplyCancel

  • RebekkaMay 2, 2010 - 5:39 pm

    Thank you so much Becca for this fabulous tutorial. I love this set you made and plan on making some of these my self. :)ReplyCancel

  • Mary HavlovicMay 2, 2010 - 5:46 pm

    Thank you so much for sharing the tutorial on how you made your box. Those will make a great Mother’s Day Gift with the Tag messages inside them.ReplyCancel

  • Debbie PammentMay 2, 2010 - 5:47 pm

    I recently found your blog and must say you’ve been inspiring me ever since! Thanx sooo much for sharing your talent with us!
    xXxReplyCancel

  • SueMay 2, 2010 - 5:50 pm

    Becca, will you be making an adobe file template as you often times do as well? It helps to have the pattern available to print. If possible, that would be great! Beautiful box by-the-way! Can’t wait to make it myself!ReplyCancel

  • WillowMay 2, 2010 - 5:53 pm

    Thanks so much Becca!! This is such a pretty box!! I also could just listen to you forever…you have a great voice for video!!ReplyCancel

  • Janis LUMay 2, 2010 - 6:02 pm

    Becca,
    Love your box. Plan to make one, two or maybe more! I do have a question, where did you purchase your stylus (metal paper scorer). I have been looking all over for a meta one.

    Thanks,ReplyCancel

  • Marion (Australia)May 2, 2010 - 6:08 pm

    Hi Becca,
    I really enjoyed your box tutorial. it makes it so easy to do your card project. Thanks a lot.
    Hugs MarionReplyCancel

  • ShawnaMay 2, 2010 - 6:21 pm

    Thanks for another wonderful Becca Bit. Someone mentioned a file to print; that would be nice, but I know you must be so busy. Thanks for all your wonderful inspiration and the work you put into all your fabulous projects.ReplyCancel

  • marianneMay 2, 2010 - 6:22 pm

    You are a paper engineer! How do you figure out this stuff? Another awesome project!ReplyCancel

  • Diane LMay 2, 2010 - 6:39 pm

    TFS your fab tutorial Becca!! Lovely box!!!ReplyCancel

  • Vicky SchmidtMay 2, 2010 - 6:40 pm

    Becca,
    Your box is great. I plan to try that maybe tomorrow after I am done watch my grandchildren. I like your corner rounder too. May I ask where you got that from?ReplyCancel

  • LindaMay 2, 2010 - 7:07 pm

    That is a sweet little box Becca…you make it look so good! Great video-I enjoyed watching how it was done. Cheers! xLReplyCancel

  • KathiMay 2, 2010 - 7:12 pm

    Becca thank you for showing us how you made this lovely box. You make it so easy. I love the extras you added to your box.ReplyCancel

  • LindaMay 2, 2010 - 8:07 pm

    Becca love the box, I am going to do one for a best friend tomorrow, I love your videos.ReplyCancel

  • Gloria WestermanMay 2, 2010 - 8:34 pm

    I love it when you do video’s……and I love this box…..I want to make one (several) for some GF’s……thank you so much…..ReplyCancel

  • Clare CurcioMay 2, 2010 - 9:08 pm

    Hi, Becca! Your box is neat, and I got my tags yesterday to try it. I can’t wait. Thanks!ReplyCancel

  • Lori AragonMay 2, 2010 - 9:20 pm

    Wonderful!!! Now I have to go back to see the tags – lol! Thank you so much, Becca : )

    Love and hugs ~
    LoriReplyCancel

  • alcoholinkyMay 3, 2010 - 2:49 am

    wonderful, really useful video which I’m off to try out. (wish I had your nails! LOL)ReplyCancel

  • emilyMay 3, 2010 - 3:43 am

    Thank-you for sharing! Love tutorials!!! :o)ReplyCancel

  • Nancy SchulltzMay 3, 2010 - 4:45 am

    Thank you for the tutorial for this adorable box! You are awesome Becca love your blog!
    Hugs,
    NancyReplyCancel

  • bonnie weissMay 3, 2010 - 5:11 am

    Thanks once again, Becca, for an easy-to-understand tutorial and for sharing it with your blog readers. You can’t begin to imagine how inspirational your blog and your talents are to such a vast number of crafters. I’m sure I speak for many others that we anxiously wait to see what you create and share next…thanks.ReplyCancel

  • AnneMay 3, 2010 - 5:38 am

    Thanks so much for sharing this tutorial with us :o)

    I love the way you take a basic shape and then create something so beautiful with punches or dies by thinking ‘outside the box’ – quite literally in this case!

    Off to make a box now….

    Hope your knee is completely better now.

    Hugs
    Anne (UK)ReplyCancel

  • MargMay 3, 2010 - 7:43 am

    This is wonderful. Thank you. I agree, so many ideas for the use of this box.ReplyCancel

  • Wendy MooreMay 3, 2010 - 8:16 am

    Thanks so much for clarifying the making of the box. Beautifully done. I will be making many of these.ReplyCancel

  • Peggy MaierMay 3, 2010 - 9:46 am

    Very pretty little box! Your tutorial was very clear & easy to follow. Thanks!ReplyCancel

  • Shirley LeeMay 3, 2010 - 10:05 am

    Thanks for the tutorial. It looks so easy! Where did you get that scoring tool you used (the long white one)? It looked like it made a better score than the tool that came with the Score Pal. Have a great week!
    Shirley L.
    Roseville, CAReplyCancel

  • lindylou50May 3, 2010 - 10:55 am

    Thanks for sharing the box tutorial Becca I love the addition of the paper to make the flap.

    Love Lin
    U.K.ReplyCancel

  • EarlineMay 3, 2010 - 11:50 am

    Thanks so much have to try this one.ReplyCancel

  • BonnieMay 3, 2010 - 12:50 pm

    Thanks so much for the video tutorial. Great job.ReplyCancel

  • Pam GlennMay 3, 2010 - 1:44 pm

    Thank you so much for your great instructions on making this little box. Now I am going to have to go try to make it.

    Maggie Hugs!!
    PamReplyCancel

  • SheriMay 3, 2010 - 9:07 pm

    Thanks Becca. I love Becca Bits. Your talent is extraordinary and I enjoy looking at each and every new thing you make.ReplyCancel

  • terry yMay 4, 2010 - 4:35 pm

    Thanks for restating the dimensions. Most of all, Becca, thanks for all your time spent on helping us “OUT HERE” get our craftiness flowing! If others are like me, we need the outlet of some crafting goodness for ourselves AND to share! (Do you have any links to other mini-bk projects to share?) Thanks for all and have a VERY blessed week!ReplyCancel

  • Deebi27May 5, 2010 - 5:37 pm

    Thanks, thanks, thanks! This is wonderful and you share your wonder and craft in such a generous way. What a great mini gift box. Eazy Peazy!ReplyCancel

  • Sarah SchwerinOctober 21, 2010 - 5:32 am

    Thanks for the great tutorial! See mine here:

    ATC Folder and ATC’s.

    ~Sarah~ReplyCancel

I N F O