Hi there sweet friends, thank you so much for your patience while I finished up some projects I needed to finish. Earlier this week I used a technique to ink the border of my dies for a card and lots of you had questions and quite of few of you requested a video. I have another card to show using the same technique and a video to go along with it. There are a couple of ways to get this look, so I hope you take a second to review my video and I hope you’ll try the technique on your own.
Here’s the video:
Now on to my card, I framed it up withSpellbinders Radiant Rectangles, added some embellishment withSpellbinders Fantastic Flourish TwoandSpellbinders Venetian Accents. I finished up with a bow, some mulberry flowers and a pen. To recap the layers I used from the bottom up, a cardbase 5 -1/2″ x 7-1/2″, cream matting layer 5-3/8″ x 7-3/8″, foam tape, dark blue matting layer 5-1/16 x 7-1/16″, light blue matting layer 5″ x 7″, foam tape, brown matting layer 4-5/8″ x 6-5/8″, blue design paper layer 4-1/2″ x 6-1/2″, foam tape, Radiant Rectangles die cut and oval, Venetian Accent embellishment on oval, Fantastic Flourish Two embellishment on flowers. Add Ribbon, Flowers and Pin on appropriate layer.
I have another short video to share with you tomorrow – I want to feature one of my tool heroes. I hope you’ll come back in check it out – I think you’ll be surprised!
THANK YOU BECCA!!!!!!!! PERFECT VIDEO TUTORIAL!!!!!!!!!!! :) I know what I’m going to try!!!!!!! :)ReplyCancel
charleneJune 15, 2013 - 7:37 pm
Thank you so much for explaining. Which die cut machine are you using? if you don’t mind me asking…ReplyCancel
Marilyn in E-TownJune 15, 2013 - 7:43 pm
OH MY. . . And yet another gorgeous card and tutorial too! That is one of my all time favorite quotes, thank you Becca for Blessing my life with such beauty both in your cards, blogging and your postings that are heartfelt from you!ReplyCancel
Juanita BraunJune 15, 2013 - 7:59 pm
Thank you so much for this perfect video. A special thanks for being so prompt in doing this. I think we are all getting out our stamp pads .ReplyCancel
AngelaLJune 15, 2013 - 8:06 pm
Another beautiful card Becca. Thanks so much for sharing your technique for inking die cut edges. :-)ReplyCancel
Lovely video. Thank you so very much for taking time to make this video and share with us bloggers. I am intrigued by the narrower looking mats you used. I’ve not seen this size of mat. Are they specific to the GCalibur, or is there another machine they are used for? I’m off to S/Binders to see if I can spot them. Also thanks for the always so-beautiful card. Can’t wait to see your video tomorrow. Again, thanks for sharing your amazing skills with all us. Hugs & Happy Sunday.ReplyCancel
Great video — I have to ask where did you get those smaller plates? They look like 5×7? So much easier with the smaller set…ReplyCancel
Heather BJune 15, 2013 - 8:20 pm
Thanks for making the video for how to color the edges-I’ve been wondering the simplest way to do it– my hand is not steady enough to do it afterwards. I like being able to have the choice of a colored border or shading color on the inside and leaving the edge white. I have a question for you on another matter… since you use so many spellbinders products that I love– are you aware of how to use either Tim Holtz diffusers or darice diffusers with embossing folders using the Spellbinders Grand Calibur? Thanks for creating such inspiration projects and videos.ReplyCancel
Gorgeous card! Thanks for the tutorial for perfect boarders!ReplyCancel
FernandaJune 15, 2013 - 9:07 pm
Thank you so much for demonstrating this technique! I must try it out. You are so talented and sharing!ReplyCancel
RufusJune 15, 2013 - 9:08 pm
Another gorgeous card, Becca. Thank you for taking the time to make a video showing your technique for perfectly inked edges. I really appreciate the time and effort to make your videos for us. Will be back tomorrow to see what else you’ve got up your sleeve!
R/ReplyCancel
Beautiful card, Becca. I had forgotten about this technique. Thanks for the video tutorial.ReplyCancel
Diana G. StewartJune 15, 2013 - 9:34 pm
Hi Becca, You really have a great eye for layering and composition. Love the inking with the dies too.ReplyCancel
ChelseaJune 15, 2013 - 9:35 pm
Wow – wow – wow!!! My entire way of using dies may have just changed forever!! Thank you Becca! I haven’t seen anyone else do this technique, so I appreciated you showing both methods of achieving the colored edge. I am amazed!!! Off I go to try this out –ReplyCancel
Sue AshtonJune 15, 2013 - 9:52 pm
Thanks Becca for another awesome video. Can’t wait to get in my craft room an try it out.
Cheers
SueReplyCancel
Marcie SmithJune 15, 2013 - 9:55 pm
Thanks Becca for this little video. I thought you had to cut out a smaller nested shape to get this effect. Had no idea that you inked the die itself. See we are always learning something from you!!!!!! Thanks. Which leads me to the next question, what do you use to clean your die so as not to ruin it or dull it??????
MarcieReplyCancel
Sandra SmithJune 15, 2013 - 9:59 pm
WOW!!! Another unbelieveably gorgeous card. I just love it and the tutorial is awesome! I was one who asked how you inked the edges and I am so appreciative that you actually did a video while you have been busy with other projects. As always, your instructions and videos are so easy to follow. Thank you so muc Becca!!!ReplyCancel
ann robbinsJune 15, 2013 - 10:17 pm
I LOVE THIS TECHNIQUE. THIS IS AN EXQUSITE CARD, BECCA!! LOVE THE SOFT COLOR OF BLUE. YOUR SAYING, PAPER (COLOR IS BEAUTIFUL) AND JUST EVERYTHING ABOUT IT.
HUGS
MSTGANE96ReplyCancel
MickieJune 15, 2013 - 10:20 pm
Thanks for showing us your way of inking the die. So ingenious! And another lovely card. You are enabling me to break the bank with my having to have all those beautiful dies, LOL! Love your work my dear!ReplyCancel
DebraK in FloridaJune 15, 2013 - 10:52 pm
Stunning and elegant, and the true Becca-classy style… !ReplyCancel
EveleneJune 16, 2013 - 12:22 am
Finally, it’s now clear to me how you ink the edges of your dies. I’ve been trying to figure out this technique you’ve done with your other cards. Thanks kindly, Becca.ReplyCancel
Super card – very wedgewoodesque (is that a real word?) anyway, fab video and I shall have a go at inking edges of dies -never seen this technique before so lots of thanks for sharing it with us.ReplyCancel
Anne BJune 16, 2013 - 4:23 am
Thank you so much for this – I was one of those who requested it! Another question – how do you create such beautiful loopy bows? I know you use your bowmaker but before I order, I’d like to see how it works so that I can get the best results!ReplyCancel
Your card here today is absolutely stunning work again Becca. I so love, how you made this gorgeous creation. And thanks soooo very much for sharing the video here on how you made this perfect and gorgeous inked edges to your cards. You´re so talented and I just love your gorgeous work always and the card today is definitely among my biggest favorites ever. It is sooooooooo so beautiful.
Have a wonderful sunday and great week ahead hun.ReplyCancel
Anne(UK)June 16, 2013 - 6:02 am
Great tutorial as always, Becca. Thanks so much for sharing. I would try it out today, but I’m sitting in glorious sunshine in an hotel garden at Disneyland, Paris and am without the means to craft. The holiday washing can wait when I return! There are much more pressing things to do ;o)
Hugs
Anne (UK) xReplyCancel
Cindie DJune 16, 2013 - 6:22 am
Thank you so much! I can’t wait to try this!ReplyCancel
Dottie DavisJune 16, 2013 - 7:08 am
Wonderful tutorial! Such a simple technique but got past all of us! Awesome! Thanks so much for showing us another one of “Becca’s Bits!” We love them.ReplyCancel
AmyJune 16, 2013 - 7:15 am
Thank You Becca! That was really a great video. TFS.ReplyCancel
colleen howellJune 16, 2013 - 7:31 am
Wow, awesome video. I never thought about doing either one of those techniques but they make perfect sense. Guess that’s why I am not a designer or teacher. I will be using these for sure on my next cards.
THANKSReplyCancel
TheresaJune 16, 2013 - 8:04 am
Love the color, love the saying, absolutely love the card. It needs to be in an exquisite frame and on the wall for everyone to see.ReplyCancel
KarenJune 16, 2013 - 8:05 am
What a great video!!! It sure will cut down on layers when you send a card in the mail but you still have a layered look. I will definitely have to try this. Thanks and hugsReplyCancel
Chris RJune 16, 2013 - 8:41 am
Love love love your cards and thank you for the tutorials. One comment though – Isn’t the frame from Radiant Rectangles instead of Resplendent Rectangles?ReplyCancel
Stunning card Becca. Thank-you for super video tutorial. Nicola xReplyCancel
Sherrie ClarkJune 16, 2013 - 1:24 pm
Great idea Becca…..the Lord continues to bless your talents. Thanks for sharing.ReplyCancel
Patricia HowarthJune 16, 2013 - 1:50 pm
Hi Becca, Amazing card, as always, and a fantastic video, brilliant tips and techniques, looking forward to tomorrow too.
Lots of love from Patricia xxReplyCancel
Barbara PhillipsJune 16, 2013 - 4:28 pm
Never thought of this technique so thank you for the wonderful tutorial, your cards are so beautiful!!!ReplyCancel
Shirley L.June 16, 2013 - 8:31 pm
Thank you so much for the video tutorial. I’ve always wondered how to get that border so evenly, too. Looks like I will try it this week. Only thing I need to worry about are my inky fingers! Thanks again.ReplyCancel
Kathy RJune 16, 2013 - 8:50 pm
Thanks so much for the video! I loved the card and wondered how you did it…I finally decided you did it with a matching marker pen. This is so much easier than I had envisioned and I don’t have to buy a matching marker to duplicate it!! Thanks!ReplyCancel
Chris RJune 16, 2013 - 10:27 pm
Becca, since I don’t know the names of the dies I click on yoir links then I can recognize if I have that set of dies or not so I completely understand. :-)ReplyCancel
Denise TrottierJune 17, 2013 - 6:50 am
Thank you so much, Becca, for this video, this is such a great idea and not complicated at all…thank you especially for taking the time to show us all your techniques, it’s really appreciated!!!Hugs…
Denise TrottierReplyCancel
Francie in MontrealJune 17, 2013 - 7:45 am
What a clever technique! Thank you for taking the time to produce this very clear instructional video. I will most definitely add it to my mental tool box of techniques to pull out when appropriate. Oh yes… your card is a delight. A feast for the eyes and brings to mind Wedgewood as one of your other followers mentioned. Pure loveliness!ReplyCancel
I was going to say the same thing as Chris R as I own that set and I ran to check it thinking I don’t remember owning that die, lol lol….however I checked and it is on my wish list, ty for clarifying :) and thanks to Chris R for pointing it out! Absolutely gorgeous card Becca, I love it, I love all your papers and soft colours and inspiring sentiments, I wish I owned them all, lol :)
big inky hugs tc cant wait for your next postReplyCancel
whoops I forgot to say this is a great idea, I usually sit and try to colour the edge with out messing up, I always end up with one little mishap where it isn’t perfect, but not so bad that I would discard it, I will have to try this method, your cards always look so perfect and amazing!!! ty so much for sharing with us, I’ve never seen this method, and I like the first way as I think the second way wastes to much ink :)
I do have an issue though, some of the first dies I bought are leaving a dark edge, looks like rust to me and I always have to ink my edges. I always clean the dies with water, dry them well and let air dry before putting them away in their cases. I can’t figure out why I have this issue and haven’t ever read that anyone else has this problem. Have you? It bothers me, especially since I have so much invested in these dies….but it’s not all of them just a few but it shouldn’t be any!! :) I would call Spellbinders and ask them about it but my hubby changed out phone plan and I don’t have long distance to the States any more, I am in Canada! Maybe I could email them my ?….
well have a great day Becca, ty for all you share with your loyal followers, big inky hugsReplyCancel
Carol PJune 17, 2013 - 9:09 am
I cannot open your video. Is there any way you could send it to me via email? I know you are a very busy lady, but I would greatly appreciate it.ReplyCancel
SusanJune 17, 2013 - 3:01 pm
Thanks so much for your informative, useful video Becca. Can’t wait to try out this technique!ReplyCancel
I watched the videos in reverse order so for me this is “Thanks!” again. So nice to still be learning from the best after all this time. One day, I am actually going to make that 2-piece card you do so often. I love a BIG card!!ReplyCancel
Victoria C.June 18, 2013 - 7:41 pm
Thank You, Becca…great tip for inking around the die cut, and such a beautiful card…Those Spellbinder Radiant Rectangles are on my list to buy this month..thank you for sharing your beautiful creations..I get so inspired…I am going to try and make one like this similiar for my mother in law’s BD coming up next month! so pretty!~:)ReplyCancel
DorothyJune 21, 2013 - 9:16 am
Becca, You are one amazing Lady. Love God’s gift of creativity He has placed inside of you and with it the desire to teach and share with others. Blessings From Orillia, Ontario. CanadaReplyCancel
Marilyn GoddardJune 21, 2013 - 10:14 am
Where do you buy your Neehah white paper?ReplyCancel
Juanita BraunJune 21, 2013 - 10:34 pm
I have never seen the small cutting plates or the small rubber mat. Could you please tell me where I can get them.
JuanitaReplyCancel
Hi Becca,
I also am a great admirer of your card making and tutorials. I am wondering if you could answer a question that I have with radiant rectangles. I cannot get the largest cutout one to actually cut through the paper. I have a Big Kick machine but it cuts all the other ones that I have pretty good. Is there a secret to the way you cut or what do you suppose could be the answer? I don’t want to go to the expense of getting a different cutter at the moment. I have read other peoples posts and a lot of them are having the same problem.
I do understand the you did not manufacture these dies but you work with so many that I wondered if you might have come across something like this before and have found an answer.
Thank you and God blesReplyCancel
Hello there my crafty friends. I’m busy behind the scenes with CHA samples and some catalog samples so although I’ve been creative, I haven’t had anything to show for it. That’s okay though, because I made something from the left overs :-) Seriously, I started my last creative session by cutting everything in sight, just in case I might need it. Cut, cut, cut . . . toss, toss, toss . . . but never into the garbage. I toss all those extras into a bin and the bin lives in a cubby near my feet. I had to be on hold with my insurance company today and while I waited, I played with the leftovers. It’s rare that I can say I made a 20 minute card, and kept my patience intact. I feel so blessed with the latter of the two — all in all, I’ll have to say it was a good day :-)
To recap the layers I used from the bottom up, I started with a Decorative Labels Eight card base 4″ x 5-1/2″, foam tape, die cut layer from Floral Ovals, die cut layer from Labels Eighteen, foam tape, another die cut layer from Labels Eighteen. See what I mean? This one will go into my quick card idea file for the next time I’m empty handed and need a quick card.
Oh, Becca! What a delightful surprise! Thank you so much for using the rubber stamp to make such a beautiful card! You made excellent use of your “on hold” time. When they came back on the line, did you remember who you were talking to? ;-)ReplyCancel
Beautiful card; and I LOVE the sentiment.ReplyCancel
Sandra SmithJune 11, 2013 - 6:45 pm
I love that you keep all the extras and use them. By sharing this beautiful card, you again inspire us to use our extras to create. Thank you for the continued sharing of your creative gifts.ReplyCancel
Holly TownsendJune 11, 2013 - 7:03 pm
So pretty as always! And just how did you do that perfect pink edging on the label dies? Thanks for sharing with us :)ReplyCancel
FABULOUS BECCA!!!!!!! :) YOU ALWAYS ARE!!!!!!!!!! ;)ReplyCancel
MickieJune 11, 2013 - 7:24 pm
Beautiful! How did you make that perfect lining around the layers? I do so wish you could make a DVD to sell to us who live in the boonies and download time is sooooo slow. I get maybe 4 or 5 words and then wait 5 minutes for the next 4 or 5, lol, gets exasperating. You could sell them to all us who have sloooowww download.
I love your style and all of your work. Been a fan for a long time!ReplyCancel
Love it! Although a simple design, it sure doesn’t give that impression. The use of the SB dies and the QUALITY supplies always makes such a big difference. I’m so design lifting this one for that next time I’m stumped for a quick card. You’re blog has saved me many times when I needed a nice card. Thanks again Becca for another great idea. Here’s to loving what you do! You rockReplyCancel
Juanita BraunJune 11, 2013 - 7:54 pm
Your card is so beautiful. How and what did you use to go around the edges of the dies. It is so neat.
WOW….Love, love and love it. This has got to be my ultimate FAVE. I love how you offset the labels with the sentiment on top. Brilliant! The ribbon color is fabulous. I love May Arts ribbon. The flowers match perfectly and I love the green curls. That little bit of green is awesome! The pearl placement is perfect too! I love that spellbinders die. I wish, I wish. Clicking my heels together. Thank you so much for sharing! Love it.ReplyCancel
Beaufiful card as always Becca do you use Neena 80 on everything? I have a hard time getting the fancy dies to cut good Any suggestions Thanks Blessings LindaReplyCancel
Charlene DahlbergJune 11, 2013 - 8:07 pm
Beautiful card, Becca. I love all the die cuts. so elegant. Can you tell me how you got the pink edged around the die cuts? It adds just the perfect touch .ReplyCancel
Carol HintermeierJune 11, 2013 - 8:11 pm
Beautiful, as always! I so appreciate you sharing your takent!ReplyCancel
Wonderful”quick” card.
thanks for using the Quietfire Stamp.
So elegant!ReplyCancel
ann robbinsJune 11, 2013 - 8:52 pm
I watched your technique again and have to try this. You make it look so easy in your video. I just love you showing us your little “trade” secrets!!! LOL! Yes, very easy but absolutely elegant!! Love the quietfire verse.
Hugs,
Mstgane
AnnReplyCancel
SusanJune 11, 2013 - 9:50 pm
Wish my scraps were as good as yours! :)ReplyCancel
Rebekka KJune 11, 2013 - 10:59 pm
I wish my scraps turned out this gorgeous too! :)ReplyCancel
Sue AshtonJune 11, 2013 - 11:15 pm
Love all your creations Becca, and thanks for the tutorial. I have tried the tutorial but it it leaves a line where it’s doubled, I have the big shot what ‘sandwich’ do you recommend?
Cheers
SueReplyCancel
ChelseaJune 11, 2013 - 11:40 pm
Gorgeous!!!! So lacy and elegant! This is a card that will work for many occasions, and I thank you for sharing it so we may all put this idea into play when we run out of ideas for a quick beautiful card. Thank you, Becca!ReplyCancel
Sooo beautiful as always Becca. It´s always such a pleasure to watch your stunning creations, as you can always get something beautiful out of anything, so even the smallest leftover will turn into beauty somehow, and I just love to see that. Can´t wait to see all your grogeous CHA project sometime soon.
Have a wonderful day and time ahead, and take care.ReplyCancel
Anne BJune 12, 2013 - 1:44 am
Such a beautiful card! I would also like to ask how you got that perfect pink edging?ReplyCancel
LydiaJune 12, 2013 - 2:18 am
What beautiful card! How could you get such a perfect rim around your diecuts? Love to follow your blog!ReplyCancel
Anne (UK)June 12, 2013 - 2:36 am
Just sooooo beautiful!
Hugs
Anne (UK) xReplyCancel
Patricia HowarthJune 12, 2013 - 3:17 am
Morning Becca, Such a stunning, really easy card, but so elegant, I love it.
Lots of love from Patricia xxReplyCancel
Ok, for the perfect pink edge, my idea is that she must have traced around the “inside” of the die and cut that out and used it as a masking piece…any other ideas? By the way Becca, I get so much enjoyment from your cards. I just wait for them each day.ReplyCancel
JoJoJune 12, 2013 - 5:29 am
I heard/read that you use ink on the edge before you cut it. I tried it once. Must not have had the right ink. I really could use that technique a lot with the difference in die sizes. I’ve been cutting the same die and then cutting it in half and spreading it apart to just barely show the edge. It’s not perfect, but the best way I know.ReplyCancel
Trish AveryJune 12, 2013 - 5:29 am
Becca just love love this card, but could you please explain how you got the perfect pink around the outside. But love it.
hugs Trish.ReplyCancel
mollieJune 12, 2013 - 5:41 am
Its just so lovely. Such a easy card so easy on the eyeReplyCancel
colleen howellJune 12, 2013 - 7:55 am
very pretty, love all of the dies that you put togetherReplyCancel
Dottie DavisJune 12, 2013 - 9:23 am
We are all enthralled with this card not just because it is beautiful but all of us caught the pink edging which makes the whole card pop! We have tried cutting out the original ivory then cut one whole die with pink paper, but your ivory part, if trimmed, is so perfect. How’d ya do it???? See we’re all sitting on the edge of our seats…..ReplyCancel
AMAZING. I DO THIS SOMETIMES WHEN I CUT OUT TO SEE WHAT IT LOOKS LIKE. iT ALL PILES UP ON THE DESK . SO USE THEM UP AND SOME OF MY BEST CARDS ARE MADE THIS WAY, LOLReplyCancel
I wish I had your talent but I don’t. Thanks for sharing with us and instructions on how you make everything look the way it does. God bless.ReplyCancel
LenoriaJune 12, 2013 - 1:19 pm
This is gorgeous and just to think it was therapy! I laughed when I read it was stuff you had already cut out on hand “just in case” because it is so beautiful that only you could come up with this!! I love the saying.ReplyCancel
LesleyJune 12, 2013 - 1:58 pm
Very nice. I wonder if you ink up the cutting side of the die the die before cutting out the card you would get that perfect edge? Would need to use something sticky like pigment ink?ReplyCancel
Marcia TattersJune 12, 2013 - 7:19 pm
Becky this is a great video and a beautiful card. Can you please tell me what scoreboard you are using in this video.ReplyCancel
LorraineJune 12, 2013 - 8:44 pm
Again. . . beautiful!! Thank you for sharing! My first thought was – how in the world did she do those fabulous pink edges on the dies??ReplyCancel
ohhhhhhhhhhhhhhhhhhhhhhhhhhhhhhhhhhhh myyyyyyy gosh……LOVEEEEE!! So beautiful and simple….but looks like you spent a lot of time with it, I love now simple, elegant and gorgeous, you inspire me…you are the reason I own over 100 spellbinders sets and my wish list is at 140 new die sets and counting…..now if I just had the money…they need to put production on hold so I can catch up….lmbo!!! If I ever win the lottery…..I’d have to get a bigger craft space….LOL ty so much for sharing with us Becca, your “amaZING”ReplyCancel
Well JO JO you must have the right answer!! I tried inking the edge of the die before cutting and “YEA!” it worked. Looks great and I learned something new.ReplyCancel
Juanita BraunJune 15, 2013 - 12:30 pm
Kay and JoJo
If you ink the edge of the die before cutting how do you know how far to go in with the ink so it is where it belongs?
Oh my! What a beautiful card! I really like the layering, the delicateness, your bow of course, the sentiment and it’s white and pink – always a winner in my book.ReplyCancel
You are so clever…and this card is so gorgeous. It looks anything but easy to make!ReplyCancel
Karen HetheringtonJune 18, 2013 - 8:51 am
I love your tutorials! They are always easy to understand and informative.Thank you for sharing all of your wonderful ideas. You inspire me.
KarenReplyCancel
JanJune 19, 2013 - 6:08 pm
So lusciously beautiful, as always. You are truly an inspiration to all of us. Go bless you!ReplyCancel
Thank you for the perfect inked border video. That is a great technique.
LindaReplyCancel
amy c/pJune 26, 2013 - 5:00 am
your work inspires me so much …thank you for sharing what you do with me as I have been stamping for a bit but need all the help i can get with instruction etc ….can’t wait to see what you show us next …love your blog !ReplyCancel
Greetings blog friends! I hope you’ve had a fantastic week! I’ve been pushing things around the craft table this week and today I’m sharing a tall card with a shaped bottom out of cool purples. Purple is growing on me! I pulled the small sentiment from Get Well Labels Twenty with JustRite Papercrafts to make a thinking of you kind of card. Over Memorial Day I snagged a couple of good sales at Joann’s and picked up these huge flowers, skeptical that I’d be able to use them. I folded one of them in half and tucked it underneath my focal panel for an effect I like. It made the perfect place to seat a bow and a mulberry flower. I created the card base using Spellbinders A2 Bracket Borders Oneand added a panel using Spellbinders Resplendent Rectanglesand topped things off withSpellbinders Labels Twenty.
So to recap the layers I used from the bottom up, I started with a card base from cream paper cut to 4-5/8″ x 7″ using A2 Bracket Border on the bottom, design paper layer 4-1/2″ x 6-1/4″, Foam Tape (optional), die cut Resplendent Rectangles layer, purple matting layer 3-3/8″ x 4-5./8″, design paper 3-1/4″ x 4-1/2″, foam tape, die cut Labels Twenty. Ribbon, bow and pearls set on appropriate layers.
Oh my god, this is sooo gorgeous Becca. I just LOVE LOVE LOVE this card here. You´ve just done aa masterpiece here again hun, it´s so beautiful work.
Have a wonderful week-end and lots of fun.ReplyCancel
What a gorgeous card. I LOVE the Magic Garden Postcard image.and what a great idea to use that large flower the way you did.Have a great weekend!!!ReplyCancel
Donna KJune 8, 2013 - 11:21 am
Becca, Your designs are stunning! Its always a delight to check email and find that you’ve created another project that I must dash off to see IMMEDIATELY! You are truly an inspiration, and unbelievably talented!!!ReplyCancel
Oooooh! This is terrific! Everything about your card makes me feel good. Along with the wonderful attributes that we’ve come to expect from you, I particularly love the way you’ve incorporated the pretty paper and the half flower. Delicious!ReplyCancel
ChelseaJune 8, 2013 - 12:16 pm
Lovely, Becca. Just so lovely!!! The color is so soothing, and the flowers are gorgeous. What a pretty creation!ReplyCancel
Helen RoseJune 8, 2013 - 12:18 pm
Fabulous card, love the design and the digital paper is just beautiful! Love HelenReplyCancel
EveleneJune 8, 2013 - 12:18 pm
Oh, this is another very beautiful card that makes my day, Becca.ReplyCancel
Janet CastleJune 8, 2013 - 12:33 pm
Lovely garden card Becca….TFS your creative talents!ReplyCancel
LorettaJune 8, 2013 - 12:51 pm
Wow is this a beauty or what. How thrilled would the recipient be to receive one of your gorgeous cards. I’m simply amazed with all of your cards and congratulate you on your talents and focus. Blessings,ReplyCancel
Sandra SmithJune 8, 2013 - 12:52 pm
This is another lovely card that is so inspiring. Using a large silk flower by folding and tucking it under a layer is so pretty but is also a reminder to use those things we find on sale or have been sitting in our stash. I know I have that same flower in my stash and it has been there too long. Now I have an idea for using it. I also love that you added the A2 Bracket Border One to the bottom of your base to lengthen the card. You are sharing how to make cards of varying sizes by mixing our dies together. I think that is so awesome. I love your work, Becca, and thank you for sharing it with us.ReplyCancel
Your cards are always so inspiring – this one included! Thanks for sharing your God-given talent with the rest of us. I’ve started a notebook (old-fashioned I know!) with my favorite Becca cards, listing all the ingredients. Now just for fun, I can browse my catalog of ideas. Or I know where to turn when I need a very special card. Thanks so much!ReplyCancel
ann robbinsJune 8, 2013 - 3:20 pm
You have me caught up on this digital paper – Wow is this super or what? Love the card and how you used the big flower, only you would think of that. Impressed once more!!!!!!! God Bless and have a wonderful weekend.
Hugs,
Mstgane
AnnReplyCancel
Anne (UK)June 8, 2013 - 4:56 pm
What a beautiful ‘secret garden’ card (one of my favourite books as a child). The use of the flower is genius!
Hugs
Anne (UK) xReplyCancel
Rene from OZ xoJune 8, 2013 - 5:07 pm
Hi Becca, your card is so beautiful, I went straight over to the Etsy shop and purchased those images as well as the postcards. You are an inspiration.
Rene from OZ xoReplyCancel
SusanJune 8, 2013 - 5:16 pm
Lovely — that huge folder flower looks so terrific and works beautifully with the garden gate and flowers.ReplyCancel
Marlene IacuzziJune 8, 2013 - 6:10 pm
This card sent me right to the By Digital site. Oh my! You always inspire me to do more. Thanks.ReplyCancel
Carole HodginsJune 8, 2013 - 6:23 pm
Becca, I guess that you get sick of people saying that you inspire them but it is so true. I hunger after every new post on your blog and am eternally grateful for your generosity in sharing your talent. I like Anne from UK think your card looks like a secret garden and like her it was my favourite book as a child. Thanks for giving me the idea for the large flower. I have some huge silk flowers languishing in the dim dark recess of my craft room that I thought I could not use but now I will seek them out.
Blessings to you from South AustraliaReplyCancel
Victoria C.June 8, 2013 - 6:53 pm
Love it, of course…You inspire me Becca…and I thank you for it…victoriaReplyCancel
MickieJune 8, 2013 - 9:30 pm
As always, just beautiful. I am off to purchase the paper!!ReplyCancel
Lizzie from Titahi Bay, NZJune 8, 2013 - 11:22 pm
Beautiful. I really like the decorative extended front piece – just a bit different.ReplyCancel
ShirleyJune 9, 2013 - 12:19 am
It’s beautifully stunning. A country garden with love.ReplyCancel
Clare WJune 9, 2013 - 12:52 am
Stunning – love the use of the bracket border – will be trying that idea.ReplyCancel
loftylassJune 9, 2013 - 5:39 am
Gorgeous Becca – love the paper. I have one of those huge flowers and now I know what to do with it… thank you for the inspiration.
Hugs
Heather (UK)
xReplyCancel
Such a lovely background and love the way you folded over the flower, sweet touch!ReplyCancel
colleen howellJune 9, 2013 - 7:23 am
I love this card, and purple is my favorite color as well. So it is a win win card for me! I just love this paper you used, all of your embellishments work so well together as usual, keep them comingReplyCancel
Ann WJune 9, 2013 - 12:54 pm
Beautiful card. You do such marvelous cards.ReplyCancel
Sharon NJune 9, 2013 - 1:39 pm
Just beautiful. You’ve inspired many of my cards. Tell me, what weight/type paper do you use to print out the digi paper?
Thank you, so much, for a marvelous web site.ReplyCancel
I love the added dimension on this card provided by the design paper… it looks like you are peeking into a garden. I am becoming sold on these digital papers after seeing the beauties that you have used… I have purchased one that I saw on your site and will definitely be going for this one. I remember you saying some time ago that it is hard to find the kind of florals that you prefer and I agree. Thank goodness the digital market provides what we are looking for!! I hope they know what a great spokesperson you are for them… When you get your fingers on a product you make it irresistible to the rest of us because you make such beautiful things with whatever you put your hands to.ReplyCancel
Patricia HowarthJune 10, 2013 - 1:57 am
Morning Becca, Wow, love this. I love the die-cuts, and I adore the patterned paper, it is just so pretty, I am putting together a ‘wish list’ of all the gorgeous papers you have used. Have a lovely day.
Lots of love from Patricia xxReplyCancel
Such a lovely card. All of your creations are stunning and a great source of inspiration. Thank you so much for sharing xxReplyCancel
Kelly FlahertyJune 10, 2013 - 3:40 pm
Love this card Becca! But then again, I love all of your cards. The paper is a wonderful choice and your ability to mix and match dies to produce such elegant results is so refreshing. Thanks.ReplyCancel
wow so wonderful Card, love the colours and great details
hugs piaReplyCancel
JulieJune 10, 2013 - 10:13 pm
Hi Becca, absolutely love your cards. I have purchased some of the digital images but just wonder if you have reduced the size as the largest of the Resplendent Rectangles is actually smaller than the original image that I printed. (Hope that makes sense) Thank you for sharing your wonderful ideas to keep us inspired. Julie, New Zealand.ReplyCancel
Debbie BJune 11, 2013 - 2:35 pm
Wow what a beautiful card!!! I love all of the flowers and the work you put into it.ReplyCancel
I participate in several affiliate programs while I share and use the the things I like and am passionate about.
This means that I receive a small "tip" when products are purchased through the links I share here. I have always shared links to help you find the items used in my creations however by being an affiliate, the tip comes from the manufacturer and costs you nothing extra - the price is the same whether you use my link or not.
Please know this is a way of paying for my blog expenses without asking for donations. The tips go toward keeping Amazing Paper Grace hosted as well as pays for monthly fees and maintenance subscriptions, I give much of my instruction away for free and hope you will continue to support me by clicking and using the links whenever you can.


 Hi there sweet friends, thank you so much for your patience while I finished up some projects I needed to finish. Earlier this week I used a technique to ink the border of my dies for a card and lots of you had questions and quite of few of you requested a video. I have another card to show using the same technique and a video to go along with it. There are a couple of ways to get this look, so I hope you take a second to review my video and I hope you’ll try the technique on your own.
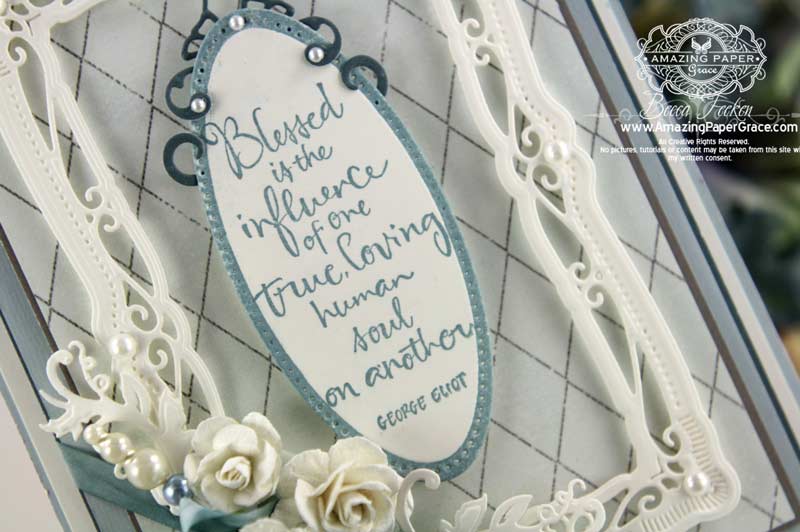


")

")


Will have to try this! You make it look so simple and it’s sooooooo beautiful!
THANK YOU BECCA!!!!!!!! PERFECT VIDEO TUTORIAL!!!!!!!!!!! :) I know what I’m going to try!!!!!!! :)
Thank you so much for explaining. Which die cut machine are you using? if you don’t mind me asking…
OH MY. . . And yet another gorgeous card and tutorial too! That is one of my all time favorite quotes, thank you Becca for Blessing my life with such beauty both in your cards, blogging and your postings that are heartfelt from you!
Thank you so much for this perfect video. A special thanks for being so prompt in doing this. I think we are all getting out our stamp pads .
Another beautiful card Becca. Thanks so much for sharing your technique for inking die cut edges. :-)
Lovely video. Thank you so very much for taking time to make this video and share with us bloggers. I am intrigued by the narrower looking mats you used. I’ve not seen this size of mat. Are they specific to the GCalibur, or is there another machine they are used for? I’m off to S/Binders to see if I can spot them. Also thanks for the always so-beautiful card. Can’t wait to see your video tomorrow. Again, thanks for sharing your amazing skills with all us. Hugs & Happy Sunday.
Great video — I have to ask where did you get those smaller plates? They look like 5×7? So much easier with the smaller set…
Thanks for making the video for how to color the edges-I’ve been wondering the simplest way to do it– my hand is not steady enough to do it afterwards. I like being able to have the choice of a colored border or shading color on the inside and leaving the edge white. I have a question for you on another matter… since you use so many spellbinders products that I love– are you aware of how to use either Tim Holtz diffusers or darice diffusers with embossing folders using the Spellbinders Grand Calibur? Thanks for creating such inspiration projects and videos.
Thank you so much Becca! I will surely try this :) Your card is beautiful and the video was great!!!
I have seen this before; but, never tried it. I am thinking that I like your way better. Gorgeous card. Thank you for sharing!
Hi Becca. I love your web site and your creativity. Where do you get wordsworth stamps?
Gorgeous card! Thanks for the tutorial for perfect boarders!
Thank you so much for demonstrating this technique! I must try it out. You are so talented and sharing!
Another gorgeous card, Becca. Thank you for taking the time to make a video showing your technique for perfectly inked edges. I really appreciate the time and effort to make your videos for us. Will be back tomorrow to see what else you’ve got up your sleeve!
R/
Awesome video. I think I prefer the second method as it is not as messy. I will have to try this. I’ve pinned this tutorial
Beautiful card, Becca. I had forgotten about this technique. Thanks for the video tutorial.
Hi Becca, You really have a great eye for layering and composition. Love the inking with the dies too.
Wow – wow – wow!!! My entire way of using dies may have just changed forever!! Thank you Becca! I haven’t seen anyone else do this technique, so I appreciated you showing both methods of achieving the colored edge. I am amazed!!! Off I go to try this out –
Thanks Becca for another awesome video. Can’t wait to get in my craft room an try it out.
Cheers
Sue
Thanks Becca for this little video. I thought you had to cut out a smaller nested shape to get this effect. Had no idea that you inked the die itself. See we are always learning something from you!!!!!! Thanks. Which leads me to the next question, what do you use to clean your die so as not to ruin it or dull it??????
Marcie
WOW!!! Another unbelieveably gorgeous card. I just love it and the tutorial is awesome! I was one who asked how you inked the edges and I am so appreciative that you actually did a video while you have been busy with other projects. As always, your instructions and videos are so easy to follow. Thank you so muc Becca!!!
I LOVE THIS TECHNIQUE. THIS IS AN EXQUSITE CARD, BECCA!! LOVE THE SOFT COLOR OF BLUE. YOUR SAYING, PAPER (COLOR IS BEAUTIFUL) AND JUST EVERYTHING ABOUT IT.
HUGS
MSTGANE96
Thanks for showing us your way of inking the die. So ingenious! And another lovely card. You are enabling me to break the bank with my having to have all those beautiful dies, LOL! Love your work my dear!
Stunning and elegant, and the true Becca-classy style… !
Finally, it’s now clear to me how you ink the edges of your dies. I’ve been trying to figure out this technique you’ve done with your other cards. Thanks kindly, Becca.
Hi Becca
What a great idea!
TFS
Hugz
Super card – very wedgewoodesque (is that a real word?) anyway, fab video and I shall have a go at inking edges of dies -never seen this technique before so lots of thanks for sharing it with us.
Thank you so much for this – I was one of those who requested it! Another question – how do you create such beautiful loopy bows? I know you use your bowmaker but before I order, I’d like to see how it works so that I can get the best results!
Stunning thanks for sharing
Your card here today is absolutely stunning work again Becca. I so love, how you made this gorgeous creation. And thanks soooo very much for sharing the video here on how you made this perfect and gorgeous inked edges to your cards. You´re so talented and I just love your gorgeous work always and the card today is definitely among my biggest favorites ever. It is sooooooooo so beautiful.
Have a wonderful sunday and great week ahead hun.
Great tutorial as always, Becca. Thanks so much for sharing. I would try it out today, but I’m sitting in glorious sunshine in an hotel garden at Disneyland, Paris and am without the means to craft. The holiday washing can wait when I return! There are much more pressing things to do ;o)
Hugs
Anne (UK) x
Thank you so much! I can’t wait to try this!
Wonderful tutorial! Such a simple technique but got past all of us! Awesome! Thanks so much for showing us another one of “Becca’s Bits!” We love them.
Thank You Becca! That was really a great video. TFS.
Wow, awesome video. I never thought about doing either one of those techniques but they make perfect sense. Guess that’s why I am not a designer or teacher. I will be using these for sure on my next cards.
THANKS
Love the color, love the saying, absolutely love the card. It needs to be in an exquisite frame and on the wall for everyone to see.
What a great video!!! It sure will cut down on layers when you send a card in the mail but you still have a layered look. I will definitely have to try this. Thanks and hugs
Love love love your cards and thank you for the tutorials. One comment though – Isn’t the frame from Radiant Rectangles instead of Resplendent Rectangles?
Oh my goodness Chris, you are absolutely right!! Lol, too many dies to remember them by name….off to change that right now. Great eye!!
Thanks so much for your video tutorial on inked edged die cuts I have wondered how you got such perfectly inks edges. Have a great week!!!
Thanks Becca… I love all your tutorials. It’s always good to learn something new to me, so my cards looks more professional. :-) Hugs
thanks for the video
Great tips Becca thanks!
Stunning card Becca. Thank-you for super video tutorial. Nicola x
Great idea Becca…..the Lord continues to bless your talents. Thanks for sharing.
Hi Becca, Amazing card, as always, and a fantastic video, brilliant tips and techniques, looking forward to tomorrow too.
Lots of love from Patricia xx
Never thought of this technique so thank you for the wonderful tutorial, your cards are so beautiful!!!
Thank you so much for the video tutorial. I’ve always wondered how to get that border so evenly, too. Looks like I will try it this week. Only thing I need to worry about are my inky fingers! Thanks again.
Thanks so much for the video! I loved the card and wondered how you did it…I finally decided you did it with a matching marker pen. This is so much easier than I had envisioned and I don’t have to buy a matching marker to duplicate it!! Thanks!
Becca, since I don’t know the names of the dies I click on yoir links then I can recognize if I have that set of dies or not so I completely understand. :-)
Thank you so much, Becca, for this video, this is such a great idea and not complicated at all…thank you especially for taking the time to show us all your techniques, it’s really appreciated!!!Hugs…
Denise Trottier
What a clever technique! Thank you for taking the time to produce this very clear instructional video. I will most definitely add it to my mental tool box of techniques to pull out when appropriate. Oh yes… your card is a delight. A feast for the eyes and brings to mind Wedgewood as one of your other followers mentioned. Pure loveliness!
I was going to say the same thing as Chris R as I own that set and I ran to check it thinking I don’t remember owning that die, lol lol….however I checked and it is on my wish list, ty for clarifying :) and thanks to Chris R for pointing it out! Absolutely gorgeous card Becca, I love it, I love all your papers and soft colours and inspiring sentiments, I wish I owned them all, lol :)
big inky hugs tc cant wait for your next post
whoops I forgot to say this is a great idea, I usually sit and try to colour the edge with out messing up, I always end up with one little mishap where it isn’t perfect, but not so bad that I would discard it, I will have to try this method, your cards always look so perfect and amazing!!! ty so much for sharing with us, I’ve never seen this method, and I like the first way as I think the second way wastes to much ink :)
I do have an issue though, some of the first dies I bought are leaving a dark edge, looks like rust to me and I always have to ink my edges. I always clean the dies with water, dry them well and let air dry before putting them away in their cases. I can’t figure out why I have this issue and haven’t ever read that anyone else has this problem. Have you? It bothers me, especially since I have so much invested in these dies….but it’s not all of them just a few but it shouldn’t be any!! :) I would call Spellbinders and ask them about it but my hubby changed out phone plan and I don’t have long distance to the States any more, I am in Canada! Maybe I could email them my ?….
well have a great day Becca, ty for all you share with your loyal followers, big inky hugs
I cannot open your video. Is there any way you could send it to me via email? I know you are a very busy lady, but I would greatly appreciate it.
Thanks so much for your informative, useful video Becca. Can’t wait to try out this technique!
You are an excellent instructor…and what a great tip! Thank you!
Becca, you are amazing. Loved the video. Bless you for sharing your talent.
I watched the videos in reverse order so for me this is “Thanks!” again. So nice to still be learning from the best after all this time. One day, I am actually going to make that 2-piece card you do so often. I love a BIG card!!
Thank You, Becca…great tip for inking around the die cut, and such a beautiful card…Those Spellbinder Radiant Rectangles are on my list to buy this month..thank you for sharing your beautiful creations..I get so inspired…I am going to try and make one like this similiar for my mother in law’s BD coming up next month! so pretty!~:)
Becca, You are one amazing Lady. Love God’s gift of creativity He has placed inside of you and with it the desire to teach and share with others. Blessings From Orillia, Ontario. Canada
Where do you buy your Neehah white paper?
I have never seen the small cutting plates or the small rubber mat. Could you please tell me where I can get them.
Juanita
that is so cool, I love that look, thanks for sharing the video!!
Fabulous tips!! Thanks for sharing!
Hi Becca,
I also am a great admirer of your card making and tutorials. I am wondering if you could answer a question that I have with radiant rectangles. I cannot get the largest cutout one to actually cut through the paper. I have a Big Kick machine but it cuts all the other ones that I have pretty good. Is there a secret to the way you cut or what do you suppose could be the answer? I don’t want to go to the expense of getting a different cutter at the moment. I have read other peoples posts and a lot of them are having the same problem.
I do understand the you did not manufacture these dies but you work with so many that I wondered if you might have come across something like this before and have found an answer.
Thank you and God bles