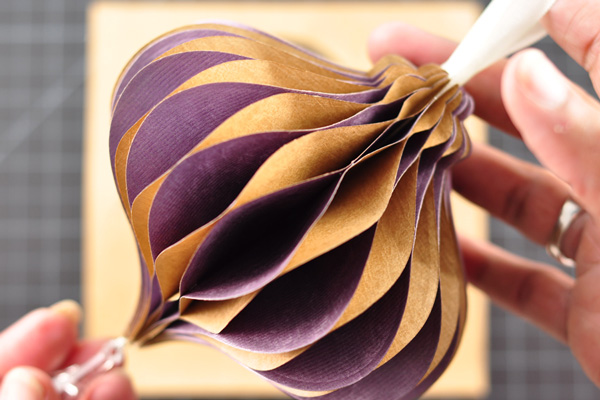
Hi there blog friends!!  Remember the Honeycomb Ornament I made last year using the Spellbinders Ornament die template?  This year Spellbinders released the 2011 Heirloom ornament and with Christmas around the corner I created a tutorial on how to make your own.  Several of you have asked for a step by step and a video and you’ve got it.  I was honored when Splitcoaststampers asked me to submit those for their site – you can see the step by step tutorial and list of products needed at this link:  http://www.splitcoaststampers.com/resources/tutorials/honeycombornament/

In the meantime, for those of you who like videos – have a look see here!

I’m quietly working in the background on projects (insert mischievous grin here).  I hope you enjoy the tutorial, there are more on the way!!

pinTHIS SHAREthis TWEETTHIS EMAILthis
  • Debbie D (Studio 3D)November 10, 2011 - 11:36 am

    Becca – this is an awesome tutorial. Very clear and understandable. I will be running off to make some of these honeycomb ornaments today! DddReplyCancel

  • Sue from OregonNovember 10, 2011 - 11:40 am

    oh my…I can’t wait to make one of these!!!ReplyCancel

  • ElaineNovember 10, 2011 - 11:53 am

    Great project! Thanks for thinking of so many creative ways to use products and tools and making tutorials!ReplyCancel

  • ErikaNovember 10, 2011 - 11:57 am

    Oh my Becca you’ve done it again, this is fantastic….I must try this, many thanks for sharing.
    Crafty hugs,
    Erika.ReplyCancel

  • PtitesmiminesNovember 10, 2011 - 11:57 am

    I’m very impressed about your work,
    Everything is absolutely wonderful !
    thanks for sharing
    CélineReplyCancel

  • TammyNovember 10, 2011 - 12:15 pm

    WOWEEEEE—Hallelujah!!!
    Becca—the Lord so shines through you on this one!!!! Thank you so very much for allowing me to glean from you!!! Huge hugs !

    be blessed………..
    Beyond Measure
    tammy
    (working diligently on blog)ReplyCancel

  • GraceNovember 10, 2011 - 12:19 pm

    This is a wonderful tutorial. Thank you! I just love this! I will be making some this year!ReplyCancel

  • Jennifer FerrellNovember 10, 2011 - 12:22 pm

    What a wonderful project! So beautifully done! thank you so much for taking the time to make the video!
    Kindest regards,
    JenniferReplyCancel

  • MarisaNovember 10, 2011 - 12:28 pm

    Simply gorgeous ornament, Becca, and a fabulous tutorial!! Thank you!!ReplyCancel

  • Bonnie WeissNovember 10, 2011 - 12:28 pm

    Wonderful project and equally wonderful tutorial, Becca. Can’t wait to see what else you will be posting! BTW … I am so loving my BPBS (Becca Peg Bow System). I just finished a mass production of cards and I used the Figure Eight bow. They turned out SOOO nice.ReplyCancel

  • Robin FishbackNovember 10, 2011 - 12:34 pm

    Beautiful ornament and fantastic, concise directions. Thanks for sharing!ReplyCancel

  • Diana BNovember 10, 2011 - 1:15 pm

    Absolutely beautiful – now to buy the die and paper.ReplyCancel

  • Joan FrickerNovember 10, 2011 - 1:15 pm

    Becca, you are just amazing. This ornament is fabulous and your video is wonderful. I love it. Thanks so much for sharing with us.ReplyCancel

  • Diana E. BishopNovember 10, 2011 - 1:23 pm

    Amazing….amazing….and how do you always come up with such fabulous projects. Thank you so much for the video, as that certainly helps (me especially) to see how you do it.ReplyCancel

  • Barb GhigliottyNovember 10, 2011 - 1:26 pm

    Oh my ~ What a GORGEOUS ornament, Becca! Thank you so much for the tutorial, and I can’t wait to see more (wink, wink)!

    Have a wonderful day,

    Barb G.ReplyCancel

  • MaryannNovember 10, 2011 - 1:29 pm

    Oh yes I´ve already seen it on Splitcoas stampers site and it was so awesome hun. You are such a genius to think these ideas out, that´s for sure, and your work are always so awesome. Thank you sooo much for sharing all these wonderful ideas with all of us here hun.
    Have a wonderful week-end ahead here soon and lots of crafting fun.ReplyCancel

  • Vicky SchmidtNovember 10, 2011 - 1:34 pm

    Becca,
    You are4 great to share your ideas with us. I just love your blog.
    Love the ornament.
    VickyReplyCancel

  • KathyNovember 10, 2011 - 1:35 pm

    Absolutely stunning…great tutorial. Love your blog. The setup is beautiful.ReplyCancel

  • Marge R. (mer)November 10, 2011 - 1:53 pm

    SOOO LOVE this, Becca — TFS!!! It’s AWSOME, sooo elegant and classy in every detail!!!ReplyCancel

  • Debbie BNovember 10, 2011 - 1:57 pm

    Yes I do love the ornament. You are an amazing artist and a wonderful person. I have really missed you. I check you blog everyday to see what you have cooked up for us.ReplyCancel

  • sherry gardnerNovember 10, 2011 - 2:20 pm

    This ornament is beautiful, I am going to get this spell die and over the Thanksgiving break, I am going to make these with my daughter…this is so fun….Thank you so much for sharing…:)ReplyCancel

  • RubyNovember 10, 2011 - 2:26 pm

    Absolutely beautiful… I’m in awe! Tku for sharing this. Definitely an amazing creation.ReplyCancel

  • Patricia BassonNovember 10, 2011 - 2:55 pm

    You have a new follower in me!!! This is so fabulous…I will be back to watch the rest of your great tutorials…Thank you so much!ReplyCancel

  • ShauneenNovember 10, 2011 - 2:58 pm

    Absolutely gorgeous! Thanks for the inspiration Becca !!ReplyCancel

  • barb fNovember 10, 2011 - 3:00 pm

    Does any one know where to get the thin test weight paper Becca used on this project??? I love the ornament but can never find paper like she uses. Thanks BarbaraReplyCancel

  • janeyNovember 10, 2011 - 3:38 pm

    thank you, Becca!!! I loved the ornament last year and I am grateful for the tutorial – this technique might be in my future.

    hugsReplyCancel

  • StephanieNovember 10, 2011 - 3:48 pm

    Love the ornament! Your “stuff” is beautiful.ReplyCancel

  • Clarissa DNovember 10, 2011 - 3:55 pm

    Love the ornament and the tutorial!ReplyCancel

  • KathyNovember 10, 2011 - 4:26 pm

    I LOVE your tutorials! This ornament is awesome!!!! I wonder what size glue dots you are using.. they appear to be so very tiny!ReplyCancel

  • Lillian ChildNovember 10, 2011 - 4:32 pm

    Really detailed tutorial – thanks so much!ReplyCancel

  • mayNovember 10, 2011 - 4:45 pm

    Beautiful !!
    I wait in earnest for the next project
    everything you make is awesome ! Thank’s for showing all these nice item’sReplyCancel

  • Crystal AnneNovember 10, 2011 - 5:20 pm

    I love it Becca! Absolutely beautiful!ReplyCancel

  • Beverly UNovember 10, 2011 - 5:45 pm

    Oh my goodness, this is so cool! And the best part is I just received this die yesterday in the mail. Guess what I’ll be doing???? lol I love your blog and all your fabulous ideas!ReplyCancel

  • Judy McMullenNovember 10, 2011 - 7:08 pm

    Becca, I saw your tutorial and SCS yesterday and fell in love with this ornament. The paper you used really caught my eye. I would love to get my hands on this purple and gold combination. My nephew is a U of WA grad and purple and gold are the school colors. I thought he would love getting an ornament using this gorgeous paper! I know you mentioned Hobby Lobby. We don’t have one in the city I live in but I thought I might be able to find it online if you could give me more info. Thanks!ReplyCancel

  • LalaNovember 10, 2011 - 7:44 pm

    Hi Becca, I love watching your tutorials. You are so precise and so calm in your instructions. You always leave me thinking “I can do it”. Thanks for always sharing your beautiful projects.ReplyCancel

  • MarinaNovember 10, 2011 - 8:44 pm

    Beautiful!!!!! OH my gosh Becca maybe I missed something that you take breaks between cards. You are a love drug for me and treasure your creativity. I can’t be without your daily cards. My husband said I was going through withdrawals. I look so forward to checking your site after work. I am sure I am not the only one. Your wonderful! My mom passed away some time ago and I feel that your cards and comments are so welcoming and a comfort zone. I just can’t tell you how much it means to me. Sorry ladiesfor my long comment but I am addicted.ReplyCancel

  • RufusNovember 10, 2011 - 11:01 pm

    Gorgeous, Becca! I saw the piece on the Spellbinders blog and was hoping (crossed fingers) that you’d do a video. Can’t wait to see what else you’ve got in the works. We’ve missed you! Thanks for sharing your creativity and for creating the video for us visual types.
    R/ReplyCancel

  • RufusNovember 10, 2011 - 11:10 pm

    Sorry meant to say over on Splitcoaststampers!
    R/ReplyCancel

  • HettieNovember 11, 2011 - 1:00 am

    WOW! You never cease to amaze me. Thanks for the wonderful project!ReplyCancel

  • SusanNovember 11, 2011 - 1:30 am

    Thanks for another inspirational tutorial Becca — I don’t know how you come up with so many unique creations!ReplyCancel

  • ChelseaNovember 11, 2011 - 1:42 am

    Another wonderful tutorial! Thank you so much, Becca, for sharing your idea with us. I hope to be able to try this technique soon!ReplyCancel

  • mayNovember 11, 2011 - 4:17 am

    Awesome !
    You are so talented
    cant wait till the next projectReplyCancel

  • Nancy WNovember 11, 2011 - 4:18 am

    What a gorgeous ornament! I will be making one in red and gold, in conjunction with wearing a red poppy for our Remembrance Day and I will hang in on our Christmas tree to keep those close memories. Thanks for the inspiration, Becca.ReplyCancel

  • HeatherNovember 11, 2011 - 4:35 am

    Hi Becca – gorgeous gorgeous project and a great tutorial thank you – you were missed…..
    Hugs
    Heather
    xReplyCancel

  • Barbara AKA GardenladyNovember 11, 2011 - 5:33 am

    How fabulous! Thanks Becca for another great tutorial. You really rock!
    Hugs,
    BarbaraReplyCancel

  • FrancineNovember 11, 2011 - 6:57 am

    It look so easy but i know it is because it is very well done. Merci !ReplyCancel

  • Marilyn ClarkNovember 11, 2011 - 7:26 am

    You are one amazing woman. WOW what a talent! You have me believeing I can do this (if I can find the die) Thanks for sharing with us. God bless.ReplyCancel

  • lois skiathitisNovember 11, 2011 - 7:37 am

    Gorgeous Ornament. Thanks for the very clear video with the easy to follow steps. As always Becca, TFS!!! :-DReplyCancel

  • Wanda HNovember 11, 2011 - 8:23 am

    Love this, Becca!!!ReplyCancel

  • CarolNovember 11, 2011 - 9:36 am

    Love your tutorials – thanks!ReplyCancel

  • Cheryl LNovember 11, 2011 - 10:23 am

    Becca I cannot tell you how excited I was to see that you had this tutorial!!! Been thinking about doing this for a few weeks and your step by step instructions in the video are wonderful. Thank you!ReplyCancel

  • EileenNovember 11, 2011 - 1:02 pm

    thank you Becca for all your wonderful tutorials and for all the time you put into them to help make us better crafters.
    LOL EileenReplyCancel

  • CandyNovember 11, 2011 - 2:42 pm

    Thank you! Your talent knows no bounds.ReplyCancel

  • SondraNovember 11, 2011 - 3:26 pm

    Hi Becca

    Amazed that after years of browsing the internet I have only today discovered you through Splitcoaststampers. Your site is amazing and your creativity is inspiring. I too, as another commenter mentioned loved the paper you used. We fortunately do have a Hobby lobby here but I wasn’t able to find anything double sided that I thought was thin enough. Is there anything else you can me? Did it come in a pack? Was it with the scrapbook paper etc…. Anything information is appreciated.

    Signed up for your emailings and am looking forward to what is to come

    SondraReplyCancel

  • BeverlyNovember 11, 2011 - 5:22 pm

    This is so amazing! I was very inspired by your amazing creativity that I made an ornament using the Cricut Art Philosophy Cartridge and posted it on my blog: ScrappinThread.blogspot.com. I linked to your amazing tutorial so that others cans see how you created the beautiful ornament above. Thank you for sharing your gift of creativity with others. BeverlyReplyCancel

  • WinkNovember 11, 2011 - 9:44 pm

    You are something else! The ornament is Absolutely Gorgeous! I wish I was only half as creative as you! I look forward to your emails everyday. Thank you so much for all your inspiration.ReplyCancel

  • Sandy KempfNovember 12, 2011 - 11:35 am

    What a BEAUTFUL paper craft! I am going to make one with my 10 year old daughter. I’m sure she will treasure it. Thank You for sharing!ReplyCancel

  • AnneNovember 12, 2011 - 1:11 pm

    I love your tutorials! Thank you so much for sharing your amazing creative talent with us.
    Hugs
    Anne (UK) xReplyCancel

  • Suzi YerkesNovember 12, 2011 - 9:30 pm

    What talent you have! You make amazing cards and projects and am kind enough to share directions with all of us. Thank you is hardly enough. Thank you and God Bless.ReplyCancel

  • GG Judy JacksonNovember 14, 2011 - 4:16 am

    Loved it. Don’t have this die yet so I checked out another of your ornament videos. I also don’t have the Fluer De Lis Motif but found the Flur De Lis square (S4-318) works just as well using the 3 embossed markings on the center of each side. I used the largest die (#4) in white and #2 for the center in silver patterened wrapping paper. I cased your video to make a topper for the square metal tin, then threaded a large ribbon with glittered snowflakes thru the lid and bottom so the tin could be hung on a tree until Christmas morning. One of my more eyecatching gift card holders! My SU demonstrator takes pic and uploads for me at times so If you want to see it, let me know. (GG stands for great grandma; as apposed to the talented Judy Jackson of the TJ magazine). Thank you for all your creative ideas.ReplyCancel

  • Mia McDonaldNovember 14, 2011 - 11:55 pm

    Becca, your work is so awesome!! Everytime I enter your site I have to be ready to work bc I’m always so inspired by what you have done. I’m doing an ornament swap with some of my closest girlfriends and when I saw the Honeycomb ornament. I felt like it was a must have. I’m doing mine with tissue paper so a needed to add a few extra steps but I would love to share my results with you.ReplyCancel

  • MargieNovember 19, 2011 - 9:09 pm

    love it..you are so clever..thanks for sharingReplyCancel

  • Cindie DNovember 21, 2011 - 5:13 pm

    WOW! So beautiful! I love watching your tutorials.ReplyCancel

  • SaBrinaNovember 23, 2011 - 1:28 pm

    Very Pretty!ReplyCancel


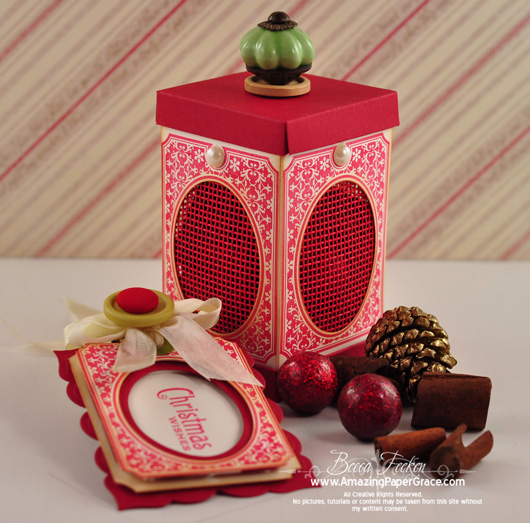
Hi there blog friends!  How about all the ideas you are getting from the Waltzingmouse Design Team for fabulously cute and quick gifties for the upcoming holiday season?  I’m astounded by what’s running out of the creative faucet – ideas I haven’t seen before.  Well, today is the last day of the Waltzingmouse Stamp of Approval Parade and another trinket.  Don’t you just love the smell of the holidays in the air?  When I’m in the craft store and run past one of those cinnamon brooms — Mmmmmm!  Let me linger on the candle aisle — yummy!  The other day I ran past some scrumptious potpourri that somehow made it into my bag.  I decided to make a potpourri holder that would be small enough to give as a gift and open enough to let the sweet fragrance out.  This is a little bit on the small size but holds a lot of potpourri – it’s 2.5″ wide by 2.5″ deep by 4-1/4″ tall (not counting the knob).
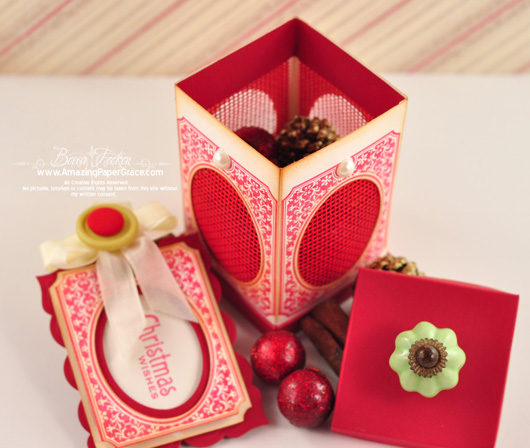

Did you peek inside to see how I made it.  Not very hard.  I stamped four of the tags, side by side with just a skosh of space in between them and allowed 1/2″ on the top and bottom of my stamping.  Then I went back and scored in between each of the four motifs to make the sides of the boxes.  Once scored I went back and cut the ovals with Spellbinders Classic Ovals LG.   On the back side I cut four pieces of red screen which I glued down with ScorTape along the top and the bottom.  (By the way, I was so intrigued with these colored screens that I picked up several colors from my quilt store – the simple option is to pick up plastic canvas, it will work just fine).  Just to make the inside pretty (can’t you tell I’m a seamstress?) I glued down an strip of contrast paper at the top and bottom of the inside just to cover up all my ScorTape and the raw edges of the screen.

Glue then goes along the entire bottom and along one side, which is then joined to make the box.  Then I constructed a top and a bottom from my favorite box method.  With a 4-5/8″ square, I scored at 1/2″, 1″, 3-5/8″ and 4-1/8″  then turned 90 degrees and scored at the same increments again.   This makes a  strong doubled walled bottom and lid.   Here’s what the top and bottom look like before after you score and before you adhere.


My box seemed so lonely that I made a tag to along with.  I simply used the same tag stamp and cut it out with Spellbinders Classic Ovals LG then cut the outside of the tag with Spellbinders Small Labels and backed the tag with Spellbinders Labels Twenty Three.

SUPPLIES I USED
Stamps: Waltzingmouse StampsVery Vintage Christmas Stamp Set
Paper:  Neenah Classic Crest Cream 80lb Cover, Bazzill – Ruby Slippers
Ink: Colorbox Chalk Ink – Dark Red
AccessoriesSpellbinders Labels SM, Spellbinders Classic Oval LG, Spellbinders Labels Twenty Three, Seam Binding, Red Screen, Buttons, Recollections Pearls, Knob

We hope that you have enjoyed, and have been inspired, the past few days from our Stamp of Approval Parade; highlighting Claire’s lovely Christmas and holiday sets. Now it’s time for you to get your craftiness on as we invite you to participate in a CASE (Copy and Share Everything) competition.  Here’s your crafty call to action!

1.  Find a card or project from any of the projects posted over the past few days by the WMS Design Team
2.  CASE that project using Waltzingmouse Stamp images, and link it using the Inlinkz on Claire’s blog at http://waltzingmouse.blogspot.com/.
3.  At the end of the competition, one project will be randomly selected to be highlighted with a Parade of its own on several of the Design Team blogs.

We hope you will enjoy this competition and that it will inspire you be creative. You have one week to complete and link your project as the competition will close at 8:00 AM Claire’s time on August 10th, which is 3 AM Eastern, 2 AM Central and Midnight, Pacific time. The winner will be announced on Claire’s blog on November 11th.

It’s never too early for a little Christmas Inspiration! Be sure to peek in to see what the rest of the designers are up to!!

Fabulous Design Team Creations
1. Anya Schrier 8. Laurie Schmidlin
2. Becca Feeken 9. Lynn Mercurio
3. Clare Buswell 10.Mona Pendleton
4. Julia Aston 11.Sandie Dunne
5. Jennifer Holmes 12. Tosha Leyendekker
6. Kate Whelan 13. Claire Brennan (Owner)
7. Kelly Schirmer

By the way, thanks so much for following me over to the Spellbinders Blog yesterday.  You only have until Midnight tonight (Friday) to leave a comment on my tutorial so that you are in the running for a free die template as described in the post over there.  Click over and try your luck – here’s the link – Get the Knowledge! with Guest Designer Becca Feeken – Edgeabilities E8-003 Classic Triple Scallop.  So thankful for you wonderful readers, thanks so much for stopping by!

pinTHIS SHAREthis TWEETTHIS EMAILthis
  • Iris FrankNovember 4, 2011 - 2:30 am

    Hi Becca! Always so beautiful! All those little details make them so special! God bless you! Iris FrankReplyCancel

  • OliwiaenNovember 4, 2011 - 2:51 am

    Wow, Becca, this is so inspiring! I’m in awe of your perfection in everything you create. Your skill in combining dies with stamps is incredible!ReplyCancel

  • MaryannNovember 4, 2011 - 2:56 am

    Oh Becca and again you´ve made such a wonderful little giftproject, and it´s so gorgeous. I love this and it looks so gorgeous. I´m sure anyone would love to get such an awesome little gift here. It´s really amazing hun.
    Have a wonderful week-end ahead and take care.ReplyCancel

  • SusanNovember 4, 2011 - 3:37 am

    Wow Becca — I don’t know you how continually come up with such amazing projects! This pot pourri box and tag are exceptional. And you make it all seem so easy. You are an inspiration!ReplyCancel

  • SandieNovember 4, 2011 - 3:40 am

    Oh wow! This is brilliant. I’m more of a vanilla gal myself.. but the smell of cinnamon does makes me hungry for churros , lol. Love the rich colour.ReplyCancel

  • EllenaElizabethNovember 4, 2011 - 3:47 am

    Once again totally inspirational and innovative work Becca!!!!ReplyCancel

  • SusanNovember 4, 2011 - 3:59 am

    Just noticed that you said that projects had to be linked up by August 10th — you may want to correct that to November 10th!
    Thanks for clearing up what CASE means — I’ve been wondering for such a long, long time!ReplyCancel

  • Clare BuswellNovember 4, 2011 - 5:13 am

    OH fabulous! I love potpourri, very inspiring!!ReplyCancel

  • FrancineNovember 4, 2011 - 5:40 am

    I like this new presentation for potpourri. It is a clean look. To bad we cannot find those stamps in America. Have a good week end! Francine.ReplyCancel

  • Ellen - CardMonkeyNovember 4, 2011 - 5:41 am

    Where EVER do you come up with such wonderful ideas??! You are a creative genius. You inspire me! Thank you for sharing this box and your projects for WMS. I’ve gotten several as a result of your work on their design team — you’re SUCH an enabler, though I can never come close to the charming work you do!

    Fondly,
    Ellen ? CardMonkey
    ReplyCancel

  • JudyNovember 4, 2011 - 6:33 am

    Oh Becca, I absolutely LOVE your potpourri holder, it is adorable, and something that I will definitely make. I’m having some crafting friends over the Saturday after Thanksgiving and this will be a great project for all of us. Thanks for all the inspiration and all the wonderful projects that you share.ReplyCancel

  • Beth GrecoNovember 4, 2011 - 6:37 am

    Brilliant!! What a beautiful idea. Tulle or lace could also work for the openings and give a slightly softer appearance. Love the know on top! You’re so creative ~ another idea for Christmas gift giving!ReplyCancel

  • Kelly SchirmerNovember 4, 2011 - 6:50 am

    Oh so COOOOL! I love that pretty red screen! What a gorgeous idea and it will smell just as delicious as it looks. The layered tag is amazing, too!ReplyCancel

  • Sheila RogersNovember 4, 2011 - 6:51 am

    I love the red screen. Where can I purchase this?ReplyCancel

  • Julia AstonNovember 4, 2011 - 7:15 am

    what a great idea for your little box Becca! love the red and the knob on top – that netting is perfect for the sides! thanks for sharing how it was done!ReplyCancel

  • Charlotte ZweigoronNovember 4, 2011 - 8:21 am

    BEAUTIFUL, Becca!! When I first saw this, I thought it was needlepoint canvas died with Distress Ink. If I can’t find these canvas squares (Joann’s is the closest thing to a quilting store we have), I may try the needlepoint canvas. It keeps me busy finding the little things you use that do not come from the crafting section of my local Joann’s, Michael’s and Hobby Lobby! Such delicious inspiration and innovation… “Thank you” seems inadequate but it is the best I can come up with. Thank you, thank you, thank you!ReplyCancel

  • KathyNovember 4, 2011 - 8:48 am

    Becca it’s a fabulous box!ReplyCancel

  • Omega BrooksNovember 4, 2011 - 8:51 am

    Wow Becca, this is beautiful and what a wonderful little take along gift for the holidays. Thanks so much for this inspiration!ReplyCancel

  • EileenNovember 4, 2011 - 9:00 am

    What a lovely project.!…now why didn’t I think of doing something like that? <3
    …..because I am not nearly as clever as you are LOL This is one I will definately being doing for friends at Christmastime.
    Thank you once again Becca.
    LOL EileenReplyCancel

  • Sheila-UKNovember 4, 2011 - 9:30 am

    WOWEEE yet an another stunning creation and yet more wonderful inspiration from you Becca.

    Love Sheila xxReplyCancel

  • Becky GreenNovember 4, 2011 - 9:40 am

    SPLENDID IDEA Becca!!!!!!!!!!! You could even do a LITTLE stitching on the canvas, still leaving the majority open for the scent to pass through!!!!!!!! :)ReplyCancel

  • Sandy MNovember 4, 2011 - 9:44 am

    Becca, fabulous potpourii box. While I was reading your directions I couldn’t help but think how this would look with one of those little fireless candles inside rather than the potpourii. I know they are small but 3 on a windowsill would be pretty or maybe 5 or 7 on the mantle. One of the bunch could hold the potpourri so there would be a great scent and lighted boxes too.ReplyCancel

  • Mona L PendletonNovember 4, 2011 - 9:45 am

    Gorgeous 3D project Becca! Love how you used the beautiful WM label to create your box!ReplyCancel

  • RebekkaNovember 4, 2011 - 10:05 am

    This is just stunning Becca, I love the red screen.ReplyCancel

  • MeredithNovember 4, 2011 - 10:09 am

    Becca, this is amazing. Your attention to detail is just incredible! What a beautiful project.ReplyCancel

  • Marge R. (mer)November 4, 2011 - 10:14 am

    Oh My GOODNESS — I sooo want to be your close, personal friend — not only to receive one of your fabulous creations like this one, but also to maybe be lucky enough to sneak into your crafty room and watch your magical hands creating something AMAZING as you always do! LOVE this and what a fabulous gift to have for this holiday season — after Christmas you could simply put the potpourri back in a plastic bag and re-use again next season — sooo very clever, Becca!!! I can just imagine your recipient thinking sweet thoughts of you every time they pass by this fabulous aromatic box!!!ReplyCancel

  • Francie (Montreal)November 4, 2011 - 10:21 am

    Love it, love it, love it! You are so clever, Becca. Your attention to detail is second to none and I love your choice of colours, ribbon treatment of course and everything else. Did I mention I love it?ReplyCancel

  • FernandaNovember 4, 2011 - 10:32 am

    OMG! How I would love if you made a video out of this one! I’m more of a visual type learner so I kind of got lost in your instructions-even though they do seem simple enough! lol! But yes a video would be nice! Thank youReplyCancel

  • Laura with Layers of ColorNovember 4, 2011 - 11:33 am

    Amazing project, Becca! So clever and unique! Fabulous idea and workmanship, as always!

    Praying for you daily!ReplyCancel

  • Lynn MercurioNovember 4, 2011 - 11:48 am

    Becca – this is so beautiful and such a wonderful way to package up ANY holiday item. It’s a gift in itself. You really are AMAZING. I prayed for you today asking for the peace that only God can provide. Hugs to you, my friend.ReplyCancel

  • Barbara JayNovember 4, 2011 - 1:08 pm

    I clicked on your site and shouted WOW when I saw this. The projects you come up with are amazing!! A beautiful way to display Holiday PotpourriReplyCancel

  • DeirdreNovember 4, 2011 - 2:46 pm

    Stunning creation – wow… love it.ReplyCancel

  • Renee LNovember 4, 2011 - 4:01 pm

    What a fabulous idea!!
    Love this box…
    and I bet it smells incredible!! :)ReplyCancel

  • Cheryl StaufferNovember 4, 2011 - 4:18 pm

    Absolutely creative potpourri box. It is gorgeous. Thank you for sharing the directions!!ReplyCancel

  • SuziNovember 4, 2011 - 4:36 pm

    MMMmmm! I can almost smell ’em! Beautiful project, Becca! TFS!ReplyCancel

  • MNovember 4, 2011 - 6:27 pm

    How gorgeous!! Your cards/projects are so inspirational. I especially love that you incorporate Spellbinders dies!! I go weak @ the knees for those dies!ReplyCancel

  • Juanita BraunNovember 4, 2011 - 7:08 pm

    Your projects are always outstanding. Your box is beautiful.ReplyCancel

  • Juanita BraunNovember 4, 2011 - 7:08 pm

    All your projects are outstanding. Love the box.ReplyCancel

  • Karen SteinNovember 4, 2011 - 9:47 pm

    Wow, what a great idea. Beautiful stamping too!ReplyCancel

  • Kathy FrieszNovember 5, 2011 - 2:16 am

    How clever, and what a fabulous gift to receive … you inspire me !ReplyCancel

  • AnyaNovember 5, 2011 - 12:54 pm

    What a fantastically wonderful idea, Becca! I seriously love the way you think! I love the smell of those cinnamon pine cones, and something like this that not only smells wonderful but looks beautiful would be perfect around the holidays. I apologize for not stopping in here sooner.. for some reason I can’t view your blog while I’m at work (shhh!), so I needed to wait to check from home. :)ReplyCancel

  • Deborah FringsNovember 5, 2011 - 7:04 pm

    Another fabulous festive idea! I really like this – it would make a lovely gift and the smell would be fabulous!ReplyCancel

  • SuzanaNovember 7, 2011 - 12:32 pm

    Such a wonderful set!
    SuzanaReplyCancel

  • Theresa DendingerNovember 11, 2011 - 5:39 pm

    What a wonderful project! Love it! Thanks for sharing this!ReplyCancel

  • Kay LusnakNovember 14, 2011 - 6:38 pm

    I just love the card – the stamp is beautiful! I’m going to try to do something similiar for my sister-in-law’s birthday. Thanks for my “beauty” of the day!
    KayReplyCancel


Hi there blog friends, welcome to Waltzingmouse Stamp of Approval Parade (SOAP) – Day 3.  Waltzingmouse Stamps releases stamps every other month to give you a chance to play with them before the next release.  On the off month, we show you how the stamps can be utilized for projects as well as cards.  This month we’re doing a Christmas Themed parade that includes some of  the existing Waltzingmouse Stamps as well as the ones put out in November.  Today my project is a simple one, I’ll call it frugal because I’m repurposing something from my craft room.  This is a Holiday Tic-Tac-Toe set that packs nicely for the car.  Give it to the kids and it will keep them occupied for a while with this endeavor that some of us old timers would call “vintage”.  I guess I’m telling my age if I tell you that me and my siblings played for hours at Tic-Tac-Toe, Hang Man, Connect the Dots and that triangle paper football.   Yep, that’s what kids did before Nintendo, lol! 


For this project I took a plastic container and adhered my seasonal background to the top.  For the playing pieces I cut circles with Spellbinders Classic Circles and dropped them into the containers.  Although I could have gone farther, I want to be able to change this for various seasons and holidays so I kept glue to a minimum.  Had I wanted permanence, I would have filled the playing pieces with sand or such and glued them closed.  Instead I filled the pieces with quilt batting that I cut into circles.   As it is, this makes for a very quick project – able to be done within an hour.  Since it came from my craft room, I don’t have the packaging, but the organizer is under $5.00 full priced and of course $2.50 with a  50% off coupon at Michaels.

There were nine clear little containers in the organizer so I picked two motifs and put one of each side of each of the little containers.

SUPPLIES I USED
Stamps:  Waltzingmouse Stamps Seasonal Remedies, Nordic Winter,
Paper:  The Paper Company, Bazzill – Ruby Slippers, Neenah Classic Crest Cream 80 lb Cover
Ink: Colorbox Chalk Ink – Dark Read, Chestnut Roan,  Ranger Distress Ink – Vintage Photo, Brushed Corduroy,
Accessories
: Bead Storage Container – Michaels, Spellbinders Standard Circles SM, Clear Embossing Powder, ScorTape,

It’s never too early for a little Christmas Inspiration!  Be sure to peek in to see what the rest of the designers are up to!!

Fabulous Design Team Creations
1. Anya Schrier 8. Lynn Mercurio
2. Becca Feeken 9. Mona Pendleton
3. Clare Buswell 10.Niki Estes
4. Julia Aston 11.Sandie Dunne
5. Jennifer Holmes 12. Tosha Leyendekker
6. Kate Whelan 13. Claire Brennan (Owner)
7. Kelly Schirmer

Hugs all!  In the morning, I have another project Waltzingmouse project that will go live at 7:00am eastern time using Spellbinders Edgeabilities – hope you’ll come back for my second post of the day.

pinTHIS SHAREthis TWEETTHIS EMAILthis
  • MaryannNovember 3, 2011 - 2:44 am

    What a cool idea Becca. I made a set a couple of years ago too, but I made the pieces of wood and just stamped images on them and made the plate of wood too, that I painted the squares on, and then gave it all a bunch of clear lacquer at last, and it still works just fine, when we pull it out every christmas, but this one can be used all year long, and is soo easy to breing anywhere, you´ll need a little something to kill a little time for the kids. And it looks stunning, as your work always do.ReplyCancel

  • Barbara JayNovember 3, 2011 - 3:36 am

    Oh how clever!! Love it!!
    And you are up far too late or too early!! You need your beauty rest LOLReplyCancel

  • Sheila-UKNovember 3, 2011 - 4:05 am

    What a wonderful creation Becca……it’s fabulous and love the colours.

    Love Sheila xxReplyCancel

  • Ellen - CardMonkeyNovember 3, 2011 - 4:29 am

    Oh, how fun, Becca!! And yes, I too am old enough to remember the non-Nintendo days … and riding in the backseat of a car for HOURS with my siblings [once all the way from NY to Miami] without a DVD player OR even a car radio! GASP, we had to play CandyLand on a regular ol’ board and hope Dad driving didn’t stop suddenly, as then our gingerbread men-markers suddenly played Chutes’N Ladders instead, landing at the bottom (or top!) of the board. Fun for us was when the back of the station wagon’s seats were folded down and Dad put a mattress back there. Somehow, we all survived (even a head-on collision) without being seat-buckled OR in car seats.

    Thank you for sharing your inspiration with us!

    Fondly,
    Ellen ? CardMonkey
    ReplyCancel

  • Beth GrecoNovember 3, 2011 - 4:41 am

    Love this idea!! I think I’ll have to try this. Thanks for fabulous inspiration.ReplyCancel

  • Francie (Montreal)November 3, 2011 - 6:38 am

    Brilliant! This is a great gift – fun, looks terrific and it’s practical, all at the same time.

    I’m pleased to have enjoyed the computer era, but also have fond memories of playing games like X’s and O’s back in much simpler times. My friends and I whiled away the hours playing board games & kids card games; and the perennial favourites of Tag, Hide & Seek, and Stando. They cost almost nothing and kept us occupied for hours. I feel fortunate to have enjoyed both eras.ReplyCancel

  • ynnNovember 3, 2011 - 6:48 am

    What a cute idea. I played those simple games as a kid as well. thank you for sharing.ReplyCancel

  • Becky GreenNovember 3, 2011 - 7:13 am

    CUTE!!!!!!!!!!!! Yep, there were NO Ninetendos’ in my day either Becca!!!!!!! :) I don’t know about you, but those Ninetendo’s DRIVE ME CRAZY in the car! Kids have ear pieces, but they don’t like to use them! I HATE that silly music they have !!!!!!!!! BLAH!!!!! :)ReplyCancel

  • Marilyn ClarkNovember 3, 2011 - 7:21 am

    So creative. Memories…no seat belts, video games, cell phones, etc and we survived.
    I feel a trip to Michaels is in order. TFS. God bless.ReplyCancel

  • Sandy MNovember 3, 2011 - 7:34 am

    Awesome project. And so easy which is what I look for at this busy time of the year.ReplyCancel

  • DonnaNovember 3, 2011 - 8:18 am

    This is gorgeous, absoluely wonderful set Becca, love it.
    DonnaReplyCancel

  • Julia AstonNovember 3, 2011 - 8:22 am

    What a fun container and I just love how you created a game out of it Becca! This would be great to take on a car trip to keep the kiddies entertained – your stampings are lovely on this!ReplyCancel

  • JeanetteNovember 3, 2011 - 9:29 am

    I enjoy getting up and finding a new post from you in the mornings, love it! with all the new creative things you come up with is amazing. Thank you so much for sharing, your projects are beautiful. I went to order from the Waltzing Mouse Stamps website and my card was rejected. So I talked to the bank and they said they have a block on the UK/GB b/c there is a lot of fraudulent activity going on there. She said when the holiday shopping starts is when this starts. Is there any place in the United States where I can buy these stamps? I can’t wait to get started!!!ReplyCancel

  • Marianne CNovember 3, 2011 - 10:45 am

    I love your project!ReplyCancel

  • Marianne CNovember 3, 2011 - 10:46 am

    I love your project! So simple but functional. You are so creative!ReplyCancel

  • KathyNovember 3, 2011 - 11:09 am

    So cute!!!ReplyCancel

  • DarleneNovember 3, 2011 - 11:21 am

    This is pure genius!!!! I made a tic-tac-toe game with magnets, but I like this so much better!!!!ReplyCancel

  • Cyndee ScholetNovember 3, 2011 - 11:27 am

    Wow! I like how you think outside the box and come up with these totally innovative projects out of normal household items. Thanks for the eye candy.ReplyCancel

  • Kelly SchirmerNovember 3, 2011 - 11:49 am

    Okay, call me crazy but, I would not let my kids touch this…it’s TOO PRETTY, heeee! I would be all like, “Don’t get it sticky!”, or from the front seat of the car, “You didn’t lose any of the pieces did you?” hahaha What an adorable use of the Nordic Winter set! Amazing creativity, and a gift full of pure charm!ReplyCancel

  • Robin GasserNovember 3, 2011 - 11:56 am

    VERY good idea. –not just creatively artistic, but we need to teach our children to entertain themselves!! Our children are grown but occasionally we play these old games that still allow for interaction and conversation!
    RobinReplyCancel

  • Laura with Layers of ColorNovember 3, 2011 - 11:57 am

    What a clever and lovely idea!ReplyCancel

  • DooDuhhNovember 3, 2011 - 12:44 pm

    Good Morning, Sweet Becca! You are ONE TOTALLY AMAZING TALENTED Lady!!! The Good Lord blessed you abundantly!!! You never cease to amaze me!!! And one can tell the amount of love put into every single step of your projects!!! Thank You!!! Loves & HugsReplyCancel

  • AjgaciaNovember 3, 2011 - 12:47 pm

    just amazing ;->>> I love all yours projects!ReplyCancel

  • CarolaNovember 3, 2011 - 1:16 pm

    What a wonderful project! This Tic-Tac-Toe set is so pretty, I think it’s nearly too pretty to be used for playing with it. But I’m sure your kids like it and are proud to have such a unique set.

    Kind regards
    CarolaReplyCancel

  • Renee LNovember 3, 2011 - 5:30 pm

    What an incredible idea!!
    So creative…
    I LOVEY!!
    Love the packaging…
    such a great little gift/project for the kids while taking those long Holiday drives!!
    Incredible!ReplyCancel

  • Marcia WalthersNovember 3, 2011 - 6:20 pm

    Love the way you used the container to make the game. Very clever, quite outstanding.ReplyCancel

  • Debbie BNovember 3, 2011 - 6:26 pm

    Wow! How do you come up with these ideas? You are truly amazing!ReplyCancel

  • heidiNovember 3, 2011 - 6:54 pm

    Oh my goodness love this little project, love those labels.ReplyCancel

  • SharronNovember 3, 2011 - 9:04 pm

    I am so loving this WM set and you have created such a fun way to use it! Your creations are always so beautifully done! Thanks for the inspiration for a really quick & easy gift idea!ReplyCancel

  • Heidi KimmerlyNovember 3, 2011 - 10:12 pm

    What a cute gift idea! Your work is fabulous as always!ReplyCancel

  • Pat KinserNovember 3, 2011 - 11:06 pm

    Great, as usual. I adore this. It is so unique and love the color combo also. I am going to get these stamps. I am becoming a fan. Beautiful work Becca.ReplyCancel

  • SusanNovember 4, 2011 - 12:21 am

    I just love this Becca. I’m going to check for these organizers the next time I’m shopping in the U.S.!ReplyCancel

  • Ginny IngramNovember 4, 2011 - 12:47 am

    Another great idea, Becca!ReplyCancel

  • SueNovember 4, 2011 - 3:40 am

    Genius…..love it!ReplyCancel

  • AnyaNovember 5, 2011 - 1:12 pm

    Love it! Another creative idea and perfect execution! This would be great for my young nieces and nephews! Thanks for the inspiration, Becca!ReplyCancel

  • Deborah FringsNovember 5, 2011 - 7:02 pm

    Great idea to keep the children occupied and I love the way you’ve used Nordic Winter to decorate the box and counters! Fab!ReplyCancel

  • NancyDNovember 7, 2011 - 4:25 pm

    Really great project idea and so nicely executed too. NancyDReplyCancel

I N F O