WRBF-3732-2012
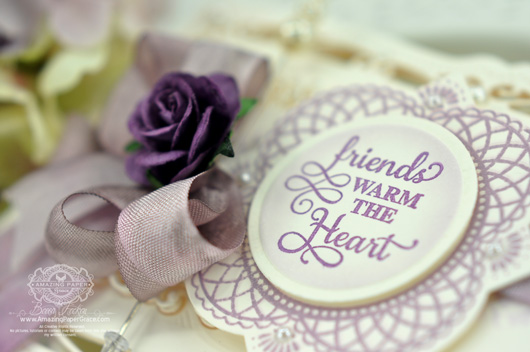
Hi there blog friends, I have another shaped card for you!! Purple is the order of the day :-)  I love taking all the new filigree dies and layering them for a lacey look.  I started out with Spellbinders™ Radiant Rectangles and cut so that I would have a hinge.  For my back side I cut the same combination but left out the middle piece so that I would have a solid back.   I did cut out an extra middle piece so that I would have something to layer with – I popped it up on two pieces of foam tape and stamped on it with Garden Gate Background Stamp.  On top of that I layered a JustRite Papercrafts custom die – Vintage Labels Three that is stamped with a matching stamp from For All You Do Vintage Labels Three.   I finished off by one more small little layer made with Spellbinders™ Standard Circles Small.  I filled it with a sweet sentiment from Circle of Love.

WRBF-3733-2012

Also, be sure to visit me tomorrow, March 1st, at noon (EST).   I have a die template to show that you probably have not seen before ;-).  It was not shown during the recent sneak peeks, so tomorrow I’m going to give you some ideas on how to use it; it’s truly a treasure.  It’s being shown as a part of the Explore Beyond Sneak Peek and Giveaway.  Yep, as a part of the Sneak Peek there is a giveaway for die templates, so you want to be sure to read the entire Sneak Peek post for the link to enter.  In addition as a bonus, (not part of the Blog Frenzy) leave a comment on my blog March 1st post after 12 o’clock noon or my March 2nd post after 12 o’clock noon (EST) and I’ll pick a name to receive the Filigree Topped Box with Cards I showed recently as well as some extra stamp set goodies I have stashed away.  I’ll pick a name on March 3rd.

Many of you had questions about how to make the filigree shaped card that I described as having a hinge, from the card I showed on this post https://www.amazingpapergrace.com/you-amaze-me/.  Today I have a quick tutorial on how to!   Even though I leave the insides of my cards blank, I try to finish off the insides so there is no tape showing or no raw ribbon edges – this video will walk you through that but you can save a step or two if the inside doesn’t matter to you.  Here’s the tutorial:

SUPPLIES I USED
Stamps:  JustRite Papercrafts –  For All You Do Vintage Labels ThreeCircle of LoveGarden Gate Background Stamp
Paper: Neenah Classic Crest – Natural White
Ink: Amuse – Amethyst, Heather, Grape
Accessories: JustRite Custom Die – Vintage Labels ThreeSpellbinders™ Radiant Rectangles, Spellbinders™ Standard Circles SmallBecca’s Bow Maker

JR_2013_NewSHIPPING_iconsmOh, and more great news – JustRite has new shipping rates!!  Check it out!!   Thanks so much for stopping by today – if you’re mildly curious about what I’ll be showing, see you tomorrow!!!

pinTHIS SHAREthis TWEETTHIS EMAILthis
  • Diana G. StewartFebruary 28, 2013 - 8:09 am

    Wow! This is one of the most elegant cards I have ever seen. Thanks Becca.ReplyCancel

  • Linda R.February 28, 2013 - 8:14 am

    Thanks so much for the video! You’re so talented. The video is great and, of course, the card is beautiful.ReplyCancel

  • Christine Harrop, Oxfordshire, UKFebruary 28, 2013 - 8:20 am

    So delicate and so gorgeous Becca. Purple is my fave colour so you were onto a winner straight way with me!!ReplyCancel

  • ColleenB.February 28, 2013 - 8:28 am

    Gorgeous and very elgant card. Luv the color as well.
    Wonderful video tutorial. Thank U
    Beautiful cards and projects you have also done recently and in past.
    ColleenB.ReplyCancel

  • carolFebruary 28, 2013 - 8:31 am

    Another beautiful Becca piece of art!ReplyCancel

  • KathRFebruary 28, 2013 - 8:31 am

    This is such Beautiful card, and the tutorial is so easy to follow even without the sound, ( hubby PC dont know where the sound button is..lol), thankyou for your endless inspiration…
    hugz Kath, Scotland…xx…ReplyCancel

  • Ann WoollumsFebruary 28, 2013 - 8:32 am

    Thank you for the tutorial . Beautiful card.ReplyCancel

  • Eileen L.February 28, 2013 - 8:33 am

    Wow, love purple and love lace. I love these new dies. Your cards are
    always so beautiful, I want to make them all.ReplyCancel

  • Judy I, St. Louis MOFebruary 28, 2013 - 8:33 am

    Awesome card. I’ll have to catch the tutorial later as I’m on the way out the door to the office. Love your work. Thanks for sharing your wonderful talent.ReplyCancel

  • Carol LeaderFebruary 28, 2013 - 8:39 am

    Beautiful card Becca, and thank you for the video. I need to see how things are made.ReplyCancel

  • Melissa BoveFebruary 28, 2013 - 8:43 am

    I Love that card Becca! I ran out and purchased Timeless Rectangles just because of it! Absolutely gorgeous!

    And such a great tutorial! I was wondering how you did it! So easy! Thank you!

    hugs….
    MelissaReplyCancel

  • Joanne O'BrienFebruary 28, 2013 - 8:44 am

    Thanks for the tutorial! You did a good job explaining who you made the card. Your card is beautiful as always. You amaze me with your ideas.ReplyCancel

  • Judy WoodlandFebruary 28, 2013 - 8:49 am

    Becca, I ‘m so glad you started doing videos again. I have missed them. Thanks so much for all your inspiration, I love your work!!!ReplyCancel

  • Francie in MontrealFebruary 28, 2013 - 9:00 am

    Your card is sensational! I am madly in love with it. Also, your video is so clear and much more efficient than my now-ex-method of creating a hinge. Thank you for sharing your remarkable creativity and teaching us your tips. You truly put the “amazing” in Amazing Paper Grace.ReplyCancel

  • MarisaFebruary 28, 2013 - 9:00 am

    Your work is always amazing, Becca. Love this gorgeous card.ReplyCancel

  • Ree DonnellyFebruary 28, 2013 - 9:05 am

    So beautiful…thank for the tutorial!ReplyCancel

  • Becky GreenFebruary 28, 2013 - 9:08 am

    THANK YOU BECCA!!!!!!!!!! WHAT AN INFORMATIVE VIDEO!!!!!!!!! :)

    AND I have to say, I ALMOST FELL OFF MY SEAT when I saw you card today!!!!!!!!!!!!!!!!! (gasp!) SOOOOOOOOOOOOOOOOOO BEAUTIFUL!!!!!!!!!!!!!!!!!!!!!!!!!!!!!!!!!!!! :) DO YOU NEVER STOP???? LOL ;) (Don’t stop!) :)ReplyCancel

  • lisa808February 28, 2013 - 9:12 am

    Thanks for the video. Your card is gorgeous.ReplyCancel

  • Rebekka RFebruary 28, 2013 - 9:25 am

    What a stunning card Becca. Thank you for the great tutorial.ReplyCancel

  • Sara TannerFebruary 28, 2013 - 9:32 am

    Oh my goodness,these cards are INCREDIBLE!. These look like those beautiful laser cut cards. The colors . everything is breath taking. You really out did yourself with these. I love them. :)ReplyCancel

  • Nancy LFebruary 28, 2013 - 9:45 am

    Becca, Beautiful card and thanks so much for the wonderful tutorial on making the card base – you should be a movie director, girl!!ReplyCancel

  • MelanieFebruary 28, 2013 - 9:55 am

    You are absolutly fantastic thank you so much .Melanie xxReplyCancel

  • JanFebruary 28, 2013 - 10:13 am

    Beautiful card. Thanks for the video it makes it all clear and I will have to try making a card like this one.ReplyCancel

  • CarolmgFebruary 28, 2013 - 10:17 am

    The cards you make are always awesome – just beautiful! Thank you.ReplyCancel

  • Diana NguyenFebruary 28, 2013 - 10:17 am

    Your cards are breathtakingly elegant and beautiful!ReplyCancel

  • Donna ShermanFebruary 28, 2013 - 10:22 am

    THANK YOU sooooooo much for sharing this with all of us!!! Your cards are sooooooooooooo outstandingly beautiful and any help you can give us is MUCH APPRECIATED!!! Blessings!ReplyCancel

  • Jean GursoyFebruary 28, 2013 - 10:25 am

    Thanks so much for this tutorial Becca – such a treat for us now you’ve began again; really grateful for your sharing with us
    Jean xxReplyCancel

  • Ann LindFebruary 28, 2013 - 10:26 am

    Thanks so much for the tutorial on the hinge and on how to use the waxed paper because I have been wondering “ok how was that done”. I love your tutorials the are always so well presented and I am definitely a visual learner. TFSReplyCancel

  • SarahFebruary 28, 2013 - 10:27 am

    Finishing touches make the difference. Beautiful card!ReplyCancel

  • DeeFebruary 28, 2013 - 10:38 am

    Hi Becca,

    I really love your cards and I enjoy watching your videos. You come up with beautiful cards with great ideas.

    Keep up the great work.

    Scrappin’ Hugz :-)ReplyCancel

  • Dottie DavisFebruary 28, 2013 - 10:40 am

    As soon as I saw how you folded the edge of the cardstock in this marvelous tutorial the whole thing came together in my confused mind! On the card for Feb 28 did you lay the back side of the card flat and run the whole thing in your die machine so it would be solid? That card was a little confusing to picture (in this confused mind)! You have gotten so good at putting these combination of dies together to accomplish the right look! Thanks for all your work making the tutorial and answering our questions.ReplyCancel

  • MaritzaFebruary 28, 2013 - 10:41 am

    Good morning Becca: Thank you very very much for your tutorials. You are very inspiring, I love all your cards and boxes. Hugs from the Republic of Panama.ReplyCancel

  • melitaFebruary 28, 2013 - 11:00 am

    Thanks so much for the tutorial Becca! It helps a lot! Another question–I find that with the more intricate Spellbinders dies, I have to fun them through the machine several times. How many times do you have to run the die through the machine to cut through the second layer of the hinge?ReplyCancel

  • MargFebruary 28, 2013 - 11:31 am

    Thanks for the tutorial. A beautiful card!ReplyCancel

  • Tami BFebruary 28, 2013 - 11:43 am

    This is absolutely gorgeous & definitely “Pin-worthy”.ReplyCancel

  • Teresa GrayFebruary 28, 2013 - 11:56 am

    This is so beautiful. Thank you for the video to learn how. Blessing too you Becca.ReplyCancel

  • RosendaFebruary 28, 2013 - 12:08 pm

    Really beautiful. Love it.ReplyCancel

  • Mary SchmidtFebruary 28, 2013 - 12:09 pm

    Gorgeous Card! You amaze me with the beautiful cards that you make. I wish I was as imaginative. You are a great inspiration. You must enable a lot of people in purchasing these awesome dies. Thanks for all the work you put into your blog. I so enjoy seeing your creations.ReplyCancel

  • DeeFebruary 28, 2013 - 12:10 pm

    Now I know I have to get this die. The card is fabulous!
    Thanks for the video.ReplyCancel

  • TheresaFebruary 28, 2013 - 12:27 pm

    WOW!! Sooooooo pretty!!ReplyCancel

  • jean w.February 28, 2013 - 12:38 pm

    Thanks Becca!ReplyCancel

  • marilyn yuFebruary 28, 2013 - 12:55 pm

    This is just a note of thanks. I’ve been following you since 2/08 and need to let you know how you have inspired and reinvented my creative mind. Up to that time I was an average crafty person dabbing in an assortment of media but not seriously committed/in love with One media but stamping was something I used for class work and ‘primitive’ card making. How I found you was definitely God’s gift to me because from day 1 – card # 1 I am having a love affair with your blog. Your card layouts, designs, choice of colors & papers, ideas aside from cards and tutorials have been the finest lessons I needed and use daily. I LOVE your cards. I have built up 3 3″ binders filled with your daily offerings and use it like a bible/guidance/ inspirational ideas to follow. Makes me feel like a teenaged kid grasping at and in awe of your creative mind. I thank you for generously sharing your ideas. May you always be blessed.ReplyCancel

  • Frances BlackwellFebruary 28, 2013 - 1:04 pm

    So-o-o Wow, You have done it again…. I love this card and the colors, dies and inspiration. Just love all of your cards. Thank God for giving you such a talent to share with us. Loved the video, sure helps. FrancesReplyCancel

  • ChelseaFebruary 28, 2013 - 1:15 pm

    Oh, I just love that cream with lavender!!!!! What a gorgeous card!! You are amazing, Becca.ReplyCancel

  • JOYCE ANDERSONFebruary 28, 2013 - 1:16 pm

    WOW —so o o o o Beautiful. I need to try and make one very soon.

    you’re AMAZING and God has given you a special Gift to share with
    all of us. PTL

    love,
    joyceReplyCancel

  • AmyjdFebruary 28, 2013 - 1:18 pm

    Lovely as usual!ReplyCancel

  • Anna kluytmansFebruary 28, 2013 - 1:52 pm

    Thank you Becca for a great tutorial, your cards are soooo beautiful, you give us all so many ideas, with those lovely die cuts, and colour combo’s, style’s and designs. LOVE IT. bless you Becca.ReplyCancel

  • SusanFebruary 28, 2013 - 2:02 pm

    That filigree die is so beautiful. Thanks for sharing another lovely card Becca.ReplyCancel

  • Anne (UK)February 28, 2013 - 2:08 pm

    Gorgeous card, Becca. Love the colours!
    Hugs
    Anne (UK) xReplyCancel

  • Barbara HagertyFebruary 28, 2013 - 2:21 pm

    Gorgeous card!!ReplyCancel

  • Heather WoodsFebruary 28, 2013 - 2:21 pm

    Wonderful Becca… so easy once you see your great tutorial. You are so generous with your talent and give us so much inspiration. Thank you.
    Hugs
    Heather (UK)
    xReplyCancel

  • Vicki SopcakFebruary 28, 2013 - 2:31 pm

    Becca you NEVER cease to amaze me!!! Your creations are works of art.ReplyCancel

  • Angela KFebruary 28, 2013 - 2:51 pm

    Brilliant, thank you Becca xReplyCancel

  • Sue NelsonFebruary 28, 2013 - 2:55 pm

    Thanks so much for this amazing tutorial … I’m so happy to view these and learn new, professional looking techniques.ReplyCancel

  • Laura Kirste CampbellFebruary 28, 2013 - 2:59 pm

    Stunning card and fabulous tutorial, Becca! You create such beauty and then make it possible for the rest of us to duplicate…thank you for these gifts!ReplyCancel

  • ann robbinsFebruary 28, 2013 - 3:19 pm

    I just love it when you have tutorials. Thank you so much for your precious time that you spend for our benefit ~ we all do so much appreciate it!! I did both my sister’s and daughter’s birthday cards based on two I have seen on your blog. I’m Getting Better at my cardmaking next to you and your blog!!
    Mstgane
    AnnReplyCancel

  • Ann LindFebruary 28, 2013 - 3:22 pm

    Becca do you have any recollection of where you found the floral sheet you used on the gift cards. I have spent hours scouring the internet looking for them. I noticed several others had been looking as well. I ordered all the dies so when they come I will have fun recreating your filigree topped box. Thanks so much for sharing your wonderful talent.ReplyCancel

  • MaxineFebruary 28, 2013 - 3:48 pm

    Thanks so much for the video! I love to watch things being done and it sure helps more than just pics.ReplyCancel

  • IreneFebruary 28, 2013 - 4:14 pm

    Love, love, love that you are back with your tutorials……..you are such an inspiration.
    IreneReplyCancel

  • SheilaFebruary 28, 2013 - 4:14 pm

    I never thougth of layering dies like that. What a great idea with such dramatic results. I really look forward to your projects and videos. Thanks so much!ReplyCancel

  • Karen LFebruary 28, 2013 - 5:13 pm

    Vey well made tutorial and a beautiful card. Thanks!
    Karen L 1020 at gmail dot comReplyCancel

  • Stella UptonFebruary 28, 2013 - 5:43 pm

    Becca thank you so much. I too was wondering exactly how you did that. You have the most elegant cards evah!!ReplyCancel

  • Rachel BrooksFebruary 28, 2013 - 5:54 pm

    What a great idea to have that inch with which to attach the back piece. Save a LOT of paper and so easy to accomplish! Thank you for thinking OUTside the box and getting us to follow you in your ventures!ReplyCancel

  • Michel EFebruary 28, 2013 - 5:55 pm

    Love the card.

    craftymom205 at yahoo dot comReplyCancel

  • Jean E.February 28, 2013 - 5:57 pm

    You are such an inspiration…& thoughtful of others. Thank you for the tutorials.
    What cardstock did you use for the back layer (roses with scrollwork top & bottom) on your Waltzingmouse card?ReplyCancel

  • karenladdFebruary 28, 2013 - 6:08 pm

    Your card is So elegant and beautiful! I always love your projects, but this one done in shades of purple and lavender is really specialReplyCancel

  • Vicky SchmidtFebruary 28, 2013 - 6:46 pm

    Hi Becca,
    Irt is good to get to a computer again. I love this card. The colors & cut out are great. How do you come up with all these great cards.ReplyCancel

  • Julia BickleFebruary 28, 2013 - 6:47 pm

    Wow! Love that die! I think I ordered it today! Your tutorial was great, as always, too! Can’t wait to see what is in store for tomorrow! Hugs!ReplyCancel

  • Robyn JosephsFebruary 28, 2013 - 7:04 pm

    thanks for the video-that tip can be used for lots of things!ReplyCancel

  • kathy/NorthCarolinaFebruary 28, 2013 - 7:12 pm

    These are so lovely, Becca….I just swoon every time I see them. Great tip on the video…nicely done! Thank you!ReplyCancel

  • Robin in WAFebruary 28, 2013 - 7:42 pm

    Thank you so much for the video!! I never would have understood without it. Thank you!ReplyCancel

  • GerryFebruary 28, 2013 - 7:52 pm

    Thank you so much for the tutorial. That certainly explains how you make the filigree card.ReplyCancel

  • Mary H.February 28, 2013 - 8:16 pm

    Becca, Thank you so very much for this tutorial. I read through explanations, but don’t always ‘see it’. I’m a visual learner. This made perfect sense, and I really appreciate this video tutorial. As you said, it can be used for other cards too. I realize it takes your time to prepare these, but oh, it is so enjoyed. Since you can’t come to my area and teach classes (or ?can you?!), your videos are the next best thing! Hope all is well in your world, and been loving the cards & posts. Just not had time to leave comments for a while. Quick look, read through, off I go. Again, many thanks and this was a beautiful card (as always of course!).ReplyCancel

  • Charlene DahlbergFebruary 28, 2013 - 8:33 pm

    Becca, your card is delicious!! I can’t wait to see what you have in store for us each day, so I am really looking forward to tomorrow’s reveal. I have ordered many of the new dies but they are taking FOREVER to get here. I try to be patient but it is not my strong suit. Love your work, you are such an inspirationReplyCancel

  • Hilda ShawFebruary 28, 2013 - 9:40 pm

    Another lovely card Becca and an easy tutorial.ReplyCancel

  • Carol RFebruary 28, 2013 - 9:51 pm

    This is Gorgeous!!! Your cards are so elegant. Love the bow too.ReplyCancel

  • Katheryn KusickFebruary 28, 2013 - 11:05 pm

    Thank you so much for the tutorial on the hinged card. Always wondered how it was done. Your cards are always beautiful and elegant. Will try this tonight. Hope that mine turns out as nice as yours.ReplyCancel

  • VeldaMarch 1, 2013 - 1:54 am

    Becca, as usual, you are brilliant in figuring out these clever methods and making such elegant, beautiful cards. Thanks so much for taking the time to share with us and teach us.ReplyCancel

  • Leanne SMarch 1, 2013 - 2:50 am

    Your cards are always elegant & fabulous. I don’t win often, but if I do, I would treasure your cards forever.ReplyCancel

  • Trish AveryMarch 1, 2013 - 4:32 am

    Becca I just love what you do and thank you so much for this tutorial. this is one die I just have to get.
    Hugs Trish.ReplyCancel

  • MaryannMarch 1, 2013 - 4:38 am

    WAUW this is sooooo gorgeous Becca. I´m totally in love with card here, sooo stunning creation. Who wouldn´t just love to recieve such a beauty?
    You are just sooo brilliant and talented Becca.
    Have a wonderful week-end.ReplyCancel

  • Diane JMarch 1, 2013 - 7:04 am

    Oh how beautiful! Love the color. Thanks for sharing. All your cards are simply amazing.ReplyCancel

  • Kathryn BrocklehurstMarch 1, 2013 - 7:33 am

    Becca – your cards and talent are amazing! I am sat here in the UK on a cold wintry day in my lunch hour watching and reading your amazing work – you brighten up my day. (The wonders of technology!) I have been crafting all my life but I never cease to learn something from you. Bless you for sharing your wonderful work and talent. xReplyCancel

  • KathyMarch 1, 2013 - 11:44 am

    Becca this card is awesome! It’s just beautiful!!!! Thanks for the video!ReplyCancel

  • LageneMarch 1, 2013 - 11:55 am

    Absolutely GORGEOUS!ReplyCancel

  • Michelle ReavesMarch 1, 2013 - 12:52 pm

    What a gorgeous creation! I love seeing your work, it’s quite inspiring!ReplyCancel

  • Jeannie HaferMarch 1, 2013 - 12:57 pm

    I loved your tutorial and the project is fantastic! I am going to try to make it with one of the spellbinders die that I already have, but I believe I am going to have to order this one!ReplyCancel

  • Pamela RomeroMarch 1, 2013 - 1:49 pm

    Your card is so beautiful! I love the lacy frame/outline! I would love to be able to make cards like this.ReplyCancel

  • Cathy-LynnMarch 1, 2013 - 2:45 pm

    Oh my goodness this card is beautiful. Now I can not wait to watch your tutorial. I’m sure I will learn something from you. Thanks!!
    Hugs, Cathy-LynnReplyCancel

  • Julie A. ShearerMarch 1, 2013 - 3:16 pm

    Your cards are so Beautiful !! Thanks so much for the video . I am truley inspired to try something new . Again , thank you.ReplyCancel

  • StephiMarch 1, 2013 - 3:21 pm

    wow!!!
    My eyes is really big, like Candy for themReplyCancel

  • Jess S.March 1, 2013 - 5:12 pm

    Your cards are so beautiful. You’re such a talented woman. Thanks for the tutorial on hinged cards. :)ReplyCancel

  • EireneMarch 1, 2013 - 6:07 pm

    love your cards!ReplyCancel

  • Judy WestMarch 1, 2013 - 8:20 pm

    Your work is so beautiful and I enjoy all of your posts When you use the
    really delicate spellbinders dies do you have trouble getting them out of the die. I spent almost a half an hour yesterday getting one out. I ran
    it through the cuttlebug both ways and several times and it cut fine but it
    was just stuck to the die. Would appreciat any help you can give me.ReplyCancel

  • Candida JMarch 1, 2013 - 8:52 pm

    Beautiful!!!!!! Thank you for sharing.
    Have a wonderful day!ReplyCancel

  • Sandra SmithMarch 1, 2013 - 8:59 pm

    I love the look of this card and truly appreciate your tutorial for making a filagree card on the front and back. All your work is stunning and so inspirational. Thank you Becca!!!!ReplyCancel

  • Marianne #6701March 2, 2013 - 2:20 am

    I enjoyed your video tutorial. Thank you for taking the time to make it!ReplyCancel

  • Jean BullockMarch 2, 2013 - 7:26 am

    I know I am a day late for the contest so I don’t expect to be entered, but I just wanted to mention how lovely the card is and to thank your for the tutorial on how to make the hinged filigree card. That was very helpful!ReplyCancel

  • Fran DMarch 2, 2013 - 12:22 pm

    Wow! You never fail to astound me with your creations! Every day you seem to outdo yourself! This hinged card is so beautiful and thanks so much for the easy to follow tutorial. You are the queen of crafting!
    FranReplyCancel

  • margaretMarch 2, 2013 - 12:43 pm

    WOW beautiful!ReplyCancel

  • LoyceMarch 2, 2013 - 12:59 pm

    I continue to be amazed by your imagination and vision when designing. You are inspiring.ReplyCancel

  • Josie LombardiMarch 2, 2013 - 1:45 pm

    This is so very beautiful. Thanks again for sharing.ReplyCancel

  • Heather BMarch 2, 2013 - 2:52 pm

    I’ve been experimenting with making hinged cards and found it a bit complicated- thank you for simplifying the process tremendously. I love that you can keep creations within a 81/2 x 11 sheet as well. These filagree dies are gorgeous. Thanks for designing them- it will be so hard to choose.ReplyCancel

  • Bev ProtheroMarch 2, 2013 - 3:49 pm

    I have never seen work that makes me feel so excited…. this is so elegant, so faminine, sooooooo creative….. its sort of soothing to my inner person, its what I want to do!!!! Thanks so much for sharing and for lighting my fire!!!ReplyCancel

  • doris greeneMarch 2, 2013 - 8:46 pm

    I loved the box made with Spellbinders Labels 28. However I don’t have this die so I improvised. The bottom was perfect but the lid did not fit. Can you give measurements for those of us that don’t have this particular die. All of your cards are luscious. Thanks for sharing.

    DorisReplyCancel

  • doris greeneMarch 2, 2013 - 8:57 pm

    Becca I loved your Decorative Border Folded Envelope. So I made one and it turned out great! I used my own creativity with the edges and embellishment. You are greatly appreciated for sharing your God given talents with us. Blessings. xoxo

    DorisReplyCancel

  • Barb in AKMarch 2, 2013 - 9:03 pm

    Thank you so much for the video! You make amazing cards :-) I see I need some Spellbinders dies!! :-)ReplyCancel

  • TomatoloverMarch 2, 2013 - 9:09 pm

    This is the absolutely most beautiful card that I’ve ever seen. I so wish I could go to class you teach! Pictures and videos are helpful, but I’m more hands on student. Gorgeous!!ReplyCancel

  • BarbaraMarch 2, 2013 - 9:42 pm

    I appreciate your taking the time to make the video, Becca! This beautiful card is so special!ReplyCancel

  • Larissa HeskettMarch 2, 2013 - 11:08 pm

    Wow!! Love the card and video!! THANKS for sharing you are so AWESOME!! THANKS also for the chance to win!! Have a fabulous weekend!!ReplyCancel

  • Nancy LMarch 2, 2013 - 11:42 pm

    Thank you, thank you, thank you. I love your site and now with these tutorials I can find even greater inspiration and ideas for using my Spellbinders more often. God bless you, Becca.ReplyCancel

  • ElizabethMarch 2, 2013 - 11:46 pm

    Truly fantastic! Just received these dies, I hope I can do one tenth of what you do!ReplyCancel

  • Denise BryantMarch 3, 2013 - 12:23 am

    Absolutely gorgeous! Love all the detail in this beautiful card!
    DeniseBReplyCancel

  • dianeMarch 3, 2013 - 8:52 am

    Thanks Becca, This was really helpful.ReplyCancel

  • SHELLEEMarch 3, 2013 - 3:16 pm

    Once again another beautiful project! The hinge work is perfect and so very simple. Thanks for the tutorial and sharing this lovely project.
    ShelleeReplyCancel

  • Pam ChambersMarch 3, 2013 - 5:16 pm

    I am sooo glad you gotten back to doing your great tutorials!! I’ve missed them.ReplyCancel

  • conniecrafterMarch 5, 2013 - 7:47 am

    Beautiful card, thanks for sharing how to make these Lovely cards!!ReplyCancel

  • […] do this on the front and the back, you can see my tutorial on Filigree Card Bases—–> HERE.  I wanted a hint of color so I simply cut the Enchanted Labels Twenty Eight again and trimmed off […]ReplyCancel

  • JeanMarch 22, 2013 - 9:18 am

    Good morning Becca: It’s been quite awhile since I’ve posted a comment – I check your site daily. I wish to thank you for sharing your beautiful creations. Your color and layering combinations are lovely works of art. thank you for your excellent, concise tutorials as well. Thank you!! Blessings.ReplyCancel

WRBF-3731-2012
Sweet Blog Friends, today I get to participate in a very cool hop!!  In previous hops we would pop in with new goodies from Waltzingmouse Stamps.  This time, we’re all going back and picking one of our favorites and using it again.   Well, no way!  No way could just pick one favorite, I have entirely too many – but here are two that I got even before I was on the Design Team – they are the Dainty Doilies – Large Set  Dainty Doilies 2 – Small Set.   This hop is also a very special occasion because we are welcoming 9 new members to the design team.  They are all fixtures in the stamping world and have always represented Waltzingmouse so well and now they are all on the team!!  Please help us welcome them!!

WRBF-3730-2012

Everybody needs a doily set in their stash and this is my favorite!!  For my card I made a 5 x 7 card base and set up my layers using Spellbinders™ 5×7 Matting Basics B.   Then I simply cut the largest die template from Spellbinders™ Big Scalloped Circles LG and embellished it with the picot doily from the small set then I cut/embossed with the second largest die template from Scalloped Circles LG again and embellished it with the full doily from the large set.  I love embossing that doily with ivory and of course it had to be dressed up with pearls.  I finished off with lace, ribbon and roses and one small decorative corner from Spellbinders™ Vintage Lace Accents :-)

SUPPLIES I USED
StampsWaltzingmouse Stamps – Dainty Doilies – Large SetDainty Doilies 2 – Small Set
Paper: Neenah Classic Crest – Natural White, from my stash
Ink: Versamark, Versafine Onyx Black
Accessories: Spellbinders™ 5×7 Matting Basics B, Spellbinders™ Big Scalloped Circles LGSpellbinders™ Vintage Lace Accents, lace, pearls, Maya Roads Trinket Pin, seam binding, mulberry roses, Ivory Embossing Powder, Becca’s Bow Maker

Hop around and see what the rest of the Design Team has up their sleeves!!

Waltzingmouse Design Team
Help us welcome nine new members of the DT!
Kim Duran • Jean Martin • Karin Åkesdotter • Jen Cuthbertson • Iwona Palamountain • Teresa Kline • Edna Morrisdie • Renee Lynch • Jeanne Jachna
 Lynn Mercurio • Julia Aston • Tosha Leyendekker  • Jennifer Holmes • Sandie Dunne • Becca Feeken • Kelly Schirmer • Laurie Schmidlin • Clare Buswell • Anya Schrier • Sarah Martina Parker • Belinda Chang Langner

Thanks for stopping by, see you soon!!


pinTHIS SHAREthis TWEETTHIS EMAILthis
  • MaryannFebruary 28, 2013 - 2:05 am

    What an awesome card here again Becca, you always deliver some beauty that´s for sure. I love the soft look to this card here and as always it´s soo perfect finished everywhere.ReplyCancel

  • Nadine IllingworthFebruary 28, 2013 - 3:04 am

    Hi Becca
    what a fabulous card, so femmine. I agree with you how can you pick just one. The last craft thing i bought is always my favorite. I am so fickle as far as my craft things are concerned lol
    Wonderful job you have done here WELL DONEReplyCancel

  • June SmithFebruary 28, 2013 - 3:35 am

    Hi Becca, This really is a beautiful card, I love the way you do them and also tie the bows, brilliant, thank you for sharing. xx

    Is there a tutorial on how you tie your bows, I can do a single or double bow but they don’t look as good as yours do. xxxReplyCancel

  • RitaFebruary 28, 2013 - 3:40 am

    Magnificent card Becca. Its just so beautiful. Enjoy your Day. Hugs from Scotland Rita xxxxReplyCancel

  • Patricia HowarthFebruary 28, 2013 - 3:44 am

    Morning Becca, This card is stunning, loving the papers and the gorgeous bow, and the stamping is fantastic, I would love to receive this card.
    Lots of love from Patricia xxReplyCancel

  • Lori mFebruary 28, 2013 - 4:11 am

    Gorgeous card, beautiful dainty doilies set! Hugs, Lori mReplyCancel

  • Jan MayoFebruary 28, 2013 - 4:29 am

    Pretty, pretty, pretty, Love the way you used the doilies. Your cars truly inspire me. Never had a disappointment.ReplyCancel

  • kathy/NorthCarolinaFebruary 28, 2013 - 5:59 am

    Love how you layered this gorgeous doily, Becca! The ribbon treatment is exquisite, too!ReplyCancel

  • Dianne CFebruary 28, 2013 - 6:09 am

    I can see why this is your favourite Becca, it is absolutley beautiful. The doilies and all the layers, soft colours and all the bling.ReplyCancel

  • bonnie weissFebruary 28, 2013 - 6:13 am

    Absolute elegance, Becca.ReplyCancel

  • Linda RobbinsFebruary 28, 2013 - 6:32 am

    I just recently looked at the Waltzingmouse and I agree, it is one of my favoritesReplyCancel

  • ann robbinsFebruary 28, 2013 - 6:58 am

    Oh my, Becca! This is just another of your glorious cards – WOW!

    No relations (I don’t think) to the Linda Robbins just ahead of me. But one thing for sure – we both love Becca!!!!!!!!!!!!!
    Mstgane
    Ann RobbinsReplyCancel

  • Francie in MontrealFebruary 28, 2013 - 7:00 am

    This is just so pretty, delightful, and charming – the colours, the stamps, the little rosettes with one of your signature bows and the lovely doily layers. It’s a feast for the eyes.ReplyCancel

  • SandieFebruary 28, 2013 - 7:18 am

    Stunning card Becca. So classy and elegant. xxReplyCancel

  • carolFebruary 28, 2013 - 7:29 am

    That is so beautiful!ReplyCancel

  • colleen hFebruary 28, 2013 - 7:48 am

    great card, I do not really like doilies much but they are very pretty on this card, but then you always make anything look GREAT!ReplyCancel

  • Lynn HardyFebruary 28, 2013 - 7:49 am

    This pretty card is so “you” Becca – I love it!ReplyCancel

  • Jeanne JFebruary 28, 2013 - 9:04 am

    Drop dead gorgeous! Pretty enough to be a wedding congratulations. Love the embossing, the layered doilies, and those flowers and that double bow… sigh….ReplyCancel

  • Becky GreenFebruary 28, 2013 - 9:12 am

    ABSOLUTELY GORGEOUS!!!!!!!!!!!!!!!!!!!!!!!!!!!! THIS card would look LOVELY as a Wedding Card too!!!!!!!!!! :)ReplyCancel

  • Julia AstonFebruary 28, 2013 - 9:30 am

    What a beautifully elegant card Becca! wonderful ribbon, florals and bling to set off your wonderful layered doilies! The patterned paper is a lovely backdrop for it all!ReplyCancel

  • Deborah FringsFebruary 28, 2013 - 10:00 am

    Beautiful!! Lovely soft colours, pretty layers, pearls and your trademark bow – just superb!ReplyCancel

  • MelanieFebruary 28, 2013 - 10:03 am

    So elegant just love your bows must try harder to do you type bows I do have you bow maker .Melanie xxReplyCancel

  • Diana NguyenFebruary 28, 2013 - 10:19 am

    Where do you get your flowers? They are just stunning and always the perfect touch to your amazing cards.ReplyCancel

  • Marcie SmithFebruary 28, 2013 - 10:48 am

    Gorgeous!!!!!! Just one question Becca, what is that beautiful background paper you have used here. I am absolutely in love with it!!!!! So soft and feminine. I am always on the hunt for beautiful papers like this, but never seem to find them. You always have such a knack for selecting papers. I have a 3D tea party project that this would be perfect for. Any info would be helpful.
    MarcieReplyCancel

  • BeeFebruary 28, 2013 - 12:37 pm

    Such a beautiful card.ReplyCancel

  • Debbie ReavesFebruary 28, 2013 - 12:52 pm

    Hi Becca,

    As usual, just beautiful. Your cards haved inspired me to get back to stamping. I’ve been stagnant for a while.

    One question … Where do you get envelopes to fit your 5×7 cards?

    Thanks for taking the time to respond. Take care,

    DebbieReplyCancel

  • Vickie ZFebruary 28, 2013 - 12:54 pm

    Gorgeous!! Yes, those are the best doilies ever!!ReplyCancel

  • ChelseaFebruary 28, 2013 - 1:18 pm

    Fabulous! I have been drooling over those lace doily sets for a while and they are sure magic in your hands. Just so gorgeous and romantic! Thank you for sharing this beauty with us!ReplyCancel

  • JOYCE ANDERSONFebruary 28, 2013 - 1:35 pm

    This is absolutely breathtaking….you AREReplyCancel

  • JOYCE ANDERSONFebruary 28, 2013 - 1:36 pm

    —–GIFTED. This comment ran off the computer and posted it!!!

    THANK YOU A Million times over.

    Love,
    JoyceReplyCancel

  • SusanFebruary 28, 2013 - 2:11 pm

    I love doilies still — so pretty and feminine — just like so many of your cards.ReplyCancel

  • Karen WeddingFebruary 28, 2013 - 2:36 pm

    As always a great job! Love your double bows.ReplyCancel

  • LaurieJFebruary 28, 2013 - 3:09 pm

    Sigh…..that is a sigh of contentment. Your card is just so lovely. It makes me happy.ReplyCancel

  • Edna MorrisedieFebruary 28, 2013 - 5:02 pm

    Gorgeous as always! The doilies are absolutely in my TOP 10!ReplyCancel

  • teresa klineFebruary 28, 2013 - 5:24 pm

    Becca, your cards are stunning, I am thrilled to be joining the team with you!

    hugs *~*ReplyCancel

  • Kathy in IdahoFebruary 28, 2013 - 10:39 pm

    I am wondering the same thing as Marcie above the background paper is beautiful but i don’t see included in your materials list. Lovely card.ReplyCancel

  • Anita BraddockMarch 1, 2013 - 1:01 am

    What a Beautiful Card your cards always look amazing. love the layering and the colors the elements and the details are super. thanks for sharing.ReplyCancel

  • margaretMarch 1, 2013 - 11:29 am

    Beautiful and interesting to watch step by step.ReplyCancel

  • LageneMarch 1, 2013 - 11:57 am

    OHHhh this is so PRETTY!ReplyCancel

  • Diane GreerMarch 1, 2013 - 11:59 am

    I wake up each morning and start my day with a cup of hot tea and your post. Always in awe and always close with lots of inspiration.ReplyCancel

  • Dottie DavisMarch 1, 2013 - 2:13 pm

    Gorgeous card. Just beautiful. I agree with Diane Greer…waking up to checking my email and see your beautiful creations. So neat.ReplyCancel

  • Julie A. ShearerMarch 1, 2013 - 3:14 pm

    So beautiful . TFS.ReplyCancel

  • conniecrafterMarch 1, 2013 - 5:39 pm

    Oh my that is just gorgeous, the pearls are great with that stamp!!ReplyCancel

  • MarshaMarch 1, 2013 - 10:55 pm

    Becca, I love the card, but what was the floral paper you used behind the 2 die-cut shapes? Thanks a lot.ReplyCancel

  • Patricia T.March 2, 2013 - 10:16 am

    Oh! Becca, Becca, Becca. You are absolutely amazing. Your cards are gorgeous! Thank you for sharing. PatriciaReplyCancel

  • SHELLEEMarch 3, 2013 - 3:17 pm

    SO very elegant and beautiful!

    ShelleeReplyCancel

WRBF-3729-2012
Hi there blog friends!  I’m keeping my promise and I might add that I’m tickled to do so.  Not to long ago while I was away I made a sweet little box – and enclosed eight little cards.  It was so easy to make that it may be my go-to box instead of the 3″ x 3″ I normally make.  Well, I thank you for your patience, I finally sat down and made up more samples and filmed a video to walk you though it.  The box has lots of possibilities and even though the one I make in the video is the same as I made before, the one that I’m showing here has an alternative lid.  Once you watch the video, if you are interested in how to do this lid, it is the same except I glued the throwaway pieces from the die back into place.   The original post with my first box is at this link:  https://www.amazingpapergrace.com/box-of-blessings/

Here is the video:

My goodness, I haven’t done a video is so long, I had a little bit of relearning to do.  It won’t be so long for the next one, I promise.   See you soon!!

pinTHIS SHAREthis TWEETTHIS EMAILthis
  • MaryannFebruary 25, 2013 - 2:36 am

    Well maybe you feel you had a bit of relearning to do, but to me it sure looked like you had never done anything else, and the tutorial is so awesome as is this wonderful box here. I am certainly going to make some of these too, that´s for sure. They are so awesome and so beautiful and it´s such a wonderful little gift for someone, if you need a little something, and they seem really fast to make, so they fits just sooo perfect tome, as I´m often in the last minute with these things he he he. I love the result hun and have also already thought of a couple more, that could be made a bit like this too, so I´ll be busy here the next while, if we ever get these new dies it means LOL.
    Have a wonderful day hun and lots of fun as well.ReplyCancel

  • LindylooFebruary 25, 2013 - 4:24 am

    Hi Becca,
    Well I’ve been away from blogland a while now but today I had to stop by and say ‘Wonderful’. Your cards, as always, are amazing but I so adore your little box. Such a innovative idea for using the die and a beautiful way to present a useful gift of notelets.
    Thank you for always sharing your wonderful ideas with us.
    Hugs and best wishes. Linda (UK)xxReplyCancel

  • Nadine IllingworthFebruary 25, 2013 - 4:29 am

    Wonderful project for Easter cards to help raise funds at my church stall . Thanks Becca for the inspirationReplyCancel

  • Heather WoodsFebruary 25, 2013 - 4:45 am

    Thank you Becca…. I’ve been eagerly waiting for this tutorial – which is excellent. Such a gorgeous little gift and now I’ve seen it made it makes it more achievable for me (hopefully). tfs
    Hugs
    Heather (UK)
    xReplyCancel

  • Patricia HowarthFebruary 25, 2013 - 4:51 am

    Hi Becca, This tutorial is fantastic, it has inspired me so much that I have just pre-ordered the dies and embossing folder. What a brilliant notelet box, I will definitely be trying these to make for Fayres at Church.
    I must tell you that I received your Bow maker on Saturday and I watched your video and made my first Becca Bow yesterday afternoon, I can see this tool will be used on every card I make, such brilliant results. Thank you for the inspiration.
    Lots of love fromm Patricia xxReplyCancel

  • RitaFebruary 25, 2013 - 4:58 am

    Good Morning Becca, I love your beautiful box and what a lovely gift to make. I need to go and see if I can purchase Labels 28 and make this box. As always Thank-you for your great tutorials and inspiration. Hugs from Scotland. Rita xxReplyCancel

  • Ruth JamiesonFebruary 25, 2013 - 5:04 am

    Hi Becca
    thankyou for this tutorial I will be trying it latter today. Its stunning and you make it look so easy I have theese dies so can get going the ladys at my church will love these thankyou so much for all your insparation
    hugs RuthReplyCancel

  • Sara TannerFebruary 25, 2013 - 5:08 am

    I don’t post often but look at your blog every time you post. I must say you NEVER disappoint. Everything is always so beautiful. I just love these boxes. They are almost to beautiful to give away. Thank you for posting a video as well. :)ReplyCancel

  • Joan FrickerFebruary 25, 2013 - 5:38 am

    Becca, I loved your video and your box! Great job as usual.
    You do such a fantastic job on everything you do!!!
    JoanReplyCancel

  • Karen LFebruary 25, 2013 - 5:43 am

    Thank you for the excellent tutorial. Now I can package up some of my little cards in a beautiful box!

    Karen L 1020 at gmail dot comReplyCancel

  • JessicaFebruary 25, 2013 - 5:49 am

    Lovely little project Becca. You always make me want to go shopping!
    TFS Hugs, JessReplyCancel

  • Dianne CFebruary 25, 2013 - 6:08 am

    Pretty box, will have to give it a try. Thanks BeccaReplyCancel

  • deniceFebruary 25, 2013 - 6:14 am

    Thank you so much Becca, I enjoy your tutorials so much. You are a wonderful teacher and I personally think you should have your own t.v. crafting show. God bless my cyber friend, Denice : )ReplyCancel

  • Dottie DavisFebruary 25, 2013 - 6:21 am

    These adorable little boxes have so much potential for all kinds of different occasions. I can’t wait to jump in and make them. Thank you so much for making this tutorial! I am so appreciative.ReplyCancel

  • diana gFebruary 25, 2013 - 6:22 am

    Just lovely! Thank you.ReplyCancel

  • ann robbinsFebruary 25, 2013 - 6:38 am

    You make it look so easy, girl! What a nice little gift this would make. I have some other boxes I have made but are larger. These are too cute! Know I will be making some of these, possibly to have on hand to give my fellow papercrafters (8 of us meet once a week for a girl’s night out) for their birthday handmade gift.
    Great job Becca.
    Mstgane
    AnnReplyCancel

  • Denise TrottierFebruary 25, 2013 - 6:40 am

    This box and card set is adorable…great job, Becca, as always…you wouldn’t happen to remember what site you got your images from for your cards would you…I sure would appreciate the link…thank you sooo much for sharing your beautiful work…ReplyCancel

  • bonnie weissFebruary 25, 2013 - 6:47 am

    Another AMAZING video tutorial Becca. Your instructions are always so easy to follow and the project results, so beautiful. Thanks for taking the time to prepare and publish the video.ReplyCancel

  • Linda RobbinsFebruary 25, 2013 - 7:01 am

    Becca, Everthing you make is so beautiful!! I want to make everything, especially this little box. Thanks so much for the tutorial.ReplyCancel

  • Eileen L.February 25, 2013 - 7:05 am

    Beautiful box Becca. What a lovely gift this is for so many occasions. Love tutorials, Im a visual learner. Thanks for sharing you did a great job with the tutorial. HugsReplyCancel

  • Linda RobbinsFebruary 25, 2013 - 7:09 am

    Becca, Back again. I am frustrated because everything you do is so wonderful. I really do want to make everything but there are two problems, where to find each die and $. Do you suggest a basic list of dies that are a go to for your projects? I would appreciate your comments.ReplyCancel

  • Becky GreenFebruary 25, 2013 - 7:24 am

    THANK YOU BECCA!!!!!!!! Your video is GREAT!!!!!!! :) LOOOOOOOOOOOVE that SWEET little box!!!!!!!!!!!! AND cards too!!!!!!!! :)ReplyCancel

  • Lisa SackettFebruary 25, 2013 - 7:40 am

    I always love your boxes. And they come with the most beautiful & classy enclosures too. Thanks so much for the tutorial. I love how you use your Spellbinders…You always think outside (and inside) the box. =) Love it!!ReplyCancel

  • Barbara WilsonFebruary 25, 2013 - 8:01 am

    This is a lovely project. But then all of your’s are. Do you happen to know where you printed the flower sheet from?ReplyCancel

  • BethEFebruary 25, 2013 - 8:21 am

    Hi Becca!
    Thanks so much for the promised video. I am anxious to make this box. Like many of our followers, I can think of many occasions for which this would be a very appropriate gift. TFS and many hugs }}}

    BethReplyCancel

  • Marilyn in E-TownFebruary 25, 2013 - 8:51 am

    I can hardly wait to make one of these! Thank you for the tutorial! Have a wonderful day!ReplyCancel

  • TheresaFebruary 25, 2013 - 9:10 am

    These are the most darling boxes I have ever seen!! Simply love them and can’t wait to make some. Thanks so much.ReplyCancel

  • Regina M. HamiltonFebruary 25, 2013 - 9:16 am

    Those are so beautiful boxes. I can’t wait to make so teachers gifts using those boxes. I so glad you are making the video tutorial again. I really missed them.ReplyCancel

  • Francie in MontrealFebruary 25, 2013 - 9:27 am

    Delightful little boxes and charming tiny notes! They are both so very pretty. Besides being a master craftslady, you also make the best videos too. Easy to follow. Thanks so much.ReplyCancel

  • Rosie WaldtFebruary 25, 2013 - 10:08 am

    Love, love, love your little box and the cards to fit inside. Would you have the link where you printed out the cards? Your creativeness never fails on such neat ideas. Hope to be able to get the Enchanted Labels 28.ReplyCancel

  • KathyFebruary 25, 2013 - 11:02 am

    Becca it was great to see a video!! This is such a cute box! I wonder how many spellbinders you sold with this box!! I love that die set… too bad my area doesn’t carry many… takes forever to get them here..if at all… love it though..ReplyCancel

  • LindaFebruary 25, 2013 - 11:21 am

    Becca

    Great tut on those boxes. I can’t wait to try it myself. You wouldn’t happen to remember where you found the flowers would you???

    Thanks so much for all you do for the crafting world.ReplyCancel

  • AmyFebruary 25, 2013 - 11:30 am

    Fantastic! Thank you for sharing your how-to video’s. Off to make them :)ReplyCancel

  • JOYCE ANDERSONFebruary 25, 2013 - 11:37 am

    So LOVELY, I can hardly wait to try and do this very project.
    What a gorgeous Gift this would make to my friends!

    Missed so many Tutorials – must do that soon. you really
    Inspire me. I’ve told so many friends about you and
    Amazing Paper Grace…..Wonderful!

    Thank you – May God richly continue to Bless you,
    JoyceReplyCancel

  • Cathy AFebruary 25, 2013 - 12:42 pm

    Such a pretty gift, thank you for the tutorialReplyCancel

  • Jane SuperFebruary 25, 2013 - 1:03 pm

    Becca. Thank you so much. Again you amaze me with your creativity and generocity!! I think that is a word. ReplyCancel

  • mary anne guthFebruary 25, 2013 - 2:21 pm

    Thank you for the tutorial. I shall be getting right on this project.ReplyCancel

  • Andrea AsherFebruary 25, 2013 - 2:44 pm

    Becca, Thank you for sharing your how-to video. These would make great little gifts!!ReplyCancel

  • Linda FieldingFebruary 25, 2013 - 3:29 pm

    So happy to see a video on this cute little box and card set.ReplyCancel

  • Theresa RFebruary 25, 2013 - 4:49 pm

    As always, I love everything you make! I just got my other spellbinder set (the one you used for the Filagree Dimensional Frame during the sneak peek. Now I need this set too!ReplyCancel

  • Rene from OZ xoFebruary 25, 2013 - 5:17 pm

    The project and the video was fantastic, thanks Becca.
    Rene from OZ xoReplyCancel

  • Margaret (Scotland)February 25, 2013 - 5:53 pm

    Hi Becca, Lovely to hear your dulcet tones, and of course the great tutorial. Loved it and your amazing talent and inspiration. Thank you so much for sharing.
    Regards
    Margaret (Scotland)ReplyCancel

  • ChelseaFebruary 25, 2013 - 6:14 pm

    Oh Becca, thank you soooo much!!! I love this little box and appreciate you sharing your techniques with us. Everything you make is fabulous and this is just another example. Thank you again and again!ReplyCancel

  • Robyn JosephsFebruary 25, 2013 - 7:55 pm

    Thanks for the video. I know how much time they take to prepare for and shoot!
    blessings,
    RobynReplyCancel

  • Jocelan PerryFebruary 25, 2013 - 9:22 pm

    Thanks Becca for another great video,
    Blessings,JocelanReplyCancel

  • Ann LindFebruary 25, 2013 - 10:11 pm

    Becca thanks so much for taking the time to do the tutorial for this lovely box I would love the link for the images you used on your note cards they are really lovely and so suited to the beautiful packaging. TFSReplyCancel

  • Billie AFebruary 25, 2013 - 10:40 pm

    Great video, miss not seeing your videos but know it’s time consuming. Thanks for the great box idea and mini cards. Love the idea.ReplyCancel

  • NeeseyFebruary 26, 2013 - 1:44 am

    Awesome video. Many Thanx!ReplyCancel

  • Cindy AlexanderFebruary 26, 2013 - 8:45 am

    Becca… I am speachless!! Truly this is an amazing project as always!!ReplyCancel

  • DebbieKFebruary 26, 2013 - 9:47 am

    Gorgeous Becca! If someone gave me a gift such as this, I’d treasure it forever….Thanks for sharing.ReplyCancel

  • FMFebruary 26, 2013 - 2:37 pm

    I, too, love this kind of project! So quick to make and to elegant and useful! How do you find websites that have downloads like the one that you used? That was perfect for this project.ReplyCancel

  • Debbie BFebruary 26, 2013 - 2:46 pm

    Great project. Thank you so much for sharing it with us. You do such beautiful work. Hope all is well with you these days. Always in my prayers!ReplyCancel

  • Diana YockeyFebruary 26, 2013 - 8:51 pm

    Thank you so much for the tutorial and for sharing your beautiful talent with all of us. You are truly an amazing artist!
    You wouldn’t happen to remember what site the “floral print out page” came from. I have search for hours and haven’t found it yet!
    Would appreciate any help you could give.
    Thank you again for all the time you spend on keeping this blog going and sharing all your beautiful creations.ReplyCancel

  • Teresa CereghinFebruary 27, 2013 - 1:31 pm

    Lovely boxes. Would love to make one for each of the ladies in my church. I too would love to know the website for the cards!ReplyCancel

  • Heather S.February 27, 2013 - 2:15 pm

    Thanks for sharing!ReplyCancel

  • patricia p.February 27, 2013 - 11:04 pm

    Becca
    It feels so good to hear your voice again in a tutorial and to see those magic hands at work..
    thank you Becca for this great idea and such a clear tutorial..

    patReplyCancel

  • Claire SFebruary 28, 2013 - 7:42 am

    Your project is as beautiful and delightful as you are…thanks for continuing to inspire us!
    Creative Wishes,
    ReplyCancel

  • Gail D.February 28, 2013 - 8:12 am

    Thank you for the tutorial on the hinged cards made from the filigree. I have tried to do that but it doesn’t always work out but your method opens up so many new cards. Love your ideas that become unbelieveable cards.ReplyCancel

  • Cathy HughesMarch 1, 2013 - 1:44 am

    I too, have been looking for hours for the flower sheet and not find it….very frustrating.ReplyCancel

  • Vivienne PeternellaMarch 1, 2013 - 10:25 am

    Hi Becca , I love your idea and please continue with this wonderfull work can you share were did you find the flower sheet for the cards.ReplyCancel

  • Ann LindMarch 1, 2013 - 11:49 am

    FOUND IT!!!!!
    THE SITE IS BY DIGITAL PAPER ETSY THE FILE IS BOUQUET EXTRACT $4.45 US $4.71 CADReplyCancel

  • Cathy HughesMarch 1, 2013 - 12:35 pm

    Thank you, thank you…got it!ReplyCancel

  • Vicki DavisMarch 1, 2013 - 6:58 pm

    Love your gorgeous projects! You have a pretty style and I always like to see what new things you will make. Thanks for the box tutorial. I will make it for sure.ReplyCancel

  • conniecrafterMarch 2, 2013 - 7:54 am

    that is so cool, thanks so much for sharing!ReplyCancel

  • SandiMarch 2, 2013 - 1:19 pm

    Thank you for sharing your gorgeous creations. Made a few of these and can’t wait to use for gifts with a gift card enclosed with the note cards. So happy to see you back!ReplyCancel

  • Kathy BMarch 5, 2013 - 7:44 pm

    Great tutorial Becca!! Thank you for taking the time to show us how to make this box and the cards…the papers you used are so pretty, and I really need to have that Spellbinders die – ;)ReplyCancel

I N F O