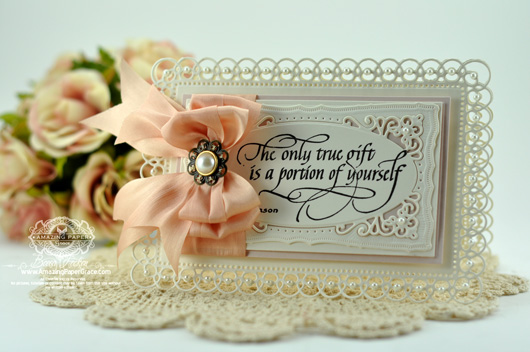 
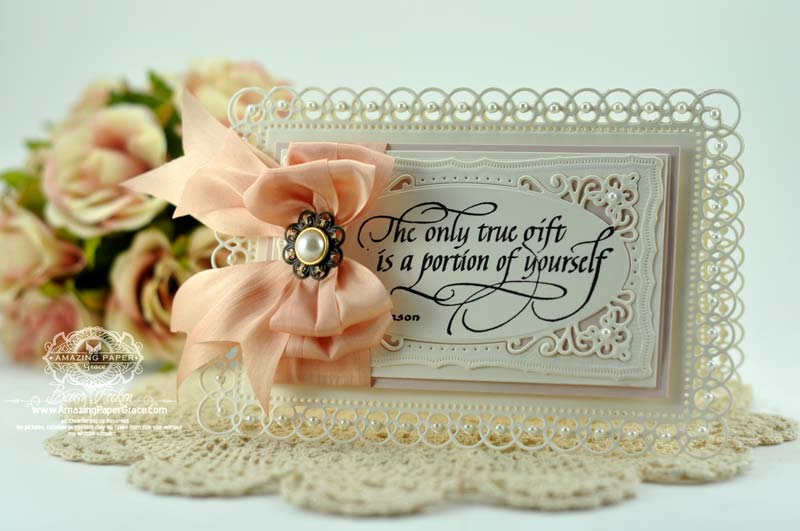
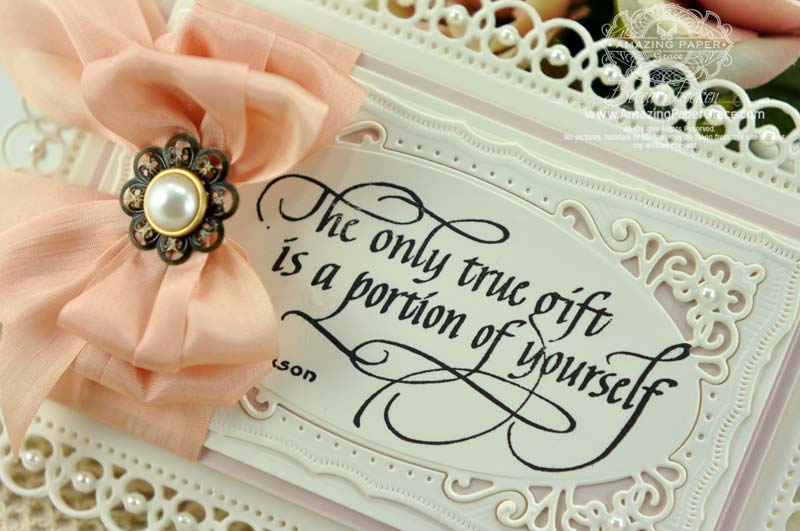
Hi there sweet blog friends, popping in to share a quick card. I’ve been scarce for the last week, but I’m in the middle of some big home projects that have waited for over 10 months and can’t wait any longer. I’m making headway but it was sooooo good to sit down and play for a minute in between all the changes. I’m using a die template that I haven’t used before but the style is one that I’m loving lately because of the ease it brings and to me it lets the die speak for itself. I created my card base using Spellbinders™ Detailed Scallops and layer the base using Spellbinders™ 5×7 Matting Basics B and Spellbinders™ 5×7 Matting Basics A. Then finally on top of that I put Spellbinders™ Radiant Rectangles.
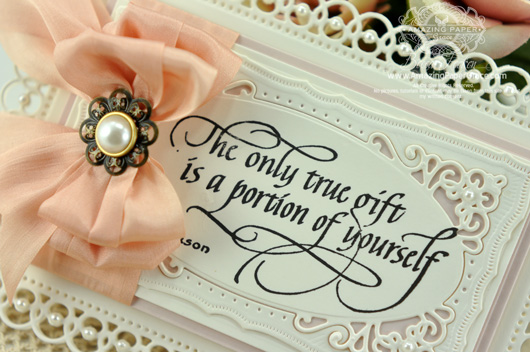
The sweet sentiment is from Quietfire Design and is called The Only True Gift. The card just begged for pearls, so I gave in with abandon :-)
Thanks for stopping by!! In addition to my house stuff, I’m working on some things I promised to show that I hope to have ready soon!


Hi there blog friends!! I hope you had a glorious week! The wait is over!!! It has been so sweet to get inky with these new Waltzingmouse Stamps, they are so dad gummed cute! For the last several days we’ve been previewing the stamps and now, here are all the sets, you can see them in full – HERE. If you jumped in the middle of our list, the best way to make your way through the hop is to start at Claire’s Blog she has the complete sequence if you get out of order or if one of the links don’t work. If you have just come here from Tosh’s blog then you are in the right place! In order complete the hop, leave a comment on as many of the Design Team Members Blogs as you can as a random name is selected from each blog and then a final winner picked from those names. The winner gets a free set of their choice of Waltzingmouse stamps. You have until March 12th at 5:59am CST to leave your comment and a winner will be selected and shown on Claire’s Blog on March 13th. Stay tuned, below I’ll tell you your next stop along the hop!!

Here are links to each of the new sets:
A Good Egg Set
Folk Art Labels No. 25 Set
Folk Art Medallion Set
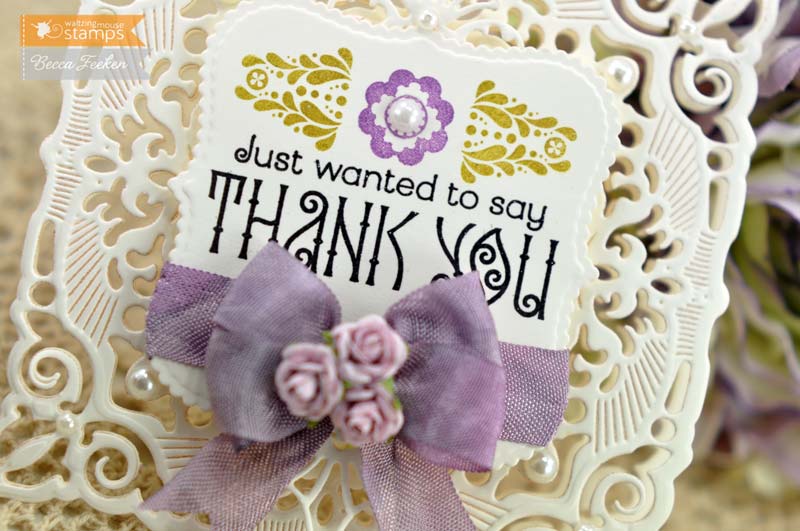
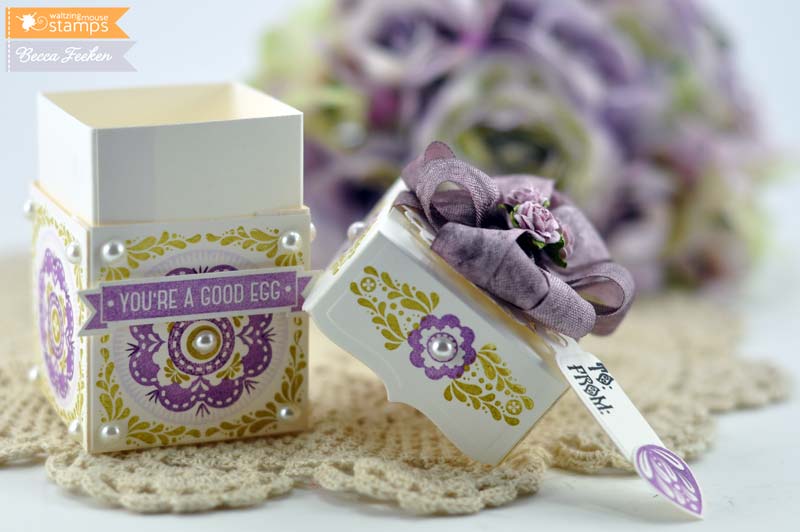
For my project today I made a square filigree card (4″ x 4″) using Spellbinders™ Adorning Squares. To make room for a sentiment I layered Spellbinders™ Scalloped Labels One on top and embellished it behind with an accent piece from Spellbinders™ Venetian Accents. That created a perfect little area to stamp the flourish and sentiment from the Folk Art Medallion Set. I also crafted a little box – instead of me creating one from scratch, I used Spellbinders™ Square Bracket Edge Box because the Folk Art motifs fit perfectly on the sides! Because Folk Art Medallions is broken down into different concentric stamps, you can change colors with each concentric motif you stamp, as I did on the box. On the lid I stamped the same flourish motifs from Folk Art Medallions and then added the little pennant from A Good Egg. On top of the box I added a little dimension using Spellbinders™ Eyelet Circles and lastly attached a little tag using Spellbinders™ Back to Basics Tags and stamped with ‘to’ and ‘from’ using Folk Art Labels No. 25 Set.
I added a 2.75″ tall piece of paper around the inside of the box in order to extend the lid and make the box taller so that you could see the stamped motifs clearly.
| SUPPLIES I USED |
Stamps: Waltzingmouse Stamps – A Good Egg Set, Folk Art Labels No. 25 Set,
Folk Art Medallion Set
Paper: Neenah Classic Crest – Smooth – Natural White
Ink: Amuse – Grape, amethyst, Heather, Blackberry, Rialto, Versafine Black
Accessories: Spellbinders™ Venetian Accents, Spellbinders™ Square Bracket Edge Box, Spellbinders™ Eyelet Circles, Spellbinders™ Back to Basics Tags, Spellbinders™ Scalloped Labels One, Seam Binding, Prima Flowers, Recollections Pearls, Becca’s Bow Maker |
Be prepared to be wowwed, your next stop is with Clare Buswell
Thanks so much for stopping by, I’ll see you soon!!!
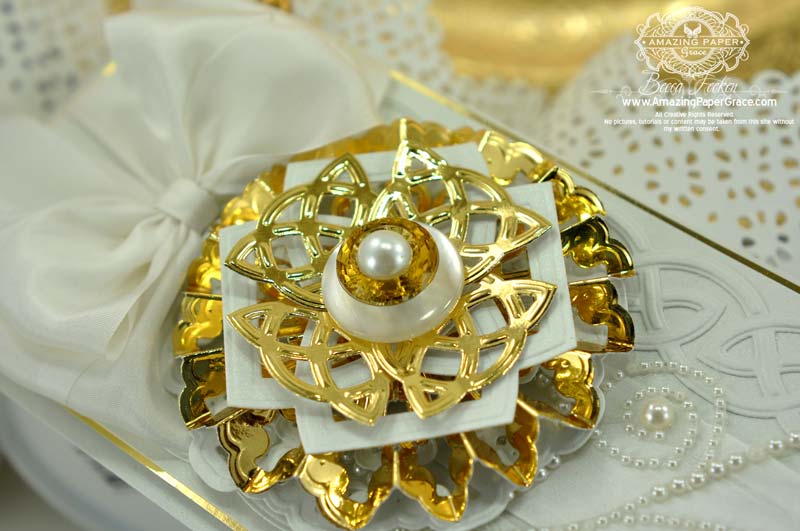
Greeting blog friends!! Welcome to the Spellbinders Explore Beyond Blog Frenzy and Giveaway! I have two projects to share with you today, the first is smack dab in the middle of my comfort zone and for the second I’m actually ‘exploring beyond’ to try something just a little bit different :-) For the first project I wanted a memorable wedding card so I picked my colors of white and gold and used Spellbinders™ Celtic Accents and Spellbinders™ Celtic Motifs for a dazzling accent of unique swirls and fine detail. The occasion called for a long format card that fits into a #10 envelope.
There’s a bit of dimension with the raised medallion and I used the border for a tone on tone accent.
The card has many details, but it’s a cinch to make and uses few supplies!
| SUPPLIES |
Die Template: Spellbinders™ Celtic Accents, Spellbinders™ Celtic Motifs
Cross Promotional Partners: JustRite Papercrafts – Everafter Antique Labels, May Arts 1.25″ Silk Ribbon SK01, Imagine Crafts – Tsukineko Versafine Onyx Black, Want2Scrap – Maxxi Girl Pearls White
Supplies: Coredinations Pearl Cardstock, Colorbok Gold Foil Cardstock 12″x12″, Bazill Button, White Button, Recollection Pearls, Ranger Glossy Accents, Brad, Darice Gold Pearl, Maya Roads Trinket Pin, Becca’s Bow Maker |
Here’s how:
- Score 8 1/2″ x 11″ pearl cardstock the long way, trimming to 4 x 9-1/4″
- Cut a panel of pearl cardstock to 8-7/8″ x 3-5/8″ and mat onto a gold panel cut to 9″ x 3-3/4″
- Cut/emboss two of the long borders and mount them on the card (using Glossy Accents) width wise with a strip of ribbon in between, securing on the back and adhering to base using foam tape. Apply swirl of pearls to right end and attach stamped sentiment.
- Cut/emboss the pieces shown above making sure gold piece centers are hollow and white piece center is filled.
- Score the gold piece as shown above on each leg AND
- Score around again on the area shown above.
- Clip as shown then accordion fold and glue gold pieces together. Glue by laying one edge on top of another and securing with two glue dots or glue.
- Adhere to white round layer – this will form the bottom of the medallion.
- Cut/emboss four of the rounded triangle pieces and secure in corner with a brad then stack the elements as shown above.
- Attach medallion towards the left side of card.
- Add bow and trinket pin on left side of card.
Now on to my second project for today…
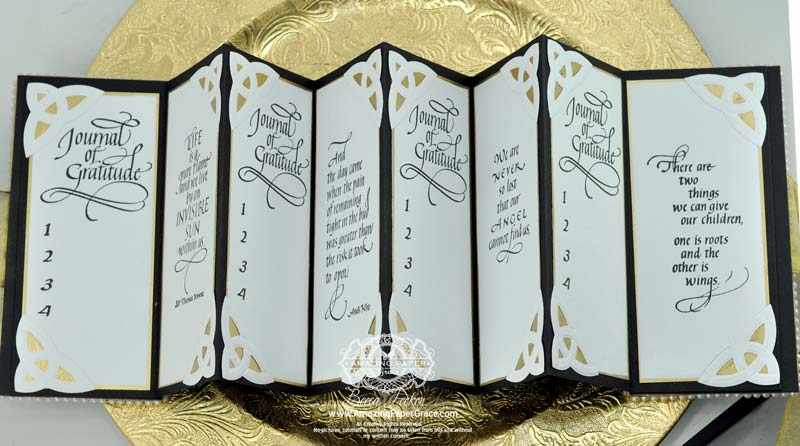
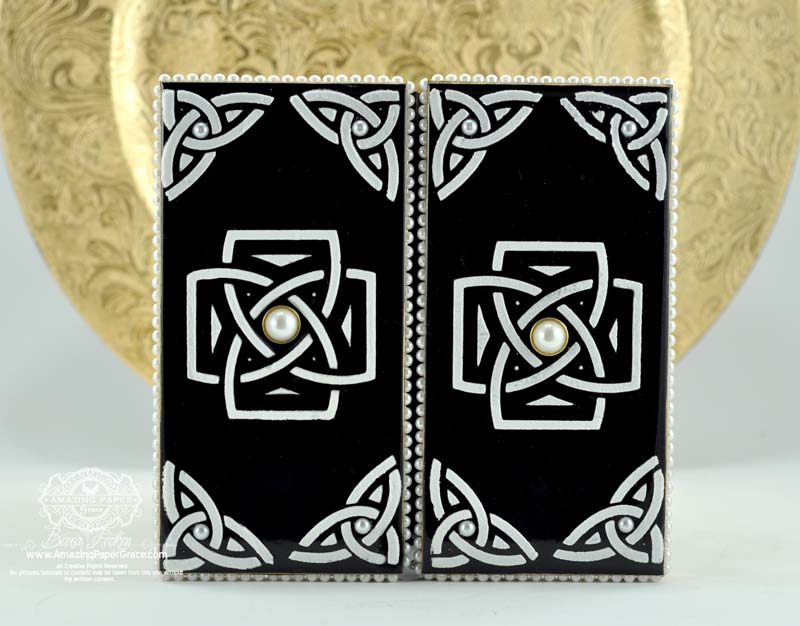
I’ve always wanted to try embossing paste using Spellbinder die templates. You never know these things until you try, so I put on my brave hat and rescued some black tiles from a remodeling project. I cleaned the tiles off and spread Dreamweaver Embossing Paste across the template which I masked with painters tape then removed leaving the relief of the Celtic pattern. I got so excited about this, that I’ll be trying again with mat board and have some gold paste coming my way. I love the dimension!
I assembled the tiles into an accordion fold book and inside I put some of my favorite Quietfire quotes as well as a place to journal some gratitude.
Each of the inner pages is rimmed with gold and the same gold leaf pen used to fill in the corners before overlaying a celtic embellishment.
The above picture shows the tile front cover and back cover of the accordion album, side by side.
So is there anything you have on your “want to try” list? Come on, be brave, tell me what it is!! I’ve found that experimenting around makes me eager enough to plunge into new techniques. I encourage you to embrace your curiosity and try those things on your ‘want to try’ list; do it – one by one.
| SUPPLIES |
Die Template: Spellbinders™ Celtic Accents, Spellbinders™ Celtic Motifs
Cross Promotional Partners: Quietfire Design – Life is a Pure Flame, And the Day Came, We Are Never So Lost, There are Two Things We Can Give, Journal of Gratitude Book Stamps, Imagine Crafts – Tsukineko Versafine Onyx Black
Supplies: Home Depot Ceramic Tiles 3″ x 6″ (Black), Dreamweaver Embossing Paste, Strathmore Black Art Paper, Krylon Gold Leaf Pen, Georgia Pacific White Cardstock, Recollection Pearls, Studio His and Hers™ Adhesive Pearls, ScorTape, Gold Ribbon
|
To Enter Today’s Giveaway… Click HERE.
For official giveaway rules… Click HERE.
Thanks so much for stopping by today!! Be sure you stop by to see Windy Robinson who has a wonderful Spellbinders project today too!!
Questions? Click here to send email to: CustomerSupport@spellbinders.us
No entries will be accepted at this email address.

|


Oh, so lovely! The delicate edge looks like fine lace. I know home improvement projects can turn life on its head…glad you found a quiet moment to “Play.”.
Absolute gorgeous card here again Becca. You really know, how to impresse us, don´t you? I love this card and this die.
Oh, Becca, this is so beautiful. It’s one of my favourite quotes (and designs!). Thanks for giving the stamp such an elegant setting!
Becca – such an elegant card. Just love it!
Hugs
Anne (UK) x
ABSOLUTELY LOOOOOOOOOOOOOOOOOOOOOOVELY!!!!!!! :)
Wonderful sentiment…lovely card! Hope things run smoothly with your home project!
Simply stunning Becca. I absolutely love it! Christine x
LOVE THE LACEY EDGE. GRAND JOB X
Becca your creations are so beautiful! I was flipping through magazines at Barnes and Nobel today and saw the Peg Bow Maker prominently advertised! Congrats! I read you will soon be coming out with another CD. I’m looking forward to purchasing it to supplement the one that came when my hubby bought me the bow maker!
Becca, this card is gorgeous – brings a whole new level to what we call hand made!
Beautiful as always. Thanks for sharing your magnificent work with us!
Breathtaking Becca! I love the length of the card, the scrolled punch out border and that peach bow if a WOW! Please let me have 1 molecule of your talent, thank you <3
This is GORGEOUS!!
Perfect! Love everything you used…and especially the Pearls.
Thank you for this card – -perfect size too.
love,
joyce
I mentally reviewed all the superlatives I know and not one is adequate to describe this card. It’s one of your very best. Thank you for sharing it with us.
Absolutely love cream on cream cards!! Your outside border is amazing with the pearls added to it and lovely touch with the coral bow. Gorgeous indeed :)
Such a beautiful card Becca. I have all these dies so I’ll be giving it a try.
I tried your last one and now understand why Spellbinders are bringing out a magnetic plate – hope it comes to the UK soon. Thanks for all the inspiration you give us.
Hugs
Heather (UK)
x
wow, this is stunning Becca, I love that design.
This is a beautiful card. I would love to make one similar. But alas I dont have the dies. I will now save up for them. Many thanks for sharing this with us.
Ah, such loveliness!
BEautiful card!!
How beautiful Becca. I love every inch of it and the sentiment is so true. Stunning card. Hugs Rita xx
Lovely, especially the sentiment, so sweet!
Love the radiant rectangle.
Beautiful setting for the quote.
Becca, you never disappoint! This card is so delicate and I love the many,many pearls. TFS
Beautiful card Becca! You give a part of yourself each time you make an addition to your blog. Thank you.
Beautiful.
I love this card as well as many others you’ve designed. I’m fairly new at card making and can’t figure our what you’ve done on the fold. How is the card held together? Both the front & back appear to have a scallop edge.
I’m sure seasoned card makers know how it’s done but, as a newby I’m confused.
Beautiful bow, love your bows!
Oooo Becca, I love that scollop die done that way. Beautiful!! So lacy!! Gorgeous colors, gorgeous everything!! I’m so thankful you had a chance to post something for us. It was worth the wait!!
Such a pretty card love all the pearls. Lookin forward to the suprise. Missed you this week glad you were just busy. TFS
Wow this is gorgeous!
Hi Becca! Thank you for taking time out of your busy schedule to share this beautiful card!! Hope your home projects go smoothly!!
Gorgeous!
Gorgeous, love how delicate it is!!
This is a beautiful card, thanks for sharing your creativity :)
Thank you again for another gorgeous card. Your tutorials are excellent.
That card is just beautiful. And I love the sentiment! Good luck eith your house projects!
Stunning as always Becca.
You definately have an eye for fine work.
LOL Eileen
Seriously – A.MAZ.ING.!!
Morning Becca i love this card is stunning i love everything about it. Take care Becca xx
Debs. A
This is truly a beautiful card. Thanks for all that you do. Blessings to you.
sensational…… Truely amazing…loving all the pearls .
Nikki x
What a nice change is conveyed in your beautiful rectangle card. The sentiment is one that anyone would love to receive. Great job as always. Thanks for sharing.
Loretta
Dear Becca,
What’s left to say that hasn’t been said many times before. Your talent is AMAZING and thank you, as always, for sharing it with us.
Linda x
Dear Becca, I just found your website and am so impressed with your work. It’s just beautiful. I especially love the elegant flourish style. You made a card a year or two ago, it was a vintage style and you said that you used a Spellbinders fleur de lis die – it was a round one. Would love to find that one, but I think it has been discontinued. I will be visiting your blog often.
Becca, your work is so lovely and always inspires me. I do miss your kits, though, and am hoping that the cancellation of the club will not be forever.
Blessings, Linda
Lovely as always. It is always such a joy to visit here.