Remember, Prima Blog Candy is up for grabs. You can leave a comment on the post ====>HERE.


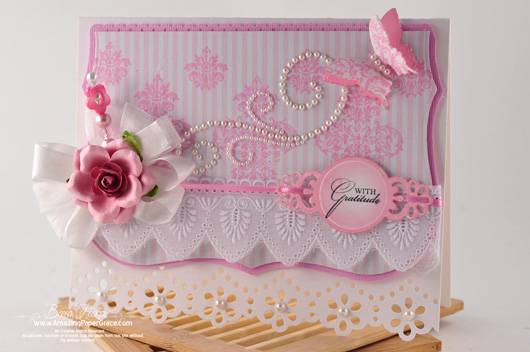
Yes it’s true . . . I try to deny it but I think it shows. Yes, I try to slip a card in here and a card in there, but it seems like there’s always something on the corner of my desk that’s pink. I surrender!  I’m swamped with quite a few deadlines and I finished up this card that has been waiting in the wings for a while – I was just rationing pink!  This is a sweet set from Flourishes called Fanciful Flourishes, that I’ve been dying to get inky. I love damask, it absolutely makes my heart sing, so it was quite satisfying to work the motif into a background. You know what that means don’t you? No hunting for hours for the right paper, because I made the perfect one myself ;-)

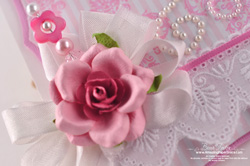
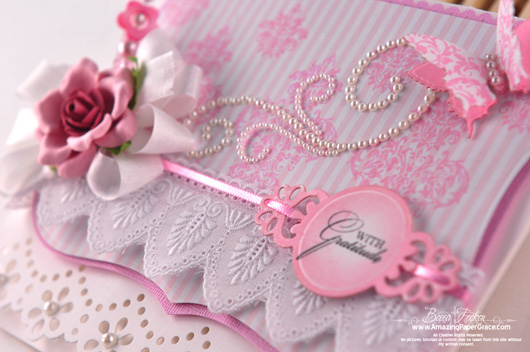
For the romantic shape of the card I used Spellbinders Grand Labels One.  Since the card is predominantly white, I wanted the bottom to seem like eyelet fabric so I punched a border.  Then I added white lace, pearls and ribbon.  I stamped the small sentiment on Spellbinders Floral Doily Accents and threaded my ribbon through to hold it in place.  Lastly, I stamped the damask butterfly (on both sides) and the solid butterfly on another paper then cut them all out with Spellbinders Fanciful Flight.  The flower was already made and I pulled together the pieces for my pearl pick.   

SUPPLIES I USED
Stamps: Flourishes – Fanciful Flourishes
Paper: K & Company, Expedit White Cardstock
Ink: Colorbox Chalk – Pink Pastel
Accessories: Spellbinders Grand Labels One, Spellbinders Fanciful Flight, Spellbinders Doily Accents, Lace, MS Border Punch, EK Success Border Punch, Hug Snug Seam Binding, Recollections Pearls, Zva Creative Pearls

Thanks for stopping in to see me.  Have a fab day!!

pinTHIS SHAREthis TWEETTHIS EMAILthis
  • Gail RMay 19, 2011 - 10:52 am

    Gorgeous card as always…..just lovin’ the lace you have used it’s adorable
    Hugs GailxReplyCancel

  • Naomi A. of ColoradoMay 19, 2011 - 11:04 am

    What a beautiful card. It truly is an inspiration to see your blessed talent come through in your cards. Thank you for sharing your blog, your projects and blessings!ReplyCancel

  • Marge (mer)May 19, 2011 - 11:12 am

    This is purely scrumptious in pink with lace & pearls — what more could a girl want?!!!ReplyCancel

  • Gretchen WilsonMay 19, 2011 - 11:14 am

    Becca, This is beautiful. I love pink and I don’t get to do enough of it, too many males in this family.ReplyCancel

  • RebekkaMay 19, 2011 - 11:17 am

    This is gorgeous. Love the pink and love that lace.ReplyCancel

  • Terri SMay 19, 2011 - 11:17 am

    This one should be framed in a wonderful Victorian frame it is so pretty. Love the idea of stamping on the b/g paper to just get the design you want.ReplyCancel

  • AlexMay 19, 2011 - 11:18 am

    I love pink, and lace, and pearls, Becca your work is beatiful and amazing.ReplyCancel

  • Debby WMay 19, 2011 - 11:19 am

    Stunningly beautiful Becca. I love the pink myself. This is an awesome card. Hope your day is going well and all of your deadlines are met. Hugs…..ReplyCancel

  • Debby WMay 19, 2011 - 11:20 am

    Stunning card Becca. I love pink. Your card invokes a feeling of romance. I love it.ReplyCancel

  • Sally GasparriMay 19, 2011 - 11:21 am

    There is no color more feminine than pink and this card is the ultimate of femininity. Love your use of the lace, pearls, ribbon – all of it together. Beautiful card!!! I would be over the top if you sent it to me.

    Sally GasparriReplyCancel

  • Ree DonnellyMay 19, 2011 - 11:24 am

    No other words fit but PRETTY, PRETTY & PRETTY!!!ReplyCancel

  • Becky DunhamMay 19, 2011 - 11:25 am

    They say the first step to overcoming an addiction is to admit that you have one :) Personally I hope you don’t overcome this addiction because you do pink so well! This card is absolutely gorgeous! I definitely have to have that eyelet lace punch – I have seen it a couple of times recently and it is calling me loudly!ReplyCancel

  • Peggy MMay 19, 2011 - 11:26 am

    Becca, This is a sweet card. You can have an affair with pink any time you want. I also like pink..purple, red, blue, green, yellow, orange, etc. {{Hugs}}ReplyCancel

  • Fran LMay 19, 2011 - 11:28 am

    Oh! So pretty! I love everything about it. Your gift always amazes me!ReplyCancel

  • Marie SellersMay 19, 2011 - 11:28 am

    Ooooh-La-La…What a georgeous card! Love it!ReplyCancel

  • CharlotteMay 19, 2011 - 11:33 am

    Another stunning creation! I love pink, too – and, all the added lace, ribbon and pearls (not to mention all the die cuts/punching) give this card such a delicate, feminine look. LOVE IT. Thank you for sharing!ReplyCancel

  • Marcie SmithMay 19, 2011 - 11:34 am

    I love all the pink-ness!! It is so soft and lovely. I really am lov’in all of the laces you have been coming up with. Where are you finding this esquisite laces. Are they from your local fabric store ? I sure am not seeing them at any that I frequent. They are truly beautiful finds.
    MarcieReplyCancel

  • Beth B.May 19, 2011 - 11:38 am

    Becca, your card is sooooo gorgeous! Love all that pink and everything else! Fantastic job, as always!ReplyCancel

  • ileanaMay 19, 2011 - 11:39 am

    this is soooo pretty! beautiful details, hugs,ReplyCancel

  • Andrea EwenMay 19, 2011 - 11:42 am

    Make no excuses for loving pink, it is a perfectly delicate and feminine color that should be honored and displayed prominently. Looks like you’ve accomplished both of those tasks… :)ReplyCancel

  • Anne McIntoshMay 19, 2011 - 11:43 am

    You continur to amaze me! I always think I’m overdoing it with embellishments, but you have convinced me there’s never too much. Your work is unbelievable! I’m so glad I found your blog!ReplyCancel

  • DawnMay 19, 2011 - 11:44 am

    I love pink!!!!
    I am wowed by your beautiful creation! (Again!)
    It is so lovely..
    Thank you for sharing.
    Hugs, DawnReplyCancel

  • Cathe EkasMay 19, 2011 - 11:47 am

    Becca, Your cards are truly works af art. What an amazing talent you have. I also love all of the pink, lace & pearls. I have not stamped or done any paperrafting for 10yrs due to illness.. Things have changed so much.
    I know you can not answer many questions because you are so busy and have so many followers but I do not know what die cut machine to buy. I know you use spellbinder dies and sizzix embossing. Do they all go together. Can I buy the more inexpensive Sizzix and use spellbinder dies?
    If you can’t answer, I’ll understand. God Bless. Have a good day.ReplyCancel

  • CandyMay 19, 2011 - 11:47 am

    Just dreamy….ReplyCancel

  • Elaine AllenMay 19, 2011 - 11:47 am

    Nothing wrong with pink in my book Becca. Especially when it looks as spectacular as your masterpiece! Gorgeous!

    Elaine AllenReplyCancel

  • ColoradoMay 19, 2011 - 11:53 am

    Lovely card!! Fanciful Flight is on my wish list!!!ReplyCancel

  • Barbara JayMay 19, 2011 - 11:56 am

    Wow this is gorgeous!! I never grow tired of your pink beauties . Everyone is magnificentReplyCancel

  • Karla TempestMay 19, 2011 - 11:57 am

    I love your card today in the pink. The backgrounf with the new stamps are going to be so great for backgrounds. The flat lace you used today as well as yestedays are outstanding and add a punch to set it all off.

    I look forward to each one of your posts to see what new you have come up with. You do such great work.ReplyCancel

  • Becky GreenMay 19, 2011 - 11:58 am

    Pink makes me SIGH!!!!!!!!!! Can you hear me????? :) This is LOVELLLLYYY!!!!!!!!! I REALLY like how you stamped the damask on top of the stripped paper!!!!!! SOOOOO ABSOLUTELY SWEET & DELICATE!!!!!!!! :)ReplyCancel

  • Marilyn ClarkMay 19, 2011 - 12:05 pm

    Pretty In Pink, TFS.ReplyCancel

  • KathyMay 19, 2011 - 12:08 pm

    Another beautiful card, Becca! Your work is absolutely amazing!ReplyCancel

  • sandi ackermanMay 19, 2011 - 12:19 pm

    Yes Becca, Pink is your color. The 3D Butterfly is cool.ReplyCancel

  • MegMay 19, 2011 - 12:31 pm

    Pink is good anytime!! Go with it. Like seeing your projects. Keep up the good work.ReplyCancel

  • MegMay 19, 2011 - 12:35 pm

    Don’t know if my first comment got on or not. But another beautiful pink card. Always nice.ReplyCancel

  • Jo UnwinMay 19, 2011 - 12:39 pm

    I share your love affair with pink :) and this card is absolutely beautiful. I would be thrilled to receive something like this!
    JoReplyCancel

  • Janet CastleMay 19, 2011 - 12:42 pm

    So sweet…love the pink…absolutely perfect Becca!ReplyCancel

  • Terry S.May 19, 2011 - 12:42 pm

    Wow, whata great card. Reminds meof the movie ‘Pretty in Pink’. Everything just goes so well together.ReplyCancel

  • Francie (Montreal)May 19, 2011 - 12:51 pm

    Oh Becca, you’ve gone and did it again. Created another memorable card and it’s pink! Pink has to be the loveliest shade in the spectrum. I’m thrilled to pieces that you incorporate it so often in your cards. Makes me feel giddy with happiness when I look at your work, specially in pink. Thanks.ReplyCancel

  • JessicaMay 19, 2011 - 12:58 pm

    I love pink too! What a sweet card. And you’re the creator, what’s wrong with pink maybe once a week. I always love your stuff.
    Hugs, JessReplyCancel

  • Beth PollockMay 19, 2011 - 1:20 pm

    Becca I just love your work! It is so soft and feminine, and, well, comforting. There is an aura that comes from your cards, as well as your website that is just so warm and welcoming. It is like coming into a friends house for tea and scones and talking over creative ideas.
    Pink is just fine in my book! LOL
    Beth PReplyCancel

  • DeniceMay 19, 2011 - 1:28 pm

    Pink is probably one of my least favorite colors, but wow this card is absolutly beautiful. Pink and all. You really have a God given talant on getting colors to zing…… God bless…..deniceReplyCancel

  • ChinnuMay 19, 2011 - 1:28 pm

    So so pretty and girly! Love it.ReplyCancel

  • SusanMay 19, 2011 - 1:28 pm

    Simply lovely.ReplyCancel

  • yvonne TuneMay 19, 2011 - 2:12 pm

    pink’s my favourite colour as well, beautiful cardReplyCancel

  • Sylvia/GeorgiaMay 19, 2011 - 2:16 pm

    Yes, pretty in pink, but this is more than pretty. It’s gorgeously beautiful!!ReplyCancel

  • Mary HarrisMay 19, 2011 - 2:19 pm

    Just GORGEOUS!! :)ReplyCancel

  • Carol RMay 19, 2011 - 2:22 pm

    Another beautiful and elegant card in pink!ReplyCancel

  • BonnieMay 19, 2011 - 2:40 pm

    Absolutely beautiful…..you are truly amazing!!!
    This has to be one of my very favourites.
    BonnieReplyCancel

  • Pat BargerMay 19, 2011 - 2:57 pm

    How gorgeous, Becca. I also love your pink!!!!!!
    By the way, where do you find your lovely lace
    that you use on your cards. It always adds such
    a gorgeous feminine touch!

    Blessings,
    PatReplyCancel

  • Pam PMay 19, 2011 - 3:07 pm

    Yet another gorgeous card. I too love pink, it is the color that I use most when making cards. Thanks for sharing your beautiful cards with us.ReplyCancel

  • Pat JandacekMay 19, 2011 - 3:13 pm

    You and your beautiful cards and comments make every day perfect. Thanks.ReplyCancel

  • Rene from OZMay 19, 2011 - 3:29 pm

    Hi Becca, your card is lovely and you do pink very well.
    Rene from OZ xoReplyCancel

  • JeanMay 19, 2011 - 3:40 pm

    Becca, you are so awesome. This is a great card. Love all the elements!ReplyCancel

  • GerryMay 19, 2011 - 3:46 pm

    Becca – You are a hopeless romantic! You are so creative. I absolutely love your work!ReplyCancel

  • Tami BMay 19, 2011 - 3:55 pm

    This is so pretty. I especially love the lace and little pink rose.ReplyCancel

  • BernieMay 19, 2011 - 3:56 pm

    Wow this is Stunning! I love the pink, lace, and pearls. I especially love how you stamped on the butterfly, makes it pop and come to life.
    You inspire and educate so many of us. I see shadows of your work and links to your blog all over blog land.
    Blessings BernieReplyCancel

  • cynthia beynonMay 19, 2011 - 4:27 pm

    BECCA NOW THAT IS WHAT I CALL A BECCA CARD, BEAUTIFUL
    FANTASTIC AND PRETTY. OH, IF I COULD ONLY COME UP WITH CARDS LIKE YOU DO. THEY ARE JUST FANTASTIC WEN YOU MAKE
    A BECCA CARD. WHO EVER WON THE BEAUTIFUL PAPER???????

    CYNTHIAReplyCancel

  • Pat FaulhaberMay 19, 2011 - 4:44 pm

    Forgot to leave a comment yesterday but here goes for today. Still loving the paper giveaway and your card today was gorgeous as usual. HAVE to look at your website every day—my favorite. PatReplyCancel

  • Deborah HooperMay 19, 2011 - 5:47 pm

    Why fight the feeling! Go with it. The card is beautiful.ReplyCancel

  • AnneMay 19, 2011 - 6:02 pm

    So so pretty! Love it :o)
    Hugs
    Anne (UK) xReplyCancel

  • DawnllMay 19, 2011 - 6:17 pm

    I am with you and Pink- Love it!ReplyCancel

  • Eunice BrownMay 19, 2011 - 6:20 pm

    I also love pink, so I don’t think you could ever go wrong using that color. Another beautiful card, Becca, thanks for sharing. E.BrownReplyCancel

  • Kathy SMay 19, 2011 - 6:27 pm

    your cards are absolutely stunning- I love this card so soft and feminineReplyCancel

  • JeanMay 19, 2011 - 7:17 pm

    Hello Becca ~ as always your card is gorgeous, very, very pretty and pink really is so feminine. Pink is in a class all by itself, as are your cards. I love the fine details that you’ve applied to this one. Thanks for sharing! Take care, Blessings.ReplyCancel

  • Beverly HubbardMay 19, 2011 - 7:50 pm

    YOU NEVER FAIL TO MAKE A BEAUTIFUL CARD. HOW I WISH I HAD YOUR TALENT.ReplyCancel

  • janeybMay 19, 2011 - 8:19 pm

    Fanciful Flight – perfect name for this perfect card!!

    hugsReplyCancel

  • VivaceMay 19, 2011 - 9:05 pm

    Beautiful! I love the pink! I really love the eyelet border.ReplyCancel

  • Michelle HonseMay 19, 2011 - 9:29 pm

    I love love love this card!! Your things are always an inspiration to me! I look forward to your daily blog each day! You creat a bright spot each day in my life! Thanks for the great things you do!!ReplyCancel

  • MickieMay 19, 2011 - 9:29 pm

    Such a beauty Becca, I don’t know where you get all your ideas. You are so a beautiful, talented person.ReplyCancel

  • LynneMay 19, 2011 - 9:34 pm

    Exquisite. I love the pink and the lace.ReplyCancel

  • Ginny IngramMay 19, 2011 - 11:11 pm

    I love that you love pink! This is another beautiful card. I don’t seem to make pink cards – maybe I’ll have to try one soon!ReplyCancel

  • AndreaAMay 19, 2011 - 11:17 pm

    OMgosh Becca, I think this is my most favorite card ever!!!!!!!!
    I think I have loved every card you ever made and it would have been hard to chose a favorite until just now.
    My favorite color goes all the way back before I started school.
    That is when I learned the difference between pink and baby pink!!!
    Love it!!!ReplyCancel

  • Debbie BMay 20, 2011 - 12:27 am

    Oh my word, another winner. Beautiful card!ReplyCancel

  • EllenMay 20, 2011 - 1:07 am

    I, too, dearly love pink! Most any shade, but especially the mauvey rosy ones. Just loved the current card. Your talent is incredible!ReplyCancel

  • Lisa D. Atha (inspired by purple)May 20, 2011 - 2:09 am

    Becca,

    This is absolutely beautiful, simply breathtaking!

    Hugs,

    LisaReplyCancel

  • trish lawrenceMay 20, 2011 - 3:05 am

    Each morning you cheer me up with your lovely cards,my fix you could say. Thankyou for being there every day.ReplyCancel

  • Sheila - UKMay 20, 2011 - 3:45 am

    Well what can I say Becca that already hasn’t been said! This card is sooooooo exquisite, such a beautiful shade of pink and the details are just amazing. Oh I love it to bits!! I always look forward so much to my daily visits to your stunning blog.

    Love Sheila xxReplyCancel

  • Angelina WesselsMay 20, 2011 - 3:49 am

    A very pretty card – I love the pink and white!ReplyCancel

  • VARSHAMay 20, 2011 - 4:11 am

    A CREATIVE BEAUTY………FROM A BEAUTIFUL HEART….ReplyCancel

  • VARSHAMay 20, 2011 - 4:11 am

    A BEAUTIFUL CREATION……FROM A BEAUTIFUL HEARTReplyCancel

  • VARSHAMay 20, 2011 - 4:15 am

    A BEAUTIFUL CARD…………FROM A BEAUTIFUL HEART……ReplyCancel

  • Anne ( Midlands UK)May 20, 2011 - 4:31 am

    Another beautiful card Becca. AnneReplyCancel

  • bonnie weissMay 20, 2011 - 5:57 am

    I always look forward to what you have created and posted, Becca and secretly I hope it’s pink! This card is another stunner.

    From one pink addict to another …ReplyCancel

  • Mi MiMay 20, 2011 - 5:58 am

    I am mad for pink too and I love this card.ReplyCancel

  • La VonneMay 20, 2011 - 6:26 am

    I luv your bows with seam binding….where to you get your binding? Thanks!ReplyCancel

  • deb vandersteegMay 20, 2011 - 6:45 am

    Oh Becca
    I love pink as well and this and this is just gorgeous!! The lace, flower and pearls are the perfect additions to this masterpiece. Beautiful work sweetie.

    Hugs and Blessings,
    DebReplyCancel

  • MarianMay 20, 2011 - 7:32 am

    Beautiful! I love the colors and am envisioning (is that a word?) it in several other pallettes too…I love paper, I love Spellbinders!! and I love punches…I’m a true addict.ReplyCancel

  • lois skiathitisMay 20, 2011 - 7:56 am

    Very pretty in pink your card is Becca, Love the flower and how you have embellished your whole card. As always Becca, TFS!!! :-DReplyCancel

  • ConniecrafterMay 20, 2011 - 9:31 am

    Oh so lovely, like your lace and punched border, pretty flower!ReplyCancel

  • MegMay 20, 2011 - 12:55 pm

    Another unique card. Would like to see how you did that frame. Thanks for sharing.ReplyCancel

  • Sue WalshMay 20, 2011 - 7:18 pm

    Totally fabulous!!!!ReplyCancel

  • Juliana TMay 20, 2011 - 8:26 pm

    beautiful, beautiful car! I love your attention to detail.ReplyCancel

  • Kathy J (Wattle)May 20, 2011 - 11:44 pm

    Pretty Pink Perfection!!! Gorgeous Becca!!ReplyCancel

  • TrishaMay 21, 2011 - 1:03 am

    Good Morning Becca
    What wonders of beauty must lay in your ‘stash’ !
    If I had your stash in my craft room, I might stay in there forever, just
    sitting and staring at all the pretty things.
    The lace that you used on this pink card, is without a doubt the most gorgeous lace ever.
    Love, love, love this card!!
    Hugs & Smiles
    TrishaReplyCancel

  • JeanneMay 21, 2011 - 4:39 pm

    Becca,

    I know you don’t usually go with pink but WOW maybe you should. This is absolutely GORGEOUS. LOVE IT!ReplyCancel

  • KimMay 21, 2011 - 6:28 pm

    What a beautiful and stunning card. You did an amazing job, I love this card. Thanks for sharing.ReplyCancel

  • EileenMay 22, 2011 - 9:57 am

    WOW this is a very pretty and feminine card which so many people would love to receive….with me at the top of the list LOL
    Gorgeous!
    LOL EileenReplyCancel

  • LalaMay 22, 2011 - 4:04 pm

    Oh Becca, You have such a talent! You always seem to have the perfect combinations on your cards, colors, embellishments, and die cuts. Love each and every card.ReplyCancel

  • Karen LinarezMay 29, 2011 - 2:11 am

    I love the card shape and it’s so perfect with that border, which really does look like eyelet. The butterfly is beautiful and goes perfectly with that sentiment die. Just an absolutely beautiful card.ReplyCancel

  • Thank Abc BlogJune 9, 2011 - 3:45 am

    Flourish Monogram Soft Pink Birth…

    […] wn inner voice. And most important, have the courage to follow your heart and in […]…ReplyCancel


Good morning blog friends.  I have a tutorial for you today, and it’s one you’ve been asking for – for a while.   I made a sample card to go along with it to show the end result for the technique.  Several years ago I figured out how to take a border punch and cut an even frame all around so that it comes out perfect every time. At the time, MS had just come out with the Punch Around The Page Product so I put my plans to do the tutorial away, thinking it obsolete.  Over the past couple of months, several have written to ask me to do the tutorial I had promised.  Then last week when I showed the Love Letter to the World framed hybrid project, several asked again.  Well, that’s how I decide content here – you request it . . . it gets on the list.  Also when a project gets a lot of comment, I assume you like it and then I plan to do more similar projects :-)  All that to say, I’m listening!!

Just a short blurb about my sample card — I’m using a two sweet sets from Waltzingmouse StampsHoliday Labels No. 14 (which conveniently matches Spellbinders Labels Fourteen) and Victorian Frippery.  You know that I have to make a special effort to tilt my cards, lol.  Yesterday I saw so many tilted cards that I determined I had to do it!  You may also notice that my card has stitching on it — that’s because I finally cleared a path to the sewing machine!

SUPPLIES I USED
Stamps: Waltzingmouse StampsHoliday Labels No. 14, Victorian Frippery
Paper: The Paper Studio, Coredinations, DCWV
Ink: Colorbox Chalk Ink – Prussian Blue, Versafine Onxy Black
Accessories: Spellbinders Labels Fourteen, EK Success Moroccan Border, Recollections Pearls, Recollections Flower, Recollections Resin Rose, Recollections Print Leaves, Seam Binding

Here is the tutorial on how to do the punching – I promise you it is not complicated, but you need to try it to get the gist of it.  It works best with single elements that repeat but try it on others:

Back tomorrow with something new!!  Hope to see you then!!

pinTHIS SHAREthis TWEETTHIS EMAILthis
  • Dolly/scrapthatMay 12, 2011 - 11:02 am

    Not seeing the link Becca…I’ll have a coffee and then maybe I’ll see it! ;)ReplyCancel

  • ColleenB.May 12, 2011 - 11:19 am

    Been busy building a storage shed so haven’t had much opportunity to do any commenting on your beautiful cards / projects so been trying to catch-up now that the shed is finished.
    Looking forward into seeing the tutorial when it’s up and running.
    Thank U 4 the great inspiration you have given.
    ColleenB.ReplyCancel

  • Marilyn BeaumontMay 12, 2011 - 11:21 am

    Gorgeous, just gorgeous!!!ReplyCancel

  • Clare CurcioMay 12, 2011 - 11:24 am

    Not seeing the link, Becca Hun! I look forward to it!ReplyCancel

  • charleneMay 12, 2011 - 11:38 am

    Thanks for all the inspirationReplyCancel

  • CindyMay 12, 2011 - 11:46 am

    Great tutorial! Thanks.ReplyCancel

  • janeyMay 12, 2011 - 11:48 am

    Thanks so much, Becca!! the old saying – ‘measure twice, cut once’ is ringing in my head.

    hugsReplyCancel

  • Bonnie GarrettMay 12, 2011 - 11:49 am

    You are just so darn smart Becca – thanks so much for all you do!ReplyCancel

  • Elaine AllenMay 12, 2011 - 11:50 am

    Hi Becca –

    What a lovely card! And thank you so much for the tutorial. It is very easy to follow.

    Elaine AllenReplyCancel

  • JulieMay 12, 2011 - 11:53 am

    Becca, what a great tutorial. I think I have messed mine up every time I have tried it. Thanks!ReplyCancel

  • Susan GMay 12, 2011 - 11:55 am

    Thanks so much for this tutorial. This is the very best explanation I’ve seen about how to do this. Now I can tackle it since you’ve made it easy to understand and follow.ReplyCancel

  • LisaMay 12, 2011 - 11:57 am

    Woooohoooo! You are one Amazing Paper Lady. Thank you soooo much for this tutorial.ReplyCancel

  • Diane LMay 12, 2011 - 12:00 pm

    Oh my goodness! You are a genius! TFS this wonderful tutorial,will def have to try that! Gorgeous!!!!ReplyCancel

  • Liz S.May 12, 2011 - 12:07 pm

    Love this card! Glad to see you breaking out of your comfort zone with this card, especially with the ribbon and bow.ReplyCancel

  • Mickie MillerMay 12, 2011 - 12:11 pm

    WOW! Beautiful card and thanks for the tutorial. You are so ingenious!!ReplyCancel

  • Edna BurgessMay 12, 2011 - 12:12 pm

    Love your tutorial and can’t wait to try it out. Thanks for sharing. Edna B.ReplyCancel

  • GerryMay 12, 2011 - 12:13 pm

    What great tutorials you produce! Thank you. Looking forward to working on this procedure.ReplyCancel

  • Mz CookieMay 12, 2011 - 12:16 pm

    Becca, this is so very informative. Those edgers are a constant battle for me. I’m definitely going to give this a try. Thanks for sharing and teaching…ReplyCancel

  • Janet CastleMay 12, 2011 - 12:19 pm

    You are such a wealth of information Becca….and I soooooooooo appreciate you sharing it! Thank you, thank you, thank you! Great tutorial!
    Hugs,
    JanReplyCancel

  • Becky BowmanMay 12, 2011 - 12:22 pm

    THANK YOU what an ahh momemt for me, I have all these border punches and not knowing how to do the corner. You have opened a new world for me… I’m bummed I’m going to out of the house this weekend so won’t be able to try this. But next week! Watch out!!!!

    Thanks again – you’re priceless!ReplyCancel

  • Karol HallMay 12, 2011 - 12:29 pm

    Thank you. I have this punch so it was great to do it along with you and it worked. Now to try it with some of my other punches.
    Thank you Becca for all the beautiful cards and the great tips you share with us.ReplyCancel

  • DawnllMay 12, 2011 - 12:30 pm

    Such a great tutorial to show another way to use the punches, sometimes they can be frustrating to get a pattern.
    blessings to you.ReplyCancel

  • Judy I, St. Louis MOMay 12, 2011 - 12:31 pm

    Thanks for another great tutorial. Can’t wait to give this a try.ReplyCancel

  • christiMay 12, 2011 - 12:32 pm

    wow, your tutorial makes it look so simple. i so could have saved alot of paper over the past few years, with this info. thanks for sharing with us.ReplyCancel

  • CheriMay 12, 2011 - 12:34 pm

    I will be forever in your debt Becca!!!!!!!!!! I have all these punches, and was ready to throw in the towel because I could not figure out how to get them around the edge! Thank you so much for sharing this, you have no idea how many people will be grateful! In this economy, any way we can save money is awesome, and so are you for all the wonderful tutorials you give (~hug, hug!~)ReplyCancel

  • PhyllisMay 12, 2011 - 12:35 pm

    Just love this idea! I always knew there had to be a way and thanks for making it so easy! We ALL love easy now, don’t we? :) I have learned so much from you Becca! You are like my crafty Christmas present that keeps getting delivered every day! How neat is that? Thank you so much!ReplyCancel

  • MaryannMay 12, 2011 - 12:44 pm

    Your card are gorgeous as always Becca. You always have such great ideas. And thanks so very much for another awesome tutorial too, it´s just really cool and definately one I´m going to try too, that´s for sure. You´re so clever to think all these awesome things out and bring them to liffe, and sooo generous always to share them all with us too. You are a remarkable woman Becca, thanks so very much for that hun.
    Have a wonderful day and week-end ahead dear friend.ReplyCancel

  • Carol WMay 12, 2011 - 12:44 pm

    This is excellent info, and clearly explained/demonstrated! I knew it had to be a matter of simple math, but couldn’t see what exactly I needed to do, or where to measure and what to do with the measurement!
    As others have said, you have just saved many people hours of frustration and wads of paper! Thank you for all that you share.ReplyCancel

  • Nancy SMay 12, 2011 - 12:45 pm

    Thank you SO MUCH for this tutorial! I can’t tell you how many projects I’ve had to put flowers or some other do-dad ont the corners because it didn’t come out quite right!ReplyCancel

  • Cathy WingeardMay 12, 2011 - 12:51 pm

    Thank you, Becca, for the tutorial on punch around the page. I have many border punches (not MS; although, I have many, many of hers!! LOL). This gives me more ideas for cardmaking and scrapbooking. Thanks, again!ReplyCancel

  • SuziMay 12, 2011 - 12:57 pm

    I have that punch and will look forward being able to use it all around the page! Thank you!ReplyCancel

  • Judy McMullenMay 12, 2011 - 12:59 pm

    Awesome tutorial! Thanks for sharing, Becca!!!ReplyCancel

  • Dawn D.May 12, 2011 - 1:00 pm

    This is by far the most incredible tutorial. I can not begin to tell you how many pieces of paper I have ruined trying to do corners. Thank you, thank you, thank you!!!! Your talent is beyond belief and your generosity unmeasurable.ReplyCancel

  • CandyMay 12, 2011 - 1:06 pm

    A brilliant tutorial. You never cease to amaze me.ReplyCancel

  • Cynthia SchelzigMay 12, 2011 - 1:07 pm

    Wonderfully understandable and now doable thanks to this good explanation…thanks a lot!ReplyCancel

  • ValMay 12, 2011 - 1:15 pm

    Hi Becca,
    Your punch tutorial was awesome and so understandable, thank you so much for doing the demo for us. I will be looking at all my punches in a new way.ReplyCancel

  • CathyMay 12, 2011 - 1:21 pm

    Now this is something I am for sure going to try. Thanks for making the tutorial! PS I even liked it before you cut off the frame. : )ReplyCancel

  • Curt O'BrienMay 12, 2011 - 1:26 pm

    This was an awesome tutorial. I love how creative you are. Thanks for taking the time to do this! Best, CurtReplyCancel

  • Vicki BMay 12, 2011 - 1:37 pm

    Becca, thank you so much for that tutorial. I tried it with a MS punch and it worked!!! My corners turned out a little more rounded but I’m fine with it. I won’t “need” any more corner punches now to have a great punched all around edge.ReplyCancel

  • JessicaMay 12, 2011 - 1:38 pm

    Thanks Becca, I just tried it with one of my punches, and it didn’t quite work out well, even thought the depth was still 3/4 inches. But I’ll keep on trying by starting out with larger pieces of paper.
    At least I’ll have a place to start. I’ve tried a couple other ways to do this, that I can’t remember now. They were just too involved. You, as always, make things very easy to understand. Thanks again
    Hugs, JessicaReplyCancel

  • Heidi KimmerlyMay 12, 2011 - 1:50 pm

    Thank you so much for the tutorial! I am off to try it out. I am soooo in love with your blog!ReplyCancel

  • Diana BMay 12, 2011 - 1:51 pm

    You’re amazing, talented, and so very generous with your time and energy. I’m sure I’m not the only one who really, really appreciates you!ReplyCancel

  • Sheila - UKMay 12, 2011 - 1:52 pm

    Thank you so much for this great tutorial Becca….you always make them so clear.

    Love Sheila xxReplyCancel

  • Diana BMay 12, 2011 - 2:05 pm

    By the way, how did you do your pretty signature with the little bird sitting on the downstroke of your first initial? There’s a tutorial I’d love to see!ReplyCancel

  • BernieMay 12, 2011 - 2:11 pm

    Wow this is awesome and a great money saver. I can’t afford those Punch Around The Page Punches but I do have a few border punches and you have just doubled their use for me. I tired it and it works! I have written the depth of each punch on the punch with a sharpie so it was quick work to sketch my lines and punch away. I am SO excited! Thank you ever so much.
    As always your card is stunning!
    Blessings BernieReplyCancel

  • Barbara WilsonMay 12, 2011 - 2:13 pm

    I will have to try this.ReplyCancel

  • DerendaMay 12, 2011 - 2:15 pm

    Hi Becca
    Thank you so much for showing this border frame. it takes border punches to a new level. Once again thank you for all your tutorials.
    DerendaReplyCancel

  • AnitaMay 12, 2011 - 2:16 pm

    Love this tutorial; very clear instructions; can’t wait to try it. Thanks, Becca.ReplyCancel

  • RosesommerMay 12, 2011 - 2:18 pm

    Thank you so much! I did not know how to do this, and I will go and practise right away!!ReplyCancel

  • Paola LeviMay 12, 2011 - 2:18 pm

    Pure GENIUS!!! you should have been twins doll, you are soooo clever. I gotta try this, TFS
    smiles
    PaolaReplyCancel

  • ColoradoMay 12, 2011 - 2:18 pm

    Thanks so much for showing how you do this. I have purchased a lot of the Punch Around the Page sets and I love them, but I also have lots of edge punches so this reminds me that I can use the edge punches for more than just straight line punching!!!ReplyCancel

  • Vicky SchmidtMay 12, 2011 - 2:31 pm

    Becca. You are so clever. I just love getting emails from you with something great like this post.
    Vicky sReplyCancel

  • RubyMay 12, 2011 - 2:33 pm

    Love, Love, Love it! Tks for the wonderful tutorial as well. Because of you I now look at border punches twice, one for a straight edge and other for around a page! haha! Tks again for sharing.ReplyCancel

  • Norma JeanMay 12, 2011 - 2:44 pm

    WOW, Holy Cow! Are you a genius or what! Thank you so much for sharing such a cool tip.ReplyCancel

  • CarolBMay 12, 2011 - 3:01 pm

    Thanks for this great tutorial, Becca. Now I can use all my border punches to go around the card. Hooray.ReplyCancel

  • Terri DaughertyMay 12, 2011 - 3:12 pm

    Becca,

    Thank you so much for doing this tutorial. I know these videos take a lot of time to put together and please know I appreciate it! I love watching and listening to you as you are always so calm and easy to follow. Thank you again, I am now offically a follower!!

    Terri :)ReplyCancel

  • Linda MayMay 12, 2011 - 3:31 pm

    Great tutorial, Becca! I’ve been needing to know this for some time…now I can use all my border punches for more than just borders! Thanks so much!ReplyCancel

  • Annie HareMay 12, 2011 - 3:44 pm

    Thank you, Becca for this tutorials. You are awesome! Hugs, AnnieReplyCancel

  • Mary AnnMay 12, 2011 - 3:48 pm

    Becca — you are amazing! Thanks so much for this video. I probably could have figured it out myself at some point, but you saved me all that time and aggravation. Your explanation is so clear and easy to follow. You’re the best!ReplyCancel

  • Robin BarwaczMay 12, 2011 - 4:39 pm

    You are such a great teacher! Always so very thorough. I’m going to try this out tonight. You’re the best! Hugs, robinReplyCancel

  • Mary JaneMay 12, 2011 - 4:45 pm

    What great timing for this tutorial. I am getting ready to make a graduation card, and I wanted to put a frame around the row of graduation items on the front of the card. Had no clue on how to do it. Thank you so much.ReplyCancel

  • lacyquilterMay 12, 2011 - 4:51 pm

    Great tutorial. Thanks, Becca.ReplyCancel

  • Barbara JayMay 12, 2011 - 5:02 pm

    Thank you very much for the tutorial!! Everything looks so easy when YOU figure it out and do it. LOL I will definitely try this as I love decorative edges on shapes and I love MS punches .ReplyCancel

  • JanineMay 12, 2011 - 5:38 pm

    That is amazing! I would have never in a million years figured this out without your help. Thanks so much!! =) xoReplyCancel

  • Sherry KMay 12, 2011 - 5:43 pm

    Becca, you are brilliant, watch out Martha Stewart – this is better than a corner punch and border. Love it.ReplyCancel

  • lois skiathitisMay 12, 2011 - 5:52 pm

    It’s amazing how you figured out how and where to makes your punches work for you, I never would have figured that out. Thanks for the very informative video Becca. Your card is gorgeous, love browns and blues together. I also like how you off centered the mat behind the mail focal. Beautiful work Becca. As always Becca, TFS!!! :-DReplyCancel

  • Cheryl StaufferMay 12, 2011 - 5:53 pm

    Becca, thanks for such a wonderful tutorial. Your directions are great and I really appreciate your taking the time to make this video to share with us.
    Now we will also be using our border punches alot more!!ReplyCancel

  • Sylvia/LittleTreasuresMay 12, 2011 - 6:11 pm

    MERCI !! Great Tutorial and Wonderful Designed Card. Thanks Becca. It’s just a joy to stop by.ReplyCancel

  • Tammy E.May 12, 2011 - 6:13 pm

    What an awesome tutorial. I must try it. Thank you so much for sharing your talents with us!ReplyCancel

  • Elaine MooreMay 12, 2011 - 6:28 pm

    Oh my goodness! You made this so easy to understand – just LOVE your tutorials!! Thanks so muchReplyCancel

  • Rachel BrooksMay 12, 2011 - 6:44 pm

    GREAT tutorial. Makes it look so easy and precise. Thank you so much for sharing!ReplyCancel

  • Jill NorwoodMay 12, 2011 - 6:53 pm

    I so appreciate the tutorial! I have that exact border punch and am going to try this with my next card! Thanks for all your wonderful inspiration and tutorials!ReplyCancel

  • Candy MillsMay 12, 2011 - 7:25 pm

    Thank you SO much for the tutorial, Becca!!
    I always wanted to use my borders to do this and had no idea how!!
    Hugs, CandyReplyCancel

  • HeyHeyPaulaMay 12, 2011 - 8:24 pm

    Thank you for ths tutorial…can’t wait to try it.ReplyCancel

  • EllenMay 12, 2011 - 8:25 pm

    simply amazing!!! tfsReplyCancel

  • Darla WelchMay 12, 2011 - 8:29 pm

    You are totally amazing! Thanks for all the help you so freely and generously give.ReplyCancel

  • Mary H.May 12, 2011 - 9:01 pm

    Thank you SO much for listening to your blogger folks. In today’s world, that is a bit of a rarity. And thanks also for taking the time to patiently create such an explicit tutorial. How on earth do you figure out these things???You MUST be an engineer. (well, maybe designers are engineers too?). The card, as usual, is lovely, and I enjoyed the great tutorial. Have a great Friday & lovely weekend.
    TFSReplyCancel

  • Shelly SchmidtMay 12, 2011 - 9:09 pm

    Wow, WOW!!! I love this technique- Thank you!!! I have to go look at my edge punches again! I love the beautiful one you used here! Thank You.ReplyCancel

  • ChinnuMay 12, 2011 - 11:46 pm

    Becca, Becca, you are a genius!! What an amazing technique – thank you SO much for sharing! I just love this! You are so clever.ReplyCancel

  • Dorothy SawtelleMay 12, 2011 - 11:47 pm

    Read your blog every day. Love your great ideas. Used you original punch tutorial a lot. Will try this new way to use a border punch as I have lots of punches. Thanks for all your clever ideas.ReplyCancel

  • ChelseaMay 13, 2011 - 1:29 am

    Thank you for this tutorial, Becca. I love seeing the magic you make with punches. I have to admit, it looks easier when you do it – somehow when I’m at my craft desk I don’t seem to be able to make mine look as good as yours!! (Practice, I guess!)
    Thank you so much for this tutorial!ReplyCancel

  • pat pMay 13, 2011 - 2:24 am

    Becca
    This is a fantastic tutorial. Seeing it done and how it’s done is so helpful for a visual learner like myself. It’s like turning a light on and being able to really understand.
    Thank you so much for this wonderful video.

    pat…..I love that pattern too.ReplyCancel

  • Vickie KrivacsMay 13, 2011 - 4:37 am

    This could be classified as a frugal tip as well. Pure genius and inspiration. Thanks again.ReplyCancel

  • Angelina WesselsMay 13, 2011 - 4:58 am

    A very helpful tutorial – Thanks for sharing! I have quite a few M.S. punch around the page sets, but you are limited to the paper sizes that equal the punch size. I will definitely try out your method. Thanks again!ReplyCancel

  • Olga JewellMay 13, 2011 - 5:38 am

    Thank you so much!!!!! I will deafeningly being trying this one!!!!ReplyCancel

  • bonnie weissMay 13, 2011 - 5:42 am

    Love this card and punch, Becca. Thanks for another wonderful tutorial that’s easy to follow and yields great results. I think you should be commissioned by M/S crafts or Fiskars or EK Success to design and create border punches! Hope you have a great weekend.ReplyCancel

  • Denise TrottierMay 13, 2011 - 6:50 am

    Thank you sooooo much for the tutorial, Becca, it’s really appreciated!!!!I will try this very soon…your explanations are so clear and that’s the fun of it…please keep inspiring us with your beautiful work…have a great day…
    Denise TrottierReplyCancel

  • JeanMay 13, 2011 - 7:08 am

    Hello Becca ~ The card and the combination of colors that you used are so pretty! Becca, thank you so much for sharing your talents. The instructions for the punched frame are very easy to follow and thank you for being so patient with some of us who are “all thumbs”. Take care, Blessings.ReplyCancel

  • JeanMay 13, 2011 - 7:24 am

    Hello Becca ~ The card and the color combinations that you used are so pretty. The instructions that you provided for the punched border frame are easy to follow and thank you for being so patient and thorough with those of us who tend to be “all thumbs”. Take care, Blessings.ReplyCancel

  • Francie (Montreal)May 13, 2011 - 7:25 am

    When the history of geometry is updated, your name will be side by side with the other greats: Pythagoras, Euclid, Archimedes and Feeken. The major difference between you and the other three is that you’re fun too and you teach us stuff we can actually use. What a brilliant tutorial. Thank you so much, dear Mentor!ReplyCancel

  • NancyMay 13, 2011 - 7:30 am

    Thank you!ReplyCancel

  • ConniecrafterMay 13, 2011 - 8:16 am

    So pretty, all the stamping and framing look so great together, great tutorial, tfs!ReplyCancel

  • Ann C.May 13, 2011 - 8:20 am

    Becca, this is great! I’m going to try it with my punches. I think I detect a trionometry background….you called the edge of the paper “the axis”. You must have a mathematical mind to have figured this out in the first place! Thanks for all your beautiful inspiration!ReplyCancel

  • LeanneMay 13, 2011 - 9:19 am

    Thank you, thank you, Becca. What a great tutorial. I’m going to give it a try. Hope it works for me?
    Blessings…LeanneReplyCancel

  • Debbie MeijerMay 13, 2011 - 10:10 am

    Thank you for your tutorial Becca! I always wanted to use my border punches in this way but i never knew how to start and now i’m definitely going to give it a try. :)ReplyCancel

  • katemeriMay 13, 2011 - 10:31 am

    Thank you so much for sharing this tutorial Becca! You make it look so easy! I don’t have any of the MS frame punches but do have a couple of these type so I’m going to give it a try. I appreciate you taking the time to show us how to do it!ReplyCancel

  • DonnaMay 13, 2011 - 11:02 am

    Becca, your tutorial was wonderful. I just bought some new punches and was not sure how to use it to frame a paper. It was very nicely done. Thank you..ReplyCancel

  • Linda EMay 13, 2011 - 12:03 pm

    Wonderful card and tutorial, Becca. You are so clever!ReplyCancel

  • RuthMay 13, 2011 - 12:47 pm

    Thanks so much for this. I can’t wait to try it!! I’ll add a link to it on my sidebar. Ruth xReplyCancel

  • Karen HetheringtonMay 13, 2011 - 12:55 pm

    Thank you Becca! Another wonderful tutorial. I am going upstairs to try this right now!ReplyCancel

  • FrancinevMay 13, 2011 - 3:43 pm

    Thank’s for the inspiration ..and the tutorial…ReplyCancel

  • LeanneMay 13, 2011 - 11:28 pm

    Thanks for the tutorial Becca. I never measured the depth before. Now I know why I always struggled to get it right.ReplyCancel

  • Janet L.May 14, 2011 - 8:29 am

    Great tutorial, Becca. I’ve several punches that just don’t get used too much, because I didn’t know how to do this technique and now they will! Thank you, thank you!ReplyCancel

  • LuraMay 14, 2011 - 10:36 am

    Loved the card and tutorial. You made it look so easy! Thanks!ReplyCancel

  • sandi ackermanMay 14, 2011 - 5:12 pm

    That looks like allot off fun Becca. Also, If you cut the frame out carefully, you can use that in a scrapbook picture, card to include a picture or just a cute way for a frame. Neat. Will have to try it. Most of my border punches are smaller so I don’t know if it will be as easy but I will see. :)ReplyCancel

  • Lillian ChildMay 14, 2011 - 7:36 pm

    Oh my … what a FABULOUS tutorial. I have this punch and have never used it to make a frame – it is so lovely! Thank you SO MUCH!ReplyCancel

  • Deebi27May 14, 2011 - 9:17 pm

    Thank you, thank you, thank you! You make it look so easy, so now it is my turn to try this out! Love the look it gives, punches just don’t seem to like me very much! Thankz again and here I go!ReplyCancel

  • MelanieMay 14, 2011 - 10:03 pm

    Thank you for posting this tutorial. I have tried to figure this one out myself but I kept getting messed up – but I see your trick is ‘in pencil lines’.ReplyCancel

  • bethann dMay 15, 2011 - 7:38 am

    thank you for taking the time to do this tutorial. i’ve tried to do this before w frustating results. you’ve given me the inspiration to try again, with patience LOL. always love your projectsReplyCancel

  • MeganMay 15, 2011 - 7:49 am

    Thank you for showing us this technique. So clever! Thank you for your patient and thorough instructions. I always learn so much. MeganReplyCancel

  • JoanieMay 15, 2011 - 12:28 pm

    Dear Becca,
    Thank you, thank you, thank you for sharing your punched border frame with your fans. I just love doing punched borders but find buying the sides and corners rather expensive. NOW! I can make a nice frame using your method. How neat!!!!!! Thanks, again.

    JoanieReplyCancel

  • Kim SearsMay 15, 2011 - 3:18 pm

    Thanks so much for sharing this Fabulous frame! I can’t wait to give it a try!ReplyCancel

  • EileenMay 17, 2011 - 7:35 am

    Another very well explained video….thank you<3

    LOL EileenReplyCancel

  • PaulaMay 19, 2011 - 10:33 am

    Becca,

    Love this! You are such a treasure to share these. I try to be a frugal scrapbooker, whenever possible. Your tutorials are a great help. Thanks so much & God bless you.ReplyCancel


Good morning to you blog friends!!  I always love the beginning of a month because all the new stamps come out and there are so many possibilities.  My mind sure gets busy, I just wish my hands could keep up!!  Today I get to show one of the new JustRite Stamper Releases called Smile. I really do like how upbeat all the sentiments these are designed to have extra wide borders.  Because of that, it seemed very easy to get my layers in place.

I essentially created a medallion (are you shocked?) that from the bottom up included a white store bought doily, then Spellbinders Lotus Pendant then my JustRite 3 1/4″ border, cut with Spellbinders Standard Circles LG and Spellbinders Standard Circles SM.  To pull some of the color back into the medallion I nestled a little circle rim inside my border.  The vertical green panel was  bordered with Spellbinders Parisian Accents while the horizontal green panel was bordered with  Spellbinders Jumbo Scalloped Borderabilites Petite.

I used the newest technique, Figure Eight Loops on my Peg Bow Maker for the little bow and the Ruffled Flower Tutorial to create a little eyelet flower to go along with my doily.  Once I’ve figured something out I love to use it a couple of times to get it down pat!

By the way, JustRite is having a fab sale this week – you can take a peek at the goodies HERE.

SUPPLIES I USED
Stamps: JustRite StampersSmile (Ribbed Collection)
Paper: K & Company, Bazzill, Xpedx White Cardstock
Ink: Colorbox Chalk Inks
Accessories:
Spellbinders Lotus Pendant, Spellbinders Standard Circles LG, Spellbinders Standard Circles SM Spellbinders Parisian Accents, Spellbinders Jumbo Scalloped Borderabilites Petite, store bought doily, Buttons, ribbon, pearls

I’ll see you tomorrow, but in the mean time, be sure to check out some of the fabulous samples made by JustRite Design Team Members!

JustRite Inspiration Blog
Kellie Fortin
Sharon Harnist
Michele Kovack
Angela Barkhouse
Heidi Blankenship
Kazan Clark

pinTHIS SHAREthis TWEETTHIS EMAILthis
  • AprilMay 5, 2011 - 8:04 am

    So beautiful as always! I love the bright colors.ReplyCancel

  • Lori mMay 5, 2011 - 8:10 am

    Just Stunning, love the bright pink and lime green colors. :)ReplyCancel

  • DawnllMay 5, 2011 - 8:26 am

    Such a beautiful designReplyCancel

  • Peggy MaierMay 5, 2011 - 8:29 am

    Love all the layers – for the life of me, I just can’t seem to layer – my cards always turn out simple. Would love to be able to make just one like this!ReplyCancel

  • Susie SugarMay 5, 2011 - 8:52 am

    Your paper is just so pretty and that sentiment says it all
    Beautiful darling
    Hugs Susie SugarReplyCancel

  • Sheila - UKMay 5, 2011 - 8:56 am

    Beatiful card Becca and the pinks oh I love them and such a meaningful sentiment.

    Love Sheila xxReplyCancel

  • SusiMay 5, 2011 - 8:59 am

    What a beautiful sentiment, Becca … much like your card!ReplyCancel

  • MickieMay 5, 2011 - 9:08 am

    WOW and double WOW!ReplyCancel

  • Carol RMay 5, 2011 - 9:08 am

    Such a pretty card! I like the bright pink color with which shows off the crisp clean white. Really like how you layer the Spellbinder die cuts.ReplyCancel

  • VivaceMay 5, 2011 - 9:20 am

    Wow! Love it! Yet another beautiful creation Becca! I think I really love that doily. It looks like a die instead of a doily! And I love the sentiment.ReplyCancel

  • MaryannMay 5, 2011 - 9:22 am

    Soooooo gorgeous Becca. Love the soft colors and all your layers, it´s just beautiful as always hun.ReplyCancel

  • Debby WaltersMay 5, 2011 - 9:44 am

    Justrite seems to be releasing some fabulous items right now. You sure did showcase this well. Beautiful.ReplyCancel

  • JulieMay 5, 2011 - 9:55 am

    Becca, your cards are amazing! I love everyone I have seen.ReplyCancel

  • Becky GreenMay 5, 2011 - 9:57 am

    WOW Becca!!!! This looks LOVELY!!!! You MUST have a STORE ROOM full of supplies to just whip these out!!!!! :)ReplyCancel

  • Francie (Montreal)May 5, 2011 - 10:02 am

    Well, that’s as pretty as a picture! Oh I do adore your cards. This might be the best one yet. Love the sentiment. It has a special meaning for those of us living in Quebec. French is our official language but 10% of us are mother-tongue English. Fortunately, most everyone speaks both languages now. And that’s a good thing. however, I digress. You’re card is a beauty and I think I just fell in love with it. Thank you again for all you do. You are appreciated more than words can express.ReplyCancel

  • BernieMay 5, 2011 - 10:10 am

    Stunning!!! Love the colors and all the lovely details.
    Blessings BernieReplyCancel

  • ChelseaMay 5, 2011 - 10:12 am

    Pretty in pink!! This beautiful card has such a springtime-fresh look to it. The design makes me smile as much as the sentiment does!ReplyCancel

  • RebekkaMay 5, 2011 - 10:24 am

    I am always amazed how you come up with such fabulous creations. This is no exception..:)ReplyCancel

  • JeanMay 5, 2011 - 10:45 am

    Love the sentiment and color combo.ReplyCancel

  • racheMay 5, 2011 - 10:52 am

    Love love love it!!!
    Thanks for sharing and inspiring again!!ReplyCancel

  • Mary HarrisMay 5, 2011 - 12:51 pm

    Oooooooooo I love this card!!ReplyCancel

  • Judy McMullenMay 5, 2011 - 12:54 pm

    Beautiful! Thanks for brightening my day, Becca!!ReplyCancel

  • Pamela O'ConnorMay 5, 2011 - 2:32 pm

    Love the sentiment on this card and stunning detail!ReplyCancel

  • DonnaMay 5, 2011 - 2:51 pm

    GORGEOUS as usual!! Love the color combo! The pink makes everything so happy! And the frame for the sentiment – Wow! Love the little pink flower! Need to try to make one. Its beautiful! And loving the bow!ReplyCancel

  • katemeriMay 5, 2011 - 4:27 pm

    What a beautiful card! I love the sentiment – it says so much. I live in a Spanish speaking country but am no where near fluent in Spanish. A smile goes a long way.ReplyCancel

  • AnneMay 5, 2011 - 5:49 pm

    Another great sentiment – and how I love the pink!
    Hugs
    Anne (UK) xReplyCancel

  • CindyMay 5, 2011 - 9:47 pm

    Beautiful! It’s got pink, and pearls, and I love that sentiment. Working in an international office, I’ve got a poster on the door with that very sentiment. Gotta order that set – it’s all about smiles and being happy! And we can never have enough of either!ReplyCancel

  • LeanneMay 6, 2011 - 2:21 am

    This one’s soooooooooo pretty! Lovely sentiment too.ReplyCancel

  • ileanaMay 6, 2011 - 4:29 am

    Love the colors you used here… the sentiment is great too!ReplyCancel

  • lois skiathitisMay 6, 2011 - 4:52 am

    Your card is just stunning Becca, Love the color combination. Love all of the embellishments and how true the sentiment. As always Becca, TFS!!! :-DReplyCancel

  • Edie L.May 6, 2011 - 5:23 am

    Another beautiful card, but then everything you do is beautiful. Would love to win that beautiful paper. Thanks for the opportunity.ReplyCancel

  • Mi MiMay 6, 2011 - 7:39 am

    Oh Becca: So beautiful. Although I can’t view your tutorials on my computer and don’t understand how to make the fancy round cuts, I have learned so much from you. I am proud of the cards I make and you are a big inspiration to me when I make my cards. Thank you, thank you, thank you. God blessReplyCancel

  • Theresa BonettiMay 6, 2011 - 10:53 am

    This card is gorgeous! Gotta get my peg bow maker put together this weekend so I can try to make this figure eight bow. Placed my first Just Rite order, I just had to have this ‘Smile’ stamp set. Love all the sentiments in it. Becca, how awesome it is to see your gorgeous cards in the Just Rite on-line catalogs. Thanks again for sharing your creations and inspiration. In appreciation – Have a great weekend!ReplyCancel

  • EileenMay 6, 2011 - 11:07 am

    Love that card and the words are so true.
    LOL EileenReplyCancel

  • MGMay 6, 2011 - 5:19 pm

    I look forward every day to viewing your cards. They are so beautiful.ReplyCancel

  • ConniecrafterMay 7, 2011 - 9:07 am

    great colors and layering, love the pearl centers to the buttons :)ReplyCancel

  • Ree DonnellyMay 8, 2011 - 10:45 pm

    Beautiful card, Becca… Don’t know who’ll remember this, but Crosby, Stills, Nash & Young did “Wooden Ships”…..
    “If you smile at me, I will understand, ’cause that is something everybody, everywhere does in the same LANGUAGE….”ReplyCancel

I N F O