Card Making Ideas by Becca Feeken using Quietfire A Family is a Circle of Strength and Spellbinders French Harmony
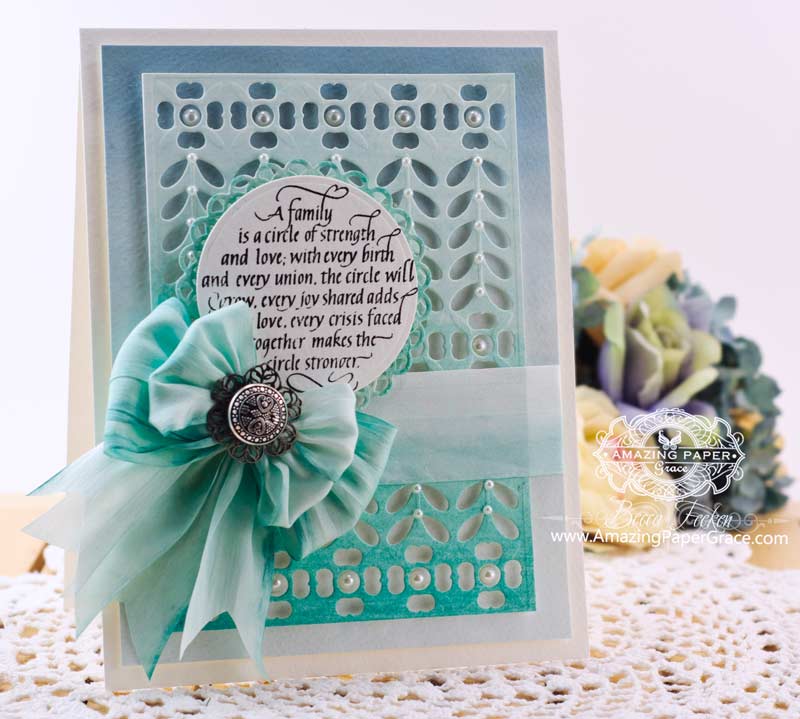
Anyone who doesn’t know that dabbling in paints and coaxing color all over paper isn’t pure, unadulterated therapy . . .  well, that person is missing out.  It has been so busy in my life lately that standing at the craft counter and slathering paint and ink – what can I say – pure.joy.   I’m so taken with the look of ombres. It doesn’t look like I got too inky but the serene wash of color and the understated look was just what I hoped for.  I taped my watercolor paper down to the counter and wet it down, then added the gradual shades of blue.  Then the same thing on another sheet making gradual shades of green.  When I assembled the card I started the heavy part of the background ombre at the top and reversed it with the next die cut layer.  While I was doing the green, I dyed up some white silk ribbon into a green ombre – so dreamy.

Card Making Ideas by Becca Feeken using Quietfire A Family is a Circle of Strength and Spellbinders French Harmony
This is the first time I’ve used Spellbinders French Harmony – oh my, what a lovely background and it cut like butter.  I also used Spellbinders Standard Circles Small and Spellbinders Stately Circles.

Here’s how I made it – step by step:

  1. Start out with a card base that measures 5-3/4″wide – 7-1/2″ tall.  
  2. From watercolor paper that has been painted with a wash of reinker, cut a panel 5-1/4″ x 7″, then attach to base with double foam tape, leaving  foam at bottom of panel unadhered.
  3. From watercolor paper that has been painted green with a wash of reinker, cut/emboss French Harmony, then attach to base with double foam tape.
  4. Take an 8″ length of ribbon to span across card, lift up bottom layer of card and anchor to back side of bottom panel, secure bottom layer.
  5. Cut/Emboss Stately Circles #3, attach to base using double foam.
  6. Stamp Quietfire “A Family is a Circle of Strength” using Versafine Onyx Black and heat emboss using clear embossing panel then cut/emboss sentiment with Standard Circles SM #5 then attach to base using double foam.
  7. Add double bow, pearls, filigree and button. 

Tip:  There are many ways to make a double bow, the easiest way is to stack two  graduated size bows on top of each other.

CRAFT SUPPLIES I USED 
Rubber Stamps:  Quietfire Design – A Family Is A Cirle of Strength
Craft Paper: Strathmore 140lb Watercolor Paper
Ink:  Versafine Black Onyx and Clear Embossing Powder, Edited-to-Add: Ranger Distress Ink – Stormy Sky, Ranger Antiquities – Topiary
Accessories:  Spellbinders French HarmonySpellbinders Standard Circles SmallSpellbinders Stately CirclesMay Arts Silk Ribbon, Button, Filigree Flower

Thanks so much for stopping by.  Oh, and happy Friday  :-)

On a more somber note, condolences to our Dutch friends and the many countries who lost citizens on the plane crash yesterday.  It was a horrible event and the loss of so many innocent lives, absolutely tragic.

Question Parking Lot:

Maureen Killen, comment #1 mused that I must get sick of reading the same comments each day.  My answer to that is Never!!  As a matter of fact, I look forward to interacting with this community every day.  I know many of you by the fact that you come every single day.  You can’t know how very grateful I am.  Just knowing you are here is enough!  You all are the real people I design for!!  After 6 years and almost 1600 posts sometimes the inspiration well goes dry and I’ve found the people who come here fill my sails with inspiration.  It’s never a requirement to leave a comment, I’m so grateful you stop by.  Lol, when both of those cease, I think that’ll be my hint to move on :-)

Carol B, comment #02 asked if I taped down the ribbon to dye it.  I hadn’t thought about that – might be work a try!  But no, what I did was set it in water.  I hope to have a video soon on the ways I dye ribbon because I take the easy way out :-)  Stay tuned.

Charlotte, comment #03 asked where the Question Parking Lot is.  Hi Charlotte, the Question Parking Lot is right here :-)  It doesn’t appear until someone asks a question about the card displayed.  Then by magic of blogs, the question is answered and the answer appear here.  People typically check back to see if the answer to their question has appeared in the parking lot.   Thanks for asking that question Charlotte, it has come up several times for people new to my site.

Marly T, comment #05 asked what colors I used for the ombres.  For the blue I used Ranger Distress Ink – Stormy Sky.  For the minty green I used Ranger Antiquities – Topiary.  On looking out and about, I can’t seem to find the latter online so I assume it is retired.  I hate that because I went through every green reinker I had to come up with the right color.  (This clearly demonstrates that I never throw anything out….)

Ronny, comment #38 asked what size ribbon I use.  I use a couple of different sizes but my favorite fabrics are silk and rayon due to their lovely drape.  On my card today I’ve used 1.25″  white silk ribbon.  I also use 1/4″ and 1/8″ for multiloop bows.  My other go ribbon is the Hug Snug Seam Binding, which is a rayon.  The size of that ribbon is 5/8″.  You’ll see my older cards have really wide ribbon and my taste has definitely changed over time to smaller width ribbon.

Rose Newlun, comment #39 asked how to stack layers and how long it takes me to make a card.  I usually set up my layers to be graduated so that the layer behind is always at least a little bit revealed.  My advise is to look at what other folks have done and after you’ve done that for a while it will become easier to improvise your own.  Get a couple of layer sets you really love then change out one die – that’s another way.  Don’t get discouraged, there is no right or wrong.  Whatever you decide to put on your card, it’s from your heart and it’s the right thing.  The card above took a couple of hours, not long at all.

pinTHIS SHAREthis TWEETTHIS EMAILthis
  • Maureen KillenJuly 18, 2014 - 12:20 pm

    Becca, this is a happy Friday and your card is absolutely gorgeous. You must get sick of reading the same comments, but it’s true – absolutely beautiful.
    By the way I have mastered the safety pin routine, it’s fab. I’m not the only one here in the U.K. but I’ll let her tell you herself.
    Love xx
    P>S> Can’t believe I’m first to blog xxReplyCancel

  • Carol bJuly 18, 2014 - 12:20 pm

    Becca, I love the look of ombré too and of course it’s all the rage. Nice job! Did you tape down and paint he ribbon too?
    Carol bReplyCancel

  • CharlotteJuly 18, 2014 - 12:27 pm

    Becca,

    This is a lovely card. I don’t know how to get to the “Question Parking Lot.” Where is it? I can’t click on it? I was wondering if you ever did a video on how to make this beautiful bow. If so, could you direct me to it.
    Thanks so much. You never cease to amaze me with your creations.
    CharlotteReplyCancel

  • Lisa GregoryJuly 18, 2014 - 12:36 pm

    So beautiful!!. There is no such thing as to inky!!! You color your world beautifully and it shows!! I love it!!ReplyCancel

  • Marly TJuly 18, 2014 - 12:41 pm

    Becca, stunning card as ever. I always look forward to seeing your posts come through to see what exciting projects you’ve been working on. Please could you tell me what product you used for the graduated minty green layer. I’m totally IN LOVE with this colour, so would like to lay my hands on the product you used to achieve this effect. Many thanks, MarlyReplyCancel

  • MaryannJuly 18, 2014 - 12:49 pm

    An absolut outstanding piece of art here again Becca. I really feel a bit like Maureen, that I just keeps repeating myself over and over again, but your work really is sooo amazing and beautiful, that it´s ahrd to keep comming up with more things to praise it LOL.
    Have a wonderful week-end ahead now and lots of fun and joy, and take good care.ReplyCancel

  • margaret driscoll UKJuly 18, 2014 - 12:51 pm

    Hello Becca
    Love it absolutely beautiful as always!
    Lovely sentiment too!
    Take care
    Love MargReplyCancel

  • Anne (UK)July 18, 2014 - 1:01 pm

    Oh my! Loving the colour mix and shading. Gorgeous!
    Hugs
    Anne (UK) xReplyCancel

  • Marilyn in E-TownJuly 18, 2014 - 1:07 pm

    Gorgeous!ReplyCancel

  • ElaineJuly 18, 2014 - 1:15 pm

    Just Gorgeous Becca ,
    God Bless
    Elaine H XReplyCancel

  • Joni StonekingJuly 18, 2014 - 1:22 pm

    Love the look of this – thanks! happy inky fingers!ReplyCancel

  • Diane CokJuly 18, 2014 - 1:26 pm

    All I can say is – just beautiful! And Happy Friday to you!ReplyCancel

  • Pat harveyJuly 18, 2014 - 1:36 pm

    We need a video on this beautiful cardReplyCancel

  • ANN ROBBINSJuly 18, 2014 - 1:41 pm

    Hi Becca
    I remember when I saw the die you used today and thought — how goofy it looked. Well, not no more. It is awesome! with just the Becca touch. I love ombre and found a lot of different colors in my stash as I was assembling my new craft room and I made all of it into bows with my BECCA BOWMAKER!!!!!!!!!
    Have a wonderful weekend!
    Hugs
    Mstgane
    AnnReplyCancel

  • BeckyJuly 18, 2014 - 2:12 pm

    Hello Becca,
    As usual you made another gorgeous card! I can’t wait to see them when I get your email!! I have a question as I am pretty new to your site: how do you make the bows? I looked for a tutorial but couldn’t find one. Also, where do I buy the May ribbon? Is there a website to buy it from as no stores here in Charlotte carry it?
    Thanks Becca!! :)
    BeckyReplyCancel

  • Becky GreenJuly 18, 2014 - 2:27 pm

    How absolutely wonderful!!! I love ombre Becca & you have executed this beautifully!!!!!!!:) EXCELLENT!!!!!!!!!!!!!:DReplyCancel

  • pat harveyJuly 18, 2014 - 3:15 pm

    Being a visual learner, I miss seeing your video’s and this would be a great one to add to your collection.ReplyCancel

  • Jeanette (New Zealand)July 18, 2014 - 3:27 pm

    What a beautiful card Becca. I love these colours and the saying on the stamp is absolutely awesome. I will have to try and find it. Take care.ReplyCancel

  • Sandy HoyJuly 18, 2014 - 4:12 pm

    This is so beautiful! I have not tried to do an ombre yet with any of my cards. However, I believe that this technique will be tried on my next project! Thank you for sharing such a lovely card.ReplyCancel

  • ConnieJuly 18, 2014 - 5:04 pm

    Such great and inspiring talent you have. What a great gift.ReplyCancel

  • Vicky SchmidtJuly 18, 2014 - 5:08 pm

    What a beautiful card. I was glad to hear about putting 2 bows together.
    I will need to try that.
    Thanks BeccaReplyCancel

  • ChelseaJuly 18, 2014 - 7:32 pm

    So lovely and refreshing! The color is marvelous. Thanks, Becca. Your cards are such a treat to the eyes!ReplyCancel

  • Gretchen WilsonJuly 18, 2014 - 7:39 pm

    Stunning, I said on face book that it was beautiful, but when you see it on the screen and not the IPhone, it make a BIG difference, I have always loved ombre and you have done this card justice. It gorgeous and one of my favorite colors. I want to sit down right now and try, but my kiddo is coming for a short visit this week end, he 20th class reunion. Where does time go, I had my 50th last year and I still act like I’m 30. Oh well I may not really look it, but I can have fun. Gorgeous again my friend.ReplyCancel

  • Carol HJuly 18, 2014 - 8:17 pm

    Beautiful! Love those shades of blue/gray! Thank you for sharing! :)ReplyCancel

  • RebekkaJuly 18, 2014 - 11:25 pm

    Gorgeous! I just love the colors.ReplyCancel

  • Clare WJuly 19, 2014 - 1:18 am

    A really dreamy. moody card with that colour – love it – love that bow – divine! Yes done a beaded safety pin now thanks to your advice given – thank you! Having a heat wave here (UK) at the mo – 30C+ – lots of thunder storms -perfect crafty weather!ReplyCancel

  • Norah McPheeJuly 19, 2014 - 4:47 am

    Good morning Becca,
    i like what you have done with your card today as it looks so lovely with the ombre look. The bows are so pretty done in the graduated colour as well and i don’t go for green all that much but this is a lovely card. Changing the bow for a small topper or embellishment could make it a lovely card for a man because they are always difficult to get right somehow. Thank you Becca,
    Love and crafty hugs
    Norah (Glenochil, Scotland)ReplyCancel

  • Mrs BJuly 19, 2014 - 5:03 am

    Hi Becca. Gorgeous card, I love the ombre look. I’m not a big green fan but this shade is beautiful. Thanks for the tip about the double bow : ) Take care.ReplyCancel

  • Colleen HowellJuly 19, 2014 - 5:06 am

    Love the card, and the colors are awesome, love the way the bow turned out on inking as well. Yet another beauty from you, thanksReplyCancel

  • Sonia ReyesJuly 19, 2014 - 7:00 am

    Gorgeous!ReplyCancel

  • JenniferJuly 19, 2014 - 7:33 am

    I love the colourway of this card Becca, beautiful design, thank you for sharing x x xReplyCancel

  • Marilyn ClarkJuly 19, 2014 - 8:08 am
  • vicki dutcherJuly 19, 2014 - 8:12 am

    My favorite color! Your bow is over the top beautiful~ReplyCancel

  • Katy LeslieJuly 19, 2014 - 8:30 am

    Becca
    What a fabulously tasty card. Tasty?? Oh yes, blues and greens are my favourite colours and you have combined them on one card.
    Such a talent. Such a lovely generous lady for sharing your ideas too. xxxxReplyCancel

  • ConniecrafterJuly 19, 2014 - 9:03 am

    Gorgeous, love the ombre effect!ReplyCancel

  • barb macaskillJuly 19, 2014 - 9:15 am

    What a wonderful card!! I love ombre but have never tried it myself. I will be trying it now that you have shown me an easy way to do it!
    So kind of you to mention the tragedy that occurred in the Ukraine! My heart goes out to all the families!
    Have a great weekend!!ReplyCancel

  • Jacquie JacobsJuly 19, 2014 - 10:17 am

    Stunning Becca, so love the colours you have used especially the Green.

    Love & Hugs

    Jacquie J xxx
    ReplyCancel

  • RonnyJuly 19, 2014 - 5:10 pm

    Maybe you have answered this before and I have missed it but I was wondering what size of ribbon do you usually use on your cards. It is hard
    to tell as the picture is blown up to show the card.ReplyCancel

  • Rosy NewlunJuly 19, 2014 - 7:43 pm

    Dear Becca, I always love your cards. No matter how hard I try, I just don’t know how to choose die cut layers to combine. It makes me very discouraged. Is there a trick, and honestly, how long does it take you to create a card like this? It would truly take me at least a week to make something like this. Thanks for always inspiring us! ?ReplyCancel

  • Robyn JosephsJuly 19, 2014 - 8:12 pm

    Lovely setting for the Quietfire quote. Thanks so much for inspiringing us all to get out and paint!!!ReplyCancel

  • Marilyn in E-TownJuly 19, 2014 - 10:08 pm

    Beautiful card!ReplyCancel

  • Sandra SmithJuly 19, 2014 - 10:31 pm

    I love the elegant simplicity of this fabulous card. I think it’s the ombre effect that gives both the elegance and simplicity. Just lovely.ReplyCancel

  • Patricia HowarthJuly 20, 2014 - 10:46 am

    Hi Becca, I adore your card, and the colours are stunning, it is so elegant and beautiful.
    Lots of love from Patricia xxReplyCancel

  • JaniceJuly 21, 2014 - 10:32 am

    Oh my goodness, another stunning card. Love the idea of the two colours, placed in opposite grades. You do some great stuff. I look forward to your video on dying ribbon. The first time I tried to do that, the ink kept coming off on my hands, and everywhere, even though I thought I had dried it well with my heat gun.ReplyCancel

Christmas Card Making Ideas by Becca Feeken using JustRite Snowflake Vintage Labels Seven and Spellbinders
Good morning sweet friends, today draws to a close this months new releases from JustRite Papercraft – lots of eye candy this week right?  Today I have a more traditional Christmas Card to show, with traditional colors of red and gold.   I’m a teensy bit pleased that I have a little stash now.  And yes, it is early but let’s not forget friends, at some point the time passes like the speed of light and by the time you realize it , it’s too late.   I know, I know – it almost seems like perpetual Christmas, but I love it because it brings out the best in people :-)
WRBF-4357-2014
Now about my card, my sentiment from Snowflake Vintage Labels Seven is stamped on a panel diecut with Vintage Labels Seven.  Peeking out just behind is a layer with Spellbinders A2 Divine Eloquence.  The next layer is Spellbinders Labels Twenty Five that is embossed with Spellbinders Adorning Labels Twenty Five.  I made by own background by cutting nine of the square motifs from Spellbinders Damask  Motifs and lining them up in a 3 by 3 grid.  Lol – that’s a quick background for when you don’t want to use design paper!  I finished it off with a safety pin that I threaded up with pearls and three jeweled rondelles in Christmas colors.  Snort — it was a great idea until I figured out that I had to disassemble and reassemble to pin to make it happen (yes, this required me to pull out jewelry tools :-))

CRAFT SUPPLIES I USED 
Rubber Stamps: JustRite Papercraft – Snowflake Vintage Labels Seven
Craft Paper: Neenah Classic Crest Natural White 80 lb, PTI – Red
Ink: Versamark and Gold Embossing Powder, Hampton Arts – Red
Accessories:  Vintage Labels SevenSpellbinders A2 Divine EloquenceSpellbinders Labels Twenty FiveSpellbinders Adorning Labels Twenty FiveDamask Accents and Motifs, Offray Firefly Gold Ribbon, Paper Studio Pearls, safety pin, Brilliance Rondelles. 

If you haven’t hit up the die sale, it’s done at midnight — just sayin’ :-)

JustRite_StamperNews_2014_JULYsaleICONdies

Be sure to pop in and visit the other designers who have creations to show today:
JustRite Inspiration • Becca Feeken • Margie Higuchi • Eva Dobilas • Sheri Holt • Michele Kovack • Heidi Blankenship •  Angela BarkhouseKathy Jones • Darsie Bruno • Kazan Clark  


Question Parking Lot:

Clare W in comment #22 asked how I managed to get the safety pin loaded and put back together without mangling it :-)

Oh Clare, bless your heart….I’m not sure I’d ever do it again because the same thing happened to me.  I’ve found there is no way to recurl the pin so that it looks as good as the original.  I took the other end off – the closure.  I just wriggled it off with jewelry pliers – just twist from side to side (You may be able to twist it off with your hands).  Then I  popped my beads on, popped the closure back on then crimped the closure tight.  Hope this helps!!

pinTHIS SHAREthis TWEETTHIS EMAILthis
  • MaryannJuly 16, 2014 - 9:20 am

    WOUW again you´vwe just made a gorgeous piece of art Becca. Sooo beautifulReplyCancel

  • Ann RobbinsJuly 16, 2014 - 9:22 am

    I just love the red and gold Becca!ReplyCancel

  • Becky GreenJuly 16, 2014 - 9:26 am

    OH! OH! OH! I LOVE that little safety pin with the jewelry findings!!!! WHAT A NICE embellishment!!!! ;D SUPERB Becca!!!!!!!!!!!!! :) “Merry Christmas” in July from me! LOL It’s the MESSAGE behind Christmas that brings out the best in people! BLESSINGS!!!!!!!!!!:DReplyCancel

  • Marilyn in E-TownJuly 16, 2014 - 9:47 am

    Beautiful card! Love your added embellishments, they are perfect!ReplyCancel

  • Clare WJuly 16, 2014 - 9:54 am

    Oh this is a must try – it’s heavenly – and I have never seen a decorate safety pin before – will have to have a go at that although not sure how you’ve dismantled it and put it back together again – expect I’ll find out when I have a go myself, unless it needs a tutorial perhaps?……ReplyCancel

  • Jacquie JacobsJuly 16, 2014 - 10:08 am

    Hi Becca,

    Very elegant card, just love the use of dies on this one, the colour is brilliant. Beautiful.

    Love & Hugs

    Jacquie J xxx
    ReplyCancel

  • ChelseaJuly 16, 2014 - 10:17 am

    OOooh! This one is soooo gorgeous! It has such an elegant Christmas-y feel. I sure have enjoyed these few days of inspiration for Christmas. Thanks, Becca!ReplyCancel

  • margaret driscoll UKJuly 16, 2014 - 10:17 am

    Hello Becca
    Thanks for reminding me about the Damask Motifs, its a Die that I had forgotten….. but now I can see how useful it is!!!
    Love all your inspirational cards
    Thank you
    Take care
    Love MargReplyCancel

  • Blue RoseJuly 16, 2014 - 10:22 am

    Becca,
    I cannot believe this is the end, I have enjoyed every creation that the Design Team has conjured…all so gorgeous in their own rite. Your card is amazing, love the homemade background…glad you told us how. Very gorgeous card, love the bow…love everything. Great job.ReplyCancel

  • MyraJuly 16, 2014 - 10:23 am

    Hi Becca,
    What a lovely card – really Christmassy! I too love that little safety pin! My eagle eyes honed in on that straight away. Not sure how it works – no jewellery tools here. I will give it a go anyway.
    I really like the lovely Sentiments on the Justrite stamps – they are always different .
    Thanks Becca!
    Love MyraReplyCancel

  • CynthiaJuly 16, 2014 - 11:10 am

    It’s beautiful, Becca!ReplyCancel

  • Mrs BJuly 16, 2014 - 11:28 am

    Hi Becca. Beautiful card, I love the safety pin embellishment. Take care.ReplyCancel

  • Anne (UK)July 16, 2014 - 12:01 pm

    You have some very blessed family and friends who are going to receive one of your fabulous creations!
    Love the little pin!
    Hugs
    Anne (UK) xReplyCancel

  • Sonia StephensonJuly 16, 2014 - 1:39 pm

    Hi Becca. Another beautiful card. I love your damask motif square background – fabulous idea, and your bejewelled safety pin is so sweet. Thanks for sharing :-) Hugs xxReplyCancel

  • Maureen KillenJuly 16, 2014 - 1:54 pm

    Good evening Becca,
    What a beautiful card, and a brilliant idea to use the square from the Damask Motifs for the background. I’ve had this set for ages and never used that particular die. A fact that I’m about to change when I’ve finished this post!!
    I’ve also got my pliers out and a few safety pins to practice on – I’d better put a sign on my craft room door saying “Danger – Maureen on a roll”.
    Thank you so much for the ideas and inspiration.
    Take care and God bless xxReplyCancel

  • MildredJuly 16, 2014 - 2:29 pm

    Gorgeous card. Love your 3×3 background grid.ReplyCancel

  • Charlotte ZweigoronJuly 16, 2014 - 4:34 pm

    I don’t believe it..! Did you say “Snort”?… You must be feeling really good about getting that little stash of Christmas Cards together… Your sense of humor has been peaking out of its hiding place lately. You are always gracious and charming; now we have to add funny to the list. What a gal…ReplyCancel

  • Vicky SchmidtJuly 16, 2014 - 4:37 pm

    Very nice Becca. I keeping telling myself that I need to staart some christmas cards. With all the work we are doing to our home,it does not leave much time to stamp.ReplyCancel

  • Marilyn ClarkJuly 16, 2014 - 4:54 pm

    Beautiful card. Thanks for sharing your talents with us followers. God bless.ReplyCancel

  • Lorraine Gould in AustraliaJuly 16, 2014 - 5:19 pm

    Awesome…. so beautiful. I would like to go on your Christmas card list!!!!! Let me know if you would like my address. :) lol
    LorraineReplyCancel

  • Dorina DJuly 16, 2014 - 7:57 pm

    Beautiful, rich looking card. Love that vintage snowflake stamp. Gorgeous.ReplyCancel

  • Clare WJuly 17, 2014 - 10:11 am

    Me again Becca – I’ve been having a go at that lovely beaded safety pin – I assume you are opening the pin, uncurling the looped end of wire, putting the beads on and then curling it back up again – this is the bit I am having difficulty with! It doesn’t resemble a safety pin by the time I’ve finished with it! Any tips please? the only other way I can think of doing it is opening the pin and putting beads on the open side thereby not needing to uncurl the looped wire end and perhaps secure the beads with a tiny pinch bead. Your help/advice would be appreciated. In anticipation many thanks.ReplyCancel

  • Blue RoseJuly 17, 2014 - 11:42 am

    Becca,
    I was just wondering, how did you adhere the square motifs? They look like they are raised…right? I wanted to give this a go, since I do have that die, but when I re-read your recipe, it was not mentioned. Please help…thank you.ReplyCancel

  • Maureen KillenJuly 17, 2014 - 1:02 pm

    Hi Becca.
    I just thought I’d let you know that I did my version of this card last night and it’s stunning BUT I did the same as Clare and my pin was a disaster. I;ve read your post on what you did so I’m off now to try that way, thanks,ReplyCancel

  • Clare WJuly 17, 2014 - 1:22 pm

    Hi Becca – thanks for your response to my question – makes feel much better knowing you’ve had the same trouble and it wasn’t only me! – well I’ve tried the wiggling with pliers technique – 1st attempt was on a silver pin – I broke the closure off the wire – completely severed it. Then I tried a brass pin and wiggled more gently and… bingo – it worked!!!!!! pin came off the closure cleanly – so many thanks – although still got to bead it up and get it back together! I suppose that’s why they are called safety pins. If all else fails I’ll revert to the crimp bead on the open side. Many thanks for your response – appreciated.ReplyCancel

  • Clare WJuly 17, 2014 - 1:24 pm

    Me yet again – just read Maureen Killen’s comment above – how is yours going Maureen?..ReplyCancel

  • DominikaJuly 17, 2014 - 1:33 pm

    Absolutely stunning card!!!!ReplyCancel

  • Patricia HowarthJuly 18, 2014 - 2:46 am

    Hi Becca, Another beautiful card, gorgeous colours, fabulous compilation and stunning bow, I love this !!
    Lots of love from Patricia xxReplyCancel

  • Maureen KillenJuly 18, 2014 - 6:30 am

    Hello Clare,
    Well my pin is done and dusted, although the longest part was finding the best beads, not too big so that the pin wouldn’t fasten but not too small so that they looked like fleas on an elephant! Dead chuffed with the result. I’ll only give cards with these on to people who will appreciate them. Once did a pergamano card for my brother-in-law, a full sailed galleon ship with all the rigging. Loads of cutting out and took me nearly a week of evenings to do it. He said it was “Quite nice” and threw it in the bin!! Never again.ReplyCancel

  • Maureen KillenJuly 18, 2014 - 8:38 am

    P.s. Clare, forgot to say the end of the pin when loosened was slightly bent to fit into the closure part, so I had to straighten that, slide on the beads, and then slightly bend it again. Hope you understand x.ReplyCancel

  • Clare WJuly 18, 2014 - 9:42 am

    Hi Maureen! (Becca – hope you dont mind us using your blog to converse re our beaded pin issues)… yes I have done one also! Like you the pins size and bead size ratio seems an issue though – I used a 23mm pin and 6mm rondelle spacers – think a 27mm pin with 4mm rondelle spacers would work beter but seeings I have neither at the mo I’ll have to wait to try that until the ones I’ve ordered come. Completely understand your PS above although I didn’t need to straighten the pin as my beads were bigger than yours I reckon – they are a bit of a fiddle to do but worth it I think – so eye catching – want to do a batch of them when my bits come so they are ready and waiting to go as n when required. I have some little jingle bells that I thought I could hang one from, in the middle say, so when the card is opened it jingles – if they are in scale with the pin we shall see – at least we’ve both managed to get something that resembles Becca’s now, thanks to her help – thanks Becca – so chuffed I managed to do one – it was feeling like a materclass in how to mangle a safety pin so it’s unrecognisable until Becca’s much needed guidance. What would we do without you Becca? It will make beaded stickpins seem like a doddle now!ReplyCancel

  • Maureen KillenJuly 18, 2014 - 11:02 am

    Clare, brilliant idea about the bells, I’ll give it a go, should look fab.
    Thanks Becca for being able to swap ideas on your blog.ReplyCancel

  • JenniferJuly 19, 2014 - 7:32 am

    Hi Becca
    Your cards continue to amaze me, so, so beautiful, from your design, to your techniques brilliant x x xReplyCancel

Christmas Card Making Ideas by Becca Feeken using Mix and Match Christmas Blessings and Spellbinders
Woohoo, this is something I don’t get to say often enough, but today there are New Amazing Paper Grace Stamps by JustRite – you can see Mix and Match Christmas Blessings HERE.  Just a shout out to my friends across the water – this set sold out on Create and Craft TV a couple of weeks ago.  You know that I love a ‘Mix and Match’ kind of format to give you the most options and that’s what this set will do.  You can use each of the lines as a single by itself or you can stack them all together – and layer the blessings on.  Simply line them up on your acrylic block, stacked in the order you’d like to see them (I like to use the “and” before the last one :-))
Christmas Card Making Ideas by Becca Feeken
I have a sample to show today and there’s a tip sheet to show a bunch of options on how to mix and match. I stayed with the same warm colors from yesterday and reached back into my stash for My Minds Eye, Lost and Found Christmas.  On a cream cardbase I made and distressed a panel from two pieces of design paper.  On top I layered Spellbinders Majestic Labels Twenty Five.  My sentiment is stamped on Spellbinders A2 Valiant Honor and the elegant accents on the corners are from Spellbinders Corner Flourish. The pennant is a hand cut shape that I simply tucked under my stamped  sentiment with the gold embossed bells and holly.  Card Size: 5-7/8″ x 7″

Thanks so much for your kind, gracious words this week as I get my creaky Christmas card making brain in order.  I’m frantically digging through papers and embellishments so that I have what I need on hand for the card making frenzy that will happen as I discover I’m running out of time, lol!!

CRAFT SUPPLIES I USED 
Rubber Stamps: JustRite PapercraftMix and Match Christmas Blessings
Craft Paper: Neenah Classic Crest Natural White 80 lb, Kraft, My Minds Eye
Ink: Amuse Studio – French Roast, Fresh Ink – Merlot, Versamark and Gold Embossing Powder, Brushed Corduroy Distress Ink
Accessories: Spellbinders Majestic Labels Twenty FiveSpellbinders A2 Valiant HonorSpellbinders Corner Flourish, Button, The Paper Studio Pearl, May Arts Silk Ribbon

Oh, if you haven’t popped in this week, JustRite is having a sale on dies – just two more days!!

JustRite_StamperNews_2014_JULYsaleICONdies

Now we have three other sets debuting today as well so be sure to pop in and visit the other designers who have creations to show today:

JustRite Inspiration • Becca Feeken • Debbie OlsonMichele Kovack • Sheri Holt • Darsie Bruno  Eva Dobilas • Angela Barkhouse • Kazan Clark

Thanks so much for stopping by, I’m wishing you a glorious week.  Looking for some positive inspiration?  I’ve gathered up a couple of prayers on my Pinterest Boards that have touched my heart this week.  Consider yourself blessed and if you need a tidbit of encouragement, browse for a minute ——->Words of Faith or Words of Wisdom :-)  (Note: I’m pretty sure you have to have an account to look, but all you need to supply is an email address and pick a password :-))

pinTHIS SHAREthis TWEETTHIS EMAILthis
  • TinaHJuly 14, 2014 - 9:10 am

    Looks like a beautiful set, Becca, really love today’s card. Heading over to see the rest of the new JustRite, thank you for your fabulous work!ReplyCancel

  • HelenJuly 14, 2014 - 9:18 am

    Fabulous little card. The Justrite sentiments are the best. The fonts they use and the elegant scrolls they add are just the best. Thanks for all your inspirations. Love HelenReplyCancel

  • Blue RoseJuly 14, 2014 - 9:26 am

    Becca,
    Another gorgeous card. Looks so vintage Christmas. Love the mix and match, so many options. Great job.ReplyCancel

  • Anne (UK)July 14, 2014 - 9:28 am

    Another stunner! Love the sound of the new set, Becca! Well done :o)
    The stripes at the bottom remind me of the stripes on some of our old fashioned winter sweets flavoured with clove, so doubly apt for a Christmas card.
    Hugs
    Anne (UK) xReplyCancel

  • AdairJuly 14, 2014 - 9:29 am

    This is gorgeous!!!ReplyCancel

  • MaryannJuly 14, 2014 - 9:40 am

    Your stamps are always sooo awesome and sooo versatile Becca, and this one as well. I can see loads of options for this set. And your card here are amazing too, just soooo beautiful as ever.ReplyCancel

  • Jan in LondonJuly 14, 2014 - 9:41 am

    I had ordered this stamp set ages ago as a pre-order and as if by magic it arrived this morning – how about that for a coincidence LOL.
    They will be so useful to use inside the cards and not just on the front and I just love the fact that I’ll be able to make lots of different combinations for my cards from just one set – it really does make a difference when true crafters (like you) come up with these sets.
    Thank you …ReplyCancel

  • ElaineJuly 14, 2014 - 9:53 am

    Your card is as beautiful as ever Becca, and the Prayers so inspiring.
    God Bless
    Elaine H XReplyCancel

  • Maureen KillenJuly 14, 2014 - 10:07 am

    Good afternoon Becca,
    (4.05 p.m. in the U.K.) This card and layout is so beautiful and I agree with Anne, the striped paper on the bottom looks like Humbugs. (They are so tasty, just like your card)! xxReplyCancel

  • Clare WJuly 14, 2014 - 10:45 am

    great card and mix and match stamps is a fabulous idea.ReplyCancel

  • margaret driscoll UKJuly 14, 2014 - 11:07 am

    Hello Becca
    I really like this card……. the stripes make me think of French papers !
    I love the colours of the Ribbons too!
    Really lovely card Becca!
    Take Care
    Love MargReplyCancel

  • Jacquie JacobsJuly 14, 2014 - 11:19 am

    Beautiful Becca, Lovely design and stamp.

    Love & Hugs

    Jacquie J xxx
    ReplyCancel

  • ConniecrafterJuly 14, 2014 - 11:20 am

    Gorgeous stamp and beautiful framing of it, love that paper to, helps give it that vintage feel with the cream!ReplyCancel

  • Marilyn ClarkJuly 14, 2014 - 12:34 pm

    Thanks for sharing your creation of this card. God bless.ReplyCancel

  • ChelseaJuly 14, 2014 - 12:50 pm

    Beautiful!! Thank you for the inspiration, Becca. Your cards are soooo fabulous!ReplyCancel

  • CraftysusanJuly 14, 2014 - 12:54 pm

    Woohoo indeed Becca. The stamps and card are absolutely gorgeous. I missed them on Create and Craft so it is lovely to see them here. Thank you.ReplyCancel

  • Sonia StephensonJuly 14, 2014 - 1:17 pm

    Hi Becca. Wow. Such a beautiful set of sentiments. Love your card too – another stunner :-) xxReplyCancel

  • Becky GreenJuly 14, 2014 - 2:35 pm

    Wonderful card Becca!!! As ALWAYS!! :) You’re so good to get your Christmas Cards done early! Thanks for the peak at your Pinterest Board! JUST what I needed today! :D What a blessing! Blessings to YOU too! :)ReplyCancel

  • Marzee CarnesJuly 14, 2014 - 2:40 pm

    This is my favorite of the Christmas cards you have posted so far. I LOVE IT!ReplyCancel

  • JOYCE ANDERSONJuly 14, 2014 - 3:14 pm

    SOOO beautiful and love the new Christmas Stamp Set you
    created!!! Will purchase immediately.
    God Bless you and His gracious talent given you,
    joyceReplyCancel

  • Jennifer BackJuly 14, 2014 - 5:03 pm

    I have rheumatoid arthritis, a very ugly disease Becca and i need frequent injections of beauty and faith……..and you give me both. Thank you for touching my heart and soul.

    Be at peace!

    jenny xReplyCancel

  • Jennifer BackJuly 14, 2014 - 5:07 pm

    Forgot to say my mix and match Christmas blessings arrived today Becca and cant wait to get started with them. Another beautiful and unique card!ReplyCancel

  • RoseJuly 14, 2014 - 6:24 pm

    Hi Becca,
    this is another beautiful card – you’re putting me to shame, haven’t resumed on my Xmas cards since I stopped in February. There’s the garden to do and because of the wet and warmth we’ve been having in Cheshire, UK, everything has just gone wild – most of all the weeds! Feels a bit like the Forth Bridge – when I’ve got to the end of the garden I can start at the front again!
    Hugs, RoseReplyCancel

  • Marilyn in E-TownJuly 14, 2014 - 11:23 pm

    Beautiful!ReplyCancel

  • Sandra SmithJuly 15, 2014 - 2:26 am

    Fabulous beyond words. I am always inspired by the elegance, texture and bling. I love everything you create.ReplyCancel

  • Colleen HowellJuly 15, 2014 - 5:01 am

    Wow, another lovely card. Just when I think you can not out due yourself you DO! I am amazed at your talent, and even more amazed that you are willing to share it with all of us. Thank YouReplyCancel

  • Debbie BJuly 15, 2014 - 8:52 am

    Very elegant Christmas card. I love it!ReplyCancel

  • Ros HodgkinsJuly 15, 2014 - 12:46 pm

    Hello Becca, I managed to get your stamps before they sold out, and I am so pleased as every message I would want to send is in there. Thank you
    X Ros H in Cambridgeshire, EnglandReplyCancel

  • lindaJuly 15, 2014 - 1:37 pm

    Hi Becca super card as alway ,l have these stamps and they are so great l cant stop my self when you bring out new stamps and dies all your stamps and dies are to die for hugs lindaReplyCancel

  • Patricia HowarthJuly 16, 2014 - 1:49 am

    Hi Becca, I’m so loving this card, and I really adore the Mix and Match stamps, they are so beautiful.
    Lots of love from Patricia xxReplyCancel

  • MyraJuly 16, 2014 - 10:30 am

    Hi Becca,
    I’m doing a bit of catching up today as have been on holiday hence no comments for a bit!
    Love today’s card and the Sentiment is lovely too. I love the colours you have used and as ever your beautiful bow!
    Take care and keep up the good work!
    Love MyraReplyCancel

I N F O