
Well, you’ve gone and done it now, you’ve pushed me over the 100,000 hit mark! No one could be more surprised than me….
I started this blog at end of February with a handful of cards that I had been working on. Scared that I wouldn’t have enough to show or have enough to say, I scattered the posts through February and sat down to figure out what to do next. Fast forward to today…I’ve met the most charming people and have made many online friendships…amazing to me because the blog was and still is a tool to keep me busy, to keep me from stressing and to keep me looking forward to tomorrow. I never knew that blogging would give me the confidence I needed to actually show what I was working on; the daily encouragement is a breath of fresh air and I’m actually using all the tools and supplies that I’ve collected for so long. I’m still shaking my head in amazement, I am so blessed.
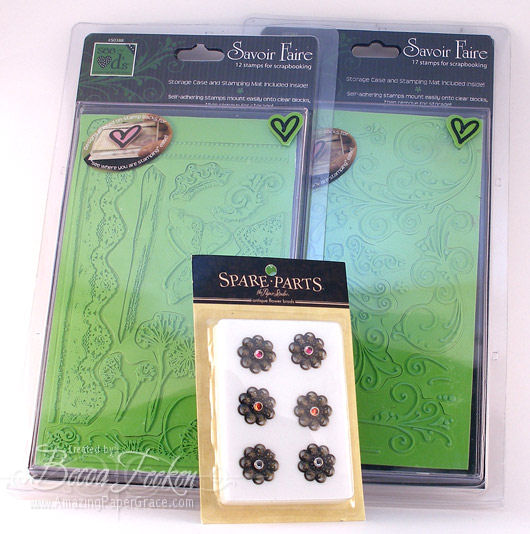

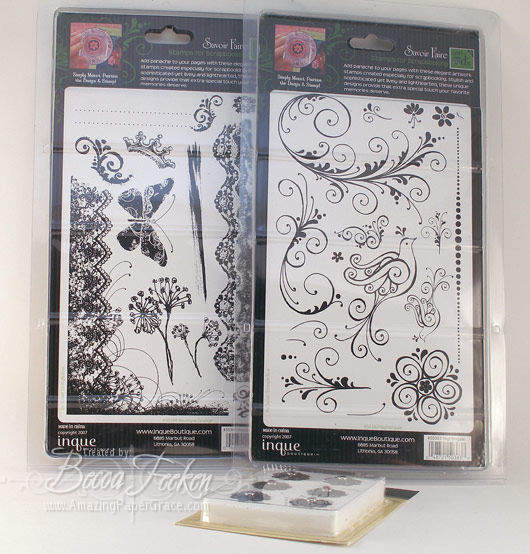
Well, the people who come and always look, the sweet lurkers and those who always, always find time to leave a kind word have a special place in my heart and my sincere thanks. As a show of gratitude and to mark the occasion, I’ll be giving Blog Candy for the the first time ever. To win you simply need to leave a comment on this post telling me how on earth you ever found me! On Wednesday, August 13 at 2:00 pm Central Time, I will close comments and shortly afterward pick a winner by drawing a name from all the comments submitted, mixed up in a basket. Why a basket and not Random.org? Well I assure you the drawing will be random, but I wanted a way thank those that step up and leave comments day after day. So if you have left at least 5 comments between July 1st and August 7th, please note that in your comment so that I can verify it and lucky you, your name will go into the basket twice as a bonus for your loyalty.
Here is the picture of what you will win. Two Inque Boutique Stamp sets and one set of my favorite, favorite filigree brads!
Thanks again!!!! Good Luck!


I found you through a beautiful card you created and posted on Splitcoast a couple of weeks ago. Your cards are so beautiful. I just love all the things you do with white paper–it turns out really stunning!
Sara
Gosh, Becca, you would have to ask how I found you. Well, I can tell you it was from visiting another blog and one of your cards was there and there was a link to your blog. That’s the way I find most of the blogs I have on my feed list. I wouldn’t miss your posts for anything. I love your cards and you inspire me to create.
Shirley in NC
Oh, I forgot to tell you…..I love those stamp sets too! LOL
Becca,
I’m very new to your blog. I think linked over to you from Card of the Week blog or maybe Inspirational blog. You are now in my Google Reader so that I’m sure not to miss anything! I love your designs!
Lisa
Becca… I found you through a search on by bloglines when I was searching for card ideas.
I love your cards… sometimes I comment most the time I read, look and dash… lol
After seeing your card yesterday I did a search for D Morgan stamps… they are beautiful and I have to try to save a bit before I can get any… hopefully I can find them then (there are not many out there)… thank you for posting that card and putting the desire in my heart for those BEAUTIFUL stamps!!!!
I’m afraid I don’t recall how I discovered your blog but it was shortly after you started. All that I know is, when I see that Google Reader has indicated an item posted by Amazing Paper Grace, that’s the first one I open. :D I went through the pasts posts to see if I had 5 comments. (No I didn’t, shame on me; close though), but I’m so glad I did, because there were 3 things that I just bought because of cards you made (Amazing Grace stamp , Wordsworthstamp: Faith , and the cuttlebug embossing folder of the bird in the tall grass). Now I remember why I had them on my “must buy” list. You obviously inspire me (not to mention sending me to poor house). ;)
Becca, I can’t remember how I came across your blog, but I think probably it was referenced by another. I was just scanning through all your previous cards earlier today and was thinking the whole time how original your techniques and style is. You always reach outside the box and I love it. I’m sorry to admit that I’m one who looks and doesn’t take the time to comment. I read 100’s of blog posts a day and it seems I’m always in a hurry when I do, so I don’t take the time I should and tell everyone how wonderful their stuff is. I’ll say it now… your stuff is wonderful!
Ohhhhh, how gorgeous are those! I might have to go hunt them down and buy them myself if I am not the lucky winner!
I just found you in the past week or two through the inspirational blog that is showcasing talent – And what a find you are! Your style is so elegant and right up my alley! Congrats on 100K – I’m guessing 200 will be here before you know it :-)
Becca, I have no idea how I found you, but I know that you have had so many beautiful cards that I just keep coming back. I know that you did a Psalm 23 card with and angel that was just gorgeous and I was searching all over the internet to find those stamps. I have no clue how many times I have commented in the period of time you spoke of. I do know that I did comment yesterday just so you don’t think that I am totally clueless! This is wonderful blog candy and I would love and opportunity to win!
I love visiting your blog on a regular basis. You style is wonderful & Incredible and gives me great deal of inspiration. I believe found your blog through a good friend of mine, Charlene Austin at Willow & Paisley Blog.
Becca, I can’t remember how I found your blog but when I did, your talent stood out immediately. Your techniques on your cards are pure inspiration! I love the effect of using the large bows and have started to do it on my cards. I look at so many blogs each day but don’t have time to comment. Now I realize how important the comments are to all of you. I get so inspired by your cards because you usually attempt something different. Even if I don’t win the blog candy, seeing your cards posted is great candy for me each time. Keep up the creativity!
Shirley L.
Roseville, CA
I found you though a post about your AWESOME blog at The Stamp Shack! Your cards are always so gorgeous! Very fun sets you have up for grabs! SMILE!
Becca, your blog was brought to my attention about 6 weeks ago by a stamping friend. It took awhile for me to start posting but once I started, I couldn’t stop. I’m sure I have more than 5 posts although that is not any great accomplishment! What is my reason for coming by on a regular basis? It is your exquisite talent in this very crazy art form. I sometimes just oogle over your creations and wonder where you pull all this creative talent from. I’m convinced that anyone lucky enough to receive one of your works of art, should promptly have it framed and give it a place in their home. And I want you to know, my comments have nothing to do with blog candy – they are truthful expressions of how I feel when I look at your art work. Thank you so much for the inspiration you bring to so many of us.
Stefanie S.
Milwaukee, WI
Haha I have no idea how i found you I believe through someone else’s blog is usually how I find most of the blogs I go to or else SCS. I have you on my google reader so every time you have an update I am there. your cards are great.. Have a great day
Dear Becca I found your site through another one of my favorites “Thinking Inking” by Debbie Olson I look at your cards at least 2-3 times a week and do truly admire your work but don’t comment on too many blogs. Thanks for the great opportunity to win some of my favorite inque boutique stamps.
I found you also through Debbie Olsen’s side bar where she lists a bunch of other blogs worth check out. Yours definitelly made my list of “favorites to bookmark.” Blessings on your beautiful work & may it bless others!
Hi Becca,
Well you’ve really put me on the spot! I am not sure, it was either through another blog or through a search on the internet. I liked what I saw so much that I added you to my RSS feed. Now I get to see your new articles straight away although I would have to add that I am a lurker! (Ok, a sweet lurker lol).
Well Becca, I actually just found you about a week ago through a thread at the SCS Forums about the “new Cuttlebug folders” and now your blog is the first one to go to on a daily basis to get me going in the right direction. I absolutely love your creativity!!!!
I would love to win your “blog candy”, as I tried in vain on Thursday to find some of those filgree brads!!!
Hello Becca!
What a great blog candy! I found you not so many days ago, and you are now one of the best card maker I know! I am so happy that I found you in Inspirational, because I love your cards and your use of embossing dies and Nestabilities! Keep up the good work, I will follow you every dag!
From Desiree in Norway
Gosh, I have no idea how I found you..probably went to this blog, then this blog, then that blog….you know how it goes.
Lovely candy. thanks for offering it to us.
Michelle
Hi Becca
Well you know how I found you and your wonderful cards – Talent scouting!!! and you have the talent indeed.
100,00 visitors that is amazing! = Well done!
Here’s to the next 100 000!
Hugs
Dawn
I don’t recall how I found you, but it could have been Splitcoast.
Enjoying your blog every day! Take care.
Wow, congrats on hitting 100K! If I recall correctly, I left a comment after you on another site, and just loved your name so had to click through and check it out; don’t think I’ve left many comments, but I do love your work and you’re in my reader!
hi Becca – I think I found you through a link over on SCS about making your own dabbers. Ever since I found your blog, I’ve read all your new entries as you are on my favorites to visit every day. I think this is my fourth comment on your blog and it’s just the beginning as I’m still catching up on all your entries. I love all your work as it is so elegant, tasteful and uplifting. The recipients of your cards are truly blessed.
Becca, Someone on Gingerwood (I think) linked to your blog because of your new cuttlebug cards. As soon as a saw your beautiful work I put you on my google reader. I love your style. You are a great inspiration.
Wow, what lovely blog candy you are offering! The way I found your blog was by accident. I was searching in google for blogs and your came up! What a happy accident! Thanks for the opportunity to win!
Becca: I’ve been coming for so long I don’t remember how I found you. Could it have been through Stamping Links to Love? I find many new friends there. However, I did it was a fortunate find for me as I am a devoted fan of your cards and your talent. I come every day, I CASE your cards and I admire everything you do. Congratulations on such a milestone!
Mary
http://www.primitiveseasons.blogspot.com
Congratulations Becca!!! It is no suprise to me that you have passed right on by that 100K mark! You are truly one of the most talented, passionate and remarkable people I have ever met!!!! Your cards are so much more than a greeting, they are true works of art. I could pick one of your cards out of a line up……lol. They are original, classy and elegant all tied up with one beautiful bow.
I am new to visiting your blog since about two weeks ago. I came across it through a link at another site. I bookmarked it right away the first time I visited…. beautiful cards and great inspiration. Thanks for all your sharing.
DeniseB
Your cards are some of the prettiest I have ever seen. You do beautiful work.
Tricia
How did I find you …. hmmm … I honestly think it was a google search on ribbon storage. Or maybe a link from someone else to your ribbon storage – I do know that that was the first entry I read on your blog. And since then I have been inspired almost daily by your gorgeous cards. Your imagination is so limitless, it makes me want to dig out my stuff and create!!!! Congrats on 100,000!!!
I have no idea how I found you Becca. I was going through my bookmarks the other night and yours was there but don’t remember bookmarking it. I opened it up and WOW! You create the most amazing cards. I love them and from now on will be a regular visitor to your blog. 100,000 posts. That is incredible! Congratulations!
Becca…I was surfing the blogs and somewhere there was a link to yours…I can’t for the life of me remember where the link was….but I feel that it was providential!!! I’m sure I’ve commented 5 times, at least, in the last month. Right? You will probably get really tired of seeing my name pop up but I really love your designs and I have this nagging feeling to tell you how great they are.
I’m not sure how I found you but I”m sure glad I did. Your site is the first one I visit each day. I love the way you use your punches and your embossing folders. Your cards are beautiful!
Thanks for making my mornings more enjoyable.
Hi,
I found your blog through a very beautiful card you posted on SCS a couple of weeks ago. In case you are interested, it was this one:
http://www.splitcoaststampers.com/gallery/photo/995538
I clicked on your blog link in your description, and I’ve been hooked since!
Connie K.
To be honest, I have no idea how I found you. I can’t remember. But, I know that as soon as I saw your wonderful creations, I very quickly added you to my Google Blog Reader and Added 3 stars to the front of your blog name so I would know that yours is one of those blogs I never want to delay reading a post. I LOVE your creations! Thank you for your generosity in sharing your talents with all of us.
Karen L.
oh wow, this is a treat! YUM! lol the best kind of candy!
I don’t have any idea how many times I’ve commented! lol
I know, I’ve emailed you two or three times too! I’ve felt like a pest! the good kind…. the inky, gluey, die cutting kind!
I do enjoy your blog and have your posts come into my mail program via the RSS feed! LOVE how that works…so convenient and a very timely manner! Thanks so much for the awesome, fabulous and inspiring posts! It encourages me to use my “stuff”!
All roads lead from Allison at Stampinwhenican.blogspot.com. I added you to my reader then created a folder called Cream of the Crop. Only the best go in here. and there you be!
Hi
I found your blog from another card maker blog. I should say your work is really pretty
Sandra
I found you the day I was born (you being my big sister and all) and loved you all my life. This blog is a manifestation of all the creativity bestowed you by those that walked before you. As with everything you touch it is successful. Wow, 100,000 hits in 6 months.
I guess I am disqualified to win the blog candy, I’m sure there is some fine print somewhere about people related to you not being able to win ($@#%^&%).
I think I have the better prize though, having you as a sister, seeing the wonderful things you create and knowing your heart is pure.
Hi Becca, I found your blog from a posting on scrapbooking friends and
really enjoy all your ideas using the cuttlebug embossing plates. I
think you have much to be proud of.
Funny.. I ran across you on SCS. I liked one of your cards ( I think) and followed you here!
I found you from a link from another blog. I am so glad. I have been meaning to drop you a note and tell how much I like your work. It’s inspiring and beautiful. I come and visit almost every day. Makes me feel better every time. Thanks!
Becca,
I don’t even remember, I was just very lucky. I love your cards, they really do inspire me to try and create.
I would love to win the stamps but if not maybe on your next blog candy, tutoring lessons for stamping, now that would be great.
Keep the ideas coming.
Donna
Someone on the Affair with Art Yahoo group recommended your site. I love your work. I have just gotten the new Cuttlebug embossing folders both fall and Christmas and you have given me so much inspiration. You are the first blog I check everyday. Keep up the good work. You truly have a God given talent.
Claudia
Your work is amazing indeed. Every one of your cards is a masterpiece. A friend referred your blog to me just a few days ago and I can’t stop looking! God bless you!
Char
Wow Becca! I found your blog in April when I was looking for card inspiration and found some of yours. I was so amazed at your work that I immediately bookmarked your blog and constantly checked it for updates. Once I discovered Google Reader and how to subscribe to blogs yours was the first I added. I really enjoy your work even though I don’t leave very many messages (hardly any at all on any of the blogs I read!) I have used several of the techniques you have shown on your cards for my own projects with fabulous results. Thanks for your willingness to share your talents!!
Congrats on 100,000 hits!
-Katherine aka Csmoferret
You are amazing as well as your stamping. I get almost daily inspiration from you. I think I have left 5 comments I dont know.. All I know is I love your cards and always start with your blog. I think I found you off of splitcoast but I am not sure. Oh I know where it was… I found you off of crafty storage because I loved your ribbon storage ideas…. and from there discovered all your wonderful talent. You are sweet to give stuff away. I just would love to be able to create the kind of cards that you do.
Hugs
Jaunice Minor
Utah
I don’t know how I came across your blog at the end of July. All I can say is I’m glad I did. In that short time, your design and creativity have truly amazed me and inspired me. (And I have left you 5 comments between 7/26 and 8/4 telling you so!) I look forward to reading your blog every day! Congratulations on hitting the 100,000 mark!
I believe God, Himself led me to you. I think it was in May. Because of your cards, I actually started stamping pretty cards myself. I have been creating and designing cards also but you are my biggest inspiration and I thank God for leading me thee and you for creating such lovely cards and giving so freely of yourself. I knew nothing about Blogs except “Hero Arts” until I discovered yours that day in May.
Because of you, one day I am going to submit to “Divine Design” I joined splitcoast because you talked about it on your Blog. I didn’t realize you had just started your Blog in Febuary. It is a great Blog, keep up the good work.
Tenderly,
Shirl
San Diego
Ephesians 3:17-19 NIV
Becca, my dear friend Bevie linked me to your blog and now I visit you daily! Your creations are works of art and I can feel the love you pour into each one!!!
Hi Becca,
I found you when someone on the DieCutsAll yahoo group posted your blog link to show off some of your gorgeous Cuttlebug embossed cards. I’ve been a frequent flier ever since! I love your work and your writing, too! Thanks for sharing!
Hi Becca,
I found you through Split Coast Stampers web site. Your blog is the first one I visit everyday, even before I pop onto splitcoast. Your artwork brings a ray of sunshine to my day no matter how difficult life gets. I stopped counting my comments after 9, but I am not sure if they fall within the dates that you mentioned. What a nice gesture to offer free gifts to one of us. What a trooper to have to read through the already more than 50 comments on todays post. A big thank you even if I don’t win! Keep blogging, you are fantastic!
Hugs, Lisa
[…] so this post will be brief. Don’t forget to leave a comment for my 100,000K Blog Candy here to be given out on Wednesday, August […]
I just recently descovered your site. Your cards are amazing to say the least. I am amazed at the number of layers you use on each. I love all the things you have done with the new cuttlebug folders. Thanks so much for sharing. :o) JuJu
Becca…I either found you on Split Coast or through someone else’s blog and it’s been a wonderful experience! I was so amazed by your cards that I finally just subscribed to your blog…your cards are not only uniquely beautiful, but I so appreciate the depth of meaning that many of them have…Thank you…Susan
Opps, discovered, can’t type! :o(
I just found you, I think, last week through Gingerwood, I think?! In any case, I’m glad I found you – love your creations. Thanks for sharing your talent.
H, Becca! I don’t need any more stamps, but I still wanted to tell you that I am so thankful for you! Your creations and spirit make my heart happy. {{{Hugs!}}}
I found your site because someone recommended it as having great examples of cuttlebug embossing folders (and they were right!)
Love your cards. Thanks for sharing all that you share! Jamie
You are a very talented person! Thank you so much for the wonderful inspiration!!! I absolutely love your blog and can’t wait to see what you will create next!!! Thanks for the chance to in some fun goodies!!!
I found your blog as a link on another blog about a week ago and instantly subscribed. Love the name and your approach to your artistry. You are a gifted designer . We are blessed by you.
I think I found you by following a card posted in the SCS gallery. The blog candy is awesome and so is your blog.
Hi Becca, thank you so much for your inspiration, definately keep the cards coming. I found you through a blog of a blog and instantly I was hooked on your beautiful creations. I can’t wait till the next feedblitz pops up because its like a receiving a birthday present everyday.
Becca,
I found you one day while I was searching for ways to organize my supplies. Until recently, I was a collector of supplies. I could never seem to fit crafting into my schedule with 4 kids (I don’t know how some people do it!), but had tons of supplies! I found your ribbon storage ideas first, then had to peek at your cards and read your posts.
Your cards are great and I love the inspirational sentiments you share with us! You are beautiful, uplifting…truly AMAZING! :0)
I found your wonderful blog through a link from another blog. Bonnie in NH
Hi, Becca.. I’m afraid I don’t recall specifically where I came from to find your blog.. I blog-hop every day, but it would have been either from the Inspirational blog, or from someone who linked to you from their blog… Katie, possibly? I do particularly seek out blogs that have ‘Christian’ titles, so that would have attracted me to yours, but – having found you – I am camped out on Google Reader, waiting for each and every glorious post! ;o)
And – yayyy! – I have counted my comments and there are exactly five since I found you on 31st July! Woohoo! :o)
It’s a wonderful candy offer, and I would love those stamps, but I have been really blessed with wins lately, so please feel free to not enter me in the draw. Just know that I love your blog. Your cards are just gorgeous.
Hugs,
Heather xx
Oh! By the way, I have posted an entry on my blog promoting yours… HERE
You’re cards are so beautiful you do such beautiful work. Becca I found you on SCS. I put all you’r cards in my favorites,I love the cuttlebug folder ones especially. I’m so glad you share you’re ideas with everyone. God Bless and thank you.
Hi Becca well done on getting so many hits on your blog. I found you through Heather but will be adding you to my blog list so I can keep an eye on your blog. Would just love to win your blog candy as I love these stamps very pretty. Thanks Su x
Hello Becca,
Well lo and behold, I found your blog by the entry on Heather’s (Craftling) blog…
I have spent almost the whole morning reading back on your blog.. and now will be off to add you to my blog candy roll and moreover to my inspiration blog roll…
I actually hardly ever get any cards made because I spend so much time drooling over blogs like yours… and now have another to add to the list!!
Take Care
Gina x
A friend sent me your link so I could see all the Cuttlebug stuff.
Enjoyed that so much I subscribed to your blog.
Thanks for sharing….I really enjoy it.
Yvonne
Hello….Congrats on a great blog! I try and visit everyday and I think I found you from SCS and one of your cards that linked to your blog?? I might have found it by way of another stamper’s blog too…whatever way I got here I am glad to come visit. Thanks for a chance to win.
Becca, I don’t remember how I found your blog but it’s on my daily read list. I don’t comment very often (my bad!) but I enjoy looking at your beautiful cards. Congrats on the high number of hits!
Hi, Becca. CONGRATULATIONS!!! I found you linked thru another blog. I now subscribe to your blog. I am truly in awe of your beautiful cards. They inspire and delight. Thank you for sharing your wonderful talent.
Congratulations Becca. I have learned a lot from looking at your creations and reading your blog. You are truly gifted. Thank you for sharing your talents on line for all of us to see.
Congratulations for so many hits!
I found your blog over Katharinas Blog. The candy is great, thanks for the chance to win this. I post it on my blog!
Hugs, Andrea
You are awesome, darling! :) I don’t know how many times I’ve commented – but I know it’s more than five. Every time I come over here there is something amazing waiting.
But, what is even more precious is the person behind the stamps.
{INKY HUGS}
Hi Becca,
I saw one of your cards on Splitcoast, went to your blog and fell in love with your work. I think the first one I saw was last week. Have I missed a lot or what???? Thank you for sharing your work with others, you are blessed with a wonderful talent. Congratulations on your blog and also congratulations to the winner of the wonderful blog candy.
Becca,
Nancy and Kathy P. told me about your blog, and I have so enjoyed it! You know what a fan I am of your work! I believe I’ve left at least 5 comments; you know I always have something to say!
I did a search on the gallery at SCS for new cuttlebug folders and found you! I was amazed at your cards — your work is sooooooo neat! After I looked at all of your amazing cards, I subscribed. You are so talented! The blog candy is great!
Congrats on 100,000 hits! I think I found you through a link from SCS. Love your work and subscribed right away so I don’t miss a post! I’ve only been visiting for a few weeks, and rarely leave comments as I pass through the sites I visit, even though your cards are definitely over the top!
Someone else talked about your blog and I can’t even remember who at the moment. I checked it out and your work is beautiful. I’m amazed that you make so many cards. I often wonder if you send that many or do you just save them? I have all this stuff and hardly ever use it (I’m working on that, trying to enter more swaps etc.). Anyway, you are very creative and I enjoy seeing your creations and getting ideas. Thanks.
I think I found your blog via a link from someone else’s, but unfortunately can not remember whose. Anyway thanks for the opportunity to win this fab blog candy. 100,000 hits, WOW, I have a long way to go before I can match that.
Many congratulations.
Love Debbie xx
Hi, I visit your blog from time to time, and always find inspiration here, your blog is great! I love your style and I don’t exactly remeber when I was first time here, I found link on SCS :)
congratulations on soo many hits:)
Hi Becca,
I can’t remember exactly how I found your blog – it was definitely a link from another blog – perhaps from the Card of the Week blog, and as soon as I saw your work, I knew that I wanted to sign up for daily emails. I love your work, and the fact that you too are a child of God. Congratulations on 100,000 hits.
Anne.
Hi Becca. I found you about a week ago. Some one and I don’t remember who had a link for your blog. Bless them because I love your creativity. Pat
I found your blog through splitcoaststampers. I must have seen some of your work there then clicked on your blog. I immediately added it to my favorites. I love the colors you use and I love all the embossing folder work that you’ve been showing lately. I passed on your blog to a friend who is also into using embossing folder and she also added you to her favorites. You’ve been our ‘water cooler’ talk lately – “did you see the latest on Amazing paper grace” “isn’t it beautiful” You do the do the stuff that I picture in my head, but just can’t get to come out my fingers. Someday I hope to get there.
But I dont unerstand. I cry.
Gratulations of course Becca !!!!
Ooo .. my God , why I dont understund english language ????
Salute for You and Your Family !!!!!!!!!!!
I found your site referenced through another card. Once here I loved what I saw. Your work in amazing. I immediately signed up for your blod. Thats for a great opportunity to win some beautiful stamps.
I’ve subscribed to your blog for some time. I’m sure I came it through one of the yahoo groups I’m on or through another blog. I love to click into blogs to see what people are creating. It’s so inspirational! Thanks so much for sharing your art with all of us.
Rene’
Farmington, MN
I t hink I found your bolg from another blog I don’t remember- but I do remember that I have you in my favorites and I come back everyday! Your inspiration is as your blog title states AMAZING!! Thanks for shareing your talent with us.
Anne S
Becca,
I just found you recently and now I can’t remember how. I think I was searching for cards with the new CB folders. Once I saw your amazing talent I quickly added you to my list of ones to view every time you have something new. You are a true inspiration! Your style is much more elegant and at a level that I haven’t seen before. I can’t remember if I’ve left any other comments on here or not but I do remember sending you an email. I will continue to look forward to your new creations.
blessings,
crystal joy
I am a CTMH consultant and I saw your blog posted on the bb’s and the Inspirational site. YOu work is beautiful and very creative. Thanks for giving us a chance to win blog candy and congrats on the hits!
Congratulations Becca! I am not sure how I found you – must have been a link from somewhere – but so glad I did. You work is wonderful. Thanks for your generosity in offering the great prize. I hope I win!!
Oh I found you through Heather’s blog, saying that you have a lovely blog and also lovely blog candy… I hink I will keep on coming back! You’re amazingly good! :)
Visit my blog anytime you want.X
Rosette.xx
Your work is impressive!!!! My best friend from South Carolina, Claudia, gave me your link last night. I am new to scrapbooking and am totally inspired by the work you do. You are in my “Favorites” and I will be checking your site daily. Thank you so much for sharing your wonderful talent.
Hi Becca, I believe I found you on a blog roll list from another blog. I loved the name of your blog and figured that if it included the name “grace” there might be a Christian influence there. Wow — and then some! I’m so hppy I found you , love your inclusion of scriptures in your work, as well as the overall beauty of your pieces.
Hi Becca! I am not really sure how I found you, but I do know that I am glad I did. Your work is outstanding and “wows” me beyond words. I hope, I have left at least 5 comments on your blog since July 1st. Each day, I can’t wait for the next day to come and see what you have created. Thanks for a chance to win some awesome blog candy. I just purchased a couple of these See d’s stamp sets and I am loving them.
A friend told me about your blog and I love your cards.
I have you bookmarked and love to see your beautiful work.
I’m one of the lurker’s you refer to. Your talent is amazing and I love looking at your website and seeing what you will do next. One thing about it, you never disapoint me.
Happy Stampin
Mary
Hi,
I have been one of the ones quietly enjoying your work.
I found your site from another blog. Sorry I can’t remember which one.
WOW! Your work is awsome, you really inspire me to get in my little craft room and make something beautiful.
thanks
Jamie L.L.
I dont know why you are so surprised you have reached so many hits! your art is truly wonderful and very inspirational!
Wow! How sweet you are! I am pretty sure that I have left at least five comments because I love all your cards! Each one is just awesome and just when I think they can’t get any awesomer- they do :D! Your blog is on my ‘check daily’ list and I am NEVER disappointed when I come here.
Ooops! Sorry, I forgot to tell you how I found you. I was doing a random search for cardmaking blogs one day and that is how I found you :D.
I only recently found your blog, I think in a link from another person’s blog, and have loved the opportunity to read your posts and see your beautiful creations! Thank you so much for sharing your crafting talent with us! What you said about blogging being a tool to remove stress and give you something positive to look forward to tomorrow really resonated with me — for some reason it’s easy for me to assume that I’m the only person who has difficulty coping in this world and everyone else is blissfully living a golden life. For the first time ina long time, these past few days I’ve actually felt like I’m just the same as everyone else, and that everyone else has the same difficulties as I do from time to time. Reading your post expressing how you have to face and overcome insecurity and difficulties in life really reinforced in me that we all face these issues. Thank you for sharing your honest and sincere thoughts in this post!!!!!!
Congratulations, Becca! I recently found your blog somehow through the Cricut.com messageboards. When I first saw your cards, I figured you were some kind of professional artist who was branching out into cards. Your designs are so elegant and inspiring. I don’t know how you come up with all the creative ideas for your cards, but if you ever publish a how-to book, I’ll be first in line to buy it! You are so inspiring, so I want to thank you from the bottom of my heart for sharing your card-making gift with all of us! Keep on blogging!!
Well it is my first time to your blog and very inspiring it is too. Congatulations! How I got here? Andrea of Kartenfreak left a kind message. I got back to her, the rest is history.
I love your blog. I visit it everyday and I get so inspired. Your’s is my second on the list that I look at in my daily views. I came to your site through another blog/site that was displaying a card you had made. It was a long time ago so don’t remember exactly. I don’t comment very often so probably haven’t done so in the time you stated.
What an achievement for you!
I found your blog through SCS…all of your creations are so beautiful…your blog is very inspirational…thanks for the chance at your great candy……congratulations on your 100,000+ hits..
I found out from the stamp club that I belong to. I have so enjoyed looking at all your cards and ideas.
Debra
Wow, I have just found your blog. I am amazed that I haven’t found you before!! But now I sure will put you in my blog-roll so everyone that visits my blog can find your blog as well. And I will put a note in my blog about your blog candy as well. :)
Kristin :)
Our sweet friend Kelly V or justkelly from SCS. told me about you and I am so glad she did. You do inspirational and beautiful work
Thank You
and God
bless
hugs
I found you through Card Of the Week. Honestly Becca, your work is amazing (and graceful :) ). You should feel great about what you create.
Hry Becca. Congrats onthe 10k at this rate you’ll soon be up to 20000!! I found your blog through a link and for the life of me, no idea who. I am constantly blog hopping looking for inspiration and yours is on my reader list and I look forward when I see a new fee. keep up the fabulous work!!
sorry, keyboard was playing up on my last post, hence the appalling spelling…lol!!
I saw one of your gorgeous cards on Splitcoast, and followed it to your gallery, and then to your blog. Your cards are all works of art!
omg what a loverly candy! I wish im the winner! But im think not! I leave your link on my blog! LOL
Well a very very dear friend asked me if I had seen your blog, and the answer was no! She quickly sent me your link and I was so blessed by it all that I went back to the beginning and read through it all and drooled over your cards. Then I went to splitcoaststampers and viewed all the cards in your gallery there!! You are very gifted and now a day does not go by that I don’t read your blog and drool over your cards for inspiration……………….So glad I found you and of course would be thrilled to win some blog candy. I NEVER win stuff, but there is a first time for everything. These stamps are right up my alley………………
Becca, I’m one of your ‘sweet lurkers’ and I’m also based in the UK. I read your blog every day as I subscribed through Feedblitz way back, when I found you. How did I find you? Blog hopping but for the life of me I can’t remember whose blog I found you through. You are, however, on my list of recommended sites as I find your work truly inspirational – well, your whole blog if I’m honest – and I readily recommend you to friends. Keep it up and continue to inspire …. for you truly have ‘amazing paper grace’
Hi Becca! 1000,000, that is amazing that you have been in contact with so many people! I found you by way of SCS…Your work is so inspiring. Not only creatively but spiritually. Thank you for sharing your faith. I look forward to your future blogs!
Evening Becca.
I’m afraid I can’t remember how I found you; it was probably ‘cos I was directed by one of your beautiful cards on another blog. Anyway, since that time I visit your site everyday when I am at home for superb inspiration – I also am a lover of my Cuttlebug.
Evening Becca, me again. Didn’t read your post correctly first time so am adding a little addendum to let you know that I have commented more than 5 times:)
Pick me, pick me–LOL. Can you believe I don’t remember how I found you? I prob was through a comment you left on someone’s blog. I do know I only recently found you, and have been here every day since then. Your work is fabulous. I’m quite jeleous of your talent actually. LOL.
Hugs,
Beth
P.S. Now I remember how I found you–it was through a card of yours I saw on SCS.
Congrats on over 100,000… I just recently came across your blog while I was on Primitive Seasons. I love your creativity & your cards… I can see why your blog is so popular. I know what you mean about sharing on a blog… I just started a blog in June just to keep busy since I lost my job in May, but I wasn’t sure if I had anything worth blogging or if anybody would even be interested… I guess I am doing it for me. Anyway, thank-you for being in all your blogginess glory!!! *Ü*
Just found you from Craftling’s Cosy Corner
Hi, Becca! I just found your blog through a suggestion on Google Reader. I’ve been looking around and your cards are amazing. I’m going back to Google Reader to subscribe right now, so I can see more!
Becca I just recently found your blog through a link somewhere. Congratulations on your number of hits. I will definitely be coming here daily for my card fix. Thank you for sharing all of your talent with everyone.
Hi Becca, I am a major blog lurker and hopper, so I found you that way very recently and since I love making cards, I bookmarked you to come and check out your beautiful creations from time to time. And by the way, congrats on over 100,000…..WOW…..
I can’t remember how I found you – tried to retrace my steps but was unsuccessful – but it had to be either through Splitcoast or blog-hopping! After I first found you, I decided IMMEDIATELY to subscribe to your blog, as your style is so clean and beautiful, and you have such great ideas! Thanks for being such an inspiration – AMAZING is right!!!
Hi Becca,
I found your blog through the Devine Challenge site on SCS. Your cards are always so pretty and inspirational. I have found myself ordering the stamps that you use to make some cards with.
thanks for sharing your wonderful talent.
Hi Becca,
I love coming to your blog and looking. Most of all it reminds me of my need for me to keep God alive and active in my life. And it’s an inspiration to see someone not afraid to voice what they feel and believe out loud.
I found you from a link to a card that was posted on another blog. And was linked back to your blog. And I am so glad I followed that link. Thank you for creating and sharing with us all.
Much Lover & Prayers
I honestly don’t remember how I first found your blog. Undoubtedly, it was through someone else’s, and perhaps they mentioned you in their entry that day–but from the very first, I was MESMERIZED! You’ve inspired me with each and every card, and I save looking at your blog for last on my list, because I know it will leave me with a smile one my face and a hope in my heart that I can someday create cards as beautiful as yours!
Thanks, Becca, for sharing your awesome talent with us!
I happened upon you from going from one blog to another and 1 of them showed one of your beautiful cards and I have been checking in ever since. Amazing work!!!
Hello, Becca,
I want to say that I found your blog a week ago and have already completed a project that I found as a subscriber to the Yahoo group, Scrappers Challenge. One of the posts involved organizing ribbon and that’s something I’ve been wrestling with for some time. Using different methods, i.e., Cropper Hopper embellishment boxes, dowels, over the door rack holder, I could not find anything that kept them all organized in one place. I have wrapped (and wrapped and wrapped) ribbon for four days (yes, I have a habit too) and have finally finished the drawers that were such a good idea from you.
Since then, I have checked every day to get ideas from your beautiful work. Thanks so much for inspiring so many people to be better at what we love;crafts.
Blessings,
Vicki
Becca – Your latest card is just as gorgeous as the others. I think what I love most about your work is that you show your faith through it – I really love that.
God bless – and I’m sure whoever wins your blog candy will LOVE it!
Becky
Becca ~ I found your blog through another and have become a daily visitor…!! Your work is stunning and quickly became one of my favorites! I have only left one comment since joining but was totally amazed that you took the time to email me back! Through your work, writings, and your “Amazing Paper Grace” I have come to feel as though we are kindred spirits!!! God Bless!
Oh my…I have no idea how I found you, but I’ve had you on my blog reader for quite some time. Your creations are just amazing and I’m totally inspired by you.
Hi Becca! Nice blog candy offering! I found you through the Divine Design Challenge and have stayed with you ever since. I love your cards and have left several comments, but I don’t think that I’ve left 5. :( Congrats on all the hits! But I’m not surprised! :)
Becca, I found your blog recently after reading a comment on Canadiancuttlebugcrew Yahoo group. Your photo looked familiar as I had seen comments you have made on my niece, MariLynn’s, cards on Split Coast Stamper. Finding your blog has been a very refreshing experience. I like all your cards using scriptures and Cuttlebug items and feel I have known you for a long time. Your blog entries and examples are inspiring. Keep up the good work. No wonder you have had 100,000 hits already. Everyone can tell your blog is a “Good thing’. Looking forward to more of your fantastic cards.
va
I just found you in the last 2 weeks. and you blew my socks off…..not really…..think I came to your blog from another site, but Amazing Grace is my favorite song, as I am the keyboardist at church..anyway, I congrat you for the big number……many more.
Becca, your work is breathtakingly beautiful. Your talent is amazing and your blog title is a perfect description of it. I found your blog on the blog roll of another blogger — just can’t remember who. It was my lucky day.
Hi Becca,
I have no idea how I found you, probably from another blog. I have you bookmarked and am always checking out your blog. I love it a lot, wish my blog was as good!
Monique
I love your blog — your creations are gorgeous!! I just found your blog but I don’t remember whether it was from google or someone else’s blog.
I just found your blog recently, also from a link on SCS. Am totally loving your work! Can’t wait to look through more of your stuff.
a link from two peas! love the texture of your work and your amazing photography!
God Bless
I found you via Craflings Cosy Corner aka Christine. Your work is beautiful.
Katie
x
Your work is sooooo inspiring!! You are a true gift to paper crafters!! I hope you don’t mind me adding your blog to my own sidebar. I will definitely be following your work. I found your blog via google reader.
I found you quite by accident lol!
Just love those Stamps and if I don’t win would love to know where you bought the Snow Fairie?
Now off to look at your cards lol!
Suze x
I’ve had a look an WOW! Just love your Cards!
I hope you don’t mind but I’ve added you to my Blog!
Suze x
I found you by a link from Kreative Kristine’s blog.
Fab candy ad wonderful the cards you make.
Ciao from Marika (Italy)
Yes I found you from a friend and now am hooked!!!! I have to have qa Beca fix everyday. Don’t know how you do it. I love3 your blog.You are turely fantastic!!!!!
I love your site, found you from SPS. Everything you do is just beautiful.
I wish I’m the winner! , your candy is so lovely…
I leave your link on my blog!
Hugs, Sonja xxx
Hi :) I found your blog candy and I love your site! Greeting from Poland!
BIg congrats on all the hits!!! I found you surfing through other sites and sure am glad I found you!
sweeeeeeet candy!
I love your blog Becca! Greeting from Poland!
WOWW Becca, Awesome Blog candy!!!!! Your cards are always great and I love your site!!!
Thanks for the chance to win!!!
I found your blog just after you created it, I think it was through SCS.
I am pretty sure that I have more than 5 comments in here, LOL.
God bless your generosity
Giovana
Hi Becca!
Good blog candy, I love Inqueboutique stamps! They are nice and clear and I always get good results. Anyway, I found you through Debbie Olson’s blog and you are now on my favourites list!
Keep making those beautiful creations.
Violet
Becca
I discovered your blog, I believe, through the Divine Design challenge. I am really impressed with all your cards but I really, really enjoy your use of the cuttlebug embossing folders. Keep stamping and sharing your cards with us, Linda
I have seen your work on Splitcoaststampers, but this is my first time to really look around your site, and man has it been worth the diggiging. I love your inspirational cards.
Tricia Jones
I think I first saw your work on SCS, but you’ve been in my blog reader since the first day I found your blog … your work is amazing … thanks for sharing & for the chance to win some awesome stamps.
I saw your work on scs also 7 i have been a lurker ever since,i read your blog daily as i have a folder with fav blogs.
I love your work & your chat on your posts.
Thanks for the chance to win
Jean
i love your stuff and found you on a link from someone elses blog and now have you in my feedblitz. yOu are so talented and love the inspirtation I get from you. I don’t know if I’ve left more than 5 in the timeframe you have listed, but I am here daily.
Dear Becca, I had purchased some of the new Cuttlebug Border Embossing folders, and in an email, said how pleased i was with them, and the reply to me was, “But you should see what has been done with them at Amazing Grace.” So to Amazine Grace I went, and oh, Becca, what an inspiration your work was with them. I now go to your site first thing each day when I open my computer and you continue to inspire me with your beautiful cards and beautiful words.
Hi Becca
I think I found your blog via stamplinglinks to love . & never looked back ! Divine inspiration you do provide ! Keep it up if possible ! lol
many thanks !
Pearl
c’est génial de voir des blogs candy fleurir un peu partout… quelle bonne idée, de faire plaisir……
Beautiful work! I found your blog from Beth’s (sunflowers and dragonflies). I haven’t commented yet, but I love checking it to see what you have been up to. How sweet of you to offer up some blog candy.
Becca…I found your site when someone else poinyed out your awesome organization for ribbon……I used your idea but tweaked it and made it my own…I wrap my ribbon around mat board that is 1″ wide by 3.5 inches tall and store them with like colours in little loaf pans……I will have to take some pics and show you. Congats on the 100, 000 mark. You rock!
[…] So, from August 15th until September 15th, I hope you’ll get excited about the ODBD new sets that I’ll be sharing. Also, don’t forget to leave a comment for the current blog candy here. […]
I am not sure how I ended up seeing you blog. I tend to click links and end up on blogs that become my favorites. I really love your work it is what I described as simple elegance.
I also have incorporated your ribbon storage idea. It took me a long time to get all my ribbon from the clothes pin system I was using before. But so worth it. It is so much easier of a system.
Congratulations on your blog milestone as well as your guest designer for Daily Bread.
Becca…. I just found your blog this morning. I saw your card on Joani’s blog. Your cards are beautiful.
Angel Hugs….Bobbie
I so enjoy seeing what you create and it gives a lot of ideas. I do wonder, do you mail your cards, how do you mail them or do you hand deliver?
I look forward to seeing what creations you come up with ODBD. I have a couple of sets and really like their stamps! Congratulations on being a designer. . .
Godspeed,
Jesse aka Inkyhive
WELL, what nice blog candy i have left at least 5 comments the ones i found were on july 17th, and three on july 11th for different cards, july 4th and august 3rd. i think i left one big comment for several cards when i was out and didnt get to see everything each day. dont worry everything is great and thanks for giving blog candy. we are so blessed to have you. and i met you through our rubber ladies group!! does that count?
kay
I poped over here from Joani’s blog & I’m blown away with your talent. You do fabulous cards & are one very talented lady.
Smiles, Barb
Hi~ I found you through the SU only blog list! I was immediatly drawn to your site, as my DD is named Grace. And boy was I surprised…what gorgeous cards!!! I can’t believe you haven’t been tapped as a designer before! thanks for all you share!
Well, I just purchased the new CB embossing folder “with love”, and I did a Google search looking for ideas on how to use the folder, and your site was the first one to come up. What a find! Your work is absolutely beautiful. Thank you for sharing.
Joyce
Becca, I found you through a link on either Taylor’s blog or Lori’s blog. I love the cards you’ve posted…I am a lurker…stop in every day but not sure I have ever left a message.
I am so pleased to see the Christian witness, and I love the scripture cards that you and the others have posted. Blessings and hoping to win candy on the 13th…the day I get the cast off my leg! Woo Hoo! Joyce Harms
Becca,
Grace to you and peace from God our Father and the Lord, Jesus Christ!
I’ve been visiting your site for a while now and just love your beautiful work. You have quite a flair for style and elegance! I first found your blog while viewing a challenge entry (sorry – don’t recall which one) that encouraged us to look at some of the other entries and included the links.
Before your design even came up, I saw the first words of your “about me” section and knew I’d be back. Thank you for sharing your beautiful work with us as a “child of God”. What a mighty witness to our gracious father who has certainly blessed you with a wonderful gift!
Congratulations on the success of your website!
Blessings,
Chris
Becca, congratulations baby!! I can’t believe YOU couldn’t believe they would ask you to be on their design team. Aside from the obvious fact that your art reveals you’re a Scriptures kind of gal, your work is gorgeous! I’m very happy for you. I’m hoping you will still be able to fit in some secular cards now and then. LOL!
Hi Becca,
I am not sure how I came across your blog….I think I was looking for some card/scrapbooking ideas. Your cards are so awesome…you have such great ideas!!
-Erica
Wow, congrats on your 100k hits! The blog candy is gorgeous, I would love to enter for it.
I have put a link on my blog, in the blog candy alert section.
I think your website is appropriately named. Because every time I return to it … I just say out loud …… “AMAZING !!!!!”
And I have amazing enough Grace from God to have known you personally. You’re an angel in my life.
hugs, deb
Hi there. I found you through another blog, Crafling’s Cosy Corner, and am glad I did. Your cards are so lovely, I will definitely be coming back again :)
Hello Becca, just returned from vacation and immediately checked my email to see what I missed on your blog. I found your blog just searching for design ideas and fell in love with your style. I get so excited when I see your fun and beautiful designs. Thanks for sharing with so many of us.
Becca — my daughter introduced me to your site and I’m in love – with your beautiful creativity. Your cards are amazing! Your sweet spirit and spiritual commitment are evident in your writing. How refreshing!
Thank you for sharing your beautiful work and God bless . . .
I found your blog through another blog and I am really glad I did, I love all of your creations they are absolutely beautiful!
I just left a comment on your ODBD announcement, and then I read more closely about your blog candy. I found you through googling “Divine Design”. I really like your elegant touch and your love for God. Thanks for the opportunity at blog candy. God bless you :)
Hello Becca
I only found your site yesterday .
Not sure what link I used to arrive at your site but I am so
grateful that I came across you.
Your work is exquisite and just so creative. What a joy to be able to use your talents and to spread to love a God through them.
God bless you Becca.
I just love your blog. We need more like this, as it is very inspirational. There are so few Christian related cards, stamps, etc. to be found, so I really enjoy your work(and I think God does, too). Continue using your talent for Him. Bless You!
I found you via a wonderful friend of mine called Joani. She had a link on her blog. Your cards are truly awesome. So glad I found you.
Hugs
Nic
Hello Becca, I absolutely love your site and email’s! I found your site through the splitcoast stamper site. I emailed you once telling you how funny some of your comments are and how I feel you think just like me and sometimes make fun of yourself in the same way I do. I hold back from sending you comments as I know reading all of them takes time away from your stamping etc. But, as I continue to subscribe to your updates I hope you know how much I look forward to seeing your art work and reading your musings, You are the BEST, thankyou so very much for sharing. gail
How awesome is that ???? To design ? scripture based ? Absolutely Absolutely wonderful !!!!!!! Look forward to seeing the designs.
hugs, deb
This is the first time I happened upon your sight-I’m glad I did!!
Julie K
Hi! I just found you from Stamping Links to Love…and so glad I did, your works is FABULOUS!
I found you through Allison at Stampin When I Can. You have a wonderful blog.
Claudia
scfranson@charter.net
Woww, 100,00 thats a lot of visitors -Heres to the next 100,00!!!
Sinaan
I think the first time I saw some of your work was on “our Daily Bread”–I just adore their stamps and use them at my church women’s group to make cards.
I also followed this recent link from Joani’s blog.
It is rare to find a person that admits she’s a christian and then lives it!
May the Lord continue to bless you with your incredible talent!
Betty
Hi Becca!
Congratulations on the 10k! It’s harder than everyone thinks… I am still barely on the 5k! (but I’m a total procrastinator, so that’s actually good :P).
I found your blog trough Stampin Links to Love ([dot] blogspot [dot] com) Google Reader feeds. I’m just about to take a peek at the rest of your blog :)
Hugs from Chile!!
I love scripture stamps and am so happy to find this new source for them! I found your blog through a link on another person’s blog, and I check your posts everyday! Joyce
I am so glad someone directed me to you blog. Your work is beautiful and insiring. QP
Becca,
Your creativity is very inspiring and a blessing! I think I found you from a link from another blog, only about a month ago, but I have sure enjoyed checking back regularily. Thanks for sharing so freely, and for also being real and transparent. :) Many blessings. Carolyn
Your cards are absolutely beautiful. I love the little stories that you put on your blog. Loved the one about the gentleman who had lunch with his wife every day even if she didn’t know him, he knew her. That brought tears to my eyes.
Thanks again for all of the work you put into your blog.
Linda
He will command angels is just gorgeous.
Tricia Jones
I found you when you posted your beautiful cards made with the new cuttlebug folders over on the 2 peas stamping board. I have really enjoyed exploring your blog. Your work is inspiring and I have bookmarked this blog to check back often.
[…] forget that this blog candy has aged to perfection and is ready to go to someone stamp room after I announce the winner some […]
Becca,
I loove yoru designs!!! I also love to make cards! Your designs make me want to get busy! They a re soo beautiful. And i especially like the inspirational ones.I am not sure where I found your blog..Ithink it was a link from another or on one of my yahoo groups, someone reccomended it. I am sorry I do not know where from.
Love love the stamps you are offering!
Keep Up the good work, I love to come see what you have done.
Micky
Hi Becca ~
My sis-in-law told me to check out your site…..lol
I’m new to stamping, have been scrapping pages for a few years…
Wondering what type of inks I should purchase…. do you teach a class or have a suggestion.
Hi, congratulations to 100.000 Hits, thanks for the chance to win this wonderful Price
Hugs
Heike
Congrats on 100.000 hits. Thanks for sweet candy.
Hugs, Katja
Congratulations! Your cards are so beautiful! I’ll definitely come back to watch more of your work. Thanks for a chance to win! Greetings from Belgium, annelies