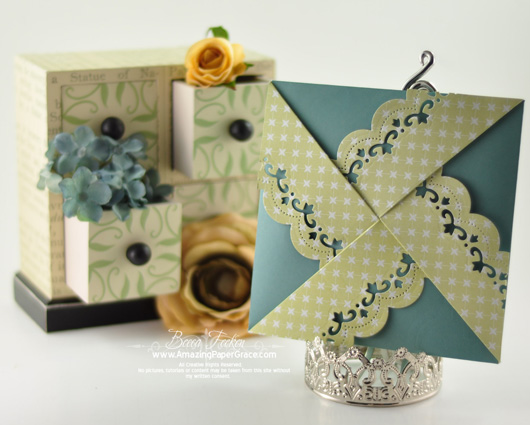
Hi there blog friends, conquering another item I’ve had on the side of my desk for months. Are your ready to do more scoring and folding? Well then, I have another tutorial for you! This one will allow you to make a Decorative Border Folded Envelope to accommodate a 5.5″ x 5.5″ card. There are two options for folding and many different options for embellishing – all of them will give you a different look. On the sample above I’ve used Spellbinders™ Classic Edges One and Spellbinders™ Classic Decorative Inserts Two.
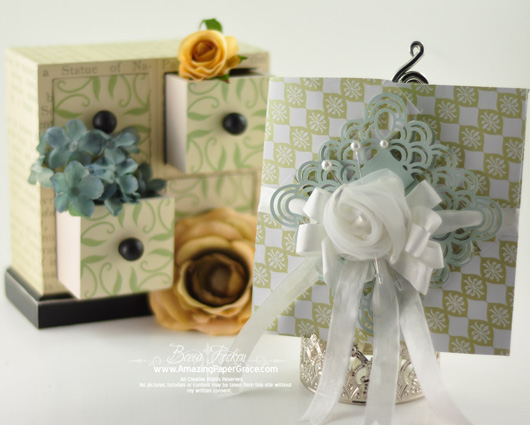
For the next sample I used a Martha Stewart Corner Punch and a Martha Stewart Border Punch, along with a rolled rose, pearls and seam binding.
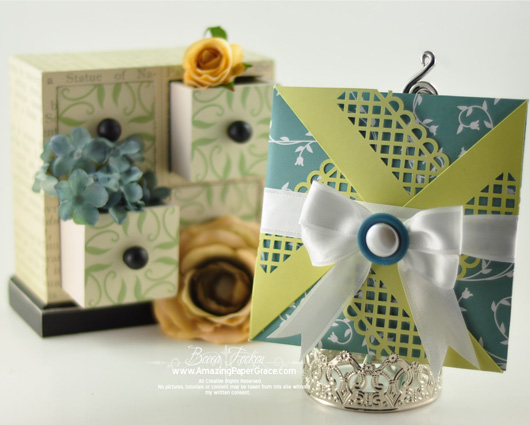
For the last sample I used a Martha Stewart Border Punch, Satin Ribbon a button and a brad.
Here’s the video to show you how:
| SUPPLIES I USED |
| Stamps: None Paper: American Crafts Ink: None Accessories: Spellbinders™ Classic Edges One, Spellbinders™ Classic Decorative Inserts Two, Martha Stewart Corner Punch, Martha Stewart Border Punches, ribbon, pearls, seam binding, brad, button, corsage pins |
I love this envelope – so easy and so pretty!! I hope you’ll give it a try. See you soon!


Lovely! Have to try this.
_
Wonderful envelopes! Loved the boxes you did the other day! I’ve made four already! LoL
How clever Becca, great video how too. Your project is beautiful. Love the samples and how different they all look, such versatility. As always Becca, TFS!!! :-D
I’m in Love, I love to add a custom envelope to my cards, these are so pretty cant wait to make these.Hugs Becca ,
What a clever project! You never cease to amaze. Since I use a Cuttlebug, I think I’ll have to fiddle with it a bit. Thanks for the always great ideas.
Becca, How wonderful, a woman after my own creative heart and with envelopes!!! I make all of my own envelopes to match the cards and I simply love the new look you have given to envelopes! Thank you, Thank you. In the past I have taught many classes with many envelope designs. Wait until people see what can be done now with your ideas. Many thanks for going the extra, gorgeous steps. WOW!! Kindest Regards, Carol
Oh this is very versatile. I will use this a lot.
You’re in my prayers
Awesome Becca I’ll have to try this one!
What a stunning presentation for a special card or even just a special note you could write inside on the envelope itself. Between this and the incredible folded box tutorial you are making my long week-end full of fun paper folding adventures. Thanks so much!
Loving the tutorials. I made the folded box and it’s lovely. Thanks so much for sharing your talent, and keep ’em coming
Absolutely love this!!! Can’t wait to make one.
I am so happy you give me some suggestions for the enveloppe. I like to give a card with an enveloppe and most of the time the card take all the attention. Not anymore.
Merci! Francine.
You’re soooooooo very clever Becca, just love to be surprised by one of your videos – THANKYOU :)
Very beautiful envelopes. Great tutorial. Thanks for sharing,
BECCA!!!!!!!
HOW do you come up with these things??????? :) This is SOOO NEAT!!!!!!!!!! (Am I dating myself?) LOL I LOVE DIFFERENT folds!!!!!!!!! Thanks for showing us!!!!!!! ( LOVE how you’re doing your tutorials lately!!!!!! )
Stunning envie….my goodness the trouble you have gone to so we can make one of these goodies…thank you so much Becca. God Bless your creative hands.
Becca, this is fab-u-lus!!!!!!! You video is so great and helpful. I will just have to try this for my daughter and son-in-law’s anniversary in March.. I always look forward to each of your posts every day and you constantly amaze me with your beautiful work. You’re such an inspiration to me and everyone who visits your.
Big hugs and smiles to you.
As always, you’ve shown us another awesome project. And your video couldn’t be easier to follow…unless, of course, you came to my house and did it for me. 8-)
Thanks so much for sharing your creativity.
— Connie C.
If this is the envelope what on earth id the card going to look like?!?!?!?!?!?!
Goodness me. What a fantasic project. I would love to see how you work these things out. Its amazing. I am going to play right now . Thanks for great video.
You have taken us one more step over the top, Becca! This envelope tutorial is fabulous! Thank you so much for sharing your awesome creativity. I really don’t know how you come up with so many beautiful and unique designs, but I think it’s wonderful that you are willing to share them with us.
Have a wonderful day! Hugs, Barbara in South Carolina
Another great tutorial. Thank you so much for showing us your beautiful envelopes and how you made them.
These are gorgeous Becca! I make a lot of 5×5 cards and this is just perfect for me. Great tutorial as always :).
Fantastic tutorial on a lovely design! As usual, you have created another layer to complement your cards. Thank you for sharing all of your talent with us.
~C8>
Hi Becca
Wonderful Envelopes. – Love the way you do your tutorials – just awesome
You were so clear with the instructions in this tutorial, making it easy for relative beginners like me to follow. Thank you so much for sharing this. These envelopes are beautiful!
Your creativity is simply amazing, Becca! Fabulous projects and tute :) Have a great week :)
Very cool, tfs!
Wow! This envelope is awesome!! Thanks for the video tutorial, Becca! You’re the greatest!!!
Thank you for this tutorial. It just adds another idea to my repertoire for family cards. They get so many from me…I always am looking for new ideas for them. I love, love, love the little box and have made my first one….guy idea with manly man colors. Awesome. I can’t wait to try this new one today. Although we haven’t gotten the new Spellbinder releases I am hoping I can die cut the edges like you have shown. There is always a learning curve though professionals like yourself make them look so easy peasey!
FANTASTIC….but I think this is one beyond my ability. When it comes to the decor and running half way….Oh Me !
This envelope is great, your tutorials are wonderful, thank you so much, they are much appreciated.
Thank you for the wonderful tutorial. I can see a lot of potential for this one.
Becca,
I so admire you and your work. You’re have inspired me over and over! I’m also very impressed with your video presentations. They have become so professional. Thank you, thank you, thank you for sharing with us.
God Bless You!
You are so amazing….your blog is so appropriately named. Thanks for the wonderful tutorial.
Hey, I think I can do that! Wow! You teach me so much! Love it! Thank you!
Just really loved what you have done. I wish I could be able to keep your site to enjoy over and over
How do you keep coming up with these creative ideas? My head spins thinking about trying to create this, never mind thinking it up in the first place! Thank you so much!
Wow, this is truly another Becca masterpiece…. I love the idea. I just wonder if it will go thru the mails… I shall find out….lol. Thank you for sharing your wonderful creativity….
STUNNING!!! Must say if I received the one with the rose I’d never be able to bring myself to open it. Again TFS a wonderful tutorial.
Blessings Bernie
What a great envelope idea. Thanks for sharing the video.
Absolutely beautiful!! I love what you have done with these cards! Your photo layouts are always so stunning! You do have quite an artistic eye, thank you for sharing and inspiring me.
Great tutorial video, Becca. Very clear to understand. Thank you.
A beautiful idea and a terrific tutorial. Thanks so much for sharing your creative talents with us all. I can’t wait to play now!
Becca: What a talented lady you are………..I love anything folded differently and you certainly out did yourself this time. I want to start making some w. my Punch Around the Page punches as soon as I finish income taxes. Thank you so much for sharing.
Wow… you really blew me away with this… you are definitely very creative and all inspiring! Tks for sharing your talent with the world.
Becca, thank you so much for such a great tutorial! The envelopes are stunning!!! I always struggle coming up with a little “ooomph” for the envelopes, but now I won’t :-) Thanks again!!!
Fabulous!!!! Those envelopes are so pretty! I can’t wait to try doing one this afternoon. I sure would like to sit in your craft room with you for a day. You are such a paper genius!!!
Wonderful tutorial beautiful samples! Will work well for wedding invites ive been asked to do,thank you xx
I love this and wouldn’t use it for an envelope at all. Instead, I would finish the inside with whatever theme my card would be (birthday, condolence, invitation) and use it without putting another piece in it. One thing makes it difficult for me is the lack of written instructions. I have to watch the tutorial for a couple of times and write down the first few steps, then go to my craft area and do those steps. Then come back and watch the next few steps, take notes and go back to work on it. There is only one computer in my home and only one room with grounded plugs where it would be safe to use it.
Beautiful envelope and lovely presentation! Thank you Becca!
Goodness Becca – do you sleep???? How do you come up with all these fab creations? Your video is amazing…… you are one clever girl. tfs
Hugs
Heather (UK)
x
wonderful. Thanks for sharing. I will have to try this for sure.
this was such a great video tutorial, becca! i love all the samples too!
tfs, sandyh
Becca I love this envelope all the embellishments are beautiful. Your tutorial is wonderful your directions are precise amd clear. Thank you for taking the time to share this tutorial with us. Have a wonderful week :)
These are so pretty, great tutorial! You’re so talented!
Becca, I get exhausted just looking at all your awesome designs! This envelope tutorial is so amazing! Thank you for sharing how to do this!!
Hi Becca,
What a beautiful idea for an envelope, though it looks more like a gift!
The tutorial, as always, is so clear and precise making it easy to follow, so thank you very much indeed. I will definitely be trying this idea out and I think I will be using it for wedding invitation envelopes.
Take care of yourself whatever you are up to this week.
Hugs Linda
Becca it’s so good seeing your tutorials again. It’s like watching a master at work. I don’t know how you do it. Talent and a gift..Thank you for sharing all your beautiful projects with all of us so we too can learn from you.
Just beautiful Becca..it’s now a high art form.
pat
Thanks for sharing your creations once again. I always enjoy your video tutes. I have been a follower of yours for quite a while now and was wondering if you ever visit my blog for a look?
Thanks.
Thank you Becca for being so generous in sharing your wonderful creative ideas with us. These gorgeous envelopes will surely amaze whoever the recepient will be as they are really great treasures.
Absolutely BEAUTIFUL!!!!!!!!! You do amazing work!!!
Becca: I just made three envies each a different way as you suggested. My favorite is the pinwheel look with a wide lacy punch, very delicate. Tomorrow I want to try it with designer paper, not cardstock and see how that works. You are one talented lady and thank you for sharing.
Becca your work is simply beautiful
Wonderful idea, beautiful presentations. I am going to give all 3 a try for sure. TFS.
Cindy
Question: When using the Edgeabilities, did you use your Grand Caliber or can the border be cut using a regular size Cuttlebug?
What a brilliant envelope. I love it. I made two boxes so now I will try this.
I love a challenge. Thank you so much for a wonderful Tuorial.
Hugs Maz
You really are amazing ! this is a wonderful tutorial hope to try it soon.
Becca, I just love that video! I am really going to give it a try although I don’t make many square cards. Your “envelopes” are so pretty! TFS
This is so pretty! I can,t wait to try it! Thanks so much for sharing your amazing talents!
Beautiful envelopes Becca! Thanks very much for the tutorial!
Becca thanks for sharing your tutorial and your beautiful envelopes. They are so Grand looking I love them. What a gorgeous way to glam up any card or small booklet or letter. Thanks for always being so generous with your time and all you do to share,
WOW!! Beautiful tfs the how to!!
Soooo pretty! Your instructions are so clear, thank you!
Becca, I tried your envelope and I am so pleased with it. It didn’t come out as beautiful as yours, of course! Your work is awesome! Thank you for sharing!
Jo Ann
Absolutely wonderful, Becca! Did you get my private message to you?
Really like this envelop. Thanks for the tutorial. Can this be done for a 6×6 card??? Your creations are so wonderful. Thanks for sharing with us…..
Dawn Bennett
Hi Becca! Great tutorial. I will be practicing your technique a little more as I think the envelopes are such a wonderful “finishing touch” for any card. You are such a creative and gifted lady. Many Thanks.
that is so cool and creative, thanks for sharing the video!
Your projects are beautiful. I am so impressed with your video style and would love for you to show us how to create them. What camera, software, etc do you use. Any tips to begin making videos would be greatly appreciated also.
This is a fabulous tutorial, Becca, I loved it and made 2 envelope cards last night
Absolutely stunning. Thank you so much for sharing, you’re amazing!!! I just had to share your link with friends on my scrapbooking forum.