Scrapbook a Micro Album to Give on the Spot - created by Becca Feeken using Spellbinders Swirl Booklet Insert Die - see supply list and at www.amazingpapergrace.com/?p=34049
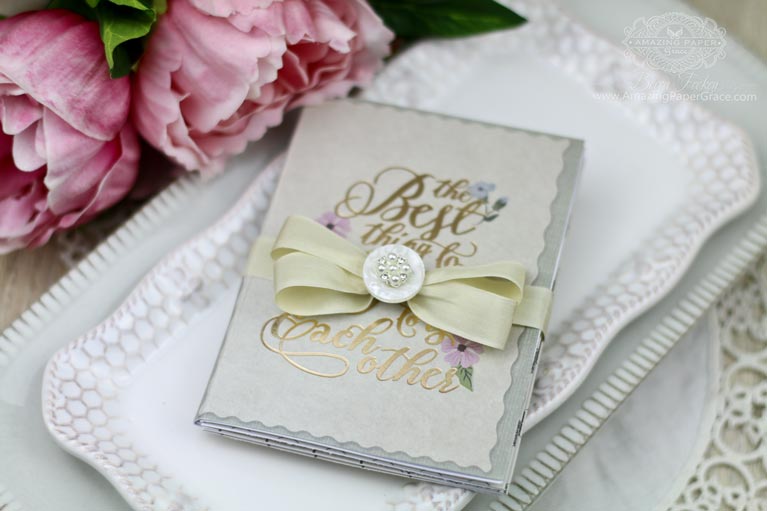
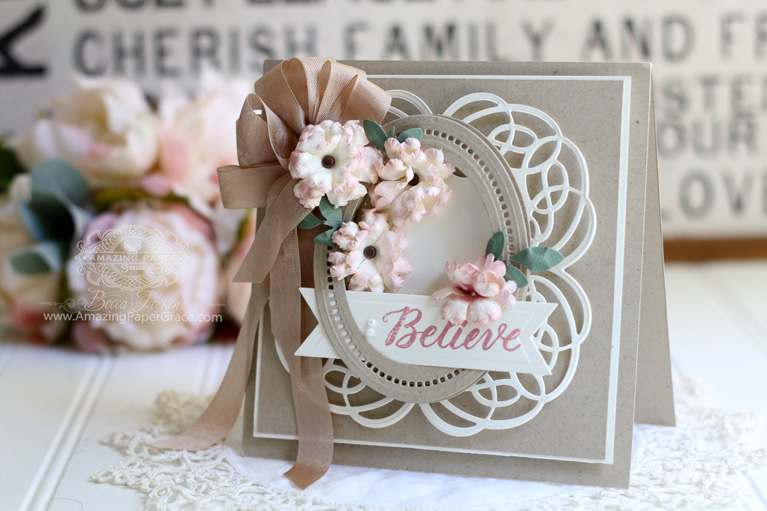
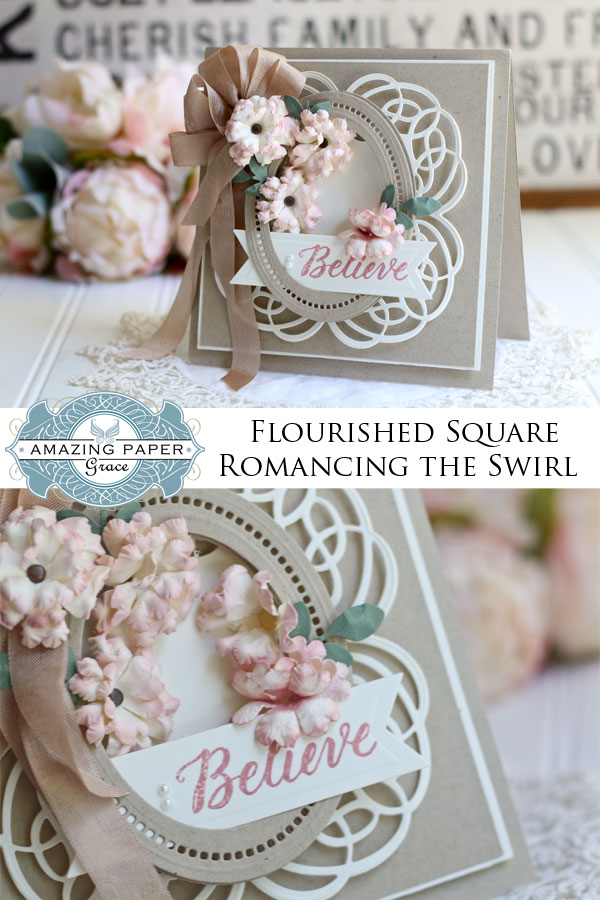
Wanna know the kind of project I love?  The one I can finish, lol!!  I love quilting and cross stitch and sewing and even scrapbooking but with a closet full of UFO’s (UnFinished Objects), I’ve gotten smart over the years and tend to pick things that always keep a light at the end of the tunnel.  I’ve actually never made a huge scrapbook, but love mini albums.  Today, I’m showing you what I call a micro album.  I can make it in 30 minutes and it’s made to be small – so that it will definitely get filled.  The Swirl Booklet Insert is a die I designed for this purpose and I thought I would explain exactly how I’m going to use it.

Scrapbook a Micro Album to Give on the Spot - created by Becca Feeken using Spellbinders Swirl Booklet Insert Die - see supply list and at www.amazingpapergrace.com/?p=34049
I love meeting up with a friend over a meal or tea or coffee.  In fact, I have one of those get-togethers coming up!!  Since we haven’t seen each other in a while I thought it would be fun to send my friend away with a ‘micro album’.  When I designed the die, I designed it to fit the Filigree Booklet Die but also designed it to hold gift cards and to hold Instax Mini Pictures.  So, I have one of these little Instax Mini Cameras that take those instant pictures that develop in a couple of minutes.  No getting home and getting onto the computer to print – nope, you have them instantly.

About My Micro Album

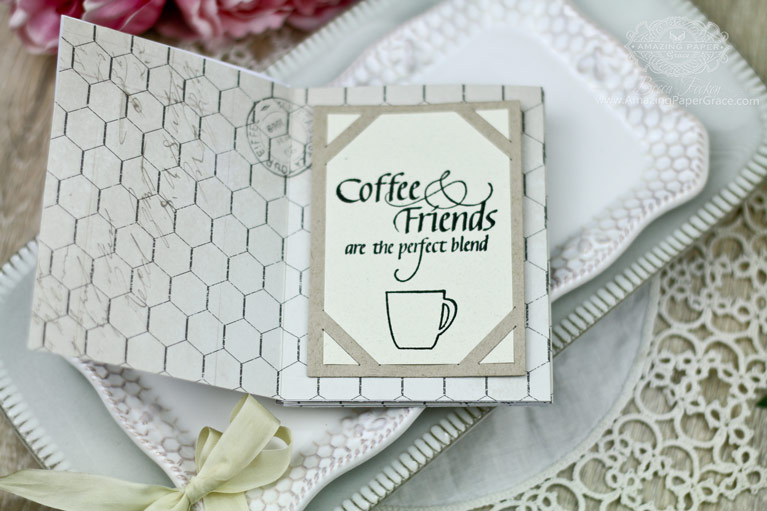
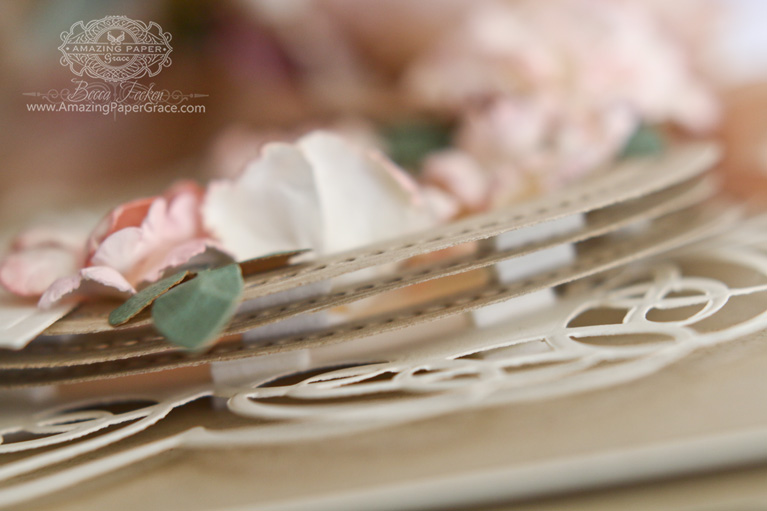
My micro album has three pages you can turn, as well as the inside front cover and inside back cover.  That gives me 8 surfaces that I can add pictures to or write notes.  I’m only going to use seven of those surfaces and the first one on the first page has a sentiment from a new set by Quietfire DesignBut First Coffee, that is perfect!!  During our get together, I’ll have enough film to get several pictures of us, perhaps one of our surroundings and of course, whatever we’re drinking or nibbling on.

Scrapbook a Micro Album to Give on the Spot - created by Becca Feeken using Spellbinders Swirl Booklet Insert Die - see supply list and at www.amazingpapergrace.com/?p=34049

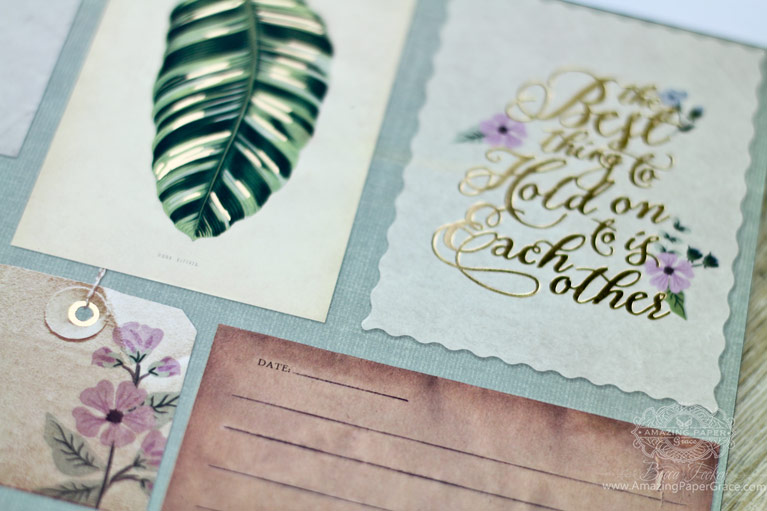
What’s the best thing?  The best thing is that by the end of the get-together, I can hand her a complete micro album to keep! It will be a great memento, until the next time we  get together.  I’m really thrilled how this turned out :-)  It was great that I could pull out some of my favorite design papers and use them to embellish.

Scrapbook a Micro Album to Give on the Spot - created by Becca Feeken using Spellbinders Swirl Booklet Insert Die - see supply list and at www.amazingpapergrace.com/?p=34049

Scrapbook a Micro Album to Give on the Spot - created by Becca Feeken using Spellbinders Swirl Booklet Insert Die - see supply list and at www.amazingpapergrace.com/?p=34049

A Pin for you :-))

Scrapbook a Micro Album to Give on the Spot - created by Becca Feeken using Spellbinders Swirl Booklet Insert Die - see supply list and at www.amazingpapergrace.com/?p=34049

WR-Supplies
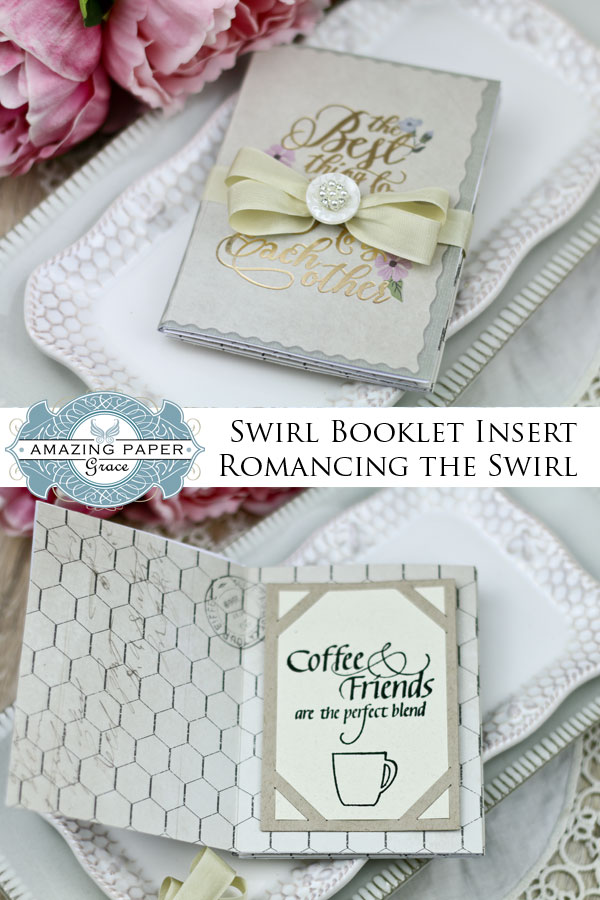
Stamps: Quietfire Design – But First Coffee
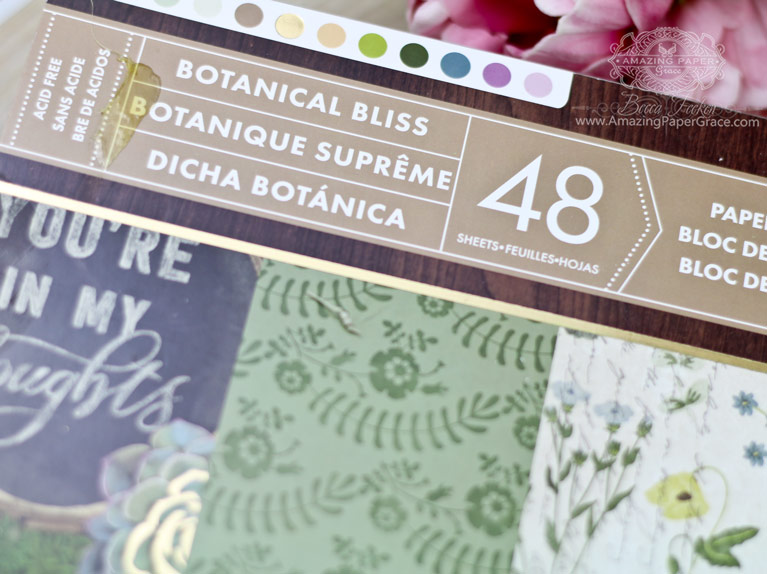
Paper:  Botanical Bliss (Michaels)
Ink:  Versafine Onyx Black
Accessories:  Amazing Paper Grace Dies by SpellbindersSwirl Booklet Insert, Seam Binding, Buttonspost-header-bottom

I think there will be many of these in my future :-) Happy creating!


APG_signature

pinTHIS SHAREthis TWEETTHIS EMAILthis
  • Lynda Mellor aka Loopy LyndaJuly 1, 2018 - 2:28 am

    Good morning Becca, just what the doctor order?
    This is right up my alley!!! My friend makes loads of these but hers are vertical so you can hang them, they look really sweet?
    Have a good one!!!
    Loopy LyndaxxxReplyCancel

  • Pam TASJuly 1, 2018 - 2:57 am

    Hi Becca these albums are getting very popular for
    gifts for birthdays etc maybe for Christmas !!
    Your friend is very lucky it’s lovely I would never get
    one done in 30 MINS …………..
    Take care hugs PamXXReplyCancel

  • Rosetta JenkinsJuly 1, 2018 - 3:32 am

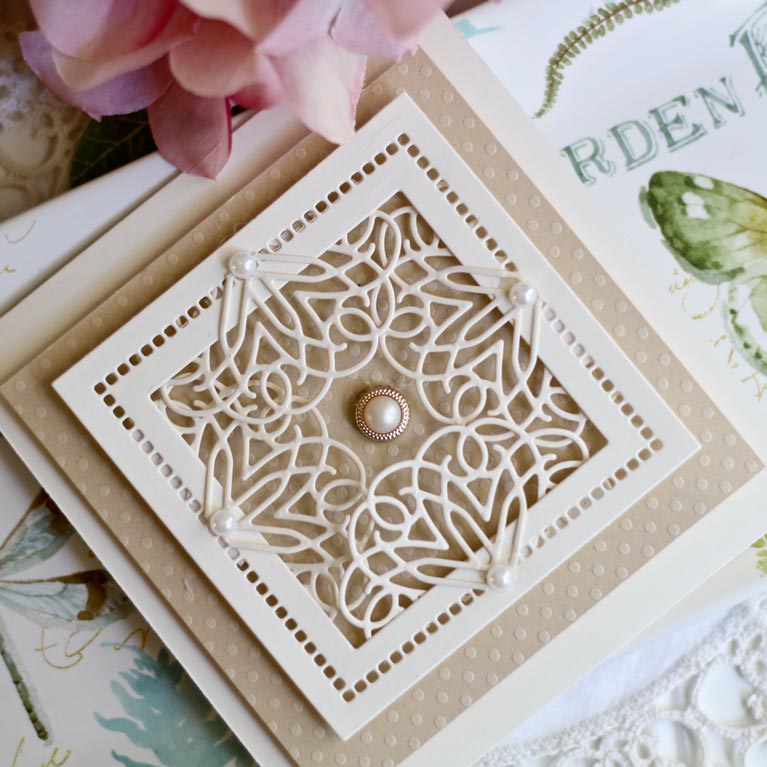
    Simply put……I must have this! So very elegant, creative design by the genius of Becca!ReplyCancel

  • Jan Symonds Adelaide AustraliaJuly 1, 2018 - 4:02 am

    Hi Becca, this is a wonderful gift, and looks so pretty too. It certainly is a must try for me. Thank you. JanReplyCancel

  • Anne(UK)July 1, 2018 - 4:27 am

    What a super idea! Hope you have a great time with your friend and create some happy memories!
    Hugs
    Anne(UK) xReplyCancel

  • ChrisJuly 1, 2018 - 5:07 am

    Hi Becca. I love the idea of these but have never made one. Is it made from one long piece of card and then concertined to make the individual pages or is there another way of doing it? I can’t quite make it out from the photos. I hope you and your friend have a great meet up!ReplyCancel

  • Christine SpringmanJuly 1, 2018 - 6:17 am

    Lovely mini album your friend should be thrilled to receive this. Quinty girlReplyCancel

  • SuzzieQJuly 1, 2018 - 7:38 am

    Such a thoughtful and sweet gift for the rememberance of a special time together with lovely friends.ReplyCancel

  • ANN ROBBINSJuly 1, 2018 - 7:38 am

    Hi Becca,
    Such a clever idea; but 30 minutes, more like 30 hours for me.Wish it were me having coffee with you! Someday soon. Haven’t got to watch the video yet but later today. Thanks for sharing this beauty.
    Hugs
    Ann RobbinsReplyCancel

  • EarlineJuly 1, 2018 - 9:45 am

    Love this ideal have to get this die setReplyCancel

  • Kathy mJuly 1, 2018 - 10:10 am

    You made the creation of booklets so easy and quick with your Swirl Booklet Insert!!!! So quick for birthdays and special events. For some reason I need to see the end result before I can determine how to best use it in my life. Once I see your creation, the, my mind jumps to creative uses by applying my changes to your beautiful model. Thanks so much!!!ReplyCancel

  • Becky GreenJuly 1, 2018 - 11:06 am

    Actually, this is one of the dies on my list! ;) Such a BEAUTIFUL keepsake for your friend, Becca! DO have a WONDERFUL TIME with your friend & ENJOY the time spent together! In our fast paced world,I’m SURE you know, we are lucky to have friends such as this & the time to spend some special time together! ;) BEAUTIFUL WORK on your mini-album!!!! ;)ReplyCancel

  • Chelsea JohnsonJuly 1, 2018 - 12:27 pm

    That is a charming little mini-album, Becca. What a beautiful gift for your friend. I know she will love the thoughtfulness and love that you put into creating it for her. It will be such a treasure, and a beautiful memento of a precious friendship.ReplyCancel

  • Dianne SchlegelJuly 1, 2018 - 5:45 pm

    In my younger years I always finished what I started – I could never wait til it was done! But after 50, when time wasn’t at a premium and my energy level began to dwindle, I found there was more projects than I had time for and couldn’t wait to get to the next one and as a result – one of these days I’m gonna have a large garage sale! Hugs DianneReplyCancel

  • RosemaryJuly 4, 2018 - 8:41 pm

    I really love this idea I really have to get restarted on my projectsReplyCancel

  • rosemaryJuly 14, 2018 - 7:56 am

    LOVE LOVE THIS when is your shop opening?ReplyCancel

How to Get Beautiful Snippings of Your Dies by Becca Feeken using Spellbinders Ringlet Round - see supply list and video tutorial at www.amazingpapergrace.com/?p=34038
Hiya, I was going through some of the cards I made recently and did not have a chance to share – there are two today plus another video!  I’m an evangelist of getting as much as you can from your dies and today that means being brave enough to cut them up.  To make beautiful snippings of your dies, experiment with your cast offs.  Snip them in half or cut around a curve to make them smaller.

I’m always looking for a quick blank card for thank you’s that I put in the mail.  This is my new ‘go to’ small card ( 4″x 4″), it uses one of my new favorites from the Romancing the Swirl Collection collection; the decorative piece inside of the Ringlet Round die along with Hemstitch Squares.   In the video below I give you tips and show you several ‘snipped’ elements to use.

How to Get Beautiful Snippings of Your Dies by Becca Feeken using Spellbinders Ringlet Round - see supply list and video tutorial at www.amazingpapergrace.com/?p=34038
Another example below – this is the card I show you how to make in the video.  There are a couple of surprises – it’s worth a watch just to get you thinking out of the box.  The card uses Sweetheart Swirl, Hemstitch Rectangles, Hemstitch Circles and Arched Swallowtail Pennants :-)

How to Get Beautiful Snippings of Your Dies by Becca Feeken using Spellbinders Ringlet Round - see supply list and video tutorial at www.amazingpapergrace.com/?p=34038

How to Get Beautiful Snippings of Your Dies by Becca Feeken using Spellbinders Ringlet Round - see supply list and video tutorial at www.amazingpapergrace.com/?p=34038

A New Video Tutorial – How to Get Beautiful Snippings of Your Dies

If you missed my videos from earlier this week, I’ve linked them here and all items used to make them are in the comments in Youtube.
How to Make Cinch and Go Flowers III  —–> HERE
How to Make an Embellished Box from Grand Cabinet ——-> HERE
How to Make Paper Tole Die Cut Layers——-> HERE
The tools I’ve used to make these items are linked below the video.

I’m absolutely a visual learner and if you are too, I have a video today to just show you exactly what I’m talking about.

A Pin for you :-))

How to Get Beautiful Snippings of Your Dies by Becca Feeken using Spellbinders Ringlet Round - see supply list and video tutorial at www.amazingpapergrace.com/?p=34038

WR-Supplies
Stamps: Kelly Creates
Paper:  Neenah Classic Crest – Natural White – 80lb Smooth,  Tim Holtz – Vintage Wallpaper, Tim Holtz – Gold
Ink:  Versafine – Victorian Velvet Distress Ink
Accessories:  Amazing Paper Grace Dies by SpellbindersRinglet Round, Hemstitch Squares Sweetheart Swirl, Hemstitch Rectangles, Hemstitch CirclesArched Swallowtail Pennants,  Seam Binding, flowers and pearlspost-header-bottom

Oooooh, I have so much good stuff in store for you all.  I can hardly wait until I can share!!  There – I just had to say that :-)


APG_signature

pinTHIS SHAREthis TWEETTHIS EMAILthis
  • ANN ROBBINSJune 29, 2018 - 10:05 pm

    Why Wait, Becca! We can’t wait either. Beautiful stuff here.
    I am heartbroken tonight as my Vagabond bit the dust trying to doing some embossing and guess I shouldn’t have pushed it. Birthday in another 10 days and hubbie said go ahead and order another one. Bless his heart, guess I’ll keep him!!
    Loving the tutorial Becca, yes I am a visual person so they really help.
    Hugs
    Ann RobbinsReplyCancel

    • Charlotte ZweigoronJune 29, 2018 - 10:57 pm

      I have jammed my Vagabond a few times. Had that same remorse… shouldn’t have pushed it. With my hubby squeezing the plates together with the brown base that holds them from each side we got them to back up and saved the day. Now, if I want deeper embossing, I lightly mist the paper before placing it in the embossing folder. It has to dry before I can use it but it beats the terror I’ve felt thinking I’d ruined my machine!ReplyCancel

      • ANN ROBBINSJune 30, 2018 - 9:15 am

        I “trashed” my Vagabond the other night. Bought it used for $100 and used almost 2 years so I got my money out of it, believe me. Ordered a new one, birthday next week so my treat! Got to have it to cut those “BECCA” intricate dies!!!!!

  • Marilyn in E~TownJune 29, 2018 - 10:14 pm

    Elegant cards?ReplyCancel

  • Linda KordesJune 29, 2018 - 11:14 pm

    Hi Becca!
    Missed your regular posts…. But boy! The clever dies uses in the videos will sure help me look at my dies differently.

    Love the simplicity and elegance of the cards this week. Take care & Happy 4th of July!ReplyCancel

  • Beverly JordanJune 29, 2018 - 11:34 pm

    Great video and am going to look for more of these multi functioning dies! I still don’t have enough!!! LOL!!ReplyCancel

  • Jennie BaileyJune 30, 2018 - 12:04 am

    Another beautiful array of cards, some lovely ideas too.ReplyCancel

  • Chelsea JohnsonJune 30, 2018 - 1:03 am

    Have mercy, Becca – what beautiful cards!!!! I love everything about these!! Thank you so much for the inspiration.
    And also, thank you for the video tutorial. You have always been a genius at figuring out cool/beautiful ways to use dies, and this is another perfect example.ReplyCancel

  • Lynda Mellor aka LoopyJune 30, 2018 - 1:31 am

    Good morning Becca, I too am a visual learner thanks for the videos.
    They really are helpful?
    Just a hint that more goodies are in store, can’t wait?
    Have a good one!!!
    Loopy Lynda xxxReplyCancel

  • Pam TASJune 30, 2018 - 5:18 am

    We have won the lottery …………
    Three days in a row and all these videos YES !!!!
    Thank you Becca for sharing all this yummy stuff to
    cast our eyes over and drool lol…..
    Love snipping dies it can make such a different look
    to dies and more use of them .
    Love these cards looks like all of us have no excuse not
    to get card making go girls…….. Hugs Pam XXXReplyCancel

  • Becky GreenJune 30, 2018 - 8:35 am

    VERY NICE, Becca! LOVE your video! ;) AND your tips! THANK YOU!!! I see, I “need” MORE of your dies! LOL SUPER JOB on BOTH of your cards today, Becca!!! ;) I LOOOVE ALL of those swirls & delicacy!!!!ReplyCancel

  • Christine SpringmanJune 30, 2018 - 9:46 am

    Another beautiful card lovely as always. Quinty girl.ReplyCancel

  • Anne(UK)July 1, 2018 - 4:22 am

    More treats for us in the pipeline… can’t wait! Thank you so much for sharing your wonderful creations with us. Your work is stunning!
    Hugs
    Anne(UK) xReplyCancel

  • Kathy mJuly 1, 2018 - 10:13 am

    Oh, thanks for the videos!!! Your tutorials help me better understand the uses and layering and assembly. Also, you videos inspire me to make my own enhancements. Thank you!ReplyCancel

Paper Tole Die Cut Layers Technique by Becca Feeken using Spellbinders Flourished Square, Cinch and Go Flowers III and Hemstitch Ovals - see tutorial at www.amazingpapergrace.com/?p=34030
Hi there sweet friends!  I’m back today with another video tutorial showing how to make this card – Paper Tole Die Cut Layers Technique.  This paper tole technique that is done with die cuts and it gives a great sense of depth to the focal panel on your card.  Its easy to do on both large die cuts as well as small and is especially good for frames!  It’s something I love to do when I’m looking for a place to put flowers.  On this card, I’m using Cinch and Go III  from the 3D Vignettes Collection (back in stock) and Hemstitch Ovals along with the new Flourished Square from the Romancing the Swirl Collection.

Paper Tole Die Cut Layers Technique by Becca Feeken using Spellbinders Flourished Square, Cinch and Go Flowers III and Hemstitch Ovals - see tutorial at www.amazingpapergrace.com/?p=34030
Here are the three elements I stacked to give the depth.  It almost gave me a bowl to work with for the flowers and gave me ample room to place my sentiment.


A New Video Tutorial – Paper Tole Die Cut Layers

I’m also, so tickled to link you to a new tutorial!   If you visited my blog yesterday, the video tutorial showed how to use Cinch and Go Flowers III  and how to make a decorated box – you can see that video —–> HERE.   Today, it’s all about embellishing using Paper Tole Die Cut Layers.   The tools I’ve used to make these items are linked below the video.

A Pin for you :-))

Paper Tole Die Cut Layers Technique by Becca Feeken using Spellbinders Flourished Square, Cinch and Go Flowers III and Hemstitch Ovals - see tutorial at www.amazingpapergrace.com/?p=34030

WR-Supplies
Stamps: Kelly Creates
Paper:  Neenah Classic Crest – Natural White – 80lb Smooth,  Neenah Classic Crest – Desert Sands – 80lb Smooth
Ink:  Versafine – Victorian Velvet Distress Ink
Accessories:  Amazing Paper Grace Dies by Spellbinders, Cinch and Go III,  Hemstitch Ovals,  Flourished Square,  Seam Binding, Bradspost-header-bottom

Thank you so much for all the kind words.  I don’t have the words to tell you all what you mean to me – so many friends.  You all continue to touch my heart and inspire me to keep creating.  What a lovely, lovely group!!


APG_signature

pinTHIS SHAREthis TWEETTHIS EMAILthis
  • Lynda Mellor aka LoopyJune 28, 2018 - 5:19 pm

    Good morning Becca, another gorgeous offering today!!!
    How lucky are we?
    Bless you!!!
    Have a good one!!!
    Loopy Lynda xxxReplyCancel

  • Lucy k.June 28, 2018 - 5:35 pm

    I’m in love with your creative abilities awesome cards!ReplyCancel

  • Rai GuidoneJune 28, 2018 - 5:48 pm

    As always, so elegant!!ReplyCancel

  • Anne(UK)June 28, 2018 - 5:53 pm

    So pretty Becca! Love the layering and the colour palette. Oh and the flowers and bow :o)
    Hugs
    Anne(UK)ReplyCancel

  • Jan Symonds from AustraliaJune 28, 2018 - 6:14 pm

    Hi Becca, it’s so wonderful to wake up 2 mornings in a row and have another beautiful card from you. This is really me, I do a lot of 3d work, but Becca don’t burn yourself out, we need you. LOL JanReplyCancel

  • Kristine VencelJune 28, 2018 - 6:26 pm

    Gorgeous, Becca! Of course it is, LoL. Now to make the envelope.
    Just curious, what is the brand of your cream cardstock? I can’t find a nice cream color. The ones I find are all way too yellow. ??ReplyCancel

  • Beverly JordanJune 28, 2018 - 6:59 pm

    Quite beautiful!!!ReplyCancel

  • Pam TASJune 28, 2018 - 7:04 pm

    Got the dies got the paper got to give this a go lol………
    Love these colours thank you for another video don’t
    burn yourself out ! I guess the health check has done
    you the power of good !
    We all had better do the check and especially the walking in the
    fresh air pretty fresh down here at the moment !!! snow on the highlands brr.
    PS the lights are still on hugs Pam XXXReplyCancel

  • ANN ROBBINSJune 28, 2018 - 7:18 pm

    Like Pam Tas said, I got the dies, the paper and I too am going to have to make this card. Beautiful card, beautiful lady. So glad you are back.
    HUGS
    Ann RobbinsReplyCancel

  • Christine SpringmanJune 28, 2018 - 7:34 pm

    Such a beautiful card your work is always so inspiring, thanks for the video on how you made this card. Quinty girlReplyCancel

  • Becky GreenJune 28, 2018 - 7:51 pm

    BEAUTIFUL, Becca!!!! I LOVE the depth you’ve given your card & the “Tole” technique you’ve done too! LOVE that Hemstitch Die! LOL (I LOVE ALL your dies REALLY! I can not help myself! ) ;)ReplyCancel

  • Jennie BaileyJune 29, 2018 - 12:46 am

    Thank you for another great video and a beautiful card tooReplyCancel

  • Maxine DJune 29, 2018 - 4:01 am

    What a gorgeous card Becca, and such an elegant look simply by layering – thank you for sharing
    Blessings
    MaxineReplyCancel

  • Crafty CruiserJune 29, 2018 - 4:14 am

    Oh so lovely! You really are an inspiration to all of us, thank you.
    Doreen RReplyCancel

  • Vicky S.June 29, 2018 - 7:42 am

    Becca, every card is more beautiful than the last.
    I like looking at your creations & get ideas from them.ReplyCancel

  • Marilyn in E~ TownJune 29, 2018 - 9:00 am

    WOW, what a beautiful card, love the layers, flowers and your bow!
    Thank you for always inspiring me?ReplyCancel

  • Chelsea JohnsonJune 29, 2018 - 10:09 am

    Wow, Becca, another beautiful card AND a fantastic tutorial!!! Score!!!!!
    Thank you so much for brightening my day with all of this beauty and inspiration.
    Keep it comin’, girl!!!ReplyCancel

  • RosemaryJune 29, 2018 - 12:26 pm

    Absolutely am thrilled that you are back on love the cardReplyCancel

  • Sandy ArtmanJune 29, 2018 - 1:08 pm

    Hi, Becca,
    I read all the other’s comments and gosh, I could just put “ditto” next to each one, I’m in such good company! We’re in this for the long haul so kudos to you for taking good care of yourself.
    Love & blessings, my dear friend,
    SandyReplyCancel

  • Leanne SJune 29, 2018 - 1:30 pm

    Very elegant card!ReplyCancel

  • Carole StrawnJune 29, 2018 - 3:39 pm

    Always so beautiful. Your cards always showcase your unique style. Love the soft colors and the romantic feel.ReplyCancel

  • Beverly JordanJune 29, 2018 - 11:48 pm

    Such a gorgeous card set with the layers of gorgeousness!!ReplyCancel

  • Denice with a "c"June 30, 2018 - 8:32 am

    Goodness, this is just so beautiful. I always love hearing from you and watching your video’s. I go to u-tube and start watching and before you know it 2 or 3 hours have gone by and I am rushing around trying to get stuff done I should have already taken care of. Ha Ha…. Oh well, I know one thing for sure, that work will still be there waiting on me…. Ha Ha… Have a great day sweet girl… God bless…DeniceReplyCancel

  • Kathy mJuly 1, 2018 - 10:15 am

    Becca, I bought these dies and can’t wait to create this card design. Of course I try to add my little changes. Thank you!!!ReplyCancel

  • SuzzieQJuly 6, 2018 - 10:25 am

    Oh, such a beautiful card. I’m loving all the layers and flowers. Thank you for the helpful and wonderful video. Great job!ReplyCancel

  • Kathy MJuly 17, 2018 - 2:33 pm

    Purchased the oval die immediately! Already had the flourish die. Another great card design!!!ReplyCancel

I N F O