There were over 541 delightful entries to the I Stayed Home from CHA Blog Candy.  I am still reading the last of them, but I must say that these came to me at a time that I needed to read them, I am truly blessed.  I hope in your blog hopping you took a second to read the uplifting entries and the goodness that pours so freely from your hearts.  My prayers are joyful and I thank God for every one of you. 

The candy is but a small token of appreciation for those who visit.   There will be more but in the interim, I need to show you the winner.

Random.org picked the following number:
 

That matches up to:

Shirley Lee, please contact me to claim your gift – you can simply go to my contact page to send me a note and your address.  Hurry though, I pick a new name every 48 hours until someone claims their gift. 

Thanks to all for entering!!

pinTHIS SHAREthis TWEETTHIS EMAILthis
  • Karen WallaceFebruary 1, 2009 - 4:29 am

    How wonderful she won, congratulations!!! She’s going above and beyond for friends and so deserving!!! I hope you enjoy all the goodies and take some time for yourself.
    Congrats again!!ReplyCancel

  • DealbaidaFebruary 1, 2009 - 6:11 am

    Oh how I hope Shirley comes forward to claim her prize; she is so deserving. Friends like her are very rare.

    Congratulations. Enjoy your prize!

    Marion,
    UKReplyCancel

  • Gail GenrichFebruary 1, 2009 - 6:47 am

    Shirley is truly a gift to her friend and deserves this prize. I just hopes she takes a few minutes to enjoy it and find new energy through creativity!ReplyCancel

  • Melissa B MitchellFebruary 1, 2009 - 7:28 am

    Anyone would be blessed to have a friend like Shirley. And although Shirley will be rewarded in heaven, this blog candy is a special reward for now.ReplyCancel

  • MarianFebruary 1, 2009 - 7:30 am

    Congratulations to Shirley. I too hope that she replies as this is such a beautiful gift to win! This site is also the top of MY list as well…it’s so inspiring :)ReplyCancel

  • BettyBeeFebruary 1, 2009 - 8:20 am

    Congratulations to Shirley. Hers is the kind of Christlike service that makes our world a better place. I, too, hope she gets here to see her deserved good fortune in the 48 hours! Thank you, Becca, for the opportunity to read such an uplifting list of comments. And thanks again for your beautiful work.ReplyCancel

  • Sherry DFebruary 1, 2009 - 8:26 am

    Becca, I just wanted to Congratulate Shirley not just for winning the blog candy but also for being there for her friend and her family in their deepest time of need.. she truly has an amazing spirit and I’m so happy for her! God Bless You Shirley…

    … and since we’re sharing, I have to say, this is one of my favorite sites to visit each morning with my cup of coffee…

    I am always blown away by not only your creativity and inspiration but also that you share your passion with tutorials … I am a visual girl and this is really helpful for me in deciding if I will actually attempt to create a project or not!ReplyCancel

  • JennyFebruary 1, 2009 - 9:00 am

    Congratulations to Shirley, a worthy winner.
    She is such a blessing to those that know her.ReplyCancel

  • SuziFebruary 1, 2009 - 9:23 am

    Congratulations, Shirley! Enjoy. . .as you spread the joy!ReplyCancel

  • CarolFebruary 1, 2009 - 10:12 am

    Congratulations Shirley Lee! You’ve gone above and beyond to be a good friend, and you’re so deserving of this prize!
    Becca, your medallion tutorial is incredible!! Thanks for sharing your talent with your readers in such a thoughtful way!ReplyCancel

  • Shirley LeeFebruary 1, 2009 - 10:20 am

    Thank you to all of the above ladies for your sweet comments. I am so touched by all your words that I had tears running down my cheek reading them. Thank you everyone for making my day!
    Shirley LeeReplyCancel

  • Carol WestFebruary 1, 2009 - 11:35 am

    Becca, please give my Congrats to Shirley. I have a friend like Shirley and am experiencing the same situation as her friend. I hope she knows how thankful her friend is to have. She definitely deserves the candy and so much more. The Lord will bless her and watch over her for her kindness and caring. She will never be forgotten because a friend like Shirley is a rare find.ReplyCancel

  • Gail S.February 1, 2009 - 11:46 am

    Congratulations Shirley!!ReplyCancel

  • colleen eFebruary 1, 2009 - 1:21 pm

    concrats to you shirley,

    nice to see you won you are truly special and I also live in Roseville ca.
    being a nurse I know how important it is to the cargiver for what you do. keep serving you are blessed.ReplyCancel

  • CharleneFebruary 1, 2009 - 2:57 pm

    Congrats Shirley. Friend s like you are hard to find and to keep. Hope you enjoythe blog candy .ReplyCancel

  • Peggy MaierFebruary 1, 2009 - 4:30 pm

    Congratulations Shirley! Sounds like your friend is very blessed to have you in her life!ReplyCancel

  • JenFebruary 1, 2009 - 6:10 pm

    Congrats Shirley God Bless You
    JenReplyCancel

  • Janet CastleFebruary 1, 2009 - 7:20 pm

    Congratulations Shirley and Becca….those who give also receive. The Lord is soooo good….all the time.
    JanReplyCancel

  • ConnieFebruary 1, 2009 - 9:38 pm

    Congrats Shirley. My Mom’s name is Shirley. She was a generous person too.ReplyCancel

  • Kathy BFebruary 2, 2009 - 12:10 am

    Shirley, what an angel you are. So many people avoid situations like this. I hope you never have to experience such a situation yourself, but if you do, you will understand how much what you are doing means to those on the receiving end. You are so very special. Congratulations on winning the blog candy. You have good kharma!ReplyCancel

  • HeatherFebruary 2, 2009 - 3:58 pm

    Congrats to you, Shirley!
    Some years back I had a friend going through a post partum depression. A very difficult time, to say the least! I do recall bringing her soups and stews (anything easy to reheat) as well as frozen rolls of cookie dough. She already had a small one at home so fresh baked cookies were a welcome gesture that didn’t require much of her time.
    She soo appreciated the extra help, as did her husband :)
    A friend is most welcome during a difficult time!ReplyCancel

  • Linda BandowFebruary 3, 2009 - 2:15 pm

    Shirley: What a blessing your friendship is for your friend AND for you. You truly are a winner.ReplyCancel

Do you remember this ensemble?  Well so many people asked how to make it that I finally have the tutorial ready.  Here we go!!

Supply List:

Spellbinders Large Scalloped Octagons Scissors
Two sided design paper Invisible tape
Bone folder or optional Scorpal Long reach hole punch
Large Brad or Threaded Button Glue Dots

A friendly reminder, it takes a lot to put together pics and such for tutorials and I offer this tutorial up in the spirit of sharing.  Most people are grateful and offer credit where credit is due.  Because others may want to sample my other tutorials, I encourage and welcome link backs to this tutorial, you do not have to ask permission.

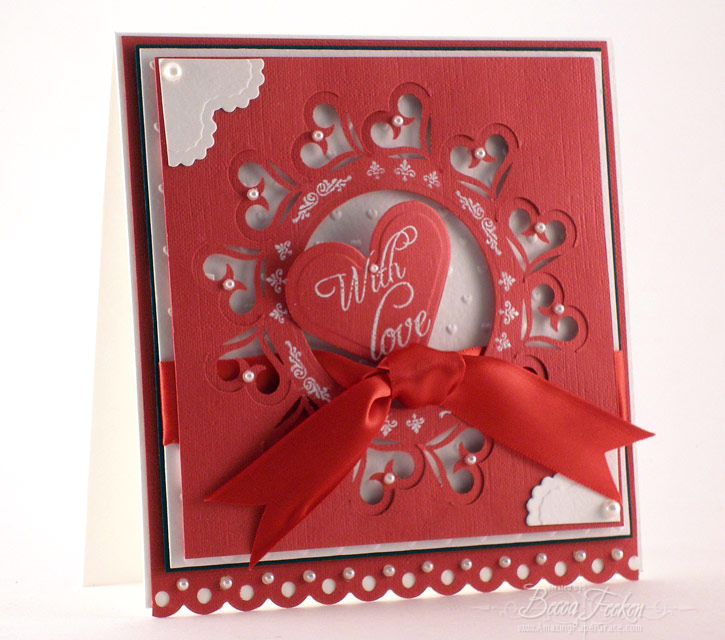
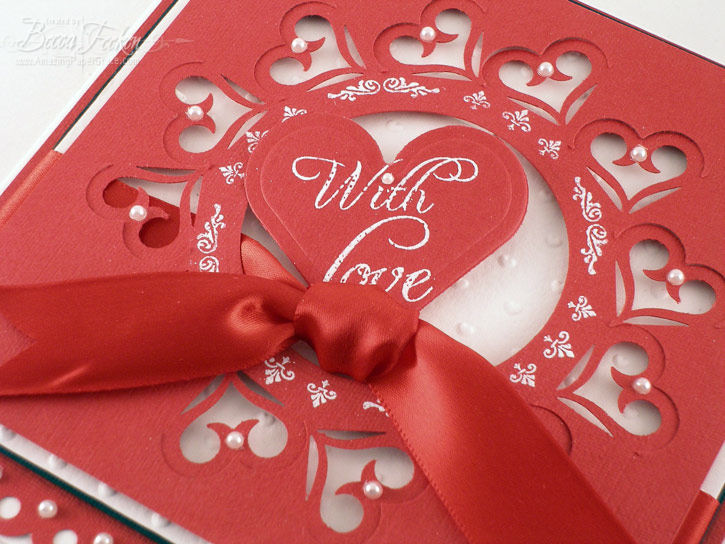
Using Spellbinders Scalloped Large Octagons, cut/emboss one of the largest size, cut/emboss three of the second largest size and cut/emboss three of the second from smallest size.  Set the largest scalloped octagon aside, we will use it later.

(Optional) To prepare your cut shapes for scoring, align the flat edge of the scalloped octagon shape with the top of your Scorpal.

Score straight down through the shape.  This score line will fall between the second and third scallop on each flat side of the octagon.

Each scalloped octagon will have four scored lines.

Using a long reach punch, set a hole in the center of each octagon, this will prevent the paper from tearing when folding.  Then snip along one score line down to the center cut hole.

Fold each of the three pieces of the medallion.  The first fold will be a mountain fold where the fold will rise above the cut edge.

Alternate mountain folds with valley folds so that each piece looks the same as that shown below.

With a bone folder, burnish the edge of each fold so they are sharp and crisp.

Using invisible scotch tape, place one piece of tape underneath your first piece of medallion with the sticky side facing up.  The tape will end up on the underneath side of the medallion and fairly inconspicuous.

Marry the second piece of your medallions to the first by placing side by side on the upward facing sticky side of the tape.

Do the same with each seam.  There will be a total of three seams.

Cut a center hole in the scalloped octagon piece that we set aside.

Put glue dots on the bottom of your medallion.  I found that six glue dots was plenty, one on every other fold.

Flip medallion over and secure it to the bottom piece that had been set aside.

Construct another medallion using the three small scalloped octagons

.

Seat the smaller medallion on top of the larger medallion, matching folds.

Put an embellishment like a brad or threaded button through the aligned center holes.

Voila!!!  Your medallion is finished, it just needs to be adhered to something.  These can be made in any size and can also be made with round scallops however the scalloped octagons are easier to work with and look prettier in my humble opinion.  You can add as many layers as you want and if you want a more rufflier medallion, thow in another folded piece.

Here’s what I did with this one.  I’m done buying bows for gift bags — too often the bow cost more than the bag . . .  Now I have a very cost effective alternative.  I hope you enjoy making medallions, once you get used to the process, they move along very quickly.

pinTHIS SHAREthis TWEETTHIS EMAILthis
  • Sue KmentJanuary 30, 2009 - 9:31 pm

    oh my gosh…this looks like so much fun to make!ReplyCancel

  • SherylHJanuary 30, 2009 - 9:38 pm

    Amazing — and here I thought I didn’t need the octagonal shapes.ReplyCancel

  • EvaJanuary 30, 2009 - 9:43 pm

    WOW, Becca, thank you for the tutorial, it is sooo beautiful!ReplyCancel

  • Silke LedlowJanuary 30, 2009 - 9:44 pm

    OMG – Becca – this is fabulous!!! Thank you for the tutorial – girl you rock!!!ReplyCancel

  • NorineJanuary 30, 2009 - 9:44 pm

    all I can say is WOW this is so creative love it
    hugs
    NorineReplyCancel

  • SandiK.January 30, 2009 - 9:47 pm

    I’m so in awe of all your wonderful creations–thanks for sharingReplyCancel

  • Linda EJanuary 30, 2009 - 9:51 pm

    What can I say, Becca? That technique is absolute genius. Your card and bag are stunning!!!ReplyCancel

  • EdnaJanuary 30, 2009 - 9:55 pm

    Totally speechless when I saw you graceful heart corner punch is not working on corners, but being a round-about-fence to the JustRite-stamped-circled Valentine heart.

    And you are absolutely right, the octagon spellbinder, so some of the “petals” are standing out, and make them look more “wave-y”

    It is amazing grace that our Heavenly Father has gift-en to you. Glory be to Him.
    EdnaReplyCancel

  • VioletJanuary 30, 2009 - 9:58 pm

    Love it! It would definitely replace expensive bows – and prettier! You are one talented lady!ReplyCancel

  • **Milu**January 30, 2009 - 10:01 pm

    thanks so much for sharing Becca!
    I have done this with the round shape one but I like this one better also =)
    Love,**Milu**ReplyCancel

  • LindaJanuary 30, 2009 - 10:12 pm

    I agree U ROCK!!!!!!!!!!!!! I’ll never have to buy another bow!!!! But I do have to get those Nestabilities!!!!!!!!! Thanks for Sharing!!!!

    Like I have said so many times before ——— YOU’RE THE BEST!!!!!!!!!!!!!ReplyCancel

  • annJanuary 30, 2009 - 10:18 pm

    Thank you Becca. I have waited patiently for you to do this tutorial. I fell in love with it the minute I saw it. but that is true for all of your creations. Thank you for sharing.

    AnnReplyCancel

  • Brenda MJanuary 30, 2009 - 10:23 pm

    How awesome. Love it.ReplyCancel

  • CookieJanuary 30, 2009 - 10:27 pm

    now if I just had my nestabilities…. this is so gorgeous… thank you so much for sharing…….

    CookieReplyCancel

  • Barbara TaylorJanuary 30, 2009 - 10:31 pm

    Thank you, Thank you, Thank you. Another Beautiful creation.ReplyCancel

  • ChristyneJanuary 30, 2009 - 10:34 pm

    This is just AMAZING Becca! Your talent is outstanding!

    Hugs~
    ChristyneReplyCancel

  • MaxineJanuary 30, 2009 - 10:40 pm

    That is beautiful, Becca, and your instructions are brilliant. Bless you for sharing.ReplyCancel

  • Jerri KayJanuary 30, 2009 - 10:48 pm

    A fabulous tutorial Becca, totally awesome!ReplyCancel

  • Debbie OlsonJanuary 30, 2009 - 11:05 pm

    You rock, Becca! Beautiful job on this tutorial!ReplyCancel

  • wannabJanuary 30, 2009 - 11:12 pm

    Wow, this is beautiful. TFS.ReplyCancel

  • BrendaJanuary 30, 2009 - 11:28 pm

    Oh how pretty! Thank you for sharing another idea using the Nesties.ReplyCancel

  • Elisa SalatJanuary 31, 2009 - 12:07 am

    Becky, you are the BEST! This is absolutely GORGEOUS!!
    I just got a few Spellbinders I had ordered and now I am going to have to order this one too! There is no doubt that you make Spellbinders so appealingby making such beautiful cards!
    YOU ROCK!ReplyCancel

  • Charlene Austin (Willow01)January 31, 2009 - 12:32 am

    GORGEOUSNESS!!ReplyCancel

  • Marisa(whiterockmama)January 31, 2009 - 12:58 am

    You are amazing, woman!! This is wonderful!! What a great way to dress up a gift bag or a card. Now if I just had some nesties…LOL! Into my “keep” file for later use. Thanks for the tutorial!ReplyCancel

  • Tracy SmithJanuary 31, 2009 - 1:00 am

    thanks so much, I’m so excited to see this tutorial – I just bought the scor-pal and I pre-ordered that set of dies! Yeah, I’ll be ready to try it out! thanks for the great directions!! You are awesome!! Tracy in Michigan, crazyforsu@aol.comReplyCancel

  • EmiliaJanuary 31, 2009 - 1:00 am

    Becca, you are so talented!!!!! I LOVE everything you create, it’s amazing!!!!ReplyCancel

  • JeanJanuary 31, 2009 - 1:06 am

    Thank you for your tutorial! Your flower is beautiful and makes me all the more anxious for my die to come. You are indeed an angel to post your tutorials – your cards are awesome! I check my email quite often during the day waiting for your new posting to come out. Thanks again!ReplyCancel

  • AlexandraJanuary 31, 2009 - 1:38 am

    Thanks for sharing! I only have the scalloped Circles but will give it a try!ReplyCancel

  • lacyquilterJanuary 31, 2009 - 2:22 am

    Awesome! I love it.ReplyCancel

  • DealbaidaJanuary 31, 2009 - 4:19 am

    Yet another beautiful creation. Thank you so much for taking the time to prepare your fantastic tutorials, and your generosity in sharing your wonderful work.

    You are an amazing lady Becca!

    Marion,
    UKReplyCancel

  • Margaret HightonJanuary 31, 2009 - 4:27 am

    My sentiments are the same as Marions from the uk
    Thank you for taking the time and effort to do this for all of us.
    You lovely lady you!
    Margaret. ukReplyCancel

  • AngieJanuary 31, 2009 - 4:32 am

    Oh wow.
    I just love your work.
    Your blog is absolutely amazing and this tutorial is no exception.
    Love Angie..xx..ReplyCancel

  • Angji PruenteJanuary 31, 2009 - 4:57 am

    Another wonderful tutorial. Thank you so much for sharing your work with us!ReplyCancel

  • HeatherJanuary 31, 2009 - 4:57 am

    Becca, this is so good – it’s amazing what YOU can do. I must buy some ‘nesties’ to recreate your fantastic tutorials. Keep them coming please.
    Love HW
    xxReplyCancel

  • Anne SpiteriJanuary 31, 2009 - 5:11 am

    So cool Becca, thanks for sharing.ReplyCancel

  • debbJanuary 31, 2009 - 6:14 am

    Thank you for making and sharing this tutorial! debbReplyCancel

  • CherylJanuary 31, 2009 - 6:19 am

    WOW!!! Thankyou so much for sharing,your flower is gorgeous!!!ReplyCancel

  • ValerieCJanuary 31, 2009 - 6:22 am

    Thank you so much for sharing your talent with us. I enjoy reading your blog! Everything you make is so elegant! Your tutorials are so CLEAR, too! I’m not left guessing if I’m going to do right. Again, I am so glad I stumbled across Amazing Paper Grace!!!ReplyCancel

  • ValerieCJanuary 31, 2009 - 6:23 am

    By the way, where do you get all the pearls you use?ReplyCancel

  • sherry vogtJanuary 31, 2009 - 6:44 am

    This is beautiful, useful, and an amazing idea! thanks for sharing! I can’t wait to get this nestablility in my hands now!! I love this product line…I want it all, of course! LOLReplyCancel

  • GigiJanuary 31, 2009 - 6:54 am

    So amazing, so beautiful, so talented, thank you for the tutorial, the time, and the thoughtfulness!ReplyCancel

  • YvonneJanuary 31, 2009 - 6:57 am

    It is just gorgeous. Can’t wait to get a set of those to make my own.ReplyCancel

  • KarenJanuary 31, 2009 - 7:40 am

    Wow Becca. You are amazingly talented. I love looking at your blog to see what you are doing next!ReplyCancel

  • TrishaJanuary 31, 2009 - 7:52 am

    Awesome, thank you for the tutorial.ReplyCancel

  • JeanneJanuary 31, 2009 - 7:54 am

    Absolutely beautiful! Becca, thank you SO much for your generous spirit! I am so grateful to have found your blog and to be inspired by your creations.

    Have a wonderful weekend!ReplyCancel

  • monnaJanuary 31, 2009 - 8:08 am

    Wow…How pretty is that!!!….thanks so much for the instructions….Love it!!!….ReplyCancel

  • CrystalJanuary 31, 2009 - 8:09 am

    Becca , thank you , thank you ! Your tutorial was very clear and helpful. Can’t wait to try this myself. Love your blog! Blessings to you !ReplyCancel

  • PaulineJanuary 31, 2009 - 8:12 am

    WOW! Becca, this is beautiful. I love your blog, you are an amazing gal! Your artwork is so inspiring to us all. Thanks for the tutorials, they are so helpful. Thanks for sharing your creations.ReplyCancel

  • Katie MJanuary 31, 2009 - 8:14 am

    Your work is so elegant and your ideas ingeneous. Thanks for sharing.ReplyCancel

  • mary puskarJanuary 31, 2009 - 8:14 am

    Thanks so much Becca. You are so generous with your time and your talent. May God bless you for your generosity.

    Mary
    http://www.primitiveseasons.blogspot.comReplyCancel

  • UrsulaJanuary 31, 2009 - 8:33 am

    FABULOUS!!! Can’t wait to get my hands on my very own set of these nesties and give these flowers a try! (with lots of help from your tutorial of course). Once again, thank you for your generosity in sharing your talent and creativity with all of us!!!ReplyCancel

  • WritingEliJanuary 31, 2009 - 8:48 am

    Oh, my!!!
    Becca this is stunning. It helps to see the amazing photos you took to understand just how you put it together! Bravo!ReplyCancel

  • CarolenJanuary 31, 2009 - 8:50 am

    Thanks Becca! Amazing as always!ReplyCancel

  • AnitaJanuary 31, 2009 - 8:57 am

    Oh my stars – you are such a nut for doing all that :-) Nut in a good way, of course! They’re too cute!!!ReplyCancel

  • MargJanuary 31, 2009 - 9:15 am

    Thanks for showing us how to make these. They are lovely.ReplyCancel

  • PatJanuary 31, 2009 - 9:34 am

    You really think outside the box!!!!
    This is truely creative. It would have taken me hours to figure that out.ReplyCancel

  • Karen MJanuary 31, 2009 - 9:49 am

    Wow! All I can say, is thank you for this awesome tutorial! I sure do want to try this now!ReplyCancel

  • CindyJanuary 31, 2009 - 9:56 am

    beautifully done Becca!
    CindyReplyCancel

  • victoria gJanuary 31, 2009 - 9:57 am

    Oh my! This is the tutorial I had asked you about just a bit ago…I’m so glad you’ve made it available now. Lovely! Just lovely! I make a different type of medallion that I love and will have to prepare a tutorial on mine as well. Yours is just incredible though…now I’m in search of that die set :-) Thank you so much, your work is just outstanding.ReplyCancel

  • Tricia JonesJanuary 31, 2009 - 9:59 am

    As usual Beautiful work Becca. And your destructions are so concise and beautifully pictured. You are a true blessing to us all.

    TriciaReplyCancel

  • SheilaJanuary 31, 2009 - 10:03 am

    You are the best! Thank you so much for the great tutorial. Appreciated very, very much.ReplyCancel

  • ChrisJanuary 31, 2009 - 10:07 am

    Thank you so much for taking the time to make this tutorial. The directions are very easy to understand. The pictures really make it so easy to make the flowers. thanks again.ReplyCancel

  • KimJanuary 31, 2009 - 10:33 am

    Thank you so much for the tutorial Becca! I can’t wait to get these dies so I can play and make flowers too!
    Hugs~ KimReplyCancel

  • MistiJanuary 31, 2009 - 10:41 am

    WOW! AMAZING! You have such a creative mind! I love how you show us what you did! Some of us are very visual learners!! Once again, your work is stunning!ReplyCancel

  • Cindy H.January 31, 2009 - 10:53 am

    Thank you so much for the tutorial! This is an awesome medallion/flower/bow for almost any occasion!!!ReplyCancel

  • DianeJanuary 31, 2009 - 10:55 am

    Becca,
    Another thank you for your wonderful tutorial.

    Enjoy your weekend!

    ~~Diane~~ReplyCancel

  • Elizabeth S.January 31, 2009 - 11:06 am

    Wow!! This is great thanks for sharing the tutorial.ReplyCancel

  • indytrishdJanuary 31, 2009 - 11:15 am

    Becca, you are one amazing woman. I am so happy that I have found your blog and that you are so willing to share your knowledge. Thank you!!!!!! Please don’t stop sharing and making your wonderful tutorials.ReplyCancel

  • kimJanuary 31, 2009 - 11:15 am

    Amazing (and beautiful choice of papers)…. never would my mind have thougth of this! Thanks for sharing your amazing talent!ReplyCancel

  • MilliejsJanuary 31, 2009 - 11:45 am

    Becca, I’m thinking this would make a fantastic Christmas decoration….you could make 2 sets and glue them back to back…with a hanger between them…maybe a foil cardstock for one layer…away goes my mind…it’s absolutely gorgeous.ReplyCancel

  • BarbaraJanuary 31, 2009 - 12:27 pm

    Wow Thanks for the tutorial!
    When I saw them on sneak peek I didn’t think I wanted them, but after seeing your tutorial they are on my wish list. LOLReplyCancel

  • Linda MJanuary 31, 2009 - 12:41 pm

    I LOVE THIS!! It’s simply gorgeous. I have to make some–your tut makes it look so easy. Wish me luck!ReplyCancel

  • melitaJanuary 31, 2009 - 12:42 pm

    just fantastic! you are so creative! i wouldn’t even begin to be able to think up some of the projects you have created! WOW! I am in awe! I am totally going to have to buy some of these plates!ReplyCancel

  • ConniecrafterJanuary 31, 2009 - 1:06 pm

    Beautiful, I need to make a purchase :) Thanks so much for sharing your talent!ReplyCancel

  • CharleneJanuary 31, 2009 - 1:19 pm

    Thanks for the instructions. Something else I can do on these cold winter days.

    Charlene R.ReplyCancel

  • VivianJanuary 31, 2009 - 1:32 pm

    Wow. That is absolutley gorgeous, and a great tutorial. I even think I can do it…maybe. But I’m sure gonna try!ReplyCancel

  • RoxieJanuary 31, 2009 - 3:45 pm

    That is sooo gorgeous, it certainly is a must have. Thank you so much.ReplyCancel

  • Beth NormanJanuary 31, 2009 - 4:40 pm

    Wow, I’m comment maker 76. Now that you’re famous, don’t forget about me–LOL. This project rocks! You have been so blessed with talent, and I’m so glad you share it with us.ReplyCancel

  • Candy FostaJanuary 31, 2009 - 5:05 pm

    Thank you for sharing this tutorial. The flowers are beautiful.ReplyCancel

  • HeatherJanuary 31, 2009 - 5:05 pm

    Oh, how gorgeous! It also looks like fun to make, which is a lovely bonus. These delicious bows put those store-bought ones to shame.

    I’m the ‘Lucky 16’ Spellbinders winner and am just soo anxious to get my fingers on these dies. ‘Look what I can make’ is going to be my new fave phrase. Of course, the biggest thanks will be to Spellbinders and you, for making all my imaginary dreams become a reality.

    Thanks Becca!

    Heather in MontrealReplyCancel

  • CherylJanuary 31, 2009 - 5:26 pm

    Becca

    This beautiful and I want to make one however…since the general public will not have access to the Octagons until mid March would you be able to share with us how to make the flower with the scalloped circles as well?

    Thanks

    CherylReplyCancel

  • Kathy (Wattle)January 31, 2009 - 5:55 pm

    OMGosh!!! Becca – you’re a genius!!!! Now I just have to wait (impatiently) for those dies to get to Australia!!!!ReplyCancel

  • AnnelieJanuary 31, 2009 - 6:00 pm

    Thank you so much for the tutorial. I really appreciate that it is in written form and not a video. This way I can print out the instructions and keep them for future use. Also I have dial-up and it would take forever to view the video. Just love alll your wonderful creations, Becca. Keep up the gorgeous creations. You’ve inspired hundreds of crafters!ReplyCancel

  • MaryJanuary 31, 2009 - 6:13 pm

    Your spirit of sharing is amazing Becca. Yours is my very favourite craft Blog and I look forward to your updates every day. All the very best to you :)ReplyCancel

  • Sandi AshJanuary 31, 2009 - 6:45 pm

    Can’t make a bow to save my life and haven’t bought them for a number of years or so. Now I can adorn packages at whim. Thanks for sharing this tutorial with us not to mention all of your spectacular cards, etc.ReplyCancel

  • SueJanuary 31, 2009 - 7:41 pm

    Becca – You are so talented. Thanks so much for sharing the tutorial. Your cards are so beautiful. ((HUGS)) to you!ReplyCancel

  • SharronJanuary 31, 2009 - 8:08 pm

    Another amazing tutorial! You rock, Becca!
    Thanks so much for sharing!
    ~~~ Huggies & Blessings ~~~ReplyCancel

  • maddy hillJanuary 31, 2009 - 8:13 pm

    wow thats such a clear and brilliant tutorial – thanks for sharing ! i have bookmarked you !ReplyCancel

  • NadiaJanuary 31, 2009 - 9:09 pm

    This is just gorgeous! You are so talented and have a wonderful imagination which helps. I just love all your tutorials, but as soon as I get this one I shall be making them. I have made some out of the scallop and I just loved it. Thanks for sharing and hugs Becca!ReplyCancel

  • Linda C.January 31, 2009 - 9:17 pm

    THANK YOU!ReplyCancel

  • Judit VJanuary 31, 2009 - 9:36 pm

    WOW, Becca, thanks for this tutorial, it is sooo awesome!ReplyCancel

  • Cindy HaffnerJanuary 31, 2009 - 9:40 pm

    Wow-zers girl, amazing.ReplyCancel

  • RebekkaJanuary 31, 2009 - 9:51 pm

    This is just so beautiful, WOW. Thank you for sharing with us.ReplyCancel

  • ToshJanuary 31, 2009 - 10:09 pm

    WOW!! This is amazing!!! Fabulous tutorial!! Fabulous designs!!ReplyCancel

  • Jamie WilcoxFebruary 1, 2009 - 1:17 am

    This is a definite WOWSA!!!! I don’t have the octagons yet, but I think I might give the circles a try and see what happens. Love your tutorials, Becca! Thanks for sharing with us.ReplyCancel

  • Paola NormanFebruary 1, 2009 - 2:14 am

    Gorgeous what a wonderful tutorial to share. Thanks so much for taking the time.ReplyCancel

  • Chris OlsenFebruary 1, 2009 - 5:41 am

    That is gorgeous Becca! I am going to have to go try it!! Thanks for sharing.

    Hugs,
    ChrisReplyCancel

  • Gail GenrichFebruary 1, 2009 - 6:53 am

    You make things so easy! This is just delicious! I can’t wait to make some today! Thanks for taking the time to teach us once again.ReplyCancel

  • Anna/OmaFebruary 1, 2009 - 7:42 am

    Another fabulous creation! Thanks for sharing!ReplyCancel

  • Ann LindFebruary 1, 2009 - 10:19 am

    Thanks so much for a wonderful tutorial. I have my spellbinder dies on pre-order can’t wait to get them and make some of these flowers. The gift bag with the flower is so elegant but your work always is. Your eye candy is always a treat. I check your blog daily to see your latest. TFS Ann LindReplyCancel

  • MarniFebruary 1, 2009 - 4:39 pm

    Thank you so much Becca! Your work is always so amazing and so very pretty. The tutorials are also VERY easy to follow. I don’t have any spellbinder dies yet, but hope to order some very soon. Take care and thanks again.ReplyCancel

  • BrenFebruary 1, 2009 - 5:24 pm

    Wow that is fantastic!ReplyCancel

  • JackieFebruary 1, 2009 - 7:59 pm

    This is over the top. Your tutorials are great.
    Tried it with the circles but now I MUST HAVE the octagons.ReplyCancel

  • NevaFebruary 2, 2009 - 7:44 am

    This is gorgeous!!!!!!!!!!!!!!!!!!!!!!!ReplyCancel

  • AntonietteFebruary 2, 2009 - 8:13 pm

    WOW! Now I’ve got to get myself those Spellbinders.ReplyCancel

  • Carol WFebruary 2, 2009 - 9:50 pm

    Thank you so much for creating this tutorial. When you did your previous post, revealing the new Spellbinders dies, I was captivated by this project, and tried to figure it out by eyeballing… well, that wasn’t very successful! So I thank you for taking the time to share with everyone how it’s done.
    Just a beautiful medallion!ReplyCancel

  • judyFebruary 4, 2009 - 1:06 pm

    Thanks a lot Becca—now I just HAVE to go out and buy this. I’m telling my husband it’s all your fault! lol—seriously Becca–you make the greatest stuff!!!!!! This is one die I have to buy. Keep it coming.ReplyCancel

  • KimFebruary 7, 2009 - 4:04 pm

    Excellent tutorial and beautiful design!ReplyCancel

  • vicki dutcherFebruary 11, 2009 - 8:34 am

    I am sure you noticed Spellbinders is hosting a challenge (saw it on SCS) – this card should be entered! They want to see different ways to use their product! What a perfect example! It would be great to see a name I recognize to win! Go girl!ReplyCancel

  • HeatherFebruary 19, 2009 - 11:35 pm

    I can’t thank you enough!
    What a well made tutorial – even I’ll be able to make these beautiful medallions now. If they’d only start to sell the dies… *sniffles*ReplyCancel

  • KATE TOYMarch 9, 2009 - 1:21 pm

    Thankyou for your hard work and time , you are truly inspirational.
    KATE TOYReplyCancel

  • stellaMarch 22, 2009 - 6:07 am

    Congratultions on the win Val! It was a fun word find, first time I have other done one, and seeing the other sites was great too! Becca you are a treasure!ReplyCancel

  • Amazing Paper GraceMarch 27, 2009 - 3:28 am

    […] Spellbinders Ruffled Flower Medallion Tutorial […]ReplyCancel

  • GrammyMarch 27, 2009 - 7:34 am

    This is just beautiful and I have to try it. I learned of your blog from a friend who tatally admires your creativity, now, so do I !!ReplyCancel

  • Josefa LauraMarch 27, 2009 - 8:52 am

    Beautiful and grade tutorial thank´s for sharing.ReplyCancel

  • SylviaMarch 27, 2009 - 9:33 am

    WOW! I love this. Your work is so inspiring. I might even give this one a try! :)ReplyCancel

  • Marie-PauleMarch 27, 2009 - 10:04 am

    Hi Becca:

    I saw the tutorial the first time you published it, but I did not comment, I cannot let this oppurtunity pass again. I think the flower is just gorgeous, I am going to try it today. Wonderful blog. Hugs.ReplyCancel

  • SusanMarch 27, 2009 - 11:02 am

    How Cool Becca! Wow! The flowers are just beautiful. Thank you for sharing.ReplyCancel

  • AnnetteMarch 27, 2009 - 11:29 am

    It´s is absolutly…sooooo wonderful!
    AnnetteReplyCancel

  • Jeanne SzaboMarch 29, 2009 - 8:57 am

    Becca, your tutorials are very thorough & easy to follow! You do such AMAZING projects! I, for one, am grateful that you consent to share your designs & ideas with us! You, Becca, are AWESOME! I & my friends always love to see what comes next!!!ReplyCancel

  • Anna BananaMarch 29, 2009 - 7:35 pm

    I’m not going to be able to get to my craft room to give it a try for a few days, but I only have the round scalloped circles … do you think these will work to create a blossom??
    Anna BananaReplyCancel

  • KarenApril 4, 2009 - 6:07 pm

    I saw this in PaperCrafts magazine and just loved it. I attended the Creating Keepsakes Scrapbook Convention in St. Louis this weekend and when I visited Spellbinders booth, I asked how this was made. I purchased the Peony flower die template. I attended one of their classes and on of the kind instructors gave me your blog address so that I could get the instructions of how to make these. These are just beautiful.ReplyCancel

  • Bobbie GriffinApril 21, 2009 - 2:07 pm

    I love this and I just got the octagons so I can make it! Thanks for the tutorial.
    BobbieReplyCancel

  • TheresaApril 23, 2009 - 5:41 am

    What a great tutorial. Thank you so much for making it look so simple :)ReplyCancel

  • Karen HApril 30, 2009 - 9:19 am

    This is absolutely wonderful. I love your creation and the directions are fantastic. I will definitely be making some of these. Thanks so much for sharing this great idea.ReplyCancel

  • Lesa RappApril 30, 2009 - 3:56 pm

    Holy Wow!!!!!!!!!!!!!!!! I love these so much and I just got a set of these dies at retreat! Thank you so much for the tutorial!ReplyCancel

  • Nancy DawsonMay 19, 2009 - 2:23 pm

    These are fantastic and certainly gorgeous. Thank you for sharing such a great tutorial.ReplyCancel

  • Linda WalkerJune 16, 2009 - 11:41 am

    Job well done. I just ordered them yesterday. Thanks for the tutorial.ReplyCancel

  • MELINDA TAugust 3, 2009 - 2:52 pm

    This design is great and so are you. I seen it in papercaft. I tried doing it by myself but could not get it right. There was no email address about you so I search your name and found your site. The turtorial is great also and now I won’t have to buy any bows.

    Also I did mind with spellbinder circles and folded them without the scro-pal for those of you who don’t have the scro-pal or the die cut you can do it with just a circle cut and foldReplyCancel

  • VernaAugust 8, 2009 - 1:11 pm

    Thank you, thank you, thank you! My friend showed me this neat ad she had ripped from her magazine as she wanted to learn how to do these beautiful flower designs and she asked me to see if I could find it for her on the internet. So for the past month I have been searching and today I hit paydirt. It is so well explained that I think she will be thrilled to be able to recreate this piece of great artistry. Hey, I printed it off for her and I am glad I can refer to this as well. I might have to try it myself. You are such an amazingly talented lady. God bless you. VernaReplyCancel

  • ev - orangedaisyAugust 16, 2009 - 4:44 pm

    very clear tut and an amazing flower
    thank you for sharing
    evReplyCancel

  • Anne LawrieAugust 19, 2009 - 12:21 pm

    Thank you for the wonderful tutorial! I bought these dies this past weekend when the store owner showed me a card with one of these flower medallions on it, but I didn’t quite understand the directions. Now I don’t need to try to re-invent the wheel.

    Smiles,
    AnneReplyCancel

  • paper canuckAugust 22, 2009 - 2:27 pm

    Dear Ms. Feeken
    I have just recently discovered your site. You are an amazing paper artist! Thank you for the tutorials and the inspiration.ReplyCancel

  • MaryAugust 26, 2009 - 4:12 pm

    Hi Becca

    Loved your cards they are great. I am looking for instructions for a snowflake made with the Fluer de Lis Pendant, could you please help me out as to what site I could go to.

    Thanks
    MaryReplyCancel

  • DiannaJanuary 15, 2010 - 4:07 pm

    These flowers are just wonderful. I am attempting to follow your basic instructions and instead use the scalloped circle (I don’t have the octagon YET). Your tutorial is just amazing. Thank you for sharing your time and talents with us.ReplyCancel

  • anjaMarch 30, 2010 - 6:25 am

    Wow, very nice

    Take a look at my blog. greetings anjaReplyCancel

  • teelaMay 12, 2010 - 8:44 am

    OK..gotta try this! You are so TALENTED! God Bless you, Becca, for sharing your talents with others.ReplyCancel

  • EdnaMay 12, 2010 - 2:16 pm

    Beautiful and I love the end result. EdnaReplyCancel

  • StacyJuly 1, 2010 - 2:15 pm

    how utterly cool is this? :) tfs!ReplyCancel

  • JoAnn K DeleryAugust 2, 2010 - 2:44 pm

    this is a very beautiful flower and easy to follow instructions. i have put off purchasing spellbinder dies for one simple reason (ok, 2 reasons). i bought the first wizard and tried as hard as i could to make it work for me. my problem lies in my arthritis. i did not know that they would come out with a much easier to handle red one later on. so i simply forgot about them. as of late (the last year at least) i have noticed them more and more and more on so many pieces of art. i am now going to start investing in them little by little and i like the set you used for these flowers. you have helped me decide which to buy first. thank you for the tutorial and the decision-making process.ReplyCancel

  • Tami WoolleyAugust 17, 2010 - 9:08 am

    Thanks for the tutorial! These are AMAZING!!ReplyCancel

  • Carole M.November 14, 2010 - 5:09 am

    thankyou for sharing your excellent tutorial; it’s a very eye-catching embellishment and I look forward to trying it too.ReplyCancel

Well I’m excited about what I’m sharing with you today.  You all know how I love my Corner Punches and how I’ve used them to make medallions.  If you’re not familiar with my zeal for medallions made using a corner punch, check out these two tutorials – the first uses a corner punch to create a circular frame, the second uses a corner punch to create a rectangular frame.  Well now I have a twist on those two tutorials and have used the corner punch to make an interior frame and the interior frame works perfectly to highlight a JustRite Stamper border!


Cool, hunh?  I’ll have a tutorial on this technique coming soon.  In the meantime see how the punch outs create a perfect ring that you can stamp your JustRite Stamper on!  

 I’ve used a border with swirls and fleurs from the Harmony Classic Circle Stamper III Ensemble and I’ve also used the With Love Sentiment from the Harmony Classic Circle Stamper II Ensemble.  To cut the center circle window I used my Spellbinders Classic Circle Large and to show off my JustRite sentiment I used my Spellbinders Classic Heart Die.  The corner pieces are a portion of a Spellbinders Classic Scalloped Heart.   I found it easiest to stamp the JustRite border first, then cut the center window.  The remainder of the recipe for the card is below:

Card Recipe:
Stamps: 
JustRite Harmony Classic Circle Stamper III Ensemble, JustRite Harmony Classic Circle Stamper II Ensemble
Ink:  Versamark and white embossing powder
Paper:  140lb Strathmore Watercolor Paper, Bazzill
Accessories:  EK Success Corner Punch – Graceful Heart.,  Cuttlebug Cut n Emboss – Love Language, Martha Stewart Scalloped Dot Border Punch, Ribbon, Pearls

Don’t forget that you have until Saturday morning to sign up for the I Stayed Home from CHA Blog Candy!  You can sign up by reading how to enter and leaving a comment on THIS post.

pinTHIS SHAREthis TWEETTHIS EMAILthis
  • JanJanuary 29, 2009 - 9:35 am

    What a beautiful card! Girl, I wish my mind worked like yours…amazing.ReplyCancel

  • Wendy GortonJanuary 29, 2009 - 9:39 am

    Becca, this is so beautiful. I can’t wait to try this again with my corner punch. WendyReplyCancel

  • Gail S.January 29, 2009 - 9:40 am

    I am in awe how you come up with such beautiful artwork! Great job.ReplyCancel

  • Nancy SchmidtJanuary 29, 2009 - 9:42 am

    that is so cool – it looks very difficult! Can’t wait to try it!ReplyCancel

  • Bev J.January 29, 2009 - 9:45 am

    Great use of the punch-beautiful card. tfsReplyCancel

  • Marisa(whiterockmama)January 29, 2009 - 9:46 am

    LOVE how you did the heart frame and added a little pearl on each one. Fabulous work as always!ReplyCancel

  • Diane WittJanuary 29, 2009 - 9:49 am

    I can’t wait for the tutorial on this card-it is simply stunning!ReplyCancel

  • ShawnaJanuary 29, 2009 - 9:52 am

    GORGEOUS! Being new to your blog, I am definitely going to go check out those previous tutorials.ReplyCancel

  • JoJanuary 29, 2009 - 9:52 am

    Beautiful – love the technique. Thanks for sharing with us!ReplyCancel

  • CindyJanuary 29, 2009 - 9:53 am

    How do you think of these things? What a creative and beautiful mind you have.
    Sincerely,
    CindyReplyCancel

  • Mary MarshJanuary 29, 2009 - 9:56 am

    this is such a beautiful card BeccaReplyCancel

  • Katie MJanuary 29, 2009 - 9:59 am

    You are truly amazing and such an inspiration to me.ReplyCancel

  • Debbie PeysenJanuary 29, 2009 - 10:01 am

    Becca,

    I am in awe of your talent. Thank you for sharing it with me.(and everyone else)

    debbieReplyCancel

  • ShariJanuary 29, 2009 - 10:01 am

    I tried it following your tutorials, but I can’t get the interior ones to work. I tried the rectangle. My corner punches are Fiskars so I need to hunt down this one. I imagine that’s what is wrong. Your cards are so gorgeous. I love your sophisticated style. Do you know where I can get this corner punch? I only have Michaels and Hobby Lobby and neither carry this…boo hoo.

    Thanks so much for the continued inspiration.ReplyCancel

  • Linda EJanuary 29, 2009 - 10:06 am

    Absolutely amazing, Becca! I would love to be a fly on the wall in you stamp room for just one day!ReplyCancel

  • DianeJanuary 29, 2009 - 10:06 am

    Wow~Wow~Wow! You think of the neatest things, does your mind ever rest…LOL! I have never seen anyone so creative in my life…really! This is one gorgeous card…..have to try it when you get the tutorial on..and who would of thought to use a piece of the heart for the corners! I made a circle one with one of your previous tutorials, have yet to put it on a card…I might have to as its pink and perfect for Valentines Day! TFS, soooooooo glad I subscribe to your blog!ReplyCancel

  • Darlene LJanuary 29, 2009 - 10:09 am

    Such a beautful Valentine for some lucky person. It is just stunning. Looking forward to another tutorial, they are so inspiring to me that I feel like I can do this too.ReplyCancel

  • Shirley LeeJanuary 29, 2009 - 10:10 am

    Stunning card, Becca! Your mind must work overtime coming up with all your beautiful creations. Can’t wait to see the tutorial. I just love visiting your blog and seeing all your wonderful and creative creations. Thank you for sharing.
    Shirley L.
    Roseville, CAReplyCancel

  • MelissaJanuary 29, 2009 - 10:13 am

    What a lifesaver. I was just thinking about our anniversary card (it is on Valenties). I always incorporate 1 Corinthians 13, as it was read at out wedding. Now I know what to do!!! Thanks so much.ReplyCancel

  • LuAnnJanuary 29, 2009 - 10:17 am

    What a woman! You blow me away with your creativity… do you lie in bed at night and dream these up? I love ya Becca for sharing all your very wonderful paper creations. Thanks for being so gracious and “Paperwise”.ReplyCancel

  • JeanneJanuary 29, 2009 - 10:20 am

    Beautiful! Your work just makes me say “Gosh, what will she think of next?!” I can’t imagine in my brain to use tools differently than what they are for – like corner punching a circle. I corner punch corners – boring! I am new to your blog (about a month) and I am always anxious to see what you come up with next.ReplyCancel

  • SusanJanuary 29, 2009 - 10:25 am

    That card is beyond words. I absolutely love it. Looking at the card – now I’m going to have to get the Just Rite stamp. You’re creativity and work is simply THE BEST.

    SueReplyCancel

  • Ann KJanuary 29, 2009 - 10:26 am

    Becca, I am in awe of your vision!! How you create the most magnificent, beautiful things by seeing something so different than others (especially me!!). I look forward to your tutorial on this. I want to give it a try. Thanks so much!

    Ann KReplyCancel

  • DEB ROBINSONJanuary 29, 2009 - 10:37 am

    How Cool is This!!!!!!! What a creative “Gift” God has given you.ReplyCancel

  • CharleneJanuary 29, 2009 - 10:52 am

    WOW1 You did it again! What a beautiful card.

    Love your work.

    CharleneReplyCancel

  • Lisa GravesJanuary 29, 2009 - 10:58 am

    This is so cool!!! you are brilliant. :-)ReplyCancel

  • Elizabeth S.January 29, 2009 - 11:00 am

    Wow!! This is beautiful, can hardly wait for the tutorial on this one.
    Thanks for sharing all your turtorials.ReplyCancel

  • LenoriaJanuary 29, 2009 - 11:01 am

    Your creativity is astounding! I love checking out your creations. This card is beautiful – as usual.ReplyCancel

  • Linda BandowJanuary 29, 2009 - 11:03 am

    Holy smokes lady….how DO you think up such creative things? This looks like fun and a lot of work…I can hardly wait for the tutorial.ReplyCancel

  • KarenJanuary 29, 2009 - 11:04 am

    Your card is just beautiful. I love all those hearts around the center. Gorgeous!ReplyCancel

  • MayleeJanuary 29, 2009 - 11:05 am

    Wow! That is gorgeous!ReplyCancel

  • SharonJanuary 29, 2009 - 11:05 am

    You are truly amazing. I love reading your blog.
    I am looking forward to the tutorials.
    Thanks for sharing!ReplyCancel

  • MicheleJanuary 29, 2009 - 11:06 am

    Oh my gosh; your work is absolutely breathtaking; this is gorgeous. I am so non-creative for things like this; but I LOVE that you take the time to share a tutorial with us!!

    Thanks for all you do!ReplyCancel

  • ChristyneJanuary 29, 2009 - 11:27 am

    WOW, WOW, WOW!!! This is just stunning! You are SOOO talented!ReplyCancel

  • WendyJanuary 29, 2009 - 11:34 am

    Absolutely stunning !!!! Your creativity continues to amaze me. Although now I have to go and buy those stamps…LOL…I can’t wait for the tutorial. Thanks.
    Bye for now
    WendyReplyCancel

  • Laurie S.January 29, 2009 - 11:37 am

    How Marvelous! Just marvelous! Big thanks.ReplyCancel

  • MarilynYJanuary 29, 2009 - 11:42 am

    What a God given gift you have and I’m so glad that you are sharing your talent with all of us. Boy, I must be lacking in imagination when it comes to punches. Your cards are truly a work of art and beauty. Am waiting anxiously for your tutorial so I can practice what you’ve created. Have a great day.ReplyCancel

  • Judi MarkelJanuary 29, 2009 - 11:42 am

    Oh Becca, another great creation. I just love it and can’t wait to try this with my punches. Thanks again for sharing your ideas. You are awesome.

    Hugs
    JudiReplyCancel

  • Karen KeyJanuary 29, 2009 - 11:42 am

    WOW! An absolutely beautiful card. I can’t wait for the tutorial. Thank you so much for sharing your talent with us.
    KarenReplyCancel

  • Joan FrickerJanuary 29, 2009 - 11:49 am

    Becca, this is beautiful. How creative to use part of the Heart Nesites for the corner pieces. You are just marvelous!

    JoanReplyCancel

  • Angel WJanuary 29, 2009 - 11:57 am

    This is just gorgeous! I love it. I wish I were as creative as you! ?ReplyCancel

  • kimJanuary 29, 2009 - 12:02 pm

    Amazing & Soooooooo Original! Are you for sure you won’t consider TEACHING!!!! I’d pay to take your class!ReplyCancel

  • Linda MJanuary 29, 2009 - 12:03 pm

    Becca, this is so pretty!. I’m so amazed at how you use your tools and sets in such innovative and beautiful ways. Who’d have thought there were so many uses for them?ReplyCancel

  • neenieJanuary 29, 2009 - 12:07 pm

    I guess this is why you are the AMAZING PAPER GRACE!!! Does your mind ever rest??? and to think I thought a corner punch was only for corners! Your tutorials are wonderful and detailed. I’ve done the circle with hearts inside for several cards and really “amazed” friends/family – but I give you the credit!!!!! A great big THANKS!!!ReplyCancel

  • Lori MJanuary 29, 2009 - 12:16 pm

    I am truly amazed with each and every one of your creations! I look forward with great excitement to each and every new post. You have been blessed with such creativity and I am grateful you are willing to share this with all of us. May the beauty of your talents and your blessings continue.ReplyCancel

  • JenJanuary 29, 2009 - 12:32 pm

    Another fantastic card Becca! {applause}

    Thank you so much for sharing your creativity!!ReplyCancel

  • Terri JacksonJanuary 29, 2009 - 12:41 pm

    BEAUTIFUL!!! You never cease to amaze me. This is beyond words! Did you cut the circle of hearts by going through the center hole after you stamped the fleurs?
    All the girls at my office are oohing and ahhing!!!!ReplyCancel

  • Sherry DJanuary 29, 2009 - 12:46 pm

    I love how much care and attention you put into your cards, they are all so very Beautiful! .. and this is no exception… it’s Gorgeous! I always enjoy coming to your site (coffee in hand) to see what you have been up to and I have never walked away first without a whole bunch of creativity and second without saying … WOW, simply Amazing! TFS all of your creations with us! ÜReplyCancel

  • Angji PruenteJanuary 29, 2009 - 12:56 pm

    This card is FABULOUS! As if I needed any more reason to nominate you for a blog award for being inspiring and having a great attitude. Check out my blog for the award.ReplyCancel

  • MaxineJanuary 29, 2009 - 12:58 pm

    Wished my brain worked as good as yours! Love your card. It is just gorgeous.
    Now thats another corner punch that I must have.ReplyCancel

  • Nancy RileyJanuary 29, 2009 - 1:04 pm

    My my my!!! Whoever receives this beauty will surely KNOW they are loved! It’s gorgeous, Becca!ReplyCancel

  • Heather xJanuary 29, 2009 - 1:11 pm

    Wow Becca! this is awesome, can I spend a week in your head please? I always find your creations so inspiring :0)
    **Hugs** Heather xReplyCancel

  • Joyce RougeouJanuary 29, 2009 - 1:12 pm

    Luv’ it, Luv’ it!!ReplyCancel

  • ValerieCJanuary 29, 2009 - 1:16 pm

    AWESOME!!!!! As usual…ReplyCancel

  • SuziJanuary 29, 2009 - 1:29 pm

    Have I told you lately that you are amazing?!!ReplyCancel

  • SallyJanuary 29, 2009 - 2:16 pm

    I have just found your site through a friend and I am hooked already.
    Your site is wonderful and the cards are just beautiful. Can not wait to try a few. The scripture verses are what I love to use on my get well and sympathy cards and I have found the most perfect spot to read and enjoy.
    Keep up the amazing job you are doing. It’s a breath of fresh air.ReplyCancel

  • JanineJanuary 29, 2009 - 2:30 pm

    Hi Becca!!! Such a beautiful card!!!ReplyCancel

  • Linda C.January 29, 2009 - 2:32 pm

    Ditto to everything written already…..and then some!!ReplyCancel

  • DianeJanuary 29, 2009 - 2:40 pm

    Becca,
    Fabulous, girlfriend! Just fabulous!!!!

    Hugs,
    ~~Diane~~ReplyCancel

  • Beth NormanJanuary 29, 2009 - 3:08 pm

    Another beauty!ReplyCancel

  • MichelleHJanuary 29, 2009 - 3:11 pm

    WOW! That is so amazingly beautiful I literally ‘ooooh’ed when I saw it. All the details are outstanding. The card is just gorgeous!!!! Thank you so much for sharing your creativity yet again. I’m awed.ReplyCancel

  • CarlaJanuary 29, 2009 - 3:13 pm

    Your card is absolutely stunning, Becca! Amazingly creative and so gorgeous! TFS!ReplyCancel

  • Erika TJanuary 29, 2009 - 3:20 pm

    You are truly inspirational. I’m in absolute AWE with your creations.ReplyCancel

  • Margaret HightonJanuary 29, 2009 - 4:01 pm

    love it, love it, love it.
    fantastic as usual. Where do you find the time? i can spend all day in my craft room and with no great results. Seeing your work keeps me going.
    lots of love to you
    margaret. ukReplyCancel

  • Elaine MooreJanuary 29, 2009 - 4:48 pm

    Becca – when do you sleep? You’re mind must be racing 24/7 to come up with so many fantastic ideas. The card is just beautiful!!!ReplyCancel

  • NorineJanuary 29, 2009 - 5:19 pm

    another pretty card and great tech
    Hugs
    NorineReplyCancel

  • JoyJanuary 29, 2009 - 5:23 pm

    You really do live up to your name! – I can’t wait for the tutorial xxReplyCancel

  • Silke LedlowJanuary 29, 2009 - 5:25 pm

    WOW – your punched out hearts look fab!!! Super cute card – Becca!!!ReplyCancel

  • Carolyn G.January 29, 2009 - 5:40 pm

    Becca, you are awesome!!! What ideas! Thanks for the video and for sharing!ReplyCancel

  • Barb (GrandmaUpNorth)January 29, 2009 - 5:57 pm

    This is really awesome! Can’t wait for the tutorial!Thanks so much for sharing your creations with us. They are wonderful!!ReplyCancel

  • lacyquilterJanuary 29, 2009 - 6:08 pm

    Just gorgeous!ReplyCancel

  • Kimberly CrawfordJanuary 29, 2009 - 7:01 pm

    You TOTALLY knock my socks off!!!! You need to design your own paper lines and embellies!!!!!!!! (((HUGS))) kReplyCancel

  • VioletJanuary 29, 2009 - 7:08 pm

    Love how you use your corner punches. I’ve tried without success to get great results but I will keep on trying.
    Thanks for sharing your great techniques.ReplyCancel

  • Sue StrozykJanuary 29, 2009 - 7:18 pm

    You are amazing!! This is gorgeous!ReplyCancel

  • Peggy MaierJanuary 29, 2009 - 7:38 pm

    Just when I thought there was nothing to top your last creation! Beautiful!!!ReplyCancel

  • Lisa D. Atha (inspired by purple)January 29, 2009 - 7:41 pm

    Wow, this is so gorgeous. Very clever as usual! One of these days I will get brave and try one of your punch medallions. Oh, love how you did the corners by trimming down Nesties hearts!

    Lisa A.ReplyCancel

  • Paula BarinJanuary 29, 2009 - 7:44 pm

    Stunning card!! Reminds me of the old fashioned Valentine’s Day cards my father gave my mother.ReplyCancel

  • C BurkeJanuary 29, 2009 - 7:59 pm

    What a gorgeous focal point. Thanks for sharing your knowledge with us!ReplyCancel

  • melitaJanuary 29, 2009 - 8:10 pm

    wow! this is amazing! i can hardly wait for the tutorial!ReplyCancel

  • SueBJanuary 29, 2009 - 8:29 pm

    You’re amazin’ Becca – TFS!ReplyCancel

  • Sharon in MOJanuary 29, 2009 - 8:38 pm

    Beautiful card! I wish I had half your talent to see things in a different light. Thanks for sharingReplyCancel

  • Charlene Austin (Willow01)January 29, 2009 - 8:58 pm

    Shut up!! Becca you are wonder woman. Love it!! This is the most beautiful Valentines card I have laid eyes on!!ReplyCancel

  • lorraineJanuary 29, 2009 - 9:01 pm

    my newest thought is I am so thankful for the internet. You are the best kept secret…..thank goodness I learned about your blog. Each time I visit it you blow me away. It is so hard to go to work everyday, because after I sit back in the evening and visit your site….all I want to do is play….and try and create and copy yours.. WOW….bring on the tutorial.

    As always…..we love you……ReplyCancel

  • Elaine AllenJanuary 29, 2009 - 9:50 pm

    Becca –

    You and your work are just amazing! What a beautiful card and what an ingeneous idea!!

    Elaine AllenReplyCancel

  • PatJanuary 29, 2009 - 10:42 pm

    Wow! You always amaze me with your creativity! This is beautiful!ReplyCancel

  • Kathy (Wattle)January 30, 2009 - 3:33 am

    OMGosh, I don’t know what to say — that is simply amazing!!! You are just so incredibly talented!!!ReplyCancel

  • NancySJanuary 30, 2009 - 4:17 am

    You’ve done it again, Becca! You’ve created another way to fall in love with and use corner punches with bits of paper, borders and embellishments…and create something amazing. You are my creative hero, and I want to be just like you when I finally stop stapling my fingers together, get the glue and glitter out of my hair, and find a tidy spot in my studio…oh yeah, and develop an imagination and some talent.

    Big hugs,
    Nancy in IndianaReplyCancel

  • ConnieJanuary 30, 2009 - 5:27 am

    This is so beautiful. I love how you layer your elements and it becomes a beautiful work of art. You are so gifted. Thank you for sharing.ReplyCancel

  • HeatherJanuary 30, 2009 - 6:29 am

    Well Becca.
    All I can say is WOW.
    You are awesome.
    Each card you do is jawdroppingly fantastic. It’s a good job I don’t live near you – I would be on your doorstep all the time!!!!
    Your brain must never close down.
    Blessings and hugs.
    Heather W
    xxReplyCancel

  • DonnaJanuary 30, 2009 - 6:47 am

    Becca, this is one of the most GORGEOUS cards I have EVER seen! It’s just unbelievable- the intricasies and detail- I love it!!!! You are truly blessed to have such a great talent, and I appreciate your willingness to share with us. Thank you!ReplyCancel

  • UrsulaJanuary 30, 2009 - 6:57 am

    WOW!!! This card is absolutely stunning (as is everything you create)! Do you ever sleep, because your mind must be going 24/7 with all the creative projects you design. You have a god-given talent and I thank you for sharing it with all of us!!!ReplyCancel

  • JeanneJanuary 30, 2009 - 7:59 am

    Absolutely gorgeous! Flawless, actually in its execution. I adore coming to your blog to see what you have created. You keep my mind spinning and I LOVE it!

    Thanks so much for sharing!ReplyCancel

  • ConniecrafterJanuary 30, 2009 - 8:42 am

    Wow that is so cool, you just amaze me with what you come up with, Love it!ReplyCancel

  • maria annaJanuary 30, 2009 - 9:11 am

    your cards are very very nice.compliments.ReplyCancel

  • Jan HunnicuttJanuary 30, 2009 - 9:13 am

    Wow! What a lovely card and your idea is amazing! Thanks for sharing with us.ReplyCancel

  • JanJanuary 30, 2009 - 5:14 pm

    How beautiful! I can’t wait for the tutorial – thanks for sharing with us! I love your work.ReplyCancel

  • LorelieJanuary 30, 2009 - 6:30 pm

    Becca, you’re a GENIUS with punches! A BEAUTY of a card!!ReplyCancel

  • Anna/OmaJanuary 30, 2009 - 6:50 pm

    This card is absolutely amazing! Wow! Gorgeous!ReplyCancel

  • Judit VJanuary 30, 2009 - 7:10 pm

    Wow…this is so gorgeous! And your tutorial on how to use the corner punch is amazing! Thanks for sharing!ReplyCancel

  • KimJanuary 30, 2009 - 8:15 pm

    Oh Becca this is beautiful! WOW! And a tutorial…you are the greatest to us! I really appreciate all of your hard work you put together to share your “how tos” with us! You are the greatest!!!
    Hugs~ KimReplyCancel

  • colleen eJanuary 30, 2009 - 8:37 pm

    Becca what a beautiful card, this is your calling in life and thank you for sharing your self with us. you can never blog to much. I look forward to what you have made and what you say in each of your blogs.

    have a blessed dayReplyCancel

  • ShannonJanuary 30, 2009 - 8:45 pm

    Becca,
    This card is so inspirational and simply gorgeous! Thank you for sharing your talent and your instruction to us!ReplyCancel

  • NanJanuary 30, 2009 - 8:52 pm

    Very nice work. All your cards are just great and thanks for showing such good directions when you do.ReplyCancel

  • gardengirl3January 30, 2009 - 10:46 pm

    I am so amazed at your talent!! So so elegant and professional. I am looking forward to the tutorial. Thanks so much for the inspiration you give us.ReplyCancel

  • Charlene H.January 30, 2009 - 11:17 pm

    I love this card. I bought that punch after seeing what you did with it. I wonder if I can master this one. I will definitely give it a try.ReplyCancel

  • Bernie D.January 31, 2009 - 7:50 am

    Beautiful! Beautiful! Beautiful! Another amazing work of art. Where do you get all these wonderful ideas? Thanks for sharing your talent and your creations. I can’t wait to see this tutorial.ReplyCancel

  • TeresaJanuary 31, 2009 - 11:22 am

    Beautiful card…what agra wonderful use of the punch. Your cards are always very beautiful and inspirational. Where do you purchase the pearls?ReplyCancel

  • JanJanuary 31, 2009 - 12:20 pm

    Can’t wait for the tutorial – gonna “play” a bit myself until you have time to post – maybe I’ll get lucky and figure it out! You just “AMAZE” me. Thanks for sharing so much with us!ReplyCancel

  • Chris OlsenFebruary 1, 2009 - 5:45 am

    This is absolutely gorgeous Becca!!!!ReplyCancel

  • SandyFebruary 1, 2009 - 10:42 am

    This has to be the all time prettiest valentine I have ever seen. I can tell I’m going to love this site. Thanks for sharing.ReplyCancel

  • LuciaFebruary 2, 2009 - 7:43 pm

    Wonderful!! I can’t wait for your tutorial…ReplyCancel

  • […] and the technique that I’ve used here is the same that I used on this Valentines Day Card HERE, it just looks different because of the way the punch was used.  I call this technique […]ReplyCancel

  • MissGFebruary 9, 2009 - 10:49 pm

    AWESOME is all I say, please share projects with punches.ReplyCancel

  • CynthiaFebruary 10, 2009 - 6:46 am

    I think you cannot come up with more new ideas and then POW you make something so stunning I’m sitting here with my mouth open. Soooo Cool!ReplyCancel

  • Liz TurnbullApril 25, 2009 - 11:15 am

    You are a Wizard and your cards are spellbinding, such a wonderful lady for sharing all your ideas. Thank you.ReplyCancel

  • ConnieSeptember 23, 2009 - 1:30 pm

    Have you posted a tutorial for the Corner Punch meets JustRite Stamper? I want to make one for a birthday card. I’m always amazed at what you come up with. Talented doesn’t quite describe you.
    ConnieReplyCancel

I N F O