

 Hi there sweet friends, thank you so much for your patience while I finished up some projects I needed to finish. Earlier this week I used a technique to ink the border of my dies for a card and lots of you had questions and quite of few of you requested a video. I have another card to show using the same technique and a video to go along with it. There are a couple of ways to get this look, so I hope you take a second to review my video and I hope you’ll try the technique on your own.
Here’s the video:
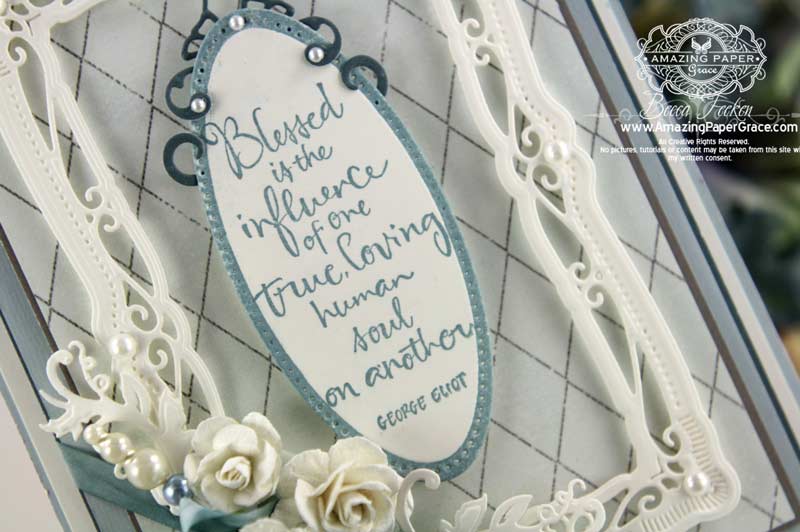
Now on to my card, I framed it up with Spellbinders Radiant Rectangles, added some embellishment with Spellbinders Fantastic Flourish Two and Spellbinders Venetian Accents. I finished up with a bow, some mulberry flowers and a pen. To recap the layers I used from the bottom up, a cardbase 5 -1/2″ x 7-1/2″, cream matting layer 5-3/8″ x 7-3/8″, foam tape, dark blue matting layer 5-1/16 x 7-1/16″, light blue matting layer 5″ x 7″, foam tape, brown matting layer 4-5/8″ x 6-5/8″, blue design paper layer 4-1/2″ x 6-1/2″, foam tape, Radiant Rectangles die cut and oval, Venetian Accent embellishment on oval, Fantastic Flourish Two embellishment on flowers. Add Ribbon, Flowers and Pin on appropriate layer.
| SUPPLIES I USED |
| Stamps: Wordsworth – Blessed is the Influence Paper: Neenah Classic Crest Smooth Natural White 80 lb paper, Colorbok Textured Paper, Creative Imaginations Ink: Amuse – Eucalyptus Accessories: Spellbinders Radiant Rectangles, Spellbinders Fantastic Flourish Two, Spellbinders Venetian Accents, May Arts Silk Ribbon, Mulberry flowers, Recollections Pearls, Maya Road Trinket Pin, Becca’s Bow Maker |
I have another short video to share with you tomorrow – I want to feature one of my tool heroes. I hope you’ll come back in check it out – I think you’ll be surprised!


Will have to try this! You make it look so simple and it’s sooooooo beautiful!
THANK YOU BECCA!!!!!!!! PERFECT VIDEO TUTORIAL!!!!!!!!!!! :) I know what I’m going to try!!!!!!! :)
Thank you so much for explaining. Which die cut machine are you using? if you don’t mind me asking…
OH MY. . . And yet another gorgeous card and tutorial too! That is one of my all time favorite quotes, thank you Becca for Blessing my life with such beauty both in your cards, blogging and your postings that are heartfelt from you!
Thank you so much for this perfect video. A special thanks for being so prompt in doing this. I think we are all getting out our stamp pads .
Another beautiful card Becca. Thanks so much for sharing your technique for inking die cut edges. :-)
Lovely video. Thank you so very much for taking time to make this video and share with us bloggers. I am intrigued by the narrower looking mats you used. I’ve not seen this size of mat. Are they specific to the GCalibur, or is there another machine they are used for? I’m off to S/Binders to see if I can spot them. Also thanks for the always so-beautiful card. Can’t wait to see your video tomorrow. Again, thanks for sharing your amazing skills with all us. Hugs & Happy Sunday.
Great video — I have to ask where did you get those smaller plates? They look like 5×7? So much easier with the smaller set…
Thanks for making the video for how to color the edges-I’ve been wondering the simplest way to do it– my hand is not steady enough to do it afterwards. I like being able to have the choice of a colored border or shading color on the inside and leaving the edge white. I have a question for you on another matter… since you use so many spellbinders products that I love– are you aware of how to use either Tim Holtz diffusers or darice diffusers with embossing folders using the Spellbinders Grand Calibur? Thanks for creating such inspiration projects and videos.
Thank you so much Becca! I will surely try this :) Your card is beautiful and the video was great!!!
I have seen this before; but, never tried it. I am thinking that I like your way better. Gorgeous card. Thank you for sharing!
Hi Becca. I love your web site and your creativity. Where do you get wordsworth stamps?
Gorgeous card! Thanks for the tutorial for perfect boarders!
Thank you so much for demonstrating this technique! I must try it out. You are so talented and sharing!
Another gorgeous card, Becca. Thank you for taking the time to make a video showing your technique for perfectly inked edges. I really appreciate the time and effort to make your videos for us. Will be back tomorrow to see what else you’ve got up your sleeve!
R/
Awesome video. I think I prefer the second method as it is not as messy. I will have to try this. I’ve pinned this tutorial
Beautiful card, Becca. I had forgotten about this technique. Thanks for the video tutorial.
Hi Becca, You really have a great eye for layering and composition. Love the inking with the dies too.
Wow – wow – wow!!! My entire way of using dies may have just changed forever!! Thank you Becca! I haven’t seen anyone else do this technique, so I appreciated you showing both methods of achieving the colored edge. I am amazed!!! Off I go to try this out –
Thanks Becca for another awesome video. Can’t wait to get in my craft room an try it out.
Cheers
Sue
Thanks Becca for this little video. I thought you had to cut out a smaller nested shape to get this effect. Had no idea that you inked the die itself. See we are always learning something from you!!!!!! Thanks. Which leads me to the next question, what do you use to clean your die so as not to ruin it or dull it??????
Marcie
WOW!!! Another unbelieveably gorgeous card. I just love it and the tutorial is awesome! I was one who asked how you inked the edges and I am so appreciative that you actually did a video while you have been busy with other projects. As always, your instructions and videos are so easy to follow. Thank you so muc Becca!!!
I LOVE THIS TECHNIQUE. THIS IS AN EXQUSITE CARD, BECCA!! LOVE THE SOFT COLOR OF BLUE. YOUR SAYING, PAPER (COLOR IS BEAUTIFUL) AND JUST EVERYTHING ABOUT IT.
HUGS
MSTGANE96
Thanks for showing us your way of inking the die. So ingenious! And another lovely card. You are enabling me to break the bank with my having to have all those beautiful dies, LOL! Love your work my dear!
Stunning and elegant, and the true Becca-classy style… !
Finally, it’s now clear to me how you ink the edges of your dies. I’ve been trying to figure out this technique you’ve done with your other cards. Thanks kindly, Becca.
Hi Becca
What a great idea!
TFS
Hugz
Super card – very wedgewoodesque (is that a real word?) anyway, fab video and I shall have a go at inking edges of dies -never seen this technique before so lots of thanks for sharing it with us.
Thank you so much for this – I was one of those who requested it! Another question – how do you create such beautiful loopy bows? I know you use your bowmaker but before I order, I’d like to see how it works so that I can get the best results!
Stunning thanks for sharing
Your card here today is absolutely stunning work again Becca. I so love, how you made this gorgeous creation. And thanks soooo very much for sharing the video here on how you made this perfect and gorgeous inked edges to your cards. You´re so talented and I just love your gorgeous work always and the card today is definitely among my biggest favorites ever. It is sooooooooo so beautiful.
Have a wonderful sunday and great week ahead hun.
Great tutorial as always, Becca. Thanks so much for sharing. I would try it out today, but I’m sitting in glorious sunshine in an hotel garden at Disneyland, Paris and am without the means to craft. The holiday washing can wait when I return! There are much more pressing things to do ;o)
Hugs
Anne (UK) x
Thank you so much! I can’t wait to try this!
Wonderful tutorial! Such a simple technique but got past all of us! Awesome! Thanks so much for showing us another one of “Becca’s Bits!” We love them.
Thank You Becca! That was really a great video. TFS.
Wow, awesome video. I never thought about doing either one of those techniques but they make perfect sense. Guess that’s why I am not a designer or teacher. I will be using these for sure on my next cards.
THANKS
Love the color, love the saying, absolutely love the card. It needs to be in an exquisite frame and on the wall for everyone to see.
What a great video!!! It sure will cut down on layers when you send a card in the mail but you still have a layered look. I will definitely have to try this. Thanks and hugs
Love love love your cards and thank you for the tutorials. One comment though – Isn’t the frame from Radiant Rectangles instead of Resplendent Rectangles?
Oh my goodness Chris, you are absolutely right!! Lol, too many dies to remember them by name….off to change that right now. Great eye!!
Thanks so much for your video tutorial on inked edged die cuts I have wondered how you got such perfectly inks edges. Have a great week!!!
Thanks Becca… I love all your tutorials. It’s always good to learn something new to me, so my cards looks more professional. :-) Hugs
thanks for the video
Great tips Becca thanks!
Stunning card Becca. Thank-you for super video tutorial. Nicola x
Great idea Becca…..the Lord continues to bless your talents. Thanks for sharing.
Hi Becca, Amazing card, as always, and a fantastic video, brilliant tips and techniques, looking forward to tomorrow too.
Lots of love from Patricia xx
Never thought of this technique so thank you for the wonderful tutorial, your cards are so beautiful!!!
Thank you so much for the video tutorial. I’ve always wondered how to get that border so evenly, too. Looks like I will try it this week. Only thing I need to worry about are my inky fingers! Thanks again.
Thanks so much for the video! I loved the card and wondered how you did it…I finally decided you did it with a matching marker pen. This is so much easier than I had envisioned and I don’t have to buy a matching marker to duplicate it!! Thanks!
Becca, since I don’t know the names of the dies I click on yoir links then I can recognize if I have that set of dies or not so I completely understand. :-)
Thank you so much, Becca, for this video, this is such a great idea and not complicated at all…thank you especially for taking the time to show us all your techniques, it’s really appreciated!!!Hugs…
Denise Trottier
What a clever technique! Thank you for taking the time to produce this very clear instructional video. I will most definitely add it to my mental tool box of techniques to pull out when appropriate. Oh yes… your card is a delight. A feast for the eyes and brings to mind Wedgewood as one of your other followers mentioned. Pure loveliness!
I was going to say the same thing as Chris R as I own that set and I ran to check it thinking I don’t remember owning that die, lol lol….however I checked and it is on my wish list, ty for clarifying :) and thanks to Chris R for pointing it out! Absolutely gorgeous card Becca, I love it, I love all your papers and soft colours and inspiring sentiments, I wish I owned them all, lol :)
big inky hugs tc cant wait for your next post
whoops I forgot to say this is a great idea, I usually sit and try to colour the edge with out messing up, I always end up with one little mishap where it isn’t perfect, but not so bad that I would discard it, I will have to try this method, your cards always look so perfect and amazing!!! ty so much for sharing with us, I’ve never seen this method, and I like the first way as I think the second way wastes to much ink :)
I do have an issue though, some of the first dies I bought are leaving a dark edge, looks like rust to me and I always have to ink my edges. I always clean the dies with water, dry them well and let air dry before putting them away in their cases. I can’t figure out why I have this issue and haven’t ever read that anyone else has this problem. Have you? It bothers me, especially since I have so much invested in these dies….but it’s not all of them just a few but it shouldn’t be any!! :) I would call Spellbinders and ask them about it but my hubby changed out phone plan and I don’t have long distance to the States any more, I am in Canada! Maybe I could email them my ?….
well have a great day Becca, ty for all you share with your loyal followers, big inky hugs
I cannot open your video. Is there any way you could send it to me via email? I know you are a very busy lady, but I would greatly appreciate it.
Thanks so much for your informative, useful video Becca. Can’t wait to try out this technique!
You are an excellent instructor…and what a great tip! Thank you!
Becca, you are amazing. Loved the video. Bless you for sharing your talent.
I watched the videos in reverse order so for me this is “Thanks!” again. So nice to still be learning from the best after all this time. One day, I am actually going to make that 2-piece card you do so often. I love a BIG card!!
Thank You, Becca…great tip for inking around the die cut, and such a beautiful card…Those Spellbinder Radiant Rectangles are on my list to buy this month..thank you for sharing your beautiful creations..I get so inspired…I am going to try and make one like this similiar for my mother in law’s BD coming up next month! so pretty!~:)
Becca, You are one amazing Lady. Love God’s gift of creativity He has placed inside of you and with it the desire to teach and share with others. Blessings From Orillia, Ontario. Canada
Where do you buy your Neehah white paper?
I have never seen the small cutting plates or the small rubber mat. Could you please tell me where I can get them.
Juanita
that is so cool, I love that look, thanks for sharing the video!!
Fabulous tips!! Thanks for sharing!
Hi Becca,
I also am a great admirer of your card making and tutorials. I am wondering if you could answer a question that I have with radiant rectangles. I cannot get the largest cutout one to actually cut through the paper. I have a Big Kick machine but it cuts all the other ones that I have pretty good. Is there a secret to the way you cut or what do you suppose could be the answer? I don’t want to go to the expense of getting a different cutter at the moment. I have read other peoples posts and a lot of them are having the same problem.
I do understand the you did not manufacture these dies but you work with so many that I wondered if you might have come across something like this before and have found an answer.
Thank you and God bles