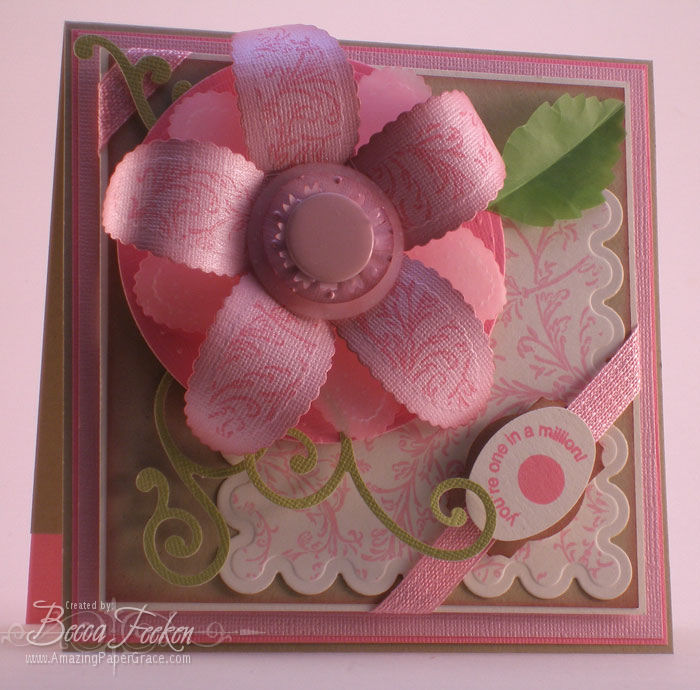
With my last post, I used distress ink applicators that I made because they fit into my stamping budget.  Yep, I can’t afford to buy handles and blender pads (Cut n’ Dry foam)  for my Distress Ink colors right now.  I love these applicators that I made tho’ – I still used the Cut n’ Dry foam – it’s awesome because it holds ink differently than the porous sponges I had been using.  By having an applicator – no more inky fingers!!

Several people asked in comments, and several others emailed me when they saw the funny applicators I was using, so this post is for you!!  I took pictures when I was making them…just in case I needed to explain…you know what they say, a picture is worth a thousand words.

Just so you know….the real applicators are ones have a wooden handle and velcro to attach Cut n’ Dry foam – you can see them here.  Most people dedicate a square of foam to each ink color they have.  Some people have a handle for each ink color they have and some change out the foam depending on which color they are using.  I wanted these things badly since I use Distress Inks a lot, so I came up with this solution.

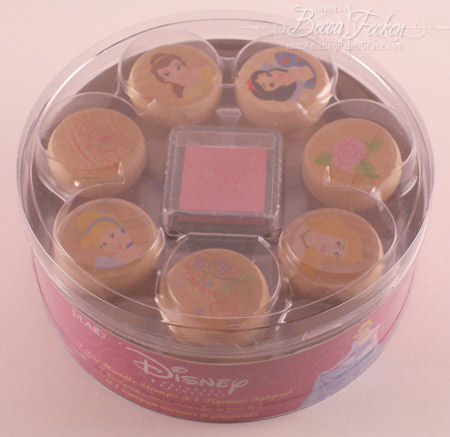
I re-purposed a set of stamps that I had.  These stamps are currently available at Michaels, so I ended up purchasing an additional set at 50% off – they ended up being $6.00.  ETA:  If you do this don’t feel like you have to use round stamps, the square $1 stamps at Michaels work just fine!


I simply took the rubber off the stamp – with this set it peeled away cleanly and also peeled the label off of the top.

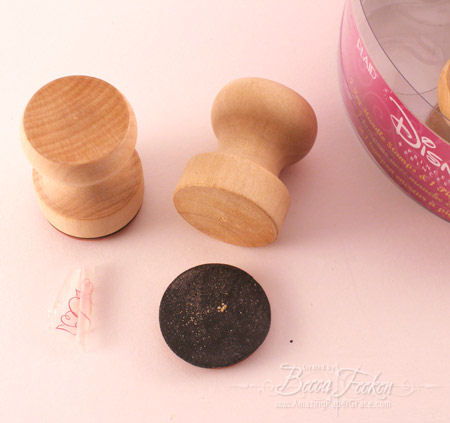
Top the mount with red tacky tape.

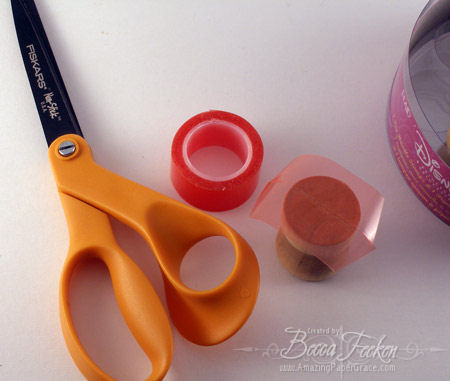
Trim tacky tape down to the size of the mount.  Set aside enough Cut n’ Dry foam for each mount that needs to be covered.

Trim the Cut n’ Dry foam to the size of the mount.  The tacky tape will hold it in place.

Apply labels so that you can tell them apart.

Here is what the whole set looks like.

WRBF-188TUT2-2008

Hope this helps those who had questions!!

pinTHIS SHAREthis TWEETTHIS EMAILthis
  • Jan SchollJuly 15, 2008 - 11:18 pm

    i give up-your site keeps saying error not correct address. phooey.ReplyCancel

  • JanineJuly 16, 2008 - 5:13 am

    Too bad Jan… I get in all the time and love it!!! Becca this is genius!!!ReplyCancel

  • PaulaJuly 16, 2008 - 5:27 am

    I was one that e-mailed you. Thanks for responding! Just let me say, how clever! I think I’ll go to the wood section at M’s and find something similar to the stamp handles. You are very creative.ReplyCancel

  • CasieJuly 16, 2008 - 5:52 am

    Thanks so much for posting how you made these!!ReplyCancel

  • mary puskarJuly 16, 2008 - 6:08 am

    Well I’m going right to my local mike’s. Thanks Becca!

    Mary
    http://www.primitiveseasons.blogspot.comReplyCancel

  • Katherine McKameyJuly 16, 2008 - 7:28 am

    Man, I love it when people re-purpose their stuff to serve in other ways!! I try to do that as often as possible since running out to the LSS or Craft store involves a 100+ mile trip! Thanks for sharing this – I have run into similar issues with my distress inks and have items that would work like this too. Now, I’m inspired to figure out a solution. Thanks Becca!!ReplyCancel

  • katieJuly 16, 2008 - 7:42 am

    I could call you thrift but I’d rather call you brilliant. This idea so rocks. I saw the finished applicator in another post and wondered how that was done. Thought about going and getting simple wooded drawer pulls but the applicator area would be too small. Thanks for sharing the how to and the inspiration.ReplyCancel

  • Kerry FitzpatrickJuly 16, 2008 - 8:43 pm

    GREAT IDEA!!!! How clever of you, Becca! Not only are you creative (card wise) but inventive as well. I’m impressed!!!ReplyCancel

  • Kay McBrideJuly 17, 2008 - 12:02 pm

    cool ,i hope michaels still have some this weekend. michaels people will wonder why they had a rush on these stamp sets!! but im sure they will like the business
    kayReplyCancel

  • ShaylaJuly 17, 2008 - 8:17 pm

    Hey – awesome idea!

    I’d also check the wood section of M’s and Jo’s for some similar wood pieces. Sometimes you can purpose certain shapes for this, or even use the plain blocks or rounds (with flat bottoms) for this stuff.

    If you wanted to REALLY go cheap, you could buy a thick dowel rod and have it cut into 2″ pieces etc and attach the foam – although maybe not as pretty, cost effective!ReplyCancel

  • JoaniJuly 20, 2008 - 2:57 pm

    Very, very smart! I always look for ways to “re-purpose” items. Great idea!
    Hugs,
    JoaniReplyCancel

  • DebbyJuly 29, 2008 - 8:03 pm

    You are very clever! What a great Idea. Thanks for sharing.ReplyCancel

  • Sharon KJuly 29, 2008 - 8:45 pm

    FINALLY a use for my SU wood blocks that I set aside when I unmounted the rubber.
    Cheers!!!
    SharonK- Crystal, MNReplyCancel

  • QJuly 30, 2008 - 11:04 pm

    Neat! where can you purchase the cut n dry foam? Mike’s or ACM? and how do you use the blenders?ReplyCancel

  • Virginia AndersonJuly 31, 2008 - 9:13 am

    Wonderful idea! Like the way you ‘recycled’ the wooden ‘stamps’. Have you considered inking the top of the ‘peg’ with the ink color so you can easily identify each color?
    Just found your blog today….July 31. Enjoying a journey through your wonderful ideas and photos.
    VA in AZReplyCancel

  • mokkaAugust 2, 2008 - 6:12 pm

    Brilliant idea. I live out in the boonies and have to take two ferries to get anywhere. I used an old handle stamp(think office type) several years ago and put self adhesive velcro to it to hold the felt strips to apply alcohol ink, love that stuff. I just dug out some round wooden stamps from the dollar store. I will unmount the animal figures and add my cut and dry. I did originally have a square wood mount, that I removed the stamp from(stuck it on the back of another similar stamp) and gued a square of cut n dry foam to it for the same thin. I could use each of the 4 sides for a different colour, woodmount was about 2.5×2.5 inches.
    I have a question though, how did you cut the circles so nicely????
    They look perfect on there, like they always were there.

    Michaels is two ferries and $100 ferry cost away, plus totals about 5 hours each way……..so I won’t be getting one of those disney sets, but sure wish I could, I like having things organized like that!

    Loving your blog……………………..ReplyCancel

  • mokkaAugust 2, 2008 - 6:46 pm

    Becca’s idea was so brilliant that it got my mind working. I couldn’t figure out how to email you Becca, so I hope it is alright to post my idea here?? I don’t have a blog.

    I was thinking about people who couldn’t get to Michaels and didn’t have any stamps they wanted to unmount and came up with another idea. I also have more than just the first set of distress inks, and can see me wanting to use chalk inks etc.

    I am on a lot of prescriptions(medically disabled ER/ICU nurse for 25 years, I guess it’s my turn now LOL) I have every size of bottle, but a lot of them have an inch size lid, and my lids are flat on top and are twst lids. If you know a relative etc on medications you could quickly collect these. My idea was to put cut n dry foam on a multiple of lids, one for each colour you would want to use in this way. Then you could just remove the lids to change to the colour you wanted to.The colour name could be put inside the lid. One bottle and a bunch of lids would work very well I think. Too bad I just threw out a whole bunch of empty pill bottles, but it won’t take long to accumulate more. Then you just need a nice little container to keep your one pill bottle and multiple lids in. I need tidy options because I have a small space and too much stuff(I did not say that LOL) I hope this might be helpful to someone. If you and your family are totally healthy most pharmacies will sell you empty bottle for just a few cents. Becca I apologize if I shouldn’t of posted this idea here………………….

    djmalliott@shaw.caReplyCancel

  • WendyAugust 4, 2008 - 7:30 pm

    I was just wondering…where can I get the cut and dry foam from please? Thanks…By the way I have saved your site in my favorites. I just love looking and learning. Thanks again
    WendyReplyCancel

  • […] so I used it to frame the corners and accent the background piece.  Using my homemade daubers here I smudged Faded Jeans Distress ink around the edges of the base card, the blue stamped layer, the […]ReplyCancel

  • KatiepAugust 10, 2008 - 6:50 am

    What a fabulous tip!

    Katie
    xReplyCancel

  • TerryAugust 18, 2008 - 4:54 pm

    YOU ARE A GENIUS!!!
    Yes, I meant the caps….LOLReplyCancel

  • Cathy B.August 18, 2008 - 6:43 pm

    Becca,
    I had thought about using an acrylic block with some Velcro and just have one with multiple pieces of felt and store the individual felts after use in baggies.

    I only have clear stamps an no wood mounts. Being mobility challenged it is difficult to get to the store and I have to order everything on line. I do have an extra acrylic block.

    I have umpteen empty medicine bottles lying around and I am going to use Mokka’s idea… sensational concept!!!

    I won’t have to worry about ordering Velcro online and can use tape I have with multiple lids and not have to worry about switching felt between one mount.

    This way I can use a lid for each color combination and keep several bottle bottoms to use for handles.

    I have one sheet of the cut-and-dry felt and one sheet of the cut-and-dry foam, so I will be off to a great start for alcohol inks and other inks… yippee!!!ReplyCancel

  • Kathryn JohnsonAugust 26, 2008 - 1:20 pm

    I have done a similar thing-I bought a package of 1″ wood cubes from Michaels (over with all the unfinished wood) and attached the foam with epoxy. Works great!ReplyCancel

  • MariangelesAugust 31, 2008 - 1:40 pm

    Great idea!!ReplyCancel

  • BarbaraSeptember 20, 2008 - 5:39 pm

    I just love your idea!! I have been cutting those round yelloe sponges in fourths and using them, but they’re messy and not nearly as cute! I ran out to Michael’s with my 50% off coupon and bought a set of stamps. Mine aren’t the same style but they’re pretty cool. I’m anxious to transform them. I love your site!ReplyCancel

  • KatieOctober 10, 2008 - 11:09 am

    What a great idea! Inexpensive, useful & classy-looking. Thanks for sharing the idea.ReplyCancel

  • Jen HooverOctober 23, 2008 - 2:35 pm

    WOW! you’re a genius! :D I *heart* your thriftiness!!! {is that even a word?} ;)ReplyCancel

  • Renée KNovember 16, 2008 - 4:38 pm

    Becca – This is genius! I wish I had found this BEFORE today’s trip to Michael’s! However, I’m off tomorrow and gas prices are down, right? I love to rationalize reasons for going to Michael’s! Tanks for sharing this.ReplyCancel

  • SusyDecember 4, 2008 - 5:15 pm

    Fabulous, love it.ReplyCancel

  • Amber aka bambi64January 2, 2009 - 7:46 am

    Headed to JoAnns today with mom, guess what I’ll be looking out for!!ReplyCancel

  • JulieJanuary 3, 2009 - 5:24 am

    This is absolutely brilliant….I also watched some of your videos on tying ribbon…you are so thoughtful to take the time to do all of this and bless you for it. Where can you purchase the cut n dry foam and is there any certain trikck to blending…your cards are always gorgeous.ReplyCancel

  • Elisa SalatFebruary 7, 2009 - 9:58 am

    Becky, I am telling my husband what a talented woman you are!! I just can’t believe it! You are such a great example to everyone. I can’t stop looking at your cards. And now you are sharing a very ingenious way to make your own distressed ink applicators. YOU ROCK!ReplyCancel

  • Inky FingersAugust 9, 2009 - 12:01 am

    Hi Becca, love your blog and you do a great job with the tuts. It was mentioned earlier on this link, about your trimming the foam so precise. What is your secret ? Ü I look forward to your reply.
    Thank you,
    Inky
    *Ü*ReplyCancel

  • ClaudetteAugust 20, 2009 - 11:41 am

    Thanks so much for sharing your great idea. My Mom always quoted the famous lines by ??? “Necessity is the mother of invention”…or maybe “There’s more than one way to skin a cat”. (Yuck! who’d want to be so mean as to skin a cat???)lol
    Anyway…GREAT PROJECT!!!ReplyCancel

  • LizetteJanuary 25, 2010 - 12:41 am

    I just discovered your site and I LOVE your boxes and ideas!!! Thank you for sharing. I never thought of making my own applicators, one more thing that made me say: “why didn’t I think of that?” CLEVER!!!ReplyCancel

  • KarenFebruary 26, 2010 - 8:31 am

    Good idea! I bought my blending tool for $4.95, got two pieces of foam and have discovered you only need one because color don;t mix or muddle. So not a big expense!ReplyCancel

I was playing around tonight with my newest petite scalloped Nestabilities and came up with a flower using the smallest oval as the petals.  After playing around with it for a while and adding layers, I finished off the flower and then didn’t quite know what I wanted to do with it.  It’s rather large, but I decided to put it on a card.

It has quite a bit of height, but depending on what I use it for, it can be flattened somewhat.  I took several pictures to show how easy it was to put together.

Cut and emboss smallest oval.  With the die still in place, stamp with background stamp.   Repeat for all 5 petals.


Score each petal 1/2″ from left side and fold.


Sponge or smudge the edge of each petal with Distress Ink.


Use a dowel or a pair of scissors to curl each petal.  Use glue dots to attach each petal to a 1¼” or 1½” base circle with the folded hinge in the center.


Cut five more petals out of vellum.  Score 1/2″ from left edge.  Sponge lightly with distress ink.  Curl each petal then attach to bottom of circle base with glue dots. 

Supplies:
Stamps:  Stampin Up Filigree Background (Retired), My Sentiments Exactly – Friends Always
Paper: Bazzill, The Paper Company – Kraft, Cottownwood
Ink:  Colorbox Chalk – Pink Pastel, Colorbox Chalk – Rouge, Distress Ink – Aged Mahogany
Accessories:  Nestabilities – Petite Scallops, SU Label Punch, Oval Punch, 1½” Circle Punch, 1¼” Circle Punch,  Leaf Punch, Big Brad, Quickutz Swirls, Ribbon

pinTHIS SHAREthis TWEETTHIS EMAILthis
  • PaulaJuly 15, 2008 - 6:56 am

    What a great card. I noticed your wooden inker with the foam attached. Can you share where you got that? Looks neat. I am using Tim’s foam pads, they are a little expensive.ReplyCancel

  • CasieJuly 15, 2008 - 8:02 am

    Ok, I wanna know about your ink dauber thingy too!! Looks really cool. Please share where you got it from.

    Wonderful looking flowers. I’ll have to try this with my nesties soon!ReplyCancel

  • Joy Kennedy (JoyOfStamping)July 15, 2008 - 9:26 am

    WOW! This is absolutely gorgeous! And I love how you labeled your dauber and ink.ReplyCancel

  • LaurieJuly 15, 2008 - 10:31 am

    Becca this card is stunning! I love the colors, layout and the flower you cleverly put together. This one is a real winning design! Beautiful!ReplyCancel

  • Kay McBrideJuly 15, 2008 - 6:51 pm

    beautiful flower and card. so creative. i am going to have to try that. i think i have the petite ovals. if not i do have a punch. i would like to know where u got the wooden deally thing sponger, too. thanks for sharing. again another blessing from becca.
    kayReplyCancel

  • Kay McBrideJuly 15, 2008 - 6:52 pm

    i changed my email address it was wrong. sorry about thatReplyCancel

  • JanineJuly 16, 2008 - 5:14 am

    This is just gorgeous!! Love what you did with the petals!! Fabulous!ReplyCancel

  • HBJuly 16, 2008 - 6:27 am

    o…. my…. GOSH! This is SO gorgeous! GORGEOUS GORGEOUS GORGEOUS!!!!ReplyCancel

  • Anne RyanJuly 17, 2008 - 11:28 am

    This is so totally creative and inspiration. I dont own an oval nesties set, but I do have the circles. I’m going to see if I can adapt your technique using this die. This is totally awesome. Thank you so much for sharing your creativity!ReplyCancel

  • JoaniJuly 20, 2008 - 2:56 pm

    I am so glad that I “found” your blog. You are amazing for sure!
    This creation is beautiful!
    Thank you so much for sharing your talents with us!
    Hugs
    JoaniReplyCancel

  • AnitaJuly 28, 2008 - 8:05 pm

    This is pure genius – awesome flower!ReplyCancel

  • Anne RyanJuly 31, 2008 - 8:56 pm

    Becca, I’m almost afraid to share my flower with you. It pales in comparison to yours!. In reviewing your flower again, I see why your’s isnt nearly as ‘big’ as mine. I’ll try it again and again until I get it right! I’ve also just checked out your ‘card of the week’. Yikes, I’m going to need a job just to keep up with your magnificent work! Girl, you are so blessed! Thanks so much for sharing your work and your tutorials!

    http://www.splitcoaststampers.com/gallery/photo/&.999140?&cat=500&ppuser=1391..

    Cant wait to see your next creation, Becca! Thanks so muchReplyCancel

  • crafty barbSeptember 11, 2008 - 8:45 am

    just come onto this blog what a fanastic card I have never writen onto
    a blog before but i am so impressed with your card so I had to writeReplyCancel

  • CHERYLSeptember 19, 2008 - 7:46 pm

    I just stumbled upon you blog and LOVE it!! You are amazing. Your cards are to die for!! Thanks for sharing all your thoughts. CherylReplyCancel

  • PaulineAugust 19, 2009 - 12:31 pm

    Wow! What a fab idea, I never know how best to use the smallest dies! Thanks for sharing xxxReplyCancel

  • LizetteJanuary 25, 2010 - 2:29 am

    Love all your clever ideas! Thank you fo sharing them with us!ReplyCancel

Layers, layers, layers……I love ’em.  I’ve had this design in my mind for a couple of days; so glad I got a chance to sit down and work it out.    The frame treatment is much like a design I did back in February that you can see here.   There are already so many options with the Nestabilities that are available right now….can you imagine what it will be like when the new Nestabilities hit the market? 

The color of the scalloped circles are light coral and dark coral…I’m not sure why but it seems to be one of the hardest colors for me to photograph.  Anyways, I’m having a ton of fun stamping…thanks for stopping by to peek at what I’m working on. 

Supplies:
Stamps:  PSX – Flowers (Retired), Printworks – Happy Spring
Paper:  Bazzill, Marcella K – Bungalow, DCWV
Ink –  Black Brilliance, SU Cameo Coral
Accessories:  Bling, Nestabilities, Ribbon, Brads, Copic Markers, McGill Word Tags Punch, Tonic Punch, Stickles


pinTHIS SHAREthis TWEETTHIS EMAILthis
  • DebJuly 11, 2008 - 9:42 am

    How lovely! I love the colors and the design. So much inspiration!
    Thank you for sharing!
    hugz
    debReplyCancel

  • Kelly VJuly 11, 2008 - 1:31 pm

    Everytime I think I have a favorite card of yours, you go and do something like this….WOW!!!
    Hugs and kisses heading your way….ReplyCancel

  • Kay McBrideJuly 11, 2008 - 1:48 pm

    i am sooooooooo behind, i have looked at your cards but just have not had time to do comments so i am catching up right now. this card is awesome. there is nothing about it i dont like but i just HAVE TO KNOW what punch that is at the bottom i have a new fiskers with a flower but dont know if it does that heh heh….. i did punch with it once though. I really do like this one.
    thanks for sharing cause u know me im adding it to my collection.
    hugs from me too
    kayReplyCancel

  • hbJuly 11, 2008 - 9:14 pm

    Becca, I am SO glad I found your blog! Your creations are just jaw dropping amazing! This one is over-the-TOP beautiful!!ReplyCancel

  • Kelley HollandJuly 11, 2008 - 11:06 pm

    Just beautiful.. I love it!!ReplyCancel

  • Linda KlebackJuly 12, 2008 - 6:31 am

    I love the darker colors in this card. Beautiful!ReplyCancel

  • Abra LeahJuly 12, 2008 - 10:08 am

    Stunning!ReplyCancel

  • JanineJuly 12, 2008 - 11:15 am

    WOW!!! This is my favorite of the last three. I just adore these colors. Hope you have a fabulous weekend.ReplyCancel

  • JoaniJuly 12, 2008 - 11:26 am

    Your card is awesome! Can I case it? I love what you did in the center. Very very nice!
    Hugs,
    JoaniReplyCancel

  • Beth NormanJuly 12, 2008 - 2:27 pm

    Oh my heavens, this is another gorgeous piece of art. I really like how you used the nestabilities.ReplyCancel

  • stampmonkeyJuly 12, 2008 - 6:36 pm

    Your work is AMAZING!! This card is just gorgeous! Love the Nestability treatment and all those layers!ReplyCancel

  • JauniceJuly 12, 2008 - 8:59 pm

    Just when I thought you couldnt top your last card…. you do. Absolutely gorgeous. Can I be you when I grow up?

    Hugs
    Jaunice Minor
    UtahReplyCancel

  • Charlene Austin (Willow01)July 13, 2008 - 12:59 am

    Becca, this is beyond amazing! I love every detail. I LOVE layers and the colors you used are just so perfect!!ReplyCancel

  • Kim HupkeJuly 14, 2008 - 1:12 am

    WOW! Deb O. shared your blog addy with me and I’m so glad she did! This card is amazing!! I absolutely love it!! Thank you for sharing your talents!

    KimReplyCancel

  • JukieJuly 14, 2008 - 4:48 am

    Stunning! it’s just so beautiful! tfsReplyCancel

  • SueJuly 19, 2008 - 7:47 pm

    OMG, this card is absolutely gorgeous. I LOVE it!!!!ReplyCancel

  • SusannaJuly 25, 2008 - 11:39 am

    This card is just stunning! The frames out of Nesties was a brilliant idea that I haven’t seen anyone else do.

    You were Runner Up for Card of the Week over at Card of the Week.com. You can check out the original post at http://www.cardoftheweek.com/2008/07/card-of-the-w-7.html.

    I did pull a picture off your site to show your work, and included links to this post and the blog itself. Please let me know if that’s OK.

    If you’d like an “I was featured on Card of the Week” badge, please email me at susanna.boyd@gmail.com and I’ll take care of it.

    Thanks for sharing your creativity with us!ReplyCancel

  • Jan SchollJuly 25, 2008 - 11:44 am

    These colors together are incredible! Would love this pairing in my living room.
    I have added this photo to my lust file of cards. It doesn’t get better than this.ReplyCancel

I N F O