You all have been so patient!!  Thank you for hanging in there with me.  I had a little bit of a backwards week with several days of migraines.  No, I’m fine now in fact better than ever.  Perplexed about last week though as I rarely get headaches, so they had me put down good.  I’ve been headache free for two days now and was tickled to get back to posting yesterday.  Well, I have another post for you today!!  I’ve had many requests for Bow/Knot tying tutorials and your wish is my command!!  I’m starting out with a basic knot tying tutorial (I know it’s crazy but some people call this a bow but I call it a knot).  With this one out of the way, I’ll concentrate on a tying a full bow, so keep checking back with me. This is simple and short!

Click HERE to access the high quality link!

Thank you so much for stopping by!  Happy Columbus Day here at home, Happy Thanksgiving to my wonderful Canadian Friends and Happy 50th Birthday to Paddington Bear (see the Google logo today)!

pinTHIS SHAREthis TWEETTHIS EMAILthis
  • DiannOctober 13, 2008 - 2:01 am

    Becca, thanks so much for this tutorial! It has been a lot of help and you made it look so easy! I come daily to see your amazing ART! DiannReplyCancel

  • kimOctober 13, 2008 - 4:25 am

    Good Morning Becca ~ Funny comment above, I also am here daily ohhing and ahhing over your creations! Thanks for the tutorial. Have a great day.
    KimReplyCancel

  • Joan FrickerOctober 13, 2008 - 5:07 am

    Becca, thank you so much for the tutorial. It was very helpful and I love seeing how you do things. It really helps.

    JoanReplyCancel

  • Nancy KOctober 13, 2008 - 6:09 am

    Thanks for the tutorial Becca! I have never bought any one sided ribbon because I wasn’t sure how to tie it right. I guess it’s time to go shopping!ReplyCancel

  • BarbOctober 13, 2008 - 6:20 am

    Thank you so much Becca for taking the time to do this tutorial :) !

    BarbReplyCancel

  • DebbyOctober 13, 2008 - 6:59 am

    Thanks Becca!
    Once again you have done a great job with the tutorial. I can’t wait to see the next one. I have added you blog as a link on mine so all my customers can see what awesome work you do.ReplyCancel

  • Jerri KayOctober 13, 2008 - 7:07 am

    What a wonderful tutorial Becca, you have such a sweet voice! That’s exactly how I tie my bows. Thanks for the tip with tissue paper, a wonderful idea! I can’t wait to see future videos on bows, I get stumped on the others!ReplyCancel

  • AnnOctober 13, 2008 - 7:26 am

    thank you so much – brilliant video. Love the present you have made for yourself too – gorgeous work.

    Ann xxxReplyCancel

  • KarenOctober 13, 2008 - 8:10 am

    Day after day you never disappoint. I learn so much from you. Thank you, for an informative, well done video.ReplyCancel

  • DonnaOctober 13, 2008 - 8:18 am

    Great tutorial, thanks for taking time to post this. Just love your creations.
    DonnaReplyCancel

  • DesireeOctober 13, 2008 - 8:22 am

    Thank you so much for the tutorial! I will try to make a knot now! Hope you make one with a bow to. Thanky you again and have a nice day!
    From Desiree in NorwayReplyCancel

  • Cindy HaffnerOctober 13, 2008 - 8:52 am

    Awesome job Becca, love your knots, perfect.ReplyCancel

  • JanineOctober 13, 2008 - 9:15 am

    Thanks a ton Becca!!! That was so helpful!! Hope you are having a great day and that you feeling better…ReplyCancel

  • DebbieOctober 13, 2008 - 10:24 am

    Becca thank you for the wonderful tutorial and the ribbon you were using is just beautiful. TFS.

    Debbie/Phx AZReplyCancel

  • Pam aka/YorkieMomOctober 13, 2008 - 11:25 am

    Oh Becca….I just love you!!! Please keep the bow tying videos coming, as that’s one of my weakest areas! Thanks again!!!ReplyCancel

  • Cindy H.October 13, 2008 - 11:50 am

    Wonderful tutorial!! TFSReplyCancel

  • Teri FrankOctober 13, 2008 - 11:55 am

    Thank You! Thank You! Thank You! Now, if my fingers would just cooperate….

    Can’t wait for the next tutorial – BTW was that wire edged ribbon? I couldn’t tell.

    TeriReplyCancel

  • LuAnnOctober 13, 2008 - 2:08 pm

    Becca, how can we say thanks enough… you are a darling for taking time to teach this technique and help us cardmakers have even better bows! I love everything you do. Thanks again for sharing your talent.ReplyCancel

  • Lisa R.October 13, 2008 - 3:20 pm

    Becca,

    Thanks so much for the delightful tutorial on tying bows/knots. It helped me a great deal. Wonderful!

    lisaReplyCancel

  • MelanieOctober 13, 2008 - 4:46 pm

    Wow Becca!!! Thanks for taking the time to so clearly show us and teach us how to tie beautiful ribbon knots like you do!! I am always just a little unhappy with my knots and bows, probably because I always reef on the knot as hard as I can. Now I know to try leaving the knot a little looser! TFS!!!!ReplyCancel

  • StefanieOctober 13, 2008 - 5:26 pm

    Great Tutorial !! I’ll be watching for future ones too !:)ReplyCancel

  • jami {sgtStamper}October 13, 2008 - 5:54 pm

    Fantastic video Becca! I’ve always loved your bows and knots!! Glad your migraines have gone away – hope they stay gone!
    hugs, JamiReplyCancel

  • Jaunice MinorOctober 13, 2008 - 6:37 pm

    Thank you so much. I always have such problems with bows and knots. Again as always you are fabulous. I love your blog. Thank you for all your help.

    Loved the paddington bear logo on google today too by the way.

    Hugs
    JauniceReplyCancel

  • Kay McBrideOctober 13, 2008 - 8:23 pm

    thanks teach!! that really helps
    kayReplyCancel

  • MakarenOctober 13, 2008 - 8:31 pm

    I was one of the ones asking for a tutorial. You have the best bows around. Thank you for doing this! Love it, love it.

    MakarenReplyCancel

  • LouiseOctober 13, 2008 - 9:17 pm

    Thanks for doing the tutorial, very helpfulReplyCancel

  • Gay FerlandOctober 13, 2008 - 10:06 pm

    Becca,
    Thanks for sharing! I love the ribbon you use. Also, thank you for taking the time to email me with gratitude! Thanks!ReplyCancel

  • Sherry107October 14, 2008 - 4:37 am

    Becca-Thanks so much for the tutorial. Your work is so beatiful-and inspring! I an’t wait to try my bows now! I m becoming a Becca-wanbee! God Bless!ReplyCancel

  • SusanOctober 14, 2008 - 4:41 am

    I have seen quite a few ribbon tying tutorials but yours is so easy to understand!! Thank you so much for sharing!ReplyCancel

  • Linda KlebackOctober 14, 2008 - 5:48 am

    That’s so much for the tutorial! I’ve never been happy with my bows; I’ll be improving now! And it was great to hear your voice. I really miss the Rubber Ladies!ReplyCancel

  • DianeOctober 14, 2008 - 6:01 am

    Becca,
    Great video. Thanks so much for all your work.
    ~~Diane~~ReplyCancel

  • MargOctober 14, 2008 - 7:03 am

    Thanks for the tutorial. Your bows are always so beautiful.ReplyCancel

  • MargaretOctober 14, 2008 - 7:22 am

    Thank you so much, I thought I knew how to tie a know but your tips made them come out perfectly! MargaretReplyCancel

  • Kelley HollandOctober 14, 2008 - 7:35 am

    That is a wonderful tutorial!! You did an awesome job! And I guess the truth is out…Becca stuffs with toilet paper..lol!!ReplyCancel

  • JindraOctober 14, 2008 - 10:55 am

    This is a lovely video tutorial. You make it seem “do-able” even for me. I have adult ADD and having video tutorials make techniques and projects so much better for me. Thank you so very much…..and, you have a lovely speaking voice!ReplyCancel

  • Sandy KOctober 14, 2008 - 11:58 am

    Hi Becca…..thank you so much for your visual bow/knot tutorial. You are right that there are lots of hints on the net but still pics and words just don’t mean the same as actually seeing this procedure in action. Excellent! Thanks again!ReplyCancel

  • Cathy B.October 14, 2008 - 12:03 pm

    Thank you, Becca, for taking the time to make this video. Your bows are always so elegant in appearance and your video makes the process look not too difficult!

    Cathy B.ReplyCancel

  • Sharon in NEOctober 14, 2008 - 12:26 pm

    That was great. Thank you for sharing your gift.ReplyCancel

  • Debbie OlsonOctober 14, 2008 - 12:38 pm

    Becca, you did a great job on this–as you do on everything!ReplyCancel

  • Christine (Craftling)October 14, 2008 - 1:16 pm

    Beautifully done, Becca! :o)

    Chris xxReplyCancel

  • Donna CoffmanOctober 14, 2008 - 4:21 pm

    Becca,
    Thank you so much, I am bow challenged, thanks for breaking it down to my level. You are so kind to do these videos for us kindergartners. Can’t wait for the full bow video. I am trying to learn something new every day and not just say I am never going to be able to do that or create beauty like you do so easily. Keep praying for me , a dear friend died today and I need to make a sympathy card for her family. Life is so fleeting.
    DonnaReplyCancel

  • Linda CoughlinOctober 14, 2008 - 11:11 pm

    Terrific job on the tutorial, Becca. I just discovered your blog recently and think it is one of the best I have seen. You have such a gift of artistry and are a great inspiration to us. Thanks so much for taking the time to make this beautiful video to help us learn to tie knots and bows.ReplyCancel

  • DawnOctober 15, 2008 - 3:37 pm

    Brilliant Tutorial Becca – this is exactly what I have hoped for – learning to tie a lovely bow, your voice is so soothing too!!
    Really professional – Well Done Becca…

    Hugs
    DawnReplyCancel

  • TrishDOctober 17, 2008 - 10:01 am

    Just happened upon your blog and so happy I did. Your work is gorgeous! Thanks for the tutorial – I can’t wait to go home and try bow tying!ReplyCancel

  • Mary DavidsonOctober 18, 2008 - 12:07 pm

    Thank you so much for making this fantastic tutorial. It has been so helpful to me. I really enjoy your blog and the beautifully elegant artwork you create!ReplyCancel

  • Christina (usarmywyfe on SCS)October 18, 2008 - 8:01 pm

    Just beautiful! Thank you for the video!ReplyCancel

  • Marie DonnellyOctober 19, 2008 - 8:30 am

    Nice, easy to follow video Becca. Thanks!! As always, I love your creations!!!ReplyCancel

  • NancyOctober 20, 2008 - 6:03 am

    Becca –

    Your cards are sooo elegant. Thanks so much for sharing your bow-tying technique.

    NancyReplyCancel

  • ShirleyApril 17, 2009 - 12:38 pm

    Hi Becca, I just wanted to let you know I am referring people to your site from my blog for this video and suggesting they browse the whole site. I have had questions on bow tying over time and I think I like yours best so far. I am assuming you tie the bow just like your knot, but with the tails, right? :-) Your cards are incredible and your other creations too!

    Hugs,
    ShirleyReplyCancel

  • Adrienne UrbanskiAugust 27, 2009 - 6:02 am

    Thank You for this bow making tutorial. You are such an inspiration. I have one question. Do you have to glue the ribbon down to the card before making the bow. Thank You again.

    Giving God All The Glory,
    AdrienneReplyCancel


How often is that you get to make a gift for yourself?   Well, in my case next to never.   I’ve always sewn, knitted, crocheted, embroidered, cross stitched, quilted and paper crafted with the idea of giving it away.  Sometimes I didn’t know that I wanted to give away until someone came to the house and wanted it.  Being the highest form of flattery, of course — I gave it away.  LOL, I really do like to give away things I make but you know what?  This is for me.  Yes, you are probably asking what is it? 

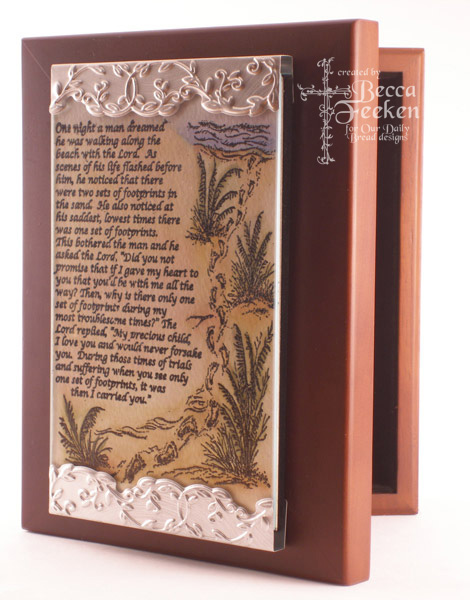
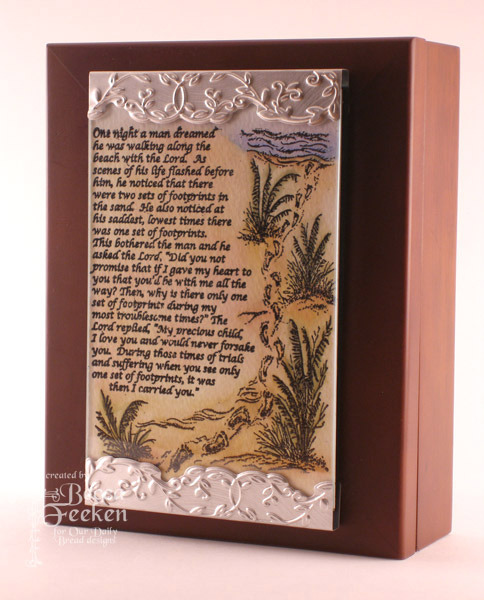
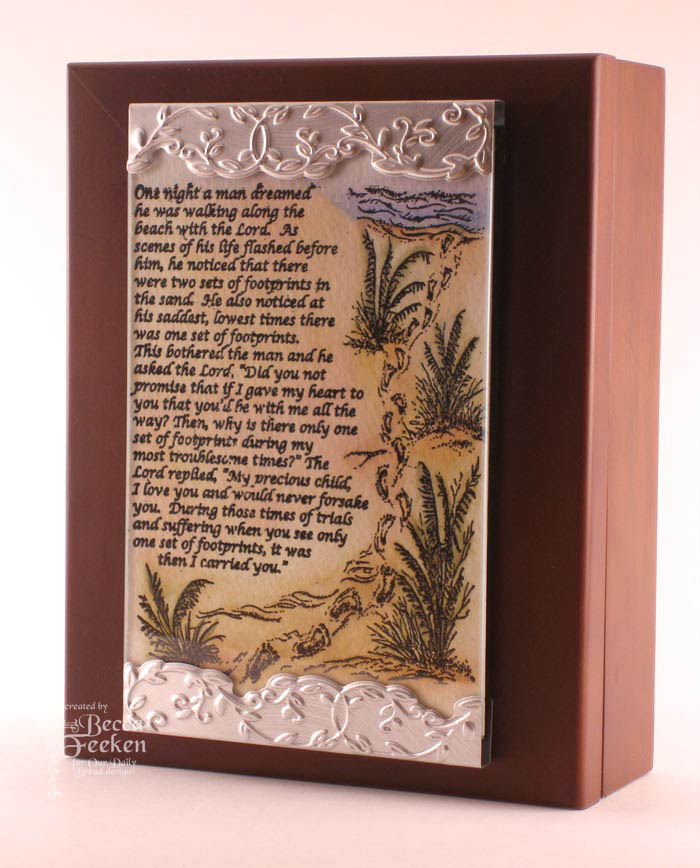
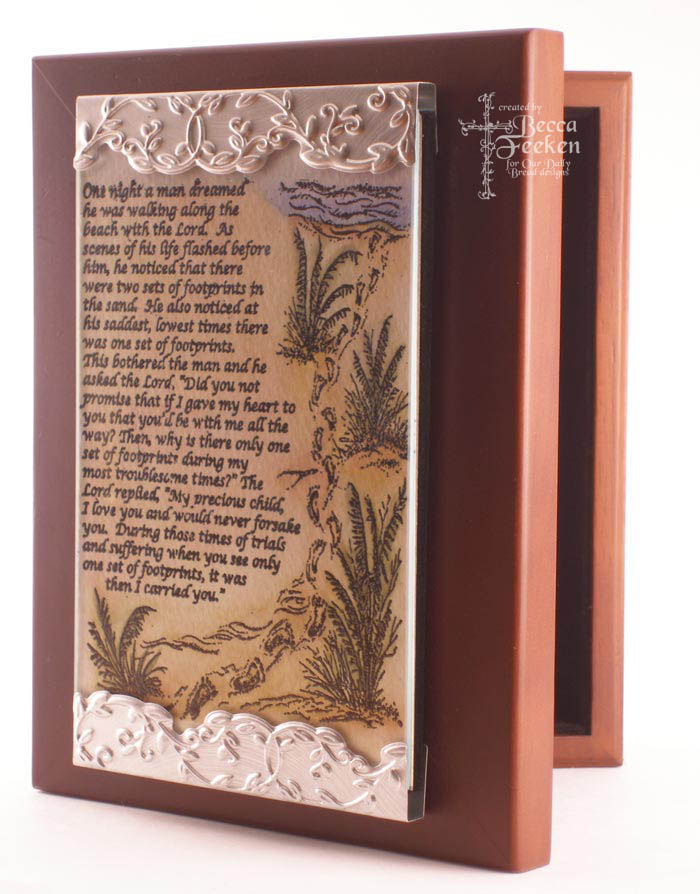
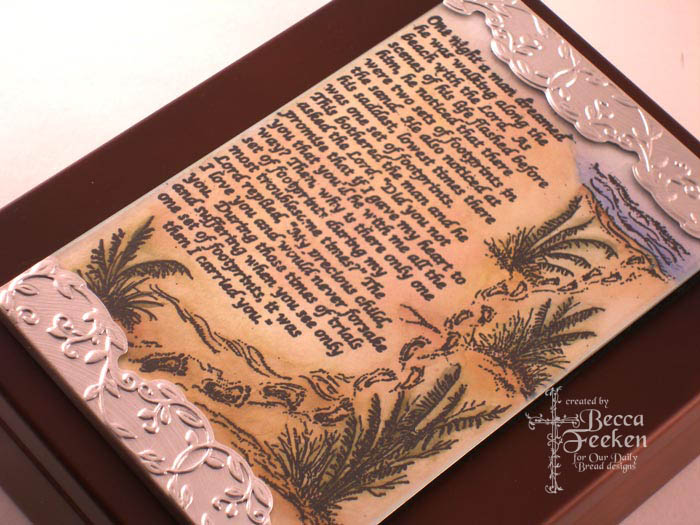
It’s a box for my Bible.   While shopping at the discount store, I came across this box that had a brushed silver frame on the top proclaiming "Congratuations Graduate 2008".  Well it was only a couple of dollars and I wondered how difficult it would be to pry up the frame and locate another frame to put down in which I could put this new image from Our Daily Bread Designs called Footprints in the Sand.  I looked next to the box and there I found this frame.  I’d say it was meant to be.  I’m so taken with the beauty of the entire image, I wanted to find somewhere to display it and I think the Bible box certainly fits the bill.  It was such a blessing to find the box an absolute joy that this odd sized frame was the perfect size for the entire image. 

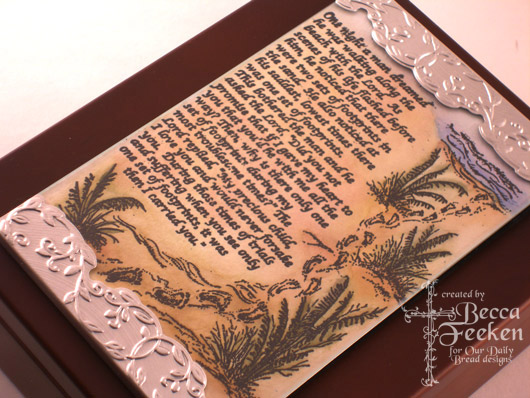
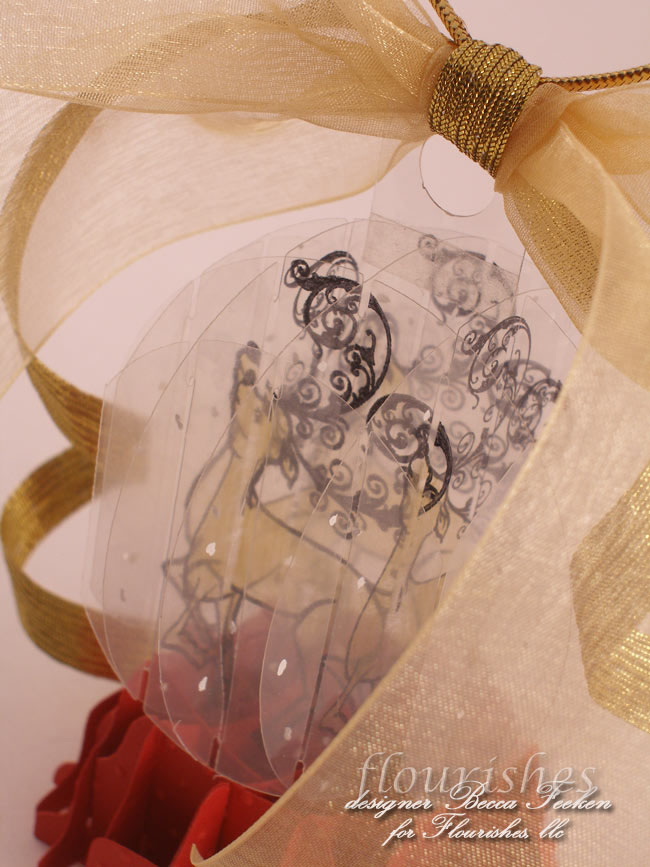
This was such a happy find for me; the box is 7¼" tall by 6" wide.  The image on the top of the box is 6" tall by 4" wide.  It is watercolored using reinkers on 140 lb watercolor paper.  The most awesome feature is that I can pull that image and replace it a stamping of my favorite scripture, perhaps the picture of We Three Kings in another newly released set – if you can’t tell, I love the ability to switch things out.

Supplies:
Stamps:  Footprints in the Sand – Our Daily Bread Designs
Paper:  Fabriano Acquarello 140 lb Watercolor Paper
Ink:  Versamark, SU More Mustard, SU Close to Cocoa, SU Brocade Blue, SU Mellow Moss
Accessories:  Black Embossing Powder
 

I hope you are having a glorious weekend!! 

pinTHIS SHAREthis TWEETTHIS EMAILthis
  • Sarah FawcettOctober 12, 2008 - 5:20 am

    Your cards and art work is just stunning. Thank you for sharing.. I have awarded you an award on my blog if you would like to see.
    http://saimba.blogspot.com/ReplyCancel

  • Sarah FawcettOctober 12, 2008 - 5:22 am

    I asboutley love your cards and creations. I have awarded you an award, if you would like to see it please visit my blog.
    Thank you for sharing your wonderful work
    http://saimba.blogspot.com/ReplyCancel

  • JanineOctober 12, 2008 - 7:04 am

    Beautiful Becca!!! Isn’t it nice to give yourself something every once in awhile?!!!ReplyCancel

  • Cindy HaffnerOctober 12, 2008 - 12:36 pm

    Becca this is gorgeous, love Footprints in the Sand. TFS.ReplyCancel

  • WendyOctober 12, 2008 - 12:46 pm

    Becca – you just keep outdoing yourself!!! This is beautiful – and I’m glad that you are keeping it for yourself – you deserve it! Thanks for sharing. God bless!ReplyCancel

  • Lisa D. AthaOctober 12, 2008 - 3:14 pm

    Becca,

    What an awesome idea! I love it when an idea comes together like that too! That makes the creation even more worth while to make….and keep. Take care, and STAY HEALTHY!

    Love and hugs, Lisa A.ReplyCancel

  • Amy ShefferOctober 12, 2008 - 6:17 pm

    How gorgeous! And what lucky finds – definitely meant to be!ReplyCancel

  • Charlene AustinOctober 12, 2008 - 8:44 pm

    Absolutley wonderful! You totally deserve to receive such a thougtful gift from yourself!!!ReplyCancel

  • Charlene AustinOctober 12, 2008 - 8:45 pm

    OMWord…I cannot believe I have 2 spelling errors in that post above. Yikesa.ReplyCancel

  • Kelley HollandOctober 12, 2008 - 9:35 pm

    Becca..wow..everything you make is just excellent! How do you keep doing it? This is fabulous!ReplyCancel

  • Judith -Overland Park, KSOctober 12, 2008 - 10:54 pm

    Becca,

    What a beautiful box and what better verse to put in a frame. You did another beautiful job. Thank you for sharing.ReplyCancel

  • Karen WallaceOctober 13, 2008 - 4:49 am

    I love it, just gorgeous and I just ordered several sets after seeing your blog.ReplyCancel

  • Joan FrickerOctober 13, 2008 - 5:09 am

    Becca, this is so beautiful. I love everything about it!

    JoanReplyCancel

  • ConniecrafterOctober 13, 2008 - 6:15 am

    That does frame it Beautifully, it was just meant to be, lovely work!ReplyCancel

  • Jerri KayOctober 13, 2008 - 7:09 am

    This is so beautiful Becca, what a wonderful box to keep your bible in. Is the frame that the stamped image in a metal embossed frame? Or did you emboss silver paper, it’s just stunning!ReplyCancel

  • FeMcBOctober 13, 2008 - 7:55 am

    this is so lovely! a work of artReplyCancel

  • DotOctober 13, 2008 - 8:10 am

    So beautiful!! I love that you can change the cover!ReplyCancel

  • Beth NormanOctober 13, 2008 - 9:48 am

    Oh, Becca, this is truly beautiful. The watercolour turned out so well. This is also one of my favourite passages. Did you read the book “Footprints” by Magaret Fishback Powers? She is the author who lost the poem and found it all over the place, and fought hard to win the right’s to her own work. Very interesting card. On the same note, I’m reading “The Shack” another inspirational book on the best seller list. Someone said it made them cry before page 100, and I was like “yah, right.” Honest to goodness, I did cry before page 100. Take care.

    Hugs,

    BethReplyCancel

  • Laura (scrapnextras)October 13, 2008 - 1:55 pm

    WOW! What a way to “recycle” ! Beautifully done, coloured and framed. Congrats to you for making a gift to yourself!ReplyCancel

  • jami {sgtStamper}October 13, 2008 - 5:57 pm

    Beautiful! How wonderful to make something for yourself!!
    hugs, JamiReplyCancel

  • Rhonda K.October 13, 2008 - 6:58 pm

    This is very beautiful! You did a fabulous job. Thanks for sharing.ReplyCancel

  • Stamper for funOctober 14, 2008 - 7:54 am

    Great tutorial. Thank you for making the video.ReplyCancel

  • Cathy B.October 14, 2008 - 12:13 pm

    This is so beautiful, Becca… now be strong and don’t cave in when some one sees it and exclaims how much they love it and would like to have it… lol!!! You deserve to keep this for yourself!

    Cathy B.ReplyCancel

  • NancyOctober 15, 2008 - 4:26 pm

    This is so pretty Becca!ReplyCancel

  • Joy OrtegaNovember 25, 2008 - 12:13 pm

    Do you make and sell these?ReplyCancel

When I saw the new releases for Flourishes I was tickled as punch.  I have a die cut globe that I’ve been dying to use and I knew the images for Sleigh Ride would fit wonderfully.  This set is adorable . . . be sure you click over to Flourishes to see this set and four other sets released this week.

The snow globe is made out of  transparency and I stamped four images of the reindeer with stazon ink.  I colored behind each copy with Adirondack and Copic markers.  On each piece of the globe I dotted the surface with a white out pen to give it white dots that will seem like snow.  The bottom pieces were embossed with the Cuttlebug Swiss Dot embossing folder, just to add some interest and texture.   Finally I added the ribbons and a tie so that the globe can be placed on a desk or hung on a tree.


Be sure to stop by and see what the Design Team and the Friends of Flourishes have created.  This is day three of the new release and the samples are simply amazing:

Cindy Lawrence
Susan Roberts
Linda Duke
Leslie Miller
Faith Hofrichter
Barb Schram
Julie Koerber

Added bonus!!  – through Monday, October 13, get 10% off of your entire order in the Flourishes store!  Use the promotion code RSC88 in the promotion code box at checkout.

Supplies:
Stamps:  Flourishes – Sleigh Ride
Paper:  The Paper Company, Clear Transparency
Ink:  Stazon Black
Accessories:  Die Cuts – Some Assembly Required, Copic Markers, Adirondack Markers, Ribbon

Thanks for stopping by today and have a blessed weekend.

pinTHIS SHAREthis TWEETTHIS EMAILthis
  • Cindy HaffnerOctober 10, 2008 - 9:17 am

    Becca, outstanding as always.ReplyCancel

  • Pansy JonesOctober 10, 2008 - 9:27 am

    Oh this is lovely Becca. I would so love to make some of these to give to some of my friends for Christmas. have you thought about making a video for this? I am such a visual person.

    Thanks so much for sharing.ReplyCancel

  • Cindy LOctober 10, 2008 - 10:46 am

    OMGosh, I can’t even BEGIN to think how you would make such a thing! This is spectacular, Becca!!!ReplyCancel

  • Laura (scrapnextras)October 10, 2008 - 10:58 am

    WOW! How do you think these up! A very cool ornament and beautifully done!ReplyCancel

  • AnitaOctober 10, 2008 - 11:21 am

    WOW! These would make great gifts!ReplyCancel

  • StefanieOctober 10, 2008 - 12:24 pm

    This reminds me of the ornaments that can be made with the SAR kits – absolutely beautiful. I bet it will sparkle beatifully on the tree too.ReplyCancel

  • Cindy H.October 10, 2008 - 12:39 pm

    This is so lovely!! I love the reindeer in the globe! I am also a fan of Some Assembly Required, but I don’t have the globe – yet! You may have pushed me off the fence, lol. TFSReplyCancel

  • Troy LouiseOctober 10, 2008 - 1:18 pm

    Becca: I love your globe. I have seen the some assembly required ads in the paper craft magazines, but never tried them. You make it very tempting! Thanks & have a lovely weekend.ReplyCancel

  • StampOwlOctober 10, 2008 - 3:18 pm

    it has been a while since I made a snowglobe … love yours!ReplyCancel

  • jami {sgtStamper}October 10, 2008 - 3:56 pm

    Wow Becca – that is such a cool globe. That reindeer is so perfect for it!
    hugs, JamiReplyCancel

  • LindaOctober 10, 2008 - 4:46 pm

    Becca,
    I just stumbled onto your blog…thanks to Splitcoaststampers!! Thank you for the wonderful, beautiful and most of all SPIRITUAL INSPRIATION!! Your work is absolutely beautiful and I’m so inspired by it! Thank you!!ReplyCancel

  • Leslie MillerOctober 10, 2008 - 9:37 pm

    What an absolutely gorgeous, creative, amazing ornament, Becca! Your home will have the Midas touch this Christmas with all the fabulous gold tone decorations you’ve been making. So very elegant!!ReplyCancel

  • EdnaOctober 11, 2008 - 3:26 am

    it is a fine piece of art.ReplyCancel

  • Jean FitchOctober 11, 2008 - 4:58 am

    WoW Becca!

    Okay sister stamper spill. Video tutorial needed! Please. Before I go insane trying to recreate the base. I’ve tried a few globe cards before but this is amazing. Even my cats are contemplating this one. Snickering probably over all the paper scraps they will get to steal!

    So much Awesome talent in one set of fingers, brain and heart is just plain unfair to the rest of us (not to mention making the angels crazy)
    – LoL! All that and beauty too.

    Thanks for sharing with the rest of us mere mortals :) – JeanReplyCancel

  • Jerri KayOctober 11, 2008 - 7:11 am

    This is totally amazing Becca! What a wonderful homemade ornament for a tree. Personally, I would buy a gold stand for it and and let it hang from that. Wow, this would be a super gift, thanks so much for sharing!ReplyCancel

  • annOctober 11, 2008 - 10:47 am

    Hi Becca,

    I am blown away with your talent. I love everything you do. this globe is the most wonerful thing I have seen in a long time. Would you please consider doing a video tutorial and let us know how you did it. Please!ReplyCancel

  • Charlene Austin (Willow01)October 11, 2008 - 11:46 am

    OH Becca~~this drops my jaw!! I am in LOVE with this. Die cut globe? Who would have ever thought. And no one could have wowed me with this as you did!! Have a great weekend Becca. It’s Cdn Thanksgiving here and I am just really looking forward to a quiet weekend at home. One more week till the cruise!! Eeek!ReplyCancel

  • wendypOctober 11, 2008 - 2:50 pm

    Wow! Absolutely amazing!!!ReplyCancel

  • ConniecrafterOctober 11, 2008 - 4:15 pm

    Wow that is just too cool, you have the neatest projects! Terrific!ReplyCancel

  • DianeOctober 11, 2008 - 4:53 pm

    So beautiful…as always. Love the dimension of this project!ReplyCancel

  • JanineOctober 12, 2008 - 7:03 am

    Love it Becca!!! YOu are amazing!!!ReplyCancel

  • Julie KoerberOctober 13, 2008 - 10:05 pm

    Becca, I am so sorry I missed this Friday! It is amazing– just like your site’s namesake! Oh my!!! I am putting it on the Flourishes Blog as we speak!ReplyCancel

  • Tammy HOctober 14, 2008 - 3:47 am

    That is so beautiful. What kind of die cut is it? Love all the details!
    Thanks for sharing!ReplyCancel

  • Heather Fullerton (Retired Heather)October 14, 2008 - 7:57 am

    What a wonderful ornament. I would also like to know where you go the die cut. Great job.
    HeatherReplyCancel

  • Raul EugarriosOctober 14, 2008 - 2:14 pm

    Mrs Becca …. What more can I said, maybe it will sound different if is in spanish…. “Esta Maravilloso”.
    Thank you and we want to know what you use to make the globe.
    Take care.
    RaulReplyCancel

  • LisaOctober 28, 2008 - 12:00 am

    So beautiful! I must bump that Flourish set up to the top of my list!
    Do you think this globe die cut would work with a photograph printed onto the clear transparency?
    Where would you suggest buying the die on line?ReplyCancel

  • debNovember 18, 2008 - 7:39 pm

    Becca, I would appreciate it if you could email me when you have a tutorial on thIS, I am really interested in making this for my mother who has everything she needs for Xmas. I always make a homade ornament for her and my 2 sisters.
    . Please either do a tut or send the instructions on the globe, Please!!!!ReplyCancel

  • Deb MuckleJanuary 6, 2009 - 1:32 pm

    WOW! is all I can say to this project! I am stunned and would love to make these for next year. I am sad that I just came across this after Christmas for this year and would like to know how to make the globe or is it something you have to buy from somewhere then decorate it. I would love it if you felt you could share the info with me. Again this is stunning!ReplyCancel

  • DeeJanuary 15, 2009 - 8:54 pm

    Could you please tell me where you got the die cut globe that you used on Oct 10/08 from? I have a friend who got a Christmas card using the same globe and I would luv to learn how to make them. Your card was fabulous!ReplyCancel

  • JaniceOctober 20, 2009 - 5:12 pm

    Greetings from Moncton, New Brunswick Canada!

    Becca, I have been subscribing to your blog for several months now, and I must say that you are one of most talented card artists I have come across. I really enjoy your style.
    This snow globe you have made has really caught my eye. (I am referring to the snow globe in your October 10th/08 posting). It is so elegant, and you say it is a die cut globe??? It is beautiful. I would love to make a few of these as special little gifts for people this Christmas but I have searched your blog and cannot find out how you made it. Are you giving out the directions? Have you made the video/tutorial that many people have requested and I have not found it? Could you please direct me in the correct direction, so I can also make these beautiful ornaments.

    Thanking you in advance,
    JaniceReplyCancel

I N F O