
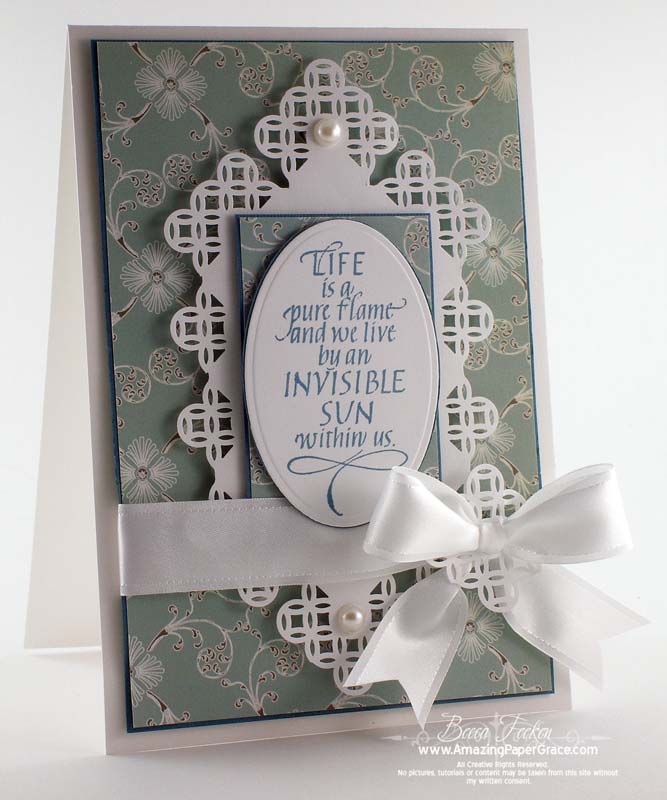

Hi there, I’m excited today because I have a new technique to get immersed in. I call it right angle punching and it opens up a whole new dimension to corner punches. My card today is the product of that new technique; the medallion that my sentiment is sitting on is made this way. It took me a couple of weeks to get my head wrapped around how to do it, reproduce it then teach it but I think I’ve got a handle on that now. The link for the first of three videos showing this technique is at the bottom of my post. In the meantime, on to my card for today!!
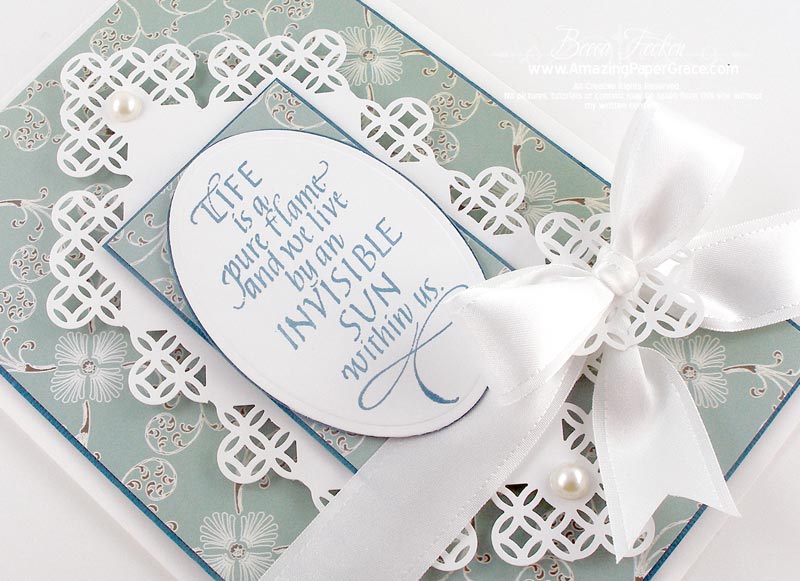
Suzanne with Quietfire Design penned this sentiment a couple of weeks ago and I’ve been dying to use it; it’s called Life is a Pure Flame. I created my medallion so that this sentiment could fit within. It’s backed on a serene Cosmo Cricket design paper with a teal mat. I’d originally done the medallion in gray but it simply got lost in the background so I redid it with bright white. On top of the medallion I layered a rectangle then a Spellbinders Petite Oval Small with the sentiment stamped in Prussian Blue Chalk Ink. The last thing I did was postage sized stamp medallion made using right angle punch. I cut a round hole in the center of the small medallion and threaded it on my bow loops for a paper collar on my bow. So have a look at the video, I’m sure your mind will start run with this :-)
Here is the first in the series of videos. My hope is that instead of presenting an overwhelming concept – I’ve broken it down so that you can master the first step before moving on to a more complex design. Enjoy!


You are quite simply, the QUEEN of punches! I do love my punches and I so appreciate you sharing new ways and ideas to get the most out of these punches. Thanks Becca!
Oh, Becca! This is divine! Thank you so much for showcasing the stamp so beautifully. I really needed this boost today!! Spectacular!
Absolutely wonderful tutorial, Becca! You are certainly the queen of the punch and Nesties die-cut templates! I have learned so much from you, and can’t wait to see your next video on these right-angle punching techniques! Have a wonderful week! Cami
Fabulous sentiment!!! LOVE how you’ve framed it too!! Thanks for the tutorial too – can’t wait to try it :D Looking forward to Part 2!!
Oh how I wish my mind was so creative! You rock, Becca!!!
I have Suzanne’s stamp. Just got it the other day and it is truly one I’ll use often.
I can’t wait to see the other videos on this new technique. You simply have such a talent and I don’t see the degree of creativity you express anywhere else. It’s fabulous.
Thank you, SO MUCH, for this great tut and for coming up with these unique ways for us to use our punches.
Lovingly,
Sue W
Thank You Becca! I’ve been thinking along the same lines, but hadn’t the time yet to figure it out. Now I don’t have to, because one of my favorite designers has it worked out. I can hardly wait to see tomorrow’s tutorial. Thank you, thank you, thank you!
You go Becca! I love this Right Angle Punching Technique. Guess what I will be doing tonight? Can’t wait for tomorrow’s video. God bless!
WOW Becca you are amazing! I don’t know how the heck you come up with this stuff, but Thank You for sharing your talent! With a creative mind like yours I wonder if you ever get any sleep! lol I’m looking forward to the next tutorial. TFS
Gosh Becca- that is so smart! What a great idea. Thanks so much for sharing it with us. Love the card too.
Thanks for sharing the tut. Beautiful card as always. TFS.
Oh my goodness this card is totally breathtaking! Thanks too for taking time to do tutorials for us, they are soooo inspiring!
Ha! Your brain is in overdrive again…can’t wait to try this!
Oh my goodness.. awesome Becca!!! Lovely indeed !!
Woohoo! You go Becca! You are so very creative and thinking out of the box/punch is just such a natural thing for you. Am practicing tonight on your first tutorial and hopefully will have it down by the time you do your next one! Thanks so much for sharing, gotta go play now :D Oh, and by the way — Your card is just gorgeous!
OOOh, OOOh, you are just so smart, that is as neat as pocket on a shirt (as my DH states). Can’t wait to see the rest of the tut. Your card is absolutely gorgeous.
Totally awesome!
My brain just doesn’t quite compute? Does this work on any corner punch? I have a couple MS corner punches, but not the same one you used? I’m not quite getting it right and it’s so gorgeous, I’d love to figure it out!!! Guess I’m the only one (or only one brave enough to admit I can’t quite do this) — LOL!!!
WOW…someone needs to pay you BIGGER bucks!! This is an awesome informational tutorial. I love my corner punches and now I have many more uses for them. Can’t wait to get busy. Becca Thank You for all that you share with us. Your card is beautiful.
Have a great week.
Absolutely Amazing. I guess, I’ll have to look at my punches in a different way. Thanks for the Tutorial, I’m looking forward to the following ones.
Luvglitztoo
Gorgeous technique! I guess I need to pick up some punches.
What a great effect this gives. So glad you are doing tutorials on it. Very clever lady!!
Marcie
Okay, looking better now — whew! Gonna take some practice, that’s for sure!!! Glad to know you worked on it “for forever” so I don’t feel quite so ungifted! LOL! Of course, now I want THAT punch — thanks, Becca!!! ;-<
thanks for sharing and for the beautiful sentiment
Wow! This is fabulous! You always come up with the greatest ideas for punches and dies! :o)
Becca i thank the holy spirit for giving you this wisdom,and sharing with all of us.
Thank you Becca for taking the time to help the rest of us! You are very good on your instructions – blessings!
Becca, your talents and creativity never cease to amaze me. You take a punch or a die with a seemingly “simple” application and turn it into something phenomenal! Thank you, again and again and again, for sharing your talents and knowledge.
OMG–this is sooo very pretty and delicate; thanks for sharing with this great tutorial–can’t wait to see the next one. You are truly our ‘amazing grace’.
Sandi
Beautiful card. Love the background you punched for it. Great tutorial.
love this………would like to know the name of Martha’s punch.
thanks
Kathy L…………….
That was awesome! I actually have a Becca Bits file! Just love your work.
nevermind I found it……..appears to be named….
corner punch …….modern garland
thanks
Kathy L……….
pretty cool, thanks for sharing!
Sandra
Very cool! I had to get my MS corner punch and practice with it while pausing and restarting your video. Love the idea and can’t wait for the next two tutorials. Thanks Becca, you’re the best!! :)
Becca – there you go again, spending my money for me. That is one punch I didn’t get – looked at it several times; it was even in my basket more than once, but it’s still hanging there (I hope). Now that I’ve seen it “in action”, it’s back on my list. Beautiful work and tutorial. Can’t wait for part 2. Thanks!
Thanks for all your ensight got to try this one.
Thanks for the great video. I love this technique. This is why you are my favorite designer. I don’t know how you come up with all these great ideas, but I really appreciate that you share it with the rest of us. thank you!
Thank you so much Becca for explaining how this is done. Really looks amazing and something I never would have thought of. Can’t wait for the follow-up videos :-)
Wow Becca
I just love this punch and what you’ve done with it..I can hardly wait to see the next episode..I feel like a kid..waiting for the next chapter of a movie serial.
Your just so clever..you must have an engineer in side of you somewhere…
thank you for sharing all your hard work with us…I feel so privileged to be able to come to your blog. and learn all this from you..
Love your Becca Bits…more more..ha ha ha ha
pat..
You’re so awesome…
Thanks for the video. Your creative juices must flow 24/7. Your card is beautiful and just looks like a work of art. I must practice to see if I can get this technique to work for me. God bless.
great looking card! and the tutorial was inspirational!
can’t wait to see the others.
i love using my punches in more creative ways, but i never think of things like this!
tfs, sandyh
I don’t comment as often as I would like, but when I do it is ususlly on your blog. You always have something that inspires me. I love my punches and my spellbinders and you always give me ideas to go beyond the basics. Thank you so very much for sharing your God given talents. You are such a blessing. Glad to hear your husband is doing good.
Very cool, Beca! Can’t wait until tomorrow’s tut! I love the way you always think outside the box, or circle, or corner punch…
Wow that is cool how wonderful that you figured it out for us. I love it. I will have to get that punch and try it as it looks awesome can’t wait for the next video. Thanks so much your awesome.
Very interesting you always come up with the most special ideas.
You amaze and challenge me once again. Thanks for all the creative time it takes to figure this out so I can just watch your videos. For all these wonderful ideas, I call you one of my VBFs.
Becca you are so creative! And generous to share all your wonderful discoveries! Love this look and your card is beautiful! Thank you for sharing so much!
Becca, you are brilliant!I love this and can’t wait to give it a go! Thanks for sharing.
Hi Becca,
You are totally awesome this idea is so cool! Thank you so much for sharing can not wait to give this a try!
Hugs,
Nancy
WOW, Becca you have a God-given talent! Love your work!
Thanks for sharing your amazing ideas and fantastic tutorials, I love them all!
Thanks for an amazing blog and tons of inspiration!
Lots of hugs,
Hanna
I love the Becca Bits, it makes your elegant cards look so easy to do. I’m always amazed after looking at the video and see how simple it really is. Your card is gorgeous Becca, the punched medallion mimics the DP. As always Becca, TFS!!! :-D
Becca, you are amazing! How cool is that.
Thanks for being so creative.
Jean
Becca, Wow.
That technique is fab, can’t wait to have a go.
Hugs
Cally x
Beautiful card Becca! Thank you for the help with punches. I have just started using them and they are a total mystery to me. Your “no fear” approach lets me try things I did not think were possible. A person like me, with a couple of punches, can try numerous things. You teach me that the “possibilites” are endless. You truly are the “Queen of Punches”!
Hugs Cheryl
Amazing, incredible, unbelievable!!!! Thank you
merci becca ingénieux très jolie carte comme d’habitude!
Great card. Love the technique.
Very useful technique! Thanks for the video~it makes learning so much easier!!
Brilliant! Thank you!
Becca – I agree with all of the others – absolutely amazing – I just love it and since I just got these punches can’t wait to try it out. Thanks so much for your generosity in sharing your talent!!
Wonderful technique for breathing fresh life into our punches…! Thanks for sharing your insight so generously!!!!
Teri
Wow, what a creative mind you have! This is such a lovely card!! Many thanks for the great tutorial, too :)
Oh wow! That is so neat!!! You are the Queen of MS punches!
I wonder if they know what you can do with those punches!!!!
Beautiful card Becca!!! TFS!
Hi Becca
I have always dubed you the QUEEN OF PUNCHES, but I have amended that to the QUEEN OF CREATIVITY. All I can say is WOW, WOW, WOW. Thank you soooooo much for shareing your God given talent with all of us.
I keep trying the different bow techniques you show with not too much success… Ahem.. make that no success (Bow Easy here I come), and your punch tutorials awesome as they are I can not mimmic either. but this one I GOT RIGHT!!!!. I so can’t wait to see and learn more.
Thank you
Have a wonderful day
Hugs
Tonniece
You continue to amaze me. I am not surprised though, your mind must gush with ideas and you problem solve. I’m so jealous. Wonderful tutorial and thanks for going through the work to show us how you do this. Looking forward to more tomorrow!
What a fabulous tutorial. I am constantly in awe of your creative powers. thank you.
Oh Mighty Queen of Creativity! (smile)
This is such a wonderful/beautiful/unique technique. I can’t wait to try this and more so the other techniques that await us. Thank you for sharing.
I think I just bought the border punch that coordinates with the corner punch you used. I would love to know the name of the corner punch you used so I could get the same one.
This is awesome…..now I need that punch…..you are so creative…..and I just love it when you have a Becca Bit…….can’t wait until tomorrow…..
wow Becca you come up with the most stunning things. Thanks so much for sharing.
Can’t wait to see the rest of this – and to try this technique with some different corner punches, although this one is absolutely stunning. I am a pretty good mimic – but I don’t think I could ever come up with this stuff on my own. So I’m grateful to you for sharing your creativity with us!!
I love this idea and had to go try it our right away.Can’t wait to see more tomorrow.Your card is stunning like always.
QUESTION
I have tried this and I must be missing something as well. Marge R you are not the only one….
My corner punches only allow me to slip the paper in on a corner, there is a guide that will accomodate a 90 degree angle. so I am not sure how to manipulate the paper to fit..
Can you tell me what I am missing?
Becca I just can’t believe this one! It is fantastic and I have this punch so will give it a try. Thanks for sharing your talents with us!!
WOW Becca, What you do with a nestie blows me away. This is GORGEOUS! Hugs!
Oh you always have something awesome that makes me want to go out shopping for! You are the punch master, you rock! Thank you for the tutorial, can’t wait to see more. :)
wow Becca – thanks for sharing that with us – just amazing…
I need to try this
paula x x x
Oh, that square looks fabulous and it my favouite one. Glad you started with that one. Darnit all, I don’t own any fancy corner punches like that!
Becca this is stunning! Just when you think there’s nothing new that someone could do with paper, voila! something new! Love this!
Beautiful card, Becca! I love that punch! I’ve gone crazy for punches (among other things) from looking at your site! I love the colors, the design is ingenius. Can’t wait to see the next video!
At the risk of using inappropriate language, I have to say that when I watched you explain this, my jaw literally dropped and the words “Son of a …..!!!” escaped my lips!
I have been painstakingly trying to measure, tweak the starting size of a square to punch, etc., etc., over and over, and so when you explained AND showed how to simply use the previous punch to line up the next one, well — I can’t even describe how big the light bulb was that went on over my head.
I ran and grabbed a pretty Martha Stewart corner punch and a scrap of paper and seconds later, with NO measuring, I had a PERFECT medallion. Literally PERFECT. I wish I could give you a big squeeze!!!
Wow! Becca….I had a lightbulb moment too…….this is great and now I don’t have to feel that I have wasted money on a punch that can be used like this! You are the ONE, girl.
You are in simple terms an AMAZING talent in this world we all have so much enthusiasm for. Your Becca Bits absolutely wow me every time I see one. I haven’t mastered all that I have seen, but I do have such wonderful insight into awesome extras. Thank YOU!
Oh my goodness, Becca, that is fantastic. Thanks so much for sharing this technique. You did a very good job explaining it, too.
Becca you are one amazing woman. I have been playing with Martha Stewart punches into shapes and made a folder to keep my ideas and measurements together.You have just sent my mind into overdrive .Thank you for sharing.
Beautiful card, thanks for sharing all your techniques~
Oh! this is too wonderful. I’m sorry if I missed this information somewhere else, but could you pls tell me the name of this MS punch?
thank you for sharing your wonderful techniques.
You are heaven sent……I am having so much difficulty trying to do the simpliest technique of punching around a page, so I am so happy to learn this new technique. Hopefully, with your tutorials I may conquer my fear of the beautiful Martha Stewart Punches!
This is a wonderful idea!!! You are one smart lady. Thanks for sharing.
Amazing!!!!
I LOVE this technique!!so much so that I shared with some gals at our SC club. I sent them to your videos after showing them my punchouts and they love it too!! We love finding new ways to use the tools in our drawer! thanks very, very much!