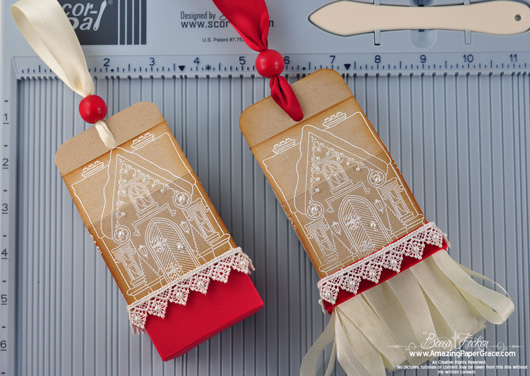
Hi there blog friends!! Just a reminder, you have a little more time to make it through the Waltzingmouse Stamps Blog Waltz and leave your name with the designers to have a chance to win! In the mean time, I thought I’d pop in really quick with a how-to!! Imagine that, I haven’t had a how-to in so so long but it just happens that I made extra pictures while I was creating just in case anyone asked. Well, some of you asked so here it is. Yesterday I showed you a little gingerbread cottage house that I created into a trinket box to hang on your tree and two were created as tasseled ornaments to hang on your tree. They were made using Waltzingmouse Stamps set – A Cottage Christmas and A Cottage Home. They’re simple to make – here’s how . . .
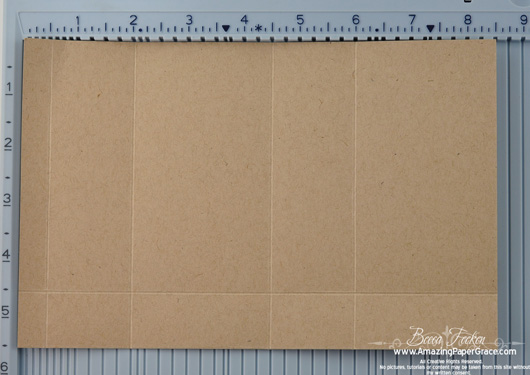
For the ornament top or the box top you will need a piece of paper that is 8.5″ x 5.5″. As shown above, score at 1/2″, 2″, 4.5″, 6″ from left side turn paper 90 degrees and score 1″ from bottom.
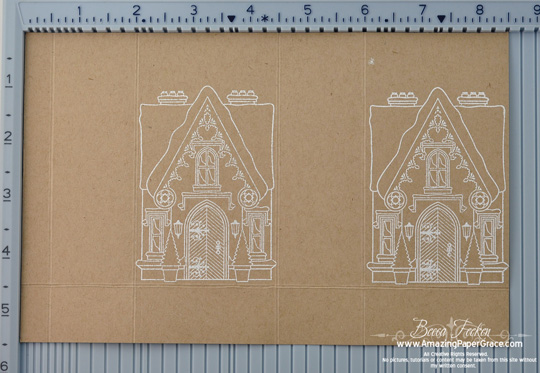
The scoremarks will guide you where to stamp each panel. Start out by stamping the Christmas Cottage in the two larger openings, just like I’ve done above. Emboss, if you like.
Mask the sides of the Christmas Cottage and stamp with the narrower, peaked roof stamp from A Cottage Home. (I did the masking second because I was embossing and I didn’t want the residue from my low tack masking tape to interfere. I masked, stamped, sprinkled embossing powder, then removed tape and applied my heat tool).
This is what the finished stamping will look like.
Cut as shown above — Snip the bottom into flaps that bend at the score line. Snip from the top down to the “v” between the roofs and snip straight down to the peak of the roof. Fold diagonally along the roof peak line.
You’ll need to make another score line just like I’ve done above. On the large Christmas Cottage panels only, score from the valley to valley of the adjacent peaked piece.
One last score . . score across the entire piece at a point that will be just above all the peaks.
Does your piece look like mine? Good, you’re ready to add Scor-tape. Decorate as you wish, then remove your tape and assemble. To me it seemed easiest to adhere along the side, adhere along the bottom then tackle the top last by punching a hole at the top and adding adhesive then threading through a ribbon loop for a holder. Snip the top part of the peak portions if the tabs stickup too far. To finish the ornament add tassels, loops or lace and velvet embellishment.
Want to make it as a trinket box? The steps are the same except you’ll fashion a box bottom like this:
For the box bottom you will need a piece of paper that is 8″ x 4 1/4″. Score at 1/2″, 1 7/8″, 4 1/4″, 5 5/8″ from left side, turn paper 90 degrees and score 1″ from the bottom.
Clip as shown above, apply Scor-Tape and assemble box bottom.
These were a ton of fun to make, I hope you’ll give them a try!! Happy crafting!!


Great tutorial and thank you so much for sharing it with us Becca…..such a cute trinket box.
Love Sheila xx
Thanks for this tutorial Becca. I just love this snowy cottage.
love from Christine x
THANKS BECCA! I was hoping this was coming! You’re terrific!
Thankyou so much Becca. I have been looking for something special to make for the ladies in the cardworkshop I go to- to hold a bracelet for their Christmas presents- I’ve just found it !!!!! Better get cracking. Anne x
Love the idea and the cottage set. Thanks Becca. Dianne
Thanks so much. I am saving it to my favorites file in its own category. You are so thoughtful. God bless.
The explanation are very clear it looks not to difficult . This project is the first on my wish list .Merci for give it to us. Francine.
Thanks for another fab tutorial. I can see lots of ways to use this little box–it’s so cute!
THANK YOU Becca! I LOOOOVE THESE!!!!!!!!!!!!!!!!!!!!! You are SOOOO CREATIVE!!!!!!!!!!!!!!!!!!!!:)
Morning Becca. In July, 2010, you made a beautiful red and white pop-up snowflake card that you said you would make a demo on. I know you’ve said you’ve received many requests for it. In 3 weeks, I’m going to a stamping retreat and I make my Christmas cards there. Could you please make that demo video before then? Many thanks. Carol
Thank you so much for this tutorial. It looks like it could be used for many things. I love this gingerbread look with the craft-type paper & white ink!
Thank-you Becca for the instructions, I love your art and your clear guidelines
are easy to follow.
Maria V.
Thank you so much for sharing the tutorial! I’m seeing some of these being made in my future :)
These little ornament boxes are very cute. I hope we can look forward to seeing a tutorial on the folding card that you made earlier. Thanks for all the hard work you put in your creations even if you don’t get to the tutorial. God Bless.
These darling ornaments will make the perfect hostess gifts and/or such cute decorations for a gingerbread Christmas tree. I will give one to each person who visits over the holidays.
Thank you for sharing the info. It helps to visualize the process.
Hi Becca! Just HAD TO come back & leave another comment! WOW!!!!!!!! WHAT A BLOG HOP!!!!!!!!! Those ladies do AMAZING WORK!!!!!!!!! I was TOTALLY IMPRESSED!!!!!!!!!!!!!!!!!!!!!! It was time WELL SPENT!!!! THANKS BECCA!!!!! ( Now, I REAAALLLLLY want that little Christmas cottage stamp set!!!!!!!!!! LOL ) :)
Thanks Becca! I can see making these in different colors to form a Christmas village fill each with goodies then letting the grandkids take one as they leave.
Blessings Bernie
Great how-to post on your adorable little house!
I have been going through ALL your past blog posts–they are wonderful–it just is taking forever because here in the Missouri boonies we only have dial-up available :(.
Hi Becca – love the house projects. Any chance of a video tutorial on the “I have a secret” fold down house warming card?
Wow! Thank you Becca! Adorable and I love those Waltzingmouse stamps.
Just think its gorgeous – love it all – the designs, the results – oh so lovely – delighted to know they originate in Northern Ireland – love all your work, so inspiring.
You make it look a little easier but you are still amazing. Thanks for the tutorial!
Your creativity never ceases to astound me Becca.
Thanks for the tutorial, Becca! These are really cute. A while back you talked about a new bow that you were perfecting…can we hope that there will be a new Becca Bow soon?
R/
Thank you tutuorial and it is a cute ornament.
Love the idea
Wonderful step-out tutorial. As always Becca, TFS!!! :-D
Another fabulous project. Thanks for the tutorial!!!
Really cute. Thanks for the how-tos.
Hi Becca you have the patience of a saint, I don’t think I could do this one,
it’s so beautiful. wonderful tutorial as always.
Yvonne
Thank you so much Becca…great simple tutorial and will be buying this stamp…perfect for my gift card gifts.
Great tutorial!!! thanks: you’re too clever :-) (i’m bookmarking this so I can find it when I need it!)
Thank you so much Becca, I am hoping to use this template for Christmas time pressies.
LOL Eileen