
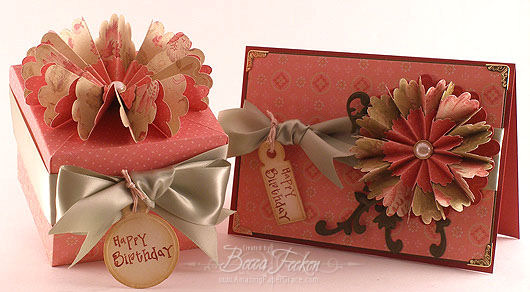
Do you remember this ensemble? Well so many people asked how to make it that I finally have the tutorial ready. Here we go!!

Supply List:
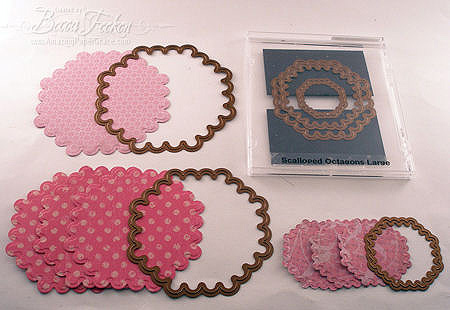
| Spellbinders Large Scalloped Octagons | Scissors |
| Two sided design paper | Invisible tape |
| Bone folder or optional Scorpal | Long reach hole punch |
| Large Brad or Threaded Button | Glue Dots |
A friendly reminder, it takes a lot to put together pics and such for tutorials and I offer this tutorial up in the spirit of sharing. Most people are grateful and offer credit where credit is due. Because others may want to sample my other tutorials, I encourage and welcome link backs to this tutorial, you do not have to ask permission.
Using Spellbinders Scalloped Large Octagons, cut/emboss one of the largest size, cut/emboss three of the second largest size and cut/emboss three of the second from smallest size. Set the largest scalloped octagon aside, we will use it later.
(Optional) To prepare your cut shapes for scoring, align the flat edge of the scalloped octagon shape with the top of your Scorpal.
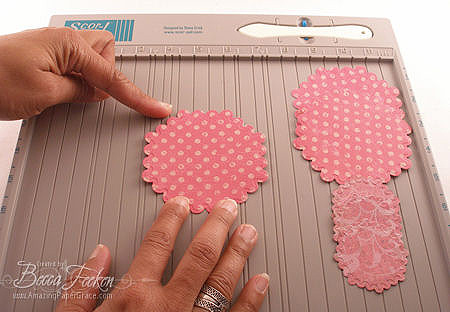
Score straight down through the shape. This score line will fall between the second and third scallop on each flat side of the octagon.
![]()
Each scalloped octagon will have four scored lines.
![]()
Using a long reach punch, set a hole in the center of each octagon, this will prevent the paper from tearing when folding. Then snip along one score line down to the center cut hole.
![]()
Fold each of the three pieces of the medallion. The first fold will be a mountain fold where the fold will rise above the cut edge.
![]()
Alternate mountain folds with valley folds so that each piece looks the same as that shown below.
![]()
With a bone folder, burnish the edge of each fold so they are sharp and crisp.
![]()
Using invisible scotch tape, place one piece of tape underneath your first piece of medallion with the sticky side facing up. The tape will end up on the underneath side of the medallion and fairly inconspicuous.
![]()
Marry the second piece of your medallions to the first by placing side by side on the upward facing sticky side of the tape.
![]()
Do the same with each seam. There will be a total of three seams.
![]()
Cut a center hole in the scalloped octagon piece that we set aside.
![]()
Put glue dots on the bottom of your medallion. I found that six glue dots was plenty, one on every other fold.
![]()
Flip medallion over and secure it to the bottom piece that had been set aside.
![]()
Construct another medallion using the three small scalloped octagons
.![]()
Seat the smaller medallion on top of the larger medallion, matching folds.
![]()
Put an embellishment like a brad or threaded button through the aligned center holes.
![]()
Voila!!! Your medallion is finished, it just needs to be adhered to something. These can be made in any size and can also be made with round scallops however the scalloped octagons are easier to work with and look prettier in my humble opinion. You can add as many layers as you want and if you want a more rufflier medallion, thow in another folded piece.
![]()
Here’s what I did with this one. I’m done buying bows for gift bags — too often the bow cost more than the bag . . . Now I have a very cost effective alternative. I hope you enjoy making medallions, once you get used to the process, they move along very quickly.
![]()


oh my gosh…this looks like so much fun to make!
Amazing — and here I thought I didn’t need the octagonal shapes.
WOW, Becca, thank you for the tutorial, it is sooo beautiful!
OMG – Becca – this is fabulous!!! Thank you for the tutorial – girl you rock!!!
all I can say is WOW this is so creative love it
hugs
Norine
I’m so in awe of all your wonderful creations–thanks for sharing
What can I say, Becca? That technique is absolute genius. Your card and bag are stunning!!!
Totally speechless when I saw you graceful heart corner punch is not working on corners, but being a round-about-fence to the JustRite-stamped-circled Valentine heart.
And you are absolutely right, the octagon spellbinder, so some of the “petals” are standing out, and make them look more “wave-y”
It is amazing grace that our Heavenly Father has gift-en to you. Glory be to Him.
Edna
Love it! It would definitely replace expensive bows – and prettier! You are one talented lady!
thanks so much for sharing Becca!
I have done this with the round shape one but I like this one better also =)
Love,**Milu**
I agree U ROCK!!!!!!!!!!!!! I’ll never have to buy another bow!!!! But I do have to get those Nestabilities!!!!!!!!! Thanks for Sharing!!!!
Like I have said so many times before ——— YOU’RE THE BEST!!!!!!!!!!!!!
Thank you Becca. I have waited patiently for you to do this tutorial. I fell in love with it the minute I saw it. but that is true for all of your creations. Thank you for sharing.
Ann
How awesome. Love it.
now if I just had my nestabilities…. this is so gorgeous… thank you so much for sharing…….
Cookie
Thank you, Thank you, Thank you. Another Beautiful creation.
This is just AMAZING Becca! Your talent is outstanding!
Hugs~
Christyne
That is beautiful, Becca, and your instructions are brilliant. Bless you for sharing.
A fabulous tutorial Becca, totally awesome!
You rock, Becca! Beautiful job on this tutorial!
Wow, this is beautiful. TFS.
Oh how pretty! Thank you for sharing another idea using the Nesties.
Becky, you are the BEST! This is absolutely GORGEOUS!!
I just got a few Spellbinders I had ordered and now I am going to have to order this one too! There is no doubt that you make Spellbinders so appealingby making such beautiful cards!
YOU ROCK!
GORGEOUSNESS!!
You are amazing, woman!! This is wonderful!! What a great way to dress up a gift bag or a card. Now if I just had some nesties…LOL! Into my “keep” file for later use. Thanks for the tutorial!
thanks so much, I’m so excited to see this tutorial – I just bought the scor-pal and I pre-ordered that set of dies! Yeah, I’ll be ready to try it out! thanks for the great directions!! You are awesome!! Tracy in Michigan, crazyforsu@aol.com
Becca, you are so talented!!!!! I LOVE everything you create, it’s amazing!!!!
Thank you for your tutorial! Your flower is beautiful and makes me all the more anxious for my die to come. You are indeed an angel to post your tutorials – your cards are awesome! I check my email quite often during the day waiting for your new posting to come out. Thanks again!
Thanks for sharing! I only have the scalloped Circles but will give it a try!
Awesome! I love it.
Yet another beautiful creation. Thank you so much for taking the time to prepare your fantastic tutorials, and your generosity in sharing your wonderful work.
You are an amazing lady Becca!
Marion,
UK
My sentiments are the same as Marions from the uk
Thank you for taking the time and effort to do this for all of us.
You lovely lady you!
Margaret. uk
Oh wow.
I just love your work.
Your blog is absolutely amazing and this tutorial is no exception.
Love Angie..xx..
Another wonderful tutorial. Thank you so much for sharing your work with us!
Becca, this is so good – it’s amazing what YOU can do. I must buy some ‘nesties’ to recreate your fantastic tutorials. Keep them coming please.
Love HW
xx
So cool Becca, thanks for sharing.
Thank you for making and sharing this tutorial! debb
WOW!!! Thankyou so much for sharing,your flower is gorgeous!!!
Thank you so much for sharing your talent with us. I enjoy reading your blog! Everything you make is so elegant! Your tutorials are so CLEAR, too! I’m not left guessing if I’m going to do right. Again, I am so glad I stumbled across Amazing Paper Grace!!!
By the way, where do you get all the pearls you use?
This is beautiful, useful, and an amazing idea! thanks for sharing! I can’t wait to get this nestablility in my hands now!! I love this product line…I want it all, of course! LOL
So amazing, so beautiful, so talented, thank you for the tutorial, the time, and the thoughtfulness!
It is just gorgeous. Can’t wait to get a set of those to make my own.
Wow Becca. You are amazingly talented. I love looking at your blog to see what you are doing next!
Awesome, thank you for the tutorial.
Absolutely beautiful! Becca, thank you SO much for your generous spirit! I am so grateful to have found your blog and to be inspired by your creations.
Have a wonderful weekend!
Wow…How pretty is that!!!….thanks so much for the instructions….Love it!!!….
Becca , thank you , thank you ! Your tutorial was very clear and helpful. Can’t wait to try this myself. Love your blog! Blessings to you !
WOW! Becca, this is beautiful. I love your blog, you are an amazing gal! Your artwork is so inspiring to us all. Thanks for the tutorials, they are so helpful. Thanks for sharing your creations.
Your work is so elegant and your ideas ingeneous. Thanks for sharing.
Thanks so much Becca. You are so generous with your time and your talent. May God bless you for your generosity.
Mary
http://www.primitiveseasons.blogspot.com
FABULOUS!!! Can’t wait to get my hands on my very own set of these nesties and give these flowers a try! (with lots of help from your tutorial of course). Once again, thank you for your generosity in sharing your talent and creativity with all of us!!!
Oh, my!!!
Becca this is stunning. It helps to see the amazing photos you took to understand just how you put it together! Bravo!
Thanks Becca! Amazing as always!
Oh my stars – you are such a nut for doing all that :-) Nut in a good way, of course! They’re too cute!!!
Thanks for showing us how to make these. They are lovely.
You really think outside the box!!!!
This is truely creative. It would have taken me hours to figure that out.
Wow! All I can say, is thank you for this awesome tutorial! I sure do want to try this now!
beautifully done Becca!
Cindy
Oh my! This is the tutorial I had asked you about just a bit ago…I’m so glad you’ve made it available now. Lovely! Just lovely! I make a different type of medallion that I love and will have to prepare a tutorial on mine as well. Yours is just incredible though…now I’m in search of that die set :-) Thank you so much, your work is just outstanding.
As usual Beautiful work Becca. And your destructions are so concise and beautifully pictured. You are a true blessing to us all.
Tricia
You are the best! Thank you so much for the great tutorial. Appreciated very, very much.
Thank you so much for taking the time to make this tutorial. The directions are very easy to understand. The pictures really make it so easy to make the flowers. thanks again.
Thank you so much for the tutorial Becca! I can’t wait to get these dies so I can play and make flowers too!
Hugs~ Kim
WOW! AMAZING! You have such a creative mind! I love how you show us what you did! Some of us are very visual learners!! Once again, your work is stunning!
Thank you so much for the tutorial! This is an awesome medallion/flower/bow for almost any occasion!!!
Becca,
Another thank you for your wonderful tutorial.
Enjoy your weekend!
~~Diane~~
Wow!! This is great thanks for sharing the tutorial.
Becca, you are one amazing woman. I am so happy that I have found your blog and that you are so willing to share your knowledge. Thank you!!!!!! Please don’t stop sharing and making your wonderful tutorials.
Amazing (and beautiful choice of papers)…. never would my mind have thougth of this! Thanks for sharing your amazing talent!
Becca, I’m thinking this would make a fantastic Christmas decoration….you could make 2 sets and glue them back to back…with a hanger between them…maybe a foil cardstock for one layer…away goes my mind…it’s absolutely gorgeous.
Wow Thanks for the tutorial!
When I saw them on sneak peek I didn’t think I wanted them, but after seeing your tutorial they are on my wish list. LOL
I LOVE THIS!! It’s simply gorgeous. I have to make some–your tut makes it look so easy. Wish me luck!
just fantastic! you are so creative! i wouldn’t even begin to be able to think up some of the projects you have created! WOW! I am in awe! I am totally going to have to buy some of these plates!
Beautiful, I need to make a purchase :) Thanks so much for sharing your talent!
Thanks for the instructions. Something else I can do on these cold winter days.
Charlene R.
Wow. That is absolutley gorgeous, and a great tutorial. I even think I can do it…maybe. But I’m sure gonna try!
That is sooo gorgeous, it certainly is a must have. Thank you so much.
Wow, I’m comment maker 76. Now that you’re famous, don’t forget about me–LOL. This project rocks! You have been so blessed with talent, and I’m so glad you share it with us.
Thank you for sharing this tutorial. The flowers are beautiful.
Oh, how gorgeous! It also looks like fun to make, which is a lovely bonus. These delicious bows put those store-bought ones to shame.
I’m the ‘Lucky 16’ Spellbinders winner and am just soo anxious to get my fingers on these dies. ‘Look what I can make’ is going to be my new fave phrase. Of course, the biggest thanks will be to Spellbinders and you, for making all my imaginary dreams become a reality.
Thanks Becca!
Heather in Montreal
Becca
This beautiful and I want to make one however…since the general public will not have access to the Octagons until mid March would you be able to share with us how to make the flower with the scalloped circles as well?
Thanks
Cheryl
OMGosh!!! Becca – you’re a genius!!!! Now I just have to wait (impatiently) for those dies to get to Australia!!!!
Thank you so much for the tutorial. I really appreciate that it is in written form and not a video. This way I can print out the instructions and keep them for future use. Also I have dial-up and it would take forever to view the video. Just love alll your wonderful creations, Becca. Keep up the gorgeous creations. You’ve inspired hundreds of crafters!
Your spirit of sharing is amazing Becca. Yours is my very favourite craft Blog and I look forward to your updates every day. All the very best to you :)
Can’t make a bow to save my life and haven’t bought them for a number of years or so. Now I can adorn packages at whim. Thanks for sharing this tutorial with us not to mention all of your spectacular cards, etc.
Becca – You are so talented. Thanks so much for sharing the tutorial. Your cards are so beautiful. ((HUGS)) to you!
Another amazing tutorial! You rock, Becca!
Thanks so much for sharing!
~~~ Huggies & Blessings ~~~
wow thats such a clear and brilliant tutorial – thanks for sharing ! i have bookmarked you !
This is just gorgeous! You are so talented and have a wonderful imagination which helps. I just love all your tutorials, but as soon as I get this one I shall be making them. I have made some out of the scallop and I just loved it. Thanks for sharing and hugs Becca!
THANK YOU!
WOW, Becca, thanks for this tutorial, it is sooo awesome!
Wow-zers girl, amazing.
This is just so beautiful, WOW. Thank you for sharing with us.
WOW!! This is amazing!!! Fabulous tutorial!! Fabulous designs!!
This is a definite WOWSA!!!! I don’t have the octagons yet, but I think I might give the circles a try and see what happens. Love your tutorials, Becca! Thanks for sharing with us.
Gorgeous what a wonderful tutorial to share. Thanks so much for taking the time.
That is gorgeous Becca! I am going to have to go try it!! Thanks for sharing.
Hugs,
Chris
You make things so easy! This is just delicious! I can’t wait to make some today! Thanks for taking the time to teach us once again.
Another fabulous creation! Thanks for sharing!
Thanks so much for a wonderful tutorial. I have my spellbinder dies on pre-order can’t wait to get them and make some of these flowers. The gift bag with the flower is so elegant but your work always is. Your eye candy is always a treat. I check your blog daily to see your latest. TFS Ann Lind
Thank you so much Becca! Your work is always so amazing and so very pretty. The tutorials are also VERY easy to follow. I don’t have any spellbinder dies yet, but hope to order some very soon. Take care and thanks again.
Wow that is fantastic!
This is over the top. Your tutorials are great.
Tried it with the circles but now I MUST HAVE the octagons.
This is gorgeous!!!!!!!!!!!!!!!!!!!!!!!
WOW! Now I’ve got to get myself those Spellbinders.
Thank you so much for creating this tutorial. When you did your previous post, revealing the new Spellbinders dies, I was captivated by this project, and tried to figure it out by eyeballing… well, that wasn’t very successful! So I thank you for taking the time to share with everyone how it’s done.
Just a beautiful medallion!
Thanks a lot Becca—now I just HAVE to go out and buy this. I’m telling my husband it’s all your fault! lol—seriously Becca–you make the greatest stuff!!!!!! This is one die I have to buy. Keep it coming.
Excellent tutorial and beautiful design!
I am sure you noticed Spellbinders is hosting a challenge (saw it on SCS) – this card should be entered! They want to see different ways to use their product! What a perfect example! It would be great to see a name I recognize to win! Go girl!
I can’t thank you enough!
What a well made tutorial – even I’ll be able to make these beautiful medallions now. If they’d only start to sell the dies… *sniffles*
Thankyou for your hard work and time , you are truly inspirational.
KATE TOY
Congratultions on the win Val! It was a fun word find, first time I have other done one, and seeing the other sites was great too! Becca you are a treasure!
[…] Spellbinders Ruffled Flower Medallion Tutorial […]
This is just beautiful and I have to try it. I learned of your blog from a friend who tatally admires your creativity, now, so do I !!
Beautiful and grade tutorial thank´s for sharing.
WOW! I love this. Your work is so inspiring. I might even give this one a try! :)
Hi Becca:
I saw the tutorial the first time you published it, but I did not comment, I cannot let this oppurtunity pass again. I think the flower is just gorgeous, I am going to try it today. Wonderful blog. Hugs.
How Cool Becca! Wow! The flowers are just beautiful. Thank you for sharing.
It´s is absolutly…sooooo wonderful!
Annette
Becca, your tutorials are very thorough & easy to follow! You do such AMAZING projects! I, for one, am grateful that you consent to share your designs & ideas with us! You, Becca, are AWESOME! I & my friends always love to see what comes next!!!
I’m not going to be able to get to my craft room to give it a try for a few days, but I only have the round scalloped circles … do you think these will work to create a blossom??
Anna Banana
I saw this in PaperCrafts magazine and just loved it. I attended the Creating Keepsakes Scrapbook Convention in St. Louis this weekend and when I visited Spellbinders booth, I asked how this was made. I purchased the Peony flower die template. I attended one of their classes and on of the kind instructors gave me your blog address so that I could get the instructions of how to make these. These are just beautiful.
I love this and I just got the octagons so I can make it! Thanks for the tutorial.
Bobbie
What a great tutorial. Thank you so much for making it look so simple :)
This is absolutely wonderful. I love your creation and the directions are fantastic. I will definitely be making some of these. Thanks so much for sharing this great idea.
Holy Wow!!!!!!!!!!!!!!!! I love these so much and I just got a set of these dies at retreat! Thank you so much for the tutorial!
These are fantastic and certainly gorgeous. Thank you for sharing such a great tutorial.
Job well done. I just ordered them yesterday. Thanks for the tutorial.
This design is great and so are you. I seen it in papercaft. I tried doing it by myself but could not get it right. There was no email address about you so I search your name and found your site. The turtorial is great also and now I won’t have to buy any bows.
Also I did mind with spellbinder circles and folded them without the scro-pal for those of you who don’t have the scro-pal or the die cut you can do it with just a circle cut and fold
Thank you, thank you, thank you! My friend showed me this neat ad she had ripped from her magazine as she wanted to learn how to do these beautiful flower designs and she asked me to see if I could find it for her on the internet. So for the past month I have been searching and today I hit paydirt. It is so well explained that I think she will be thrilled to be able to recreate this piece of great artistry. Hey, I printed it off for her and I am glad I can refer to this as well. I might have to try it myself. You are such an amazingly talented lady. God bless you. Verna
very clear tut and an amazing flower
thank you for sharing
ev
Thank you for the wonderful tutorial! I bought these dies this past weekend when the store owner showed me a card with one of these flower medallions on it, but I didn’t quite understand the directions. Now I don’t need to try to re-invent the wheel.
Smiles,
Anne
Dear Ms. Feeken
I have just recently discovered your site. You are an amazing paper artist! Thank you for the tutorials and the inspiration.
Hi Becca
Loved your cards they are great. I am looking for instructions for a snowflake made with the Fluer de Lis Pendant, could you please help me out as to what site I could go to.
Thanks
Mary
These flowers are just wonderful. I am attempting to follow your basic instructions and instead use the scalloped circle (I don’t have the octagon YET). Your tutorial is just amazing. Thank you for sharing your time and talents with us.
Wow, very nice
Take a look at my blog. greetings anja
OK..gotta try this! You are so TALENTED! God Bless you, Becca, for sharing your talents with others.
Beautiful and I love the end result. Edna
how utterly cool is this? :) tfs!
this is a very beautiful flower and easy to follow instructions. i have put off purchasing spellbinder dies for one simple reason (ok, 2 reasons). i bought the first wizard and tried as hard as i could to make it work for me. my problem lies in my arthritis. i did not know that they would come out with a much easier to handle red one later on. so i simply forgot about them. as of late (the last year at least) i have noticed them more and more and more on so many pieces of art. i am now going to start investing in them little by little and i like the set you used for these flowers. you have helped me decide which to buy first. thank you for the tutorial and the decision-making process.
Thanks for the tutorial! These are AMAZING!!
thankyou for sharing your excellent tutorial; it’s a very eye-catching embellishment and I look forward to trying it too.