
I’m back with a twist on the Circle Medallion tutorial that I put out some time ago. I guess it never occurred to me that it would be just as easy to make it with a square or rectangle. If you’re tired of going around in circles, here’s another frame type to add to your bag of tricks. Here’s the card I made to test the theory.
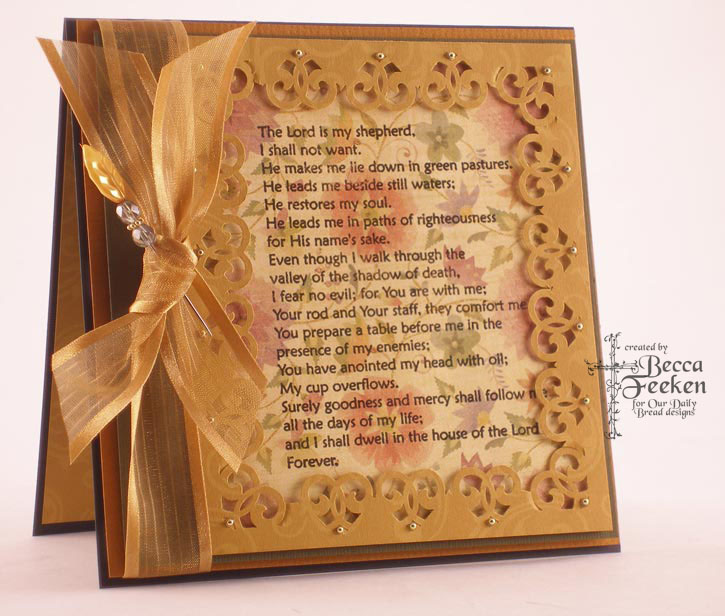

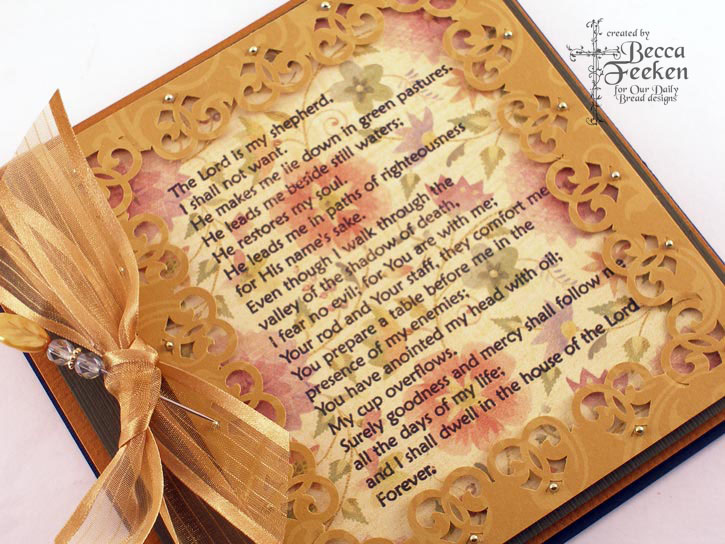
It’s as simple as making the Circle medallion! My sentiment is large so the frame takes up the whole card, but you can make it as small as you like. The sentiment I’m using here is one of the newly released stamps from Our Daily Breads Designs and the stamp is Psalm 23. Because the verse has a strong bold font, it can be used in so many different situations and still seen clearly like my in sample above which is stamped onto design paper.
Recipe:
Stamps: Our Daily Bread Designs – Psalm 23
Paper: Bazzill, K & Co
Ink: Adirondack Pitch Black with clear embossing powder
Accessories: Corner Rounder Punch, gold pearls, pin, beads, ribbon
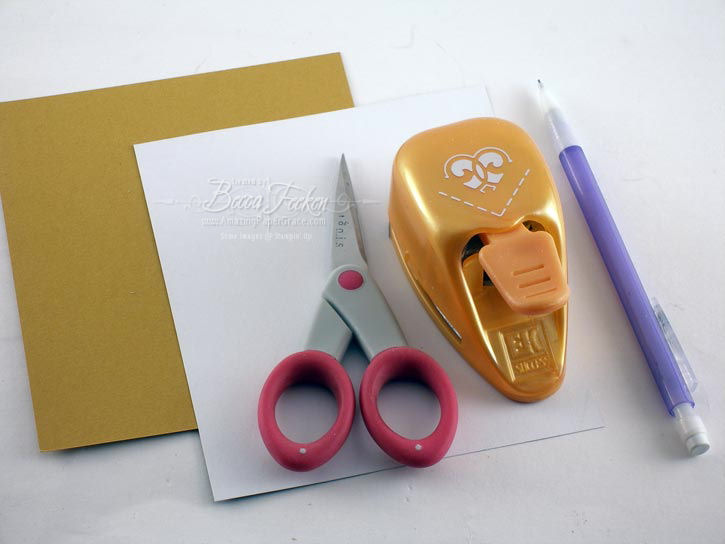
Okay, on to the tutorial, here are the supplies you’ll need:
Step 1: You’ll need a corner punch, a pencil, scissors, and two identically sized rectangular pieces of paper.
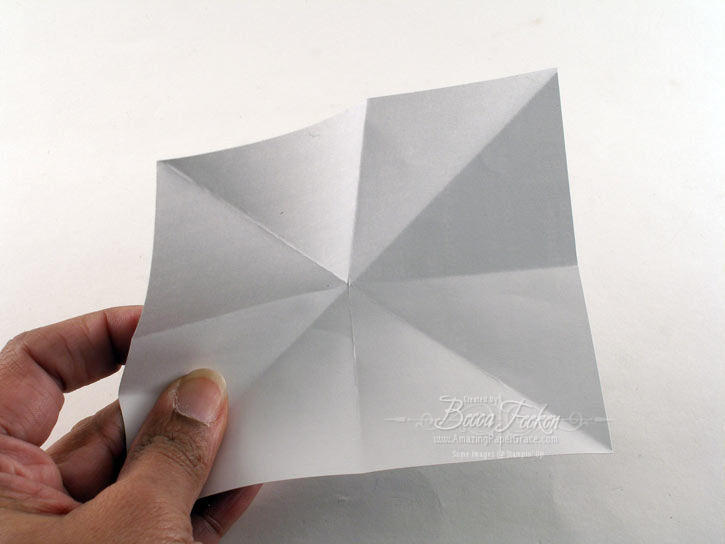
Step 2: Fold the paper into quarters.

Step 3: Fold paper diagonally, both ways. This will be your template for drawing lines.
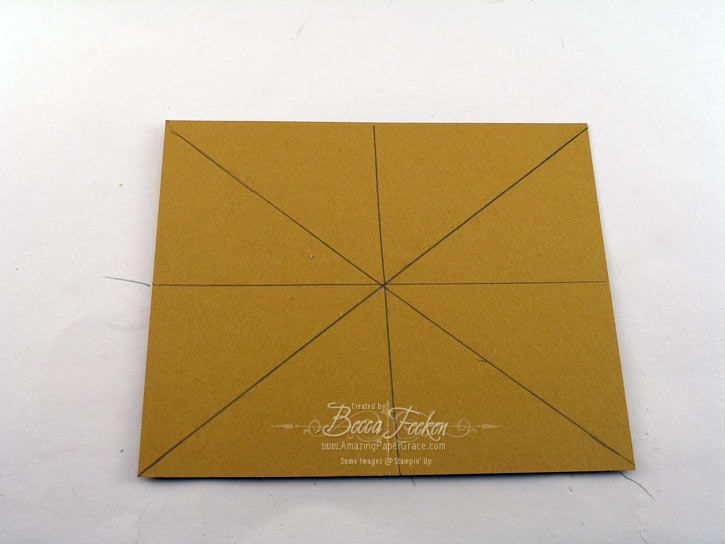
Step 4: Lay your template down on the paper you will be using as a frame. Using each crease as a guideline, take your pencil and mark each of the four lines onto the back of your frame.

This is what the back of your frame should look like after you’ve transferred the markings.
Step 5: Punch the corners and the center region of each side symmetrically. Please note that punches are sized differently and your rectangle will be a different size from my rectangle.
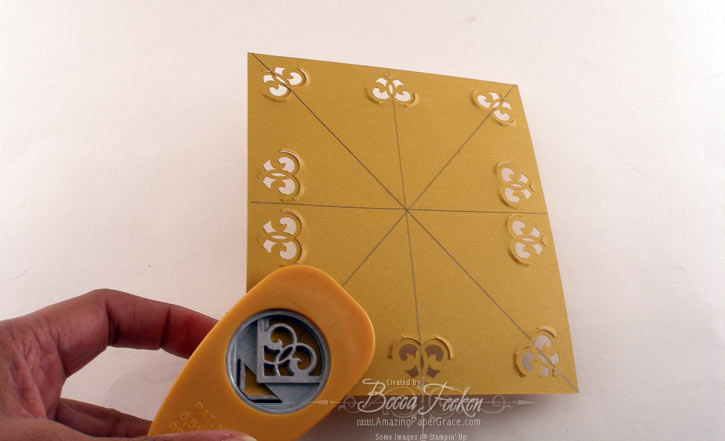
You may have to play around with this to find the best way the punches will fit. Finish off by punching out where you have remaining gaps.
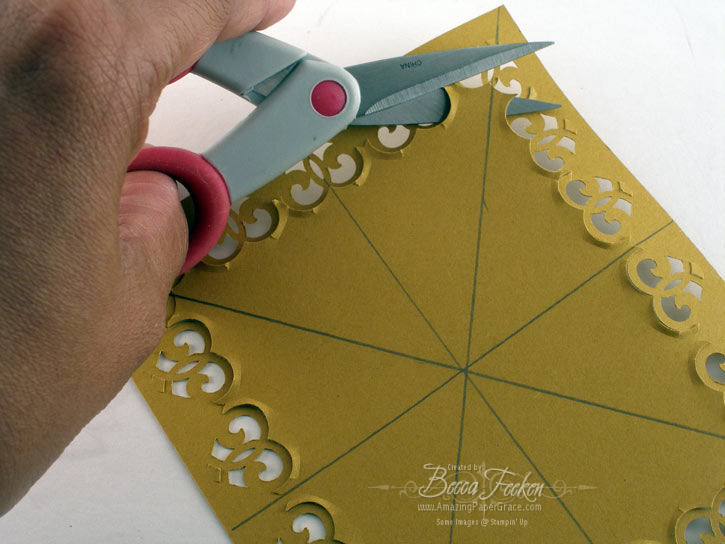
It the center doesn’t fall out on it’s own, simply take the scissors and trim any connecting points. The result will look like this:
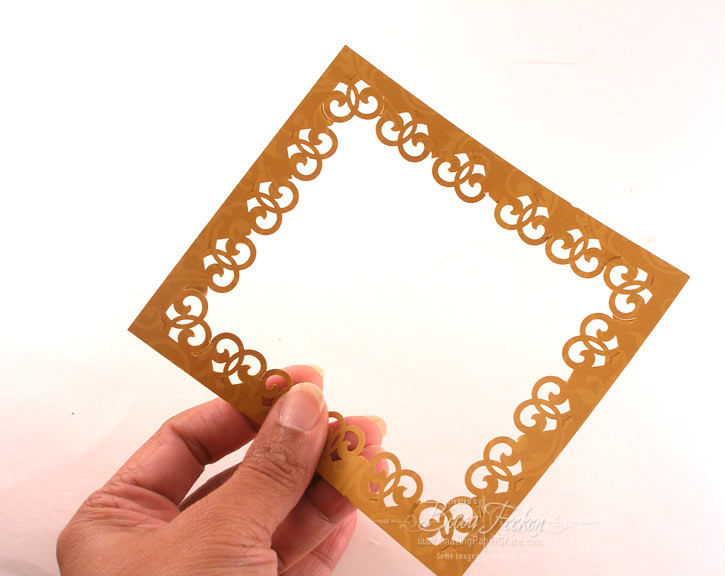
Your frame is now ready for any embellishment you desire and can be added to your card!!
I hope you enjoyed this new tutorial! Get adventurous – try any rectangle or square you like!


B
e
a
u
t
i
f
u
l
Your card is beautiful!!
Thank you for the tutorial. I am definitely going to give it a try with some of my punches.
STOP STOP!!! They just keep getting better!!!! love it, have to go try this out!!!
Your frame is gorgeous, so delightful.
OH….MY…..GOODNESS! Seriously – like I said- HOW do you come up with this stuff! I am going to Hobby Lobby today to get a corner punch. Can you believe I don’t have one that is decorative!?!?! This is too pretty!!
WOW !!! this is one terifc card thank you for your idea’s , how do you think of them all, you must never sleep. I have this punch so I will have a good look at it again, you are one talanted lady thanks again.
God Bless
Another gorgeous card!!! What were the dimensions of the template you used for this example?
Thanks for sharing another one of your beautiful cards. I love starting out my day by checking your blog. You are so talented!
Hooray, I have the same punch you used so will be giving this beautiful border a go. Thank you.
Becca, WOW!!! I must get me a corner punch so I can do both of these looks. I am finding that the corner punches I have are edge punches and do not work like the type of style you have. Awesome look and thanks for the step by step instructions.
Blessings, Betty
Beautiful frame and a gorgeous card!! Thank you for the instructions!
Brilliant! I love the way your mind works! And the gorgeous results. This is just pure loveliness. :O)
Stunning! I am going to have a go.
thanks for sharing and explaining it all so clearly.
gorgeous card, and another wonderful tutorial. Thanks so much for sharing with us.
Your design is simply gorgeous. I can’t believe I’ve had that same punch for years and never used it. I had to try it and it turned out great. Thanks for your creative mind and talent.
Gorgeous!! Love the new idea on the corner punches.
Gorgeous card and great idea. I never thought to make on with a square or circle either. It looks so awesome with that stamp too. That would look great framed on the wall too. Man, I gotta get that Guardian Angel stamp and make one of these for my daughter’s room. Thanks for the great idea! by the way, still not getting your new posts emailed to me. Strange!
Lisa
Thanks Becca!! This is beautiful!!! Hope you are having a great day!
hi becca
your cards are always so lovely, cant wait to look on your site daily to see what you have done. thank you for the instructions too.
so many of the sites i peek at are so good, and most are from the usa…i want to come over just to visit the craft places.
Becca, I love this card, i liked the circle one also from awhile back and I have thing to try but this is calling my name, also love that punch :)
Good evening Becca- a beautiful card and such a gorgeous frame- thank you so much for your tutorial. I must give this a try.
Thanks for sharing this with us !! I just bought this punch at my LSS today I thought wow!!! She reads mines to!!!LOL!!! Thanks again !!! Love the card. Kim Holochak
Gorgeous!! Great tutorial too!!
Oh my goodness Becca your card is beautiful. Your colors are awesome and the entired card is just perfect. Thanks for the tutorial too.
Joan
OMG – Becca – this is soooo gorgeous!!!! I desperately need this punch!!!
WOW Becca, that tutorial is awesome…….and that card is GORGEOUS!!! Thank-you for sharing it with us!!!
You’re so gifted!
I have had that punch for a long time and have used it maybe 3 times. I will be using it for sure now! Thanks for the tutorial!
Amazing!! I NEED to buy that punch now!!!
hugs, Jami
Awesome-as always!! Your work is such an inspiration for me! And I have been able to make some of your projects-they are “almost Becca”!!
Just wondering where do you find the beautiful pins you use in your bows?? Thanks!!
Becca, you are AWESOME! I love that you’ve figured out all this for me!
You were the Tutorial of the Week at Card of the Week.com. You can see the original post here.
I did use a picture from your post, with links back to the site and the original post. I hope that is OK. Please feel free to email me if you need me to change anything.
I also have an “I was featured” on badge for you if you want it :D
Thanks again for sharing!
Great Tutorial as always!! Thank you so much Becca. Your card is Beautiful!!!
Becca,
Two little words that mean so much…..
THANK YOU!
~~Diane~~
Thank you. You are a gift.
This is a great tutorial – will flag it up on my blog for you if that’s OK – think everyone should see this!!!
Kathleen xx
OOH, Another great idea! Thanks for the inspiration.
WOW! I am AMAZED of the talent you have and the ideas. I can’t wait to try this out. You are such an inspiration to all of us. TFS!
gorgeous Becca! Believe it or not, I had this same idea after doing one of the circle frames but I just have not had time to try it yet. So, ya beat me to it and saved me trial and error LOL. Great tutorial too. Blessings!
What a beautiful piece and thank you for sharing the ‘how to’.
xxxxxx
Such clear and exact instructions. And a great card!
Thanks
Becca, you simply amaze me…this is by far the most gorgeous card I have ever seen done using this image…and I have seen many beautiful ones…but framed like this… AMAZING!!! SIMPLY STUNNING!!!!
Hi Becca What a fantastic tutorial. You are a real star. Had the puch about a year only used it twice. Will realy be trying this one. Your card was exquisite. Like how your mins works, thank you for sharing your ideas with us. Blessings Christine x
I don’t even know what to say i am so speechless! Your tutorial was awesome but I was exhausted just looking at it! this card should be in the Card Hall of Fame
I am speechless – simply beautiful!
This is beautiful Becca.
Ohh its so beautyful! Thanks for the tutorial! I have been wondering how you do it, now I know!
I have an award for you in my blog, Becca!
Have a nice day!
From Desiree in Norway
Absolutely gorgeous!!!
What a wonderful tutorial! I checked it out from card of the week.com. Thanks for your generosity in sharing your amazing talent.
gEnIuS! YOU are a paper genius.
Your card is just beautiful!
Your card is just beautiful!
OHH I love it so much! Another gorgeous card!
Thanks for the tutorial! I really appreciate you taking the time to show us the how to’s.
I must say, your cards are absolutely gorgeous.
Thanks for the great tutorials.
This tutorial is just awesome – just like all your tutorials – what will you have for us next?. Thanks ever so much for sharing your wonderful gift so freely it is truly appreciated.
Greeting from Austra;oa
Marvellous Tutorial as always Becca you just keep getting better and better. Thank you so much for being so generous in sharing your wonderful talent.
I see further back in the comments # 17 that someone else isnt getting email updates either, very strange.
Very cool. I did the circle and it waas wonderful. TFS
WOW! This is great. I finished my card and you can view it here. It was really fun and looking forward to more of your ideas.
Thanks!
Bonnie (okstamper)
Love it. Another beautiful addition.
Ter:)
A gorgeous card Becca, I was going to try this with a rectangle for some Christmas projects I’m working on and low and behold you did all the work for me, you’re so sweet to share your tutorials, thank you so much!
Gorgeous card!!! Thanks for the tutorial.
Trish
Oh Becca, You are an amazing talent. Truly! I love that you are extraordinarily creative and super inventive. Love how you venture outside the box for new ideas and new tricks. YOU’RE such an inspiration!! Thank you for sharing your wonderful ideas/finds. :) America
WOW! This is stunning. I’ve had this SU punch for several years and didn’t realize I could use it on the straight edge because I figured it out by taking the adapter off. I thought I had to use it on corners only. Great tutorial.
Becca your eye is just amazing! The way that you consistently combine stamps, paper, ribbon and now these wonderful punch frames into awe inspiring beauty. I just love to view your blog and see what creation of the day this day brings. You are one talented lady!
Thank you for sharing this brilliant technique. I never knew a corner punch would have so many uses!
Beautiful Becca and so clever…can’t wait to try it!
Another masterpiece and fabulous tutorial. You so rock!
Very beautiful card! I love the new shape for this tutorial. Although I have not tried the other one yet, I did buy all the shaped punches I just have to get them out now and use them. I really love the different uses you are coming up with for us to use them! Very creative and beautiful. Thanks for sharing.
Your card is beautiful. Thanks for the tutorial, I’m off to do some.
Hi Becca — I really liked the circle punched frame….but I LOVE this rectangle one even more!
WOW – what an inspiration you are!!!
Hugs,
Debi
You are amazing…….and inspiring. You make me so happy. Your tutorials are the best out there. Thanks!
Becca, it’s stinking GORGEOUS, you’re a genius, I LOOOOVE coming in to your blog for inspiration!!!
Hi Becca, being a new veiwer of your gorgeous work, I must congratulate you on your use of the EK corner punches, they do make some lovely frames.
I was asked at the UK’s, NEC last weekend to pass on your website for them to see the ways you use them and to hopefully show on their own website more uses of them.
The company that was inquiring was Card-io, they are the main importers of the Stamp Tapestry stamps.
GREAT TUTORIAL!!! Thank you. It was very kind of you to share your great talent with us. I hope you know how much it is appreciated.
You deserve an award Becca. Is there a place I can vote for you?
Cheers to You,
Dot
WoW how cool is this?? Way Cool!!
Outstanding Becca! How great it is to have one more use for these rarely used punches! Thanks for sharing your creativity- it is fabulous!
Beautiful card….and such clear instructions……Your work is truly amazing. I love coming to your blog…..Thansk for the ideas and inspiration.
Wow, this is a stunner. Thank you.
Good evening, becca – have been absent for a few days- this is such a great tutorial. I just love it and will certainly give it a try.
just gorgeous! I’m so glad I never got rid of this wrought iron punch! this is so beautiful it needs to be framed & hung on a wall TFS!
This is so cool, thanks for sharing!
Could you tell me where you purchase your pins and pearls, please??
Thanks so much,
Char
Hi Becca,
You have a wonderful talent from God! and you use it beautifully. I love your blog and your creations. This card is stunning. Thank you so much for sharing God’s gifts with others.
Mira
Wow…what a fabulous and beautiful idea! I am so happy that I found your site. I have many many punches and now have a much better use for them than before…thank You!
Marian
Wow that is awesome, I don’t have this punch, but I am sure going to look for it!! Thank you for sharing.
[…] these two tutorials – the first uses a corner punch to create a circular frame, the second uses a corner punch to create a rectangular frame. Well now I have a twist on those two tutorials and have used the corner punch to make an […]
Absolutely beautiful. Thanks for figuring this out and sharing it with us. I love it…
Wow! That card is wonderful! I can’t wait to try it! Thanks so much for sharing your great creations!
Great turorial, thanks for figuring this out.
luvstamps
This is perhaps one of the most beautiful cards I’ve seen. And to think how simple it is to make.. You truly inspire me.
I just found your blog because of the Spellbinder’s Frenzy… but trust me, I’ll be back..
Thanks for the inspiration
Thx, this has definitely made my day!
_______________________
wtf
Becca, I am totally new to your blog and loving every minute of it. Thank you so much for sharing this tutorial. It’s absolutely gorgeous. Can’t wait to play with my corner punches now! Again, thank you – your blog is awesome!
Hi Becca, HNY 2 u & ur family. Would u pls share me with where u purchase ur pins that u use on ur cards r do u make them. Oh my gosh ur cards r my dream fulfilled, I love them & yes GOD has definetley blessed u with a great talent.
Thank u n advance 4 sharing the info.
Blessings
Gloria
I love this tutorial! thank-you so much I am going to give this a try today…
Your blog brings me such inspiration..
Thank-you, Christina
Thank you for the very clear tutorial, I may be able to make a card somewhat like this with your instructions. I wish I had all your punches, spellbinders, stamps and paper and most of all your talent.
Thanks so much!
Becca,
This is the most beautiful card I’ve seen so far. THe tutorial is so helpful. I copied your card for a minister’s wife baby shower card
and it turned out very pretty. I was very luck to have the (wrougth iron) corner punch that you used. Thanks so much.
Inspired-N-Texas