
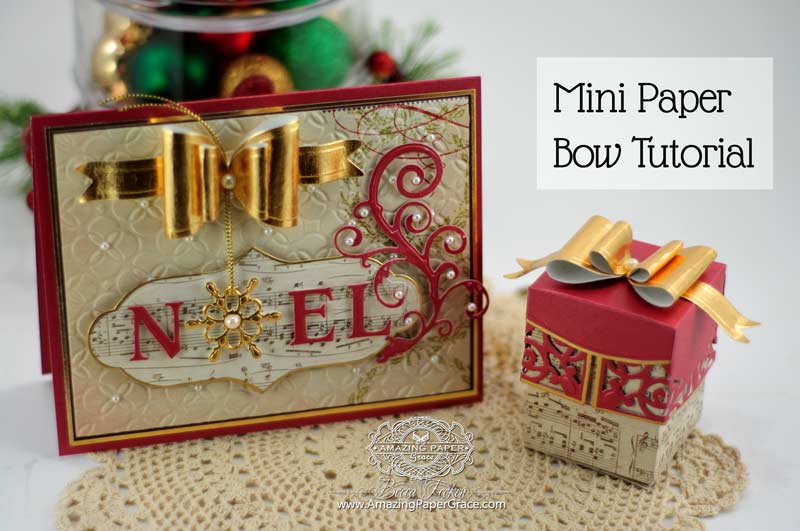

Hi, it’s me again!! I have a teeny tiny three step, three minute tutorial for you today. In my wanderings on the internet I’ve seen the cutest paper bows. On closer introspection, the shape of one caught my eye, but it was flat and I didn’t have the items they used. Light bulb moment!! I wanted it in 3D it with common dies from my stash, turned out to be easy. In fact, it was the inspiration for my card today that almost feels naked without a stitch of ribbon, but squeaks by with a plump paper bow that’s just begging for a box to go along with it :-)
The tutorial steps are listed below. Click HERE to go to the pin on Pinterest.

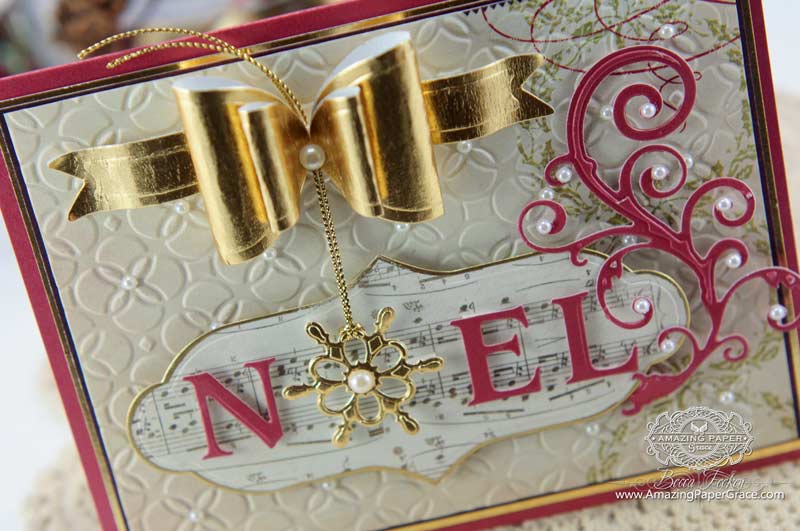
Here’s your Step By Step Recap of die cuts and layers, from the bottom up: Start out with a Card Base made using 4-3/4″ x 6″, foam tape, gold matting layer cut to 4-1/2″ x 5-3/4″, burgundy matting layer cut to 4-3/8″ x 5-5/8″, design paper layer cut to 4-1/4″ x 5-1/2″ and embossed with Spellbinders Whimsy M-Bossabilities, foam tape, die cut layer using Spellbinders Labels Thirty Three, foam tape, die cut layer using Spellbinders Font One – Uppercase for the ‘N-E-L’ and Spellbinders Create-A-Flake 5 for the ‘O’, embellish with flourish from Spellbinders Jewel Flowers and Flourishes, and bow described in tutorial above using Spellbinders Charmed I’m Sure and Spellbinders Classic Ovals SM.
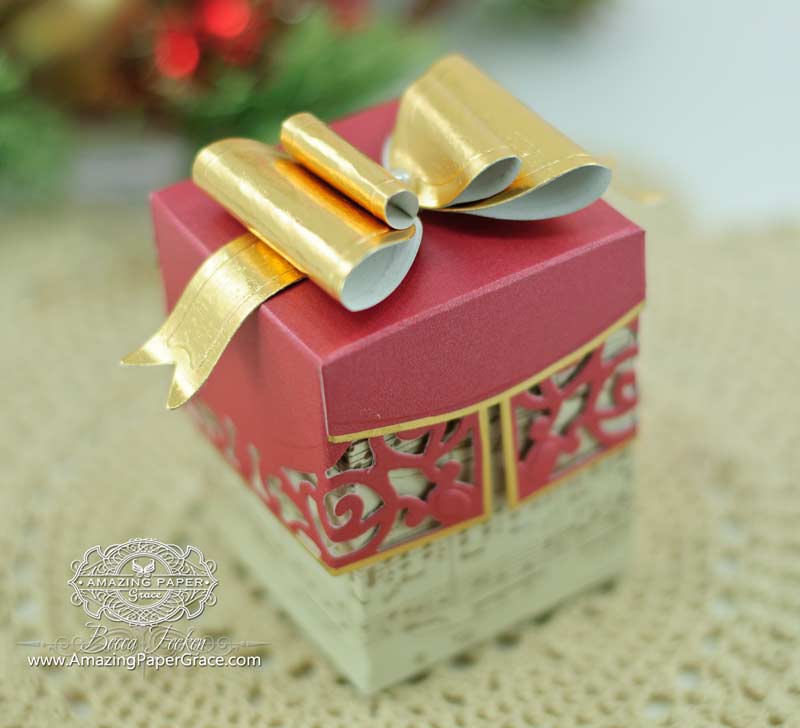
If you’re curious about the box, it’s an easy one made using Spellbinders Filigree Delight. I have a video to show you how to make the box HERE. The box in the video is 5-1/8″ tall while my box today is 3″ high – I simply trimmed it down until it was just the right size to go along with my card. Plunk a bow on top, and you’re in business :-)
As you know, I love boxes, if you’re interested in giving another box a whirl, here’s one you might have a go at https://www.amazingpapergrace.com/as-promised-filigree-box-tutorial/. (I’m hanging my head, as I know I owe you a tutorial on a box I did in August – it is coming :-))
| CRAFT SUPPLIES I USED |
| Rubber Stamps: None Craft Paper: Recollections – Holiday Shimmer, My Minds Eye- Lost and Found Christmas, DCWV Foil Cardstock Ink: None Accessories: Spellbinders Whimsy M-Bossabilities, Spellbinders Labels Thirty Three, Spellbinders Font One – Uppercase, Spellbinders Create-A-Flake 5, Spellbinders Jewel Flowers and Flourishes, Spellbinders Filigree Delight, Spellbinders Charmed I’m Sure, Spellbinders Classic Ovals SM, Recollections Pearls, Grand Calibur Die Cut Machine |
So, in my wanderings through Facebook, Pinterest or somewhere, someone said “only 10 more Saturdays until Christmas”. Lol, my post today is a panic response to that statement! I know there’s still time but please keep telling me things that will light a fire under me okay? It’ll be here before I know it and I’m lollygagging :-)
![]()


Oh my goodness, how wonderful, thanks for doing the tutorial, I love it!
Love it Bekka’s. Well done for thinking of this. X
Very cute. How resourceful you are, Becca. I will be going through my supplies to see what I can use as I don’t have exactly the same dies. One thing that I have learned from following your blog is to ‘think outside the square’!
Brilliant idea Becca!!
Love the card and your bow, so pretty. I know I will be making this bow for some of my cards and boxes. Thanks you always inspire me
Stunning card and bow here again Becca, and thanks sooo much for the tut here, you´re always sooo clever to think out a way for everything and so sweet to share it with all of us, and it always looks like a million too. I love it.
Have a wonderful week-end hun and lots of fun.
Absolutely delightful little bow and who would have thought that glueing those ovals together would make this? YOU! You are in your realm of creativity!
Hello Becca
I must say thank you, for all the wonderful tutorials on your blog that I simply adore!
Lovely card again Becca!
take care
LoveMarg
How cute! But I prefer regular bows with your bowmaker (now that I have mastered it). Card is delightful.
Hugs
Mstgane
Ann
Fantastic card and box ,just watched video it’s great .Very clear instructions.Laura O
So cleaver wish I could be a bit more inventive with my crafting! keep up the fab work :) x
Beautiful bow, Becca! Love the easy look of the tutorial too. Thanks for sharing. ?
Hi Becca,
what a marvellous idea, and so simple! Even I can do those bows (lol)..
I’m panicked now by the mention of 10 weekends!! Must get cracking.
Hugs, Rose
Hi Becca – great bow ideas – will use that. Love the word ‘lollygagging’ haven’t hear that before – Sue Wilson uses ‘katywompass’ and ‘womperjod’ (not sure I’ve spelt those correctly!) for wonky or skew wiff – great words also. Tattered Lace have just bought out a filigree bow die – saw it for the first time a couple of days ago – haven’t got it yet but it’s on my list of must haves – its lovely! Still working on gatefold card for our 25th Wedding Aniiversary – front is done, inside side panels done – just the inside main panel to do and final embellishments – will send u a foto when I finish it. Thanks for sharing all your wonderful ideas.
Becca,
What a beautiful bow and so easy. Something I will have to try- once I get the dies. Thanks so much for all the talent you share with us.
That is so clever! What a great idea!!! Thanks for sharing and have a wonderful weekend!
How creative Becca!
Thanks for sharing with us.
What a rich n wonderful set !! I loved the idea to make bow ..thanks for the tut !
So impressed, great tutorial of a gorgeous paper bow! You are SO creative!
Very adorable! And I love that you did it without a “new, specially developed die”, just for that one purpose. I absolutely all the new dies that come out, but my budget doesn’t. So, thanks, again!
wow..how cool… and gorgeous.
Absolutely stunning Becca! LOVE how you created these bows!!!!
WOW BECCA!!!!!!!!!!! I would have NEVER THOUGHT to use those dies to get a BOW!!!!!!!! DAH!!!!!!!! :P YOU’RE SOOOOO CREATIVE!!!!!!!!!:) KEEP UP THE FABULOUS WORK BECCA!!!!!!!!!! WE LOOOOOOOOOOOOOOOOOOVE IT!!!!!!!!! :P SENDING HUGS TO KEEP YOU GOING!!!!!!!!!!!:) AND I LOOOOOOOOOOOOVE your creations today!!!!!!!!!!!!!!!!!!!!!!!!!!!! JUST BEAUTIFUL!!!!!!!!!!!:)
Becca! Outstanding! You are so clever! Simply beautiful! You are the queen, of getting the most use out of your dies!
A die, simply does not lay around, at your studio!
Thank you for sharing your absolutely outstanding ideas!
Your creativity never ceases to amaze me, Becca! Gorgeous bow and card.
Your bow is gorgeous, as all your bows are. Thanks for the tutorial.
Darling and so creative! LOVE IT!
WOW !! That is so cool !! Love it !! Can’t wait to try it !! Thanks !!
What a clever and pretty little bow! Thx for the nifty instructions. Your Christmas card is so pretty and full of personality. Yours, I guess. In any event, you nailed it and some lucky person will enjoy receiving it. A really lucky person.
Another beautiful card! The paper bow is great. Thanks for sharing.
you are a genius Becca!
I would never think of an oval tag to make a bow?!
I hope and pray you feel better soon!
and by the way, your girl will love your card! Clear boxes are awesome!
Love,
Milu
Now that is just super cute and I will utilize this tutorial. I have got to get busy on Christmas!!!!!
Wow Becca…. you are truly awesome… this is so simple and you are so generous in sharing with us. Panicking now…,. 10 weekends!!!! oh my…
Hugs
Heather (UK)
x
LOVE!!!! I LOVE this bow!!!! So easy, and soooo cute!!! Must try…
Thanks, Becca!
I absolutely love this, Becca! I will be using it, too! Blessings to you!
How wonderfully creative!! As usual I am astounded!
how cool and simple. trust you to make something so easy for us to do.
Becca, your creativity continues to amaze us! We’re you really good in Geometry? Never in this world would I imagine making a bow from Spellbinders Small Ovals…maybe I can make one! Love your talent and thank you for sharing your crafts!
Becca, I tried this tonight with red instead of gold, separated the two sides a bit and added a dogwood flower and leaves from Susan Tierney in the center instead of the pearl. Just beautiful. Thanks so much for the tutorial. I will be making 4×4 boxes for Christmas gifts that will wow my family.
Fantastic paper bow! Thanks so much for the tutorial!
Becca,
You have to be the smartest crafty lady in the craft realm. In my wildest musings, I would never have thought to use these dies to create a bow. WOW!
What a great card! Thank you for the bow tutorial; it’s certainly easy enough that anyone can make a great bow!
Awww, too cute!
Hi Becca. Briliant tutorial for this lovely bow. You really are so clever for using the dies that you have! I will be having a go too. Gorgeous boxes and card. Take care.
Excellent!
Morning Becca, Wow !! Wow !! and triple Wow !!, what a clever girlie you are, and the bows are gorgeous. I will definitely be having a go with these. Thank you for the tutorial.
Lots of love from Patricia xx
PS I can’t believe where this year has gone, and I, too, am panicking ha ha xx
Aww so so beautiful , thank you for this
Elaine H X
That bow is awesome Becca! Thanks for sharing the idea…but wow only 10 more Saturdays to Christmas…oh boy, I better get dynamite under me! lol!
You are so clever…and that card is gorgeous!
You are so clever!
Oh Becca, I too,continue to be astounded with your creativity you share with us. I love your gorgeous paper bow. Thanks for sharing your tutorial with us.
I have tried to create a paper bow with Stampin’ Ups! Oval punches for the loops and cutting paper strips for the tails trimming them however.
Hugs, Cindy
Stunning! And clever use of the dies for sure!
Stunning card, thankyou so much for the tutorial.
You just are so creative, and that looks terrific in the gold paper!!
Hi Becca…I don’t know if this belongs here but I had to comment on the Honey Comb ornament tutorial. I’ve always wanted to do that ornament as it is so beautiful. thank you so much for the tutorial for folks like me we are very happy to see it. I’d forgotten about it and now found it again. It is so beautiful and I’m going to do that one. LOL
Thank you Becca for being so gifted and sharing this gift with all of us.
I hope you are happy and doing well. Thank you again Becca for your great tutorials.. They are fantastic and I would encourage anyone to look them up and watch them again. We may be ready to do the project this time.
take care Becca and GB
pat…love your blog.
Very beautiful palette