
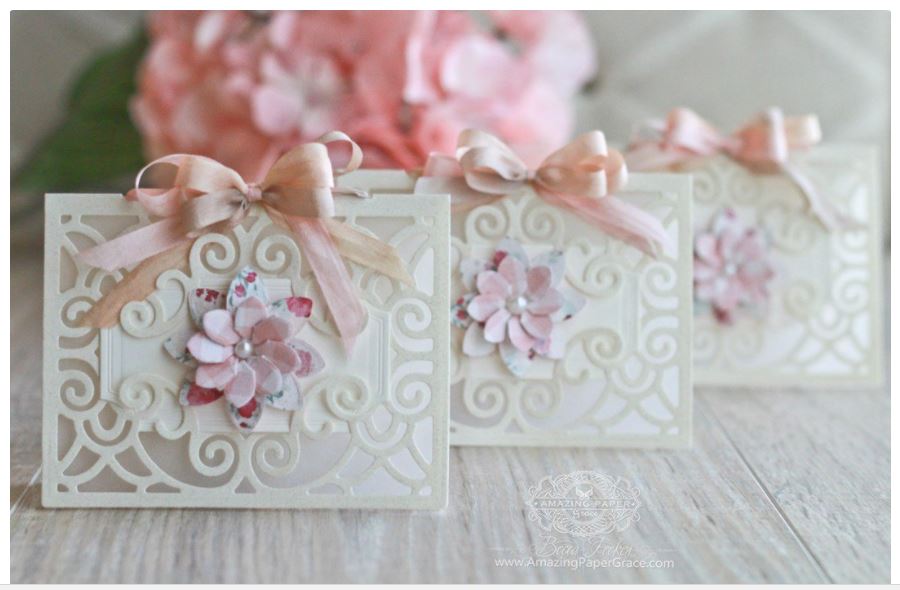

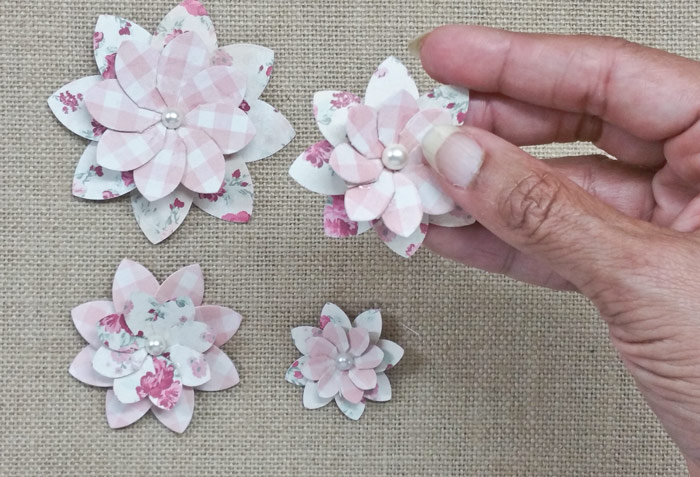
Good morning sweet friends!! I wanted to pop in and share a step by step walk through of how to use my new Fold and Go Flowers – S3-251 Vintage Elegance Round Fold and Go Flower and S3-250 Vintage Elegance Angled Fold and Go Flower. The design team has been posting lots of inspiration using the flower and once you see how easily it goes together, you’ll be able recognize the lovely ways it is being used. There are many pieces in the Vintage Elegance Collection that were designed to be embellished with this flower. Today I’m using it as a focal piece on a mini card ensemble made with Spellbinders S5-289 Filigree Booklet Die. I’ve received many puzzled looks from people when actually looking at the die and then a look of “aha” when they see how it is assembled. Since it is a double decker flower and shows two sides of paper, that gives you a lot of options and of course you can always use a solid piece of paper. The folding (along score lines) gives the petal it’s final shape and a unique texture not seen among other flowers. Double decks add lift to the flower but it’s so great because these flowers can be compressed to go through the mail flat!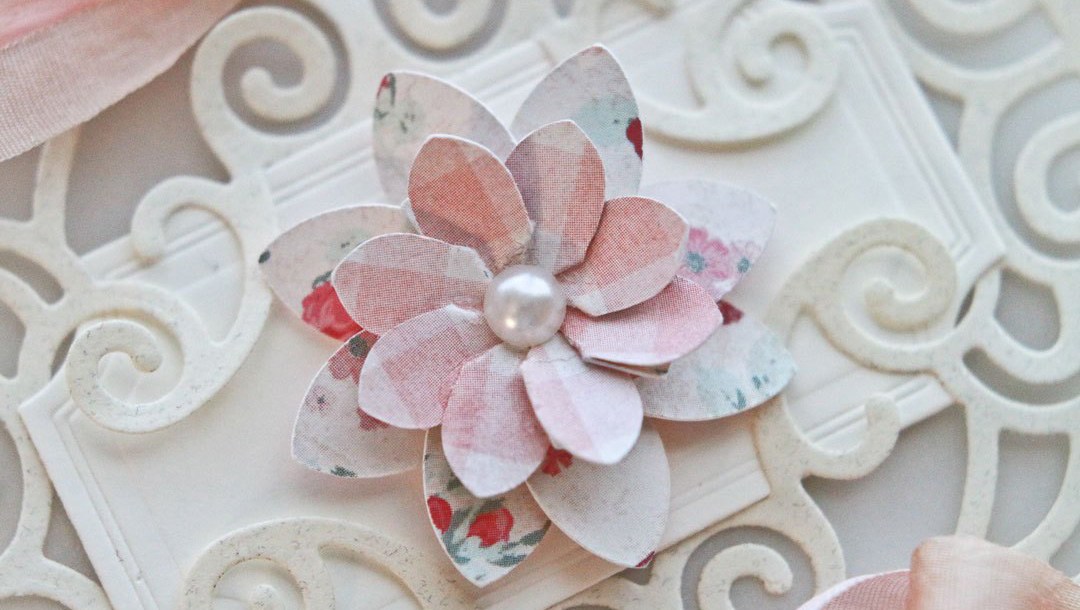 I consider myself flower challenged, I like to design dies for flowers that are easy to put together and will look the same every time you make them and you don’t have to be a flower master to master them. Dig through your stash and find a paper that has design on both sides – small patterns work best. You might even try a solid/print combinations. No worries if you don’t have any double sided paper – one color works just as well. The set comes with four sizes of petals – I often run the whole set, all sizes at once, and reserve the extras for later. You need eight same sized petals for each flower.
Let’s get started:
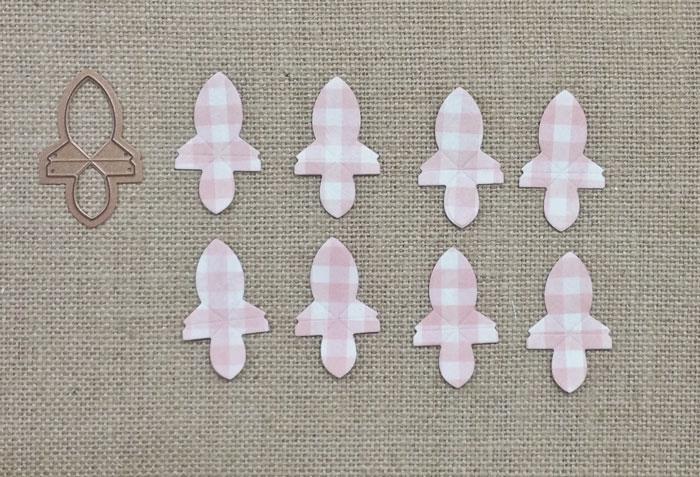
1. Cut eight petals from the desired petal size.
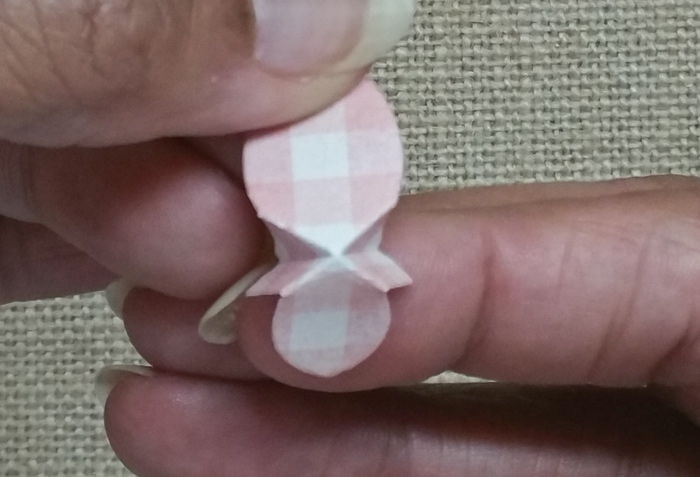
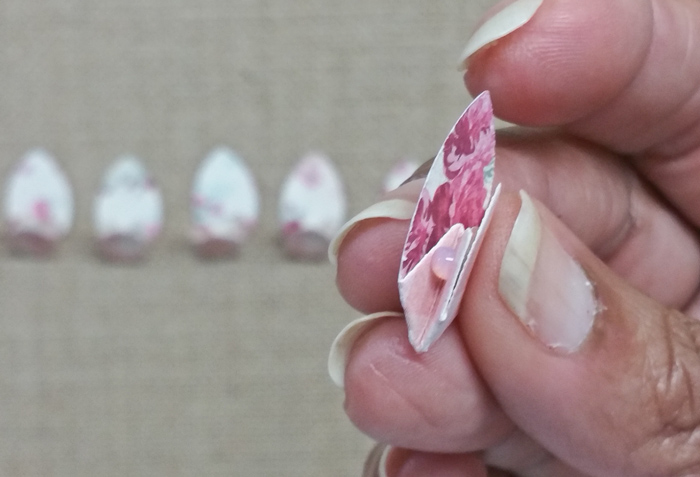
2. With right side facing up – identify ”x” shaped score line that is intersected by a horizontal line. Fold right sides together along horizontal line then open petal and bend wrong sides together along each side of ‘x’. Bend petals together again and tuck the horizontal arms to the inside so that the result are two stacked petals that come together at a point.
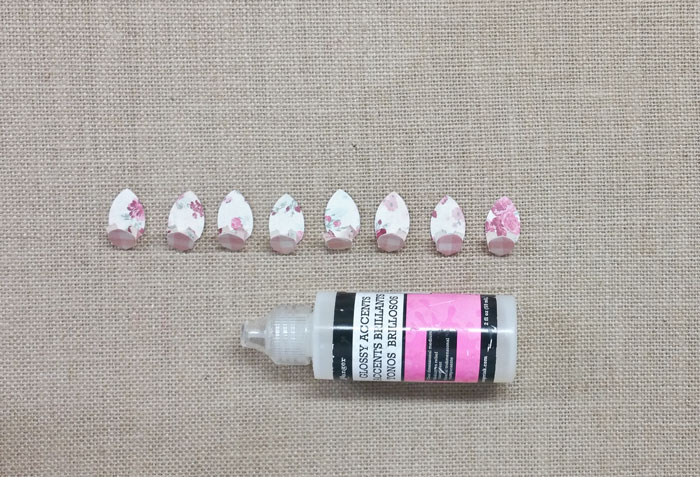
3. Fold all petals in this manner in preparation for glue – Glossy Accents (recommended). Begin by holding a petal with folded point at bottom.
4. Place a drop of glue inside the left valley.
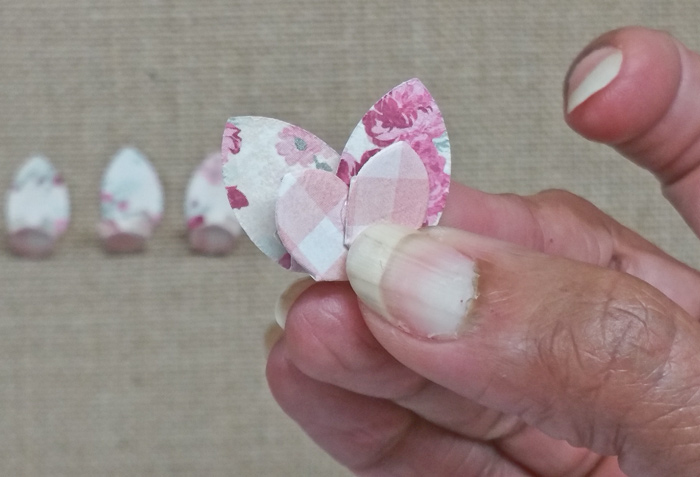
5. Seat next petal into the glued side with the largest petal all the way to the back and the small part of the petal clicks into the valley. Push all the way in until the new petal no longer moves.
6. Repeat steps 4 and 5 until there is one petal left.
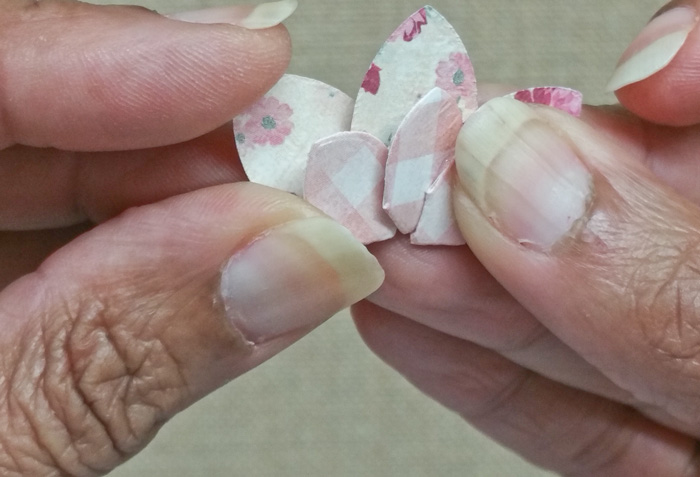
7. Put a drop of glue on the left and right side valleys then insert into the final slot.
I’ve made many sizes of these flowers and now reach for them as embellishment on gift bags and wrapped presents!

Stamps: None
Paper: Neenah Classic Crest – Natural White – Cover – 80lb smooth, Paper Studio Vellum, My Minds Eye
Ink: None
Accessories: Vintage Elegance Collection, S3-251 Vintage Elegance Round Fold and Go Flower, S3-250 Vintage Elegance Angled Fold and Go Flower, Spellbinders S5-289 Filigree Booklet Die, May Arts Silk Ribbon, The Paper Studio – Pearls
I wanted to introduce this flower and show how to put it together before sharing the lovely inspiration the ladies of the Creative Team have dreamed up. I’ll be back tomorrow with their creations!


Hi Becca
Flowers seems to have taken over my crafty life at the moment I really can’t get enough of them. These look great … I’m sure they will become another addition to my flower colection. I love the double feature. Really clever.
Love as always
Joanna (ourjojo) ?
Love these flowers, but I think I need a video to actually see and understand it. I hope I am not the only one who feels that would be helpful.
Morning Becca, I love receiving your posts, though I don’t always leave a comment. Your cards are always so beautiful and today is no exception. The flowers are stunning and this die is definitely a “must have” die. Thank-you so much for sharing your talent with us.
Wendyx
Morning Becca, What a fabulous tutorial and a fabulous flower die set, so effective in this double sided patterned paper.
Lots of love from Patricia xx
Good morning Becca, what a sweet way to create a beautiful flower!!! Looks like you could have loads of fun with these!!!
Have a good one!!!
Loopy Lyndaxxx
What an awesome flower here, and the cards are just gorgeous made. Fabulous work here once again Becca.
Becca, these flowers are beautiful. What a clever design and I love the way you have used the booklet die to make the notelets – they look really pretty.
Doreen R
Hi Becca these flowers look so good with the two patterns
it’s a good look !
Lots of different ways to mix and match can’t wait to see
more of them …….. Hugs Pamxxxxxx
I’m like Lynne b, I’d love a video too…think I got it, but, I do better with a video ..card is lovely as always..please and thank you
Hi Becca
Perfect beautiful flowers ,thank you for the tutorial.
God Bless
Elaine H X
Your step by step shows how easy it is to make these flowers! Thank you!
Wow Becca, these are great little flowers and look pretty easy. HOPE YOU HAD a great family hoiday.
Hugs
Ann R.
Very beautiful flowers. Congratulations on another making of a die.
Well…It looks easy enough…will have to try it my self.
Thank you Becca for your tutorial – and all the other tutorials you’ve put your heart into! You have made a big impact on me, and my outlook on what I love to do. I am pouring myself, my hours and my days into creating the kind of cards I’ve always dreamed of and it doesn’t matter how long one card takes to create! You are my bright and shining star – and I want to thank you for your time and effort poured into your work.
Hugs Dianne
Aren’t those just cute as a button? Can’t wait to see what all you do with those!
Stunning card and the new flowers are so pretty and dainty. Thanks for sharing the tutorial.
What a charming little flower, Becca. I love the dimension/layered look you get with this flower design. I think I will find many uses for this cute little flower.
Wow! That is pretty darn cool! Appears foolproof IMHO. You keep amazing me with your designs, Becca. Thank you so much for sharing all your creative talent with us.
I have been looking for things that don’t thicken up a card I will be mailing. Sometimes, all the thick flowers are a little over-the-top for the occasion on non-occasion celebrated. These would be perfect! With the right designer paper, they would work well on a man-card, too. Good show, Becca!!
Hi, Becca,
Well, this is inspiring…you made me aware of this product, showed me how easy it comes together and highlighted that it lays flat, which is a feature that I prefer when adding flowers to my cards. This die will surely become part of my craft supplies!
It’s been great to see posts from your creative team this past week, also! I’m gearing up my card-making right now so it is great having so many beautiful samples to fuel my imagination.
Love & blessings,
Sandy
These are so adorable. I thought that it was larger and the petals were folded as you go in a long strip. Surprised me!
What sweet little flowers these are and you have designed them to put together so easily. Thank you.
I love creating my own embellishments, especially flowers. Love your new dies and definitely plan to add to my collection.
Hi Becca, these flowers are adorable! Thak you for showing us how to put them together! Have a lovely week x
These flowers look fabulous on the Filigree Booklet die. Yet another die set to add to the list!
Hugs
Anne(UK) x
[…] her dimensional background. You can see a “How to” on assembling the basic flower HERE. I love how Joanna used Spellbinders S4-733 Braided Grace Squares as a base for her creation. […]
The center card fits perfectly woven behind the filigree of the booklet. From which set is the die for that notched card? Thanks.