

Hello there friends, I’ve been busy :-) First of all {enabler alert}, this week I will begin showing you my new dies! Stay tuned! In the interim, today I have two videos to show you and a new tool (actually I purchased mine earlier this year) to show you that I’ve absolutely fallen in love with. I’ve decided to add it to my every day repetoire but didn’t dare use it here on the blog until I could experiment around with it enough and also wanted to be ready for questions. It may be your cup of tea or you may like doing things the manual way – I’m tickled to share this because it makes my life easy.
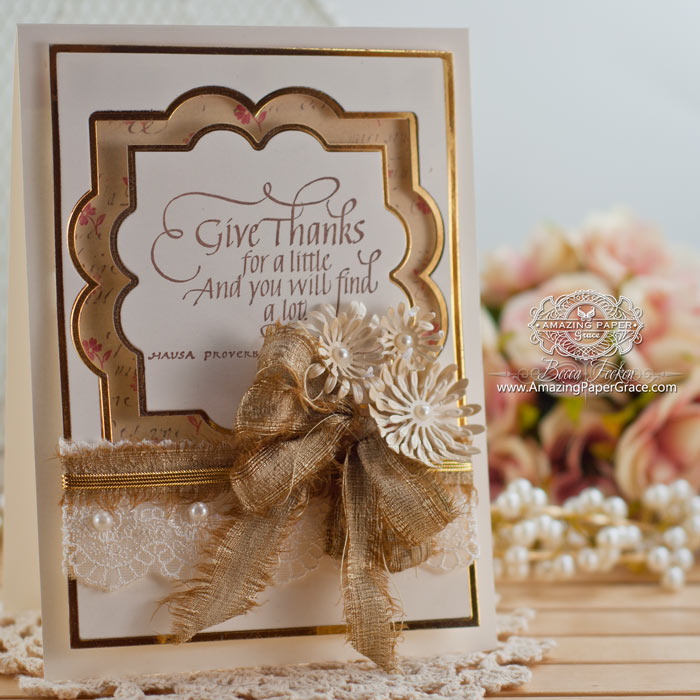
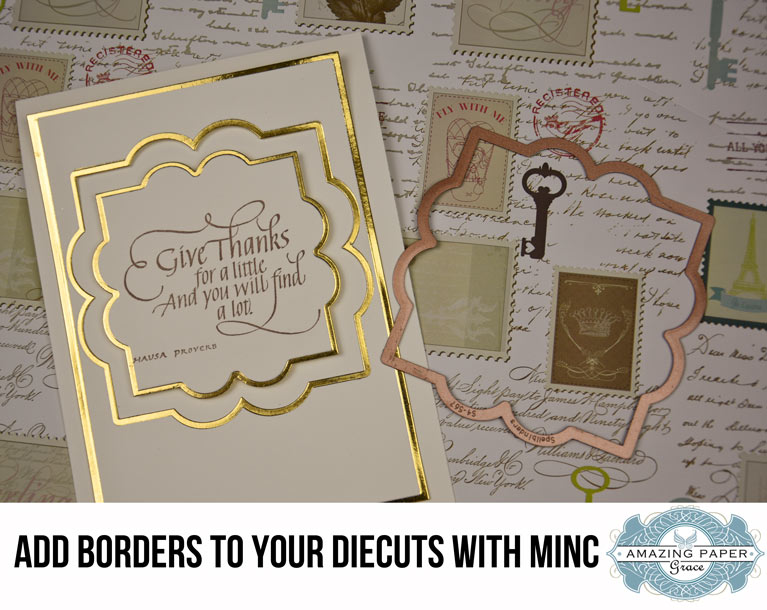
My card today uses the Minc Machine to add borders. Until now, this was a messy and not always successful venture using ink. I’m stoked to know that I can produce consistent results this way, and it works for me! For my card I’m using a stunning sentiment called Give Thanks by Quietfire Design. I’ve mounted into on a panel cut with Spellbinders 5 x 7 Matting Basics B. The label shaped that I’ve bordered and added as a frame and to hold my sentiment is Spellbinders Labels Forty Nine. I dollied that arrangement up with some silk and lace and a couple of flowers from Spellbinders Blooms One.
Want to know more? My first video (above) short and simply goes over the Minc Machine and how it works. My second video is a technique you won’t want to miss – this will get you well on your way to adding professional borders to you die cuts!
![]()
Rubber Stamps: Quietfire Design – Give Thanks
Craft Paper: Neenah Classic Crest 80lb Smooth Natural White, The Paper Studio,
Ink: Amuse Studio – French Roast
Accessories: Spellbinders 5 x 7 Matting Basics B, Spellbinders Labels Forty Nine, Spellbinders Blooms One, Lace, Pearls, Heidi Swapp Minc Machine A new video tomorrow! See you then!!


I’ve had a machine with similar abilities like yours but have ‘t used it much cause Ive been chicken! So I am so hoping to learn to use it more from your tutorials. I too have a frustrating time getting my Krylon pen to work consistently around all the borders. Christmas is coming and typically I love to use gold elements so I’m excited, Becca to see what you come up with!!
I would LOVE to own a Minc.. I have a lot of use for adding foils.. but.. my printer does not use toner. *Tears*
A side note.. I”m loving the new pocket I saw…. can’t wait to see what you post here.
I have the Minc AND all of these dies! Can’t wait to see your technique!
Hi Becca, I’ve just ordered the smaller Minc, since I have a larger size of another type of heat laminator. Enjoyed this video and looking forward to seeing what you do with the die cuts. Looks like I’m gonna have to bite the bullet and get a laser printer to go with the 3 ink jet ones. Always some new toy to have, yes? I know you’ll be doing some fabulous things with this gold foiling. What elegance it adds to your already elegant style of cards. Hope all is well. Blessings.
Hi Becca, just bought a Minc and also a laser printer on the weekend. Haven’t had a chance to take either out of their boxes yet. I am really looking forward to seeing all the wonderful ideas you have to use it. My timing looks like it was perfect for this purchase.
You’re a GENIUS!!!! Absolutely love how you came up with a way to add foil borders to dies. I’ve always painted the borders with metallic paints but I don’t have a very steady hand so they usually come out a bit messy. Your technique is perfect and can’t wait to try it. Thanks so much for sharing and I’m looking forward to seeing more of your videos.
Becca this is just amazing and I would love one, but just at this time cannot see myself getting one. Your video’s are fantastic and its lovely to see how you put a card together. Yes I really like this new machine.
Hugs Trish.
What a brilliant idea for my minc machine! Many thanks for sharing….anxious to see your new designs!
Wow , so nice to see the new machine, looking forward to your video Becca.
God Bless.
Elaine H X
BRILLIANT!!!!!! Just got the lazer printer and gold foil. Only need to decide on a minc or laminator.
I am looking forward to watching these vids. I have been spying out the mini one.. watching these might get me in trouble….:)
Good morning Becca, wow you truly are amazing!!! Your card looks stunning!!!
Thanks for sharing!!!
Have a good one!!!
Loopy Lynda xxx_
Thanks for the great idea. Love, love love it.
I do not have a minc. Love seeing your beautiful work, as always.
Becca, I have all these items but NEVER thought to use them this way. Thank you for sharing such a wonderful idea!
I HAVE A MINC!!! I purchased it online but due to my health issues, I have hardly used it. (One thing about online shopping, you can shop even lying flat on your back in bed!) I did open my MINC when it arrived and tried it out to make sure it worked and that I liked it. I definitely thought I would be fully recovered by now and having fun with it but I’m doubly excited about using it after watching your awesome tutorial.
I had NO IDEA you could add borders to die cuts or that I could make copies of my dies at home and take them to the office supply store. I thought you had to go to the office supply to do it ALL plus the whole die thing is awesome! I suspect I will get a laser copier once I’m recovered but knowing I can enlist my wonderfully supportive/helpful hubby to copy some dies at home is AMAZING! We can get them “lasered” the next time I have a doctor appointment (which is at least once a week).My mind is running with the POSSIBILITIES! Small things make me super happy (God has taught me so much through this accident!) so I’m over the moon excited, Becca. You just made my day..no week…no month…just feeling happy because I love all things that SPARKLE!
You know…blessings come from unexpected places. I was blessed by BECCA today!
Thank you!
Wonderful videos. Thank you so much for doing them. I could not figure out how to “like” them. What happened to the thumb icons on the video to click on to “like” or “not like”. I purchased an AG Minc machine earlier this year. I used it once and realized I needed more foil. And then I managed to “kill” my laser printer running a too thick of a piece of card stock through my printer. I have not gotten it repaired yet. I’m still trying to find a place to take my laser copier to get it fixed. Seems there is not a repair place near were I live. It never dawned on me that I could minc die borders. Becca, you are some kind of genius! This is a great look for the edges of the die cuts. I enjoyed seeing you in these videos. And I especially enjoyed your sweet, calming voice. I think I would even enjoy listening to you read the phone book! Please do more videos.
Lovely gilded borders! thanks of using Quietifre Design
Ok you are an enabler! I’ve been telling myself I don’t need the Minc and I’m not going to buy it!! Now you’ve got me thinking about getting it again! Haha!! I totally love your card, especially the gold with the burlap ribbon you added! Beautiful!
Beautiful card. What is that ribbon? Burlap ribbon in smaller widths is so hard to find!
Thank you for these great tutorials. I look forward to seeing more of your ideas for using this machine. I feel it is very expensive and over priced. There is another one Jennifer McGuire has a You Tube video demonstrating that appears to have good results and it is under $30.00.
So super fabulous!!!! I can do this!! Looking forward to the advanced video tomorrow! Thanks for the easy to understand videos of the Minc.
Hi Becca, a stunningly beautiful card, I love the look of the machine and one perhaps I will be lucky enough to own one, will have to get another printer first though, such professional looking cards with this machine, I am hooked. The video’s are superb
Stay safe, healthy and happy, hugs, June Smith xxx
Fab videos and wowee card. I’ve had a sneak peek of your new dies I think as some ones I didn’t recognise were on C&C in the UK this week. They are lovely but won’t say more. Don’t want to spoil your big reveal.
Wow Becca, your video was fantastic! I just love your card and this technique. I have a Minc Machine and a Laser printer so couldn’t wait to try it out…… I was so pleased with the results. I had no idea you could do this border with dies! I am going to be making a card at the weekend now and have shared your video with my mom and Aunt in England who love to make cards.
I absolutely love my Minc Machine and am so happy to have learned something new and beautiful to do on it. Can’t wait for your video tomorrow!
Hello Becca, this card is so different love it !
The bow is great and the minc machine and you are a great team
you have done well !
The gold looks very classy but I can’t have everything lol
Take care love Pam XXX
Becca – this is genius! Thank you so much for the tutorials. You are a star!
Hugs
Anne (UK) x
great tutorial!! I have the Anna Griffin Minc machine and can’t wait to try this. thanks for sharing.
Becca, this is ABSOLUTELY STUNNING!!!! Just GORGEOUS!
I always stop by the blog but I not always take a moment to leave a comment. This time I had to stop by click like everywhere I could and comment on this awesome idea and tutorial..! :D :D :D Seems like I’ll have to get new equipment for my craft room… What an enabling tutorial really, just great! Hugs dear Becca and thanks for the post!!!
Hi Becca,
Gorgeous card, love the technique with the minc machine, just beautiful, Thank you for sharing. Nice to see you in the flesh so to speak too even if it is only by video lol!
Love & hUgs
Jacquie J xxx
Just Beautiful and way cool! I definitely will be doing this! Thank you for sharing this awesome technique.:)
Hi Becca, A fabulous video, and a truly stunning card, very elegant, and it really looks as if the layers have been matted with gold card. Beautiful.
Lots of love from Patricia xx
Hello Becca,
This is very elegant, but could not justify the cost of the Minc.
Maureen xxx
This is amazing! Thanks so much!!!
How cool this technique
is! I will have to scrap
lift this for sure. So
pretty.
Carla from Utah
This machine is fantastic and your tutorials are excellent for technique and inspiration. Great work Beeca.
So gorgeous! Thanks for sharing a new technique, never thought about copying die! Genius!
Beautiful cards!
What a great idea! Thanks. I can’t wait to give this a try.
Beautiful cards, great technique. Thanks you, Becca!
Oh, Becca. Once I saw this gorgeous card, I knew I was sunk! I have resisted the Minc, but now I must have one!! Thanks for the inspiration!
Hi, could you tell us the make and model number of the laser printer you use please X
What a fantastic technique. It’s a great way to extend use of the dies and it’s such an easy way to get a tight border. I love the look of foil and learning these new techniques make me want a minc even more. Looking forward to seeing more advanced techniques.
I wish I could think outside the box like you do Becca, but I don’t so I am so grateful and thankful that you so generously share you ideas tips and techniques with us all. Thank you xx
I have had the minc for several months now and admittedly it has sat in the drawer. Now you have opened an entire world of possibilities to ,e using my vast hoard of spellbinders. Dies! Thank you ever so much , and saying prayers for your brother! God bless.
Can’t say it enough. Absolutely stunning! Thank you so much for sharing this technique. I definitely with be doing this.
You are absolutely brilliant!! These are beautiful!
I love this idea but in attempting to duplicate it I ran into a problem. My print out was not exactly the same size as my scan. Do you have any idea what I need to do to make the size match up?
Becca– I bought a Minc and made some toner copies. I ran through the machine and it came out with gold in spots but spots where it is still black. Is this because it was not hot enough or is it because the toner wasn’t dark enough?
Thank you so much for your videos on “minc-ing” your die cuts. What a fabulous technique. Your talent is im-measureable and so appreciated.
Becca,
this is awesome but I just got a Large format printer, not a laser. So, if you make
copies with your inkjet office jet printer then take it to office depot or copy place and make laser copies will that work?
Kay
[…] get two tones within the die and the border surrounding the sentiment – I explain that in my Creating Borders on Die Cuts with the Minc Machine Tutorial. If you don’t have a Minc Machine, you can achieve a similar look by die cutting foil. I […]