
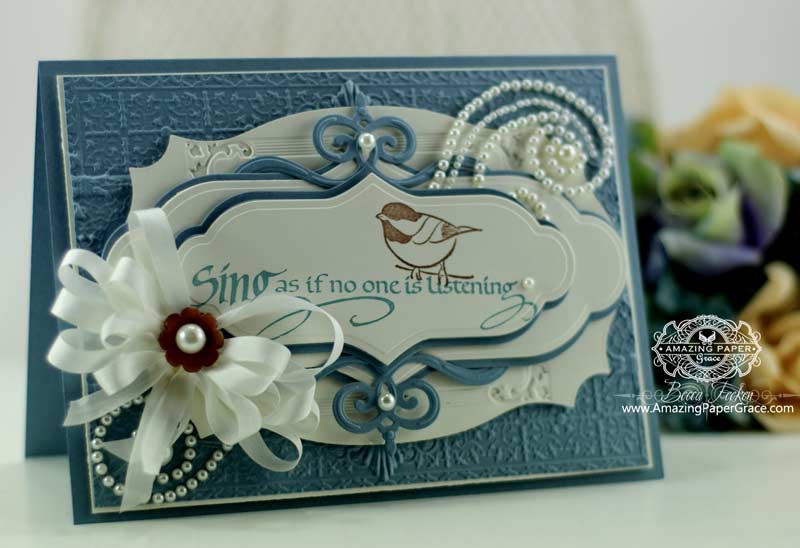

I’ve been deep in conversation with my crafty friends about card making ideas. We’ve talked about simple to make cards and cards that look complicated, but aren’t. I’m a firm believer that the dies can do the heavy lifting – so put them to work!! My card today is one that goes together easily, and looks like you fussed, but you didn’t. So often I think the optical illusion of layers makes things look much more complicated than they really are. If you’re a ‘visual’ person like I am, please know that things make much more sense when you’re working the real thing rather than looking at instructions; ‘hands-on’ is king in card making. Let me encourage you to cut the layers with the sizes I give, stack them up (without glue first) and I assure you, it will make sense. That’s exactly how I designed this card, I cut everything, stack everything to make sure it jives then I go back and glue everything and add foam tape where I want layers. Are you game???
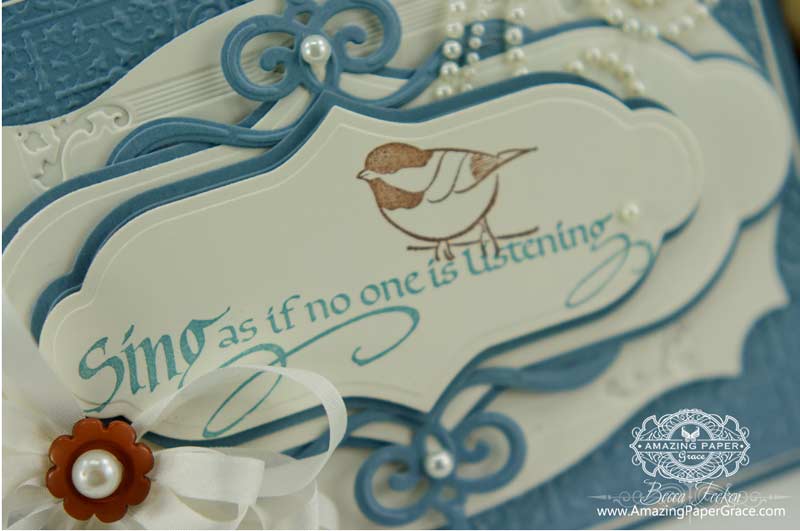
I picked an adorable rubber stamp set from Quietfire Design that makes this sentiment from The Woods Would Be Very Silent resonate, and the sweet little bird is the icing on top! I reached for Spellbinders Labels Thirty Three, Spellbinders Twisted Metal Tags and Accents, Spellbinders Majestic Labels Twenty Five, Spellbinders Gold Rectangles One and Spellbinders Persian Splendor Embossing Folder to pull this card together. Since I wanted thin matting layers I decided to create those matting layers with die cuts the same size as as the die they mat, here’s how: My blue matting layers are simply 2 duplicates of the cream layer on top of them. All I do is offset the blue matting layer behind the cream die cut making sure the first blue die cut sticks out on top and the second blue die cut stick out on the bottom. Optical illusion = a thin matting layer – try it yourself!!
Here’s your Step By Step recap of die cuts and layers, from the bottom up! Start out with a blue card base cut to 5″ x 6-3/4″, foam tape, cream matting layer cut to 4-3/4″ x 6-1/2″, panel embossed with Persian Splendor embossing folder and cut to 4-5/8″ x 6-3/8″, foam tape, combination of 2 blue and 1 cream die cut layers using Labels Thirty Three (offset as described above) then lay on top of Twisted Metal Tags and Accents and pull up on decorative point so that the points sit on top of enclosed dies, foam tape, combination of 2 blue and 1 cream die cut layers using Labels Thirty Three (offset as described above). Attach bow, button and pearls.
| CRAFT SUPPLIES I USED |
| Rubber Stamps: Quietfire Design – The Woods Would Be Very Silent Craft Paper: Neenah Classic Crest Natural White, EK Success Sea Spray Ink: Amuse Studio – French Roast. Eucalyptus Accessories: Spellbinders Labels Thirty Three, Spellbinders Twisted Metal Tags and Accents, Spellbinders Majestic Labels Twenty Five, Spellbinders Gold Rectangles One, Spellbinders Persian Splendor Embossing Folder, Recollections Pearls, May Arts Silk Ribbon, Becca’s Bow Maker, Grand Calibur Die Cut Machine |
I so appreciate all of you who are a part of the Amazing Paper Grace community – thank you for letting me share some of the products I love! Also, thank you for taking the time to stop by, I know that many of you stop by every post and I really does my heart good and it inspires me to keep producing card making ideas!! Thank you so, so much!!


Thank YOU so, so much, Becca. Your amazing site is an inspiration and a true gift. Blessings.
Ohhh, thanks so much, Becca, for that tip for thin matting layers — I so often want that and would never have thought to do it your way — very clever!!! Just got my gold dies and Majestic Labels 25, so may have to try a similar card soon!
A very beautiful multi-layered card! Shikkarny bow!
Brilliant! Love the double mat offset. Do you know of a source for bling that is less if you buy in bulk? $4-5 for one swirly seems costly to me and I’m in Hawaii so we’ve limited supplies out here. Or if I’m being unrealistic let me know that too :)
Becca, this is a gorgeous card. You’re richly blessed with creativity…you’ve inspired me to try layering. God bless!
Another absolutely stunning creation here Becca. I so love this one, really stunning layers and awesome colors too. I´ve often been wondering, how you did those layers with such a tiny edge peeling out underneath it, so thanks sooo much for the explanation. I really don´t understand why I never thought of that, but I admit, I didn´t, but now I´m definitelybeginning to get these beautiful edges too, that´s for sure.
Yes, I’m a Becca Feeken addict. I stop by all the time and can’t help myself. I’m thinking of going to get pills for it or something….
Seriously, Becca. You create such gorgeous stuff I can’t help but come all the time for inspiration. Or sometimes just to browse older work and enjoy it. I’ve said it before, everything your hands touch turns to magic…..
Hi Becca,
Am sure you already know this, but for those new to cardcraft there are 2 other ways to do thin matting using just one duplicate die cut. You just cut the die cut in half and layer it as directed – one peeking out at top and one at bottom.
If the die is not too complicated you could also place it on your card, draw around the outside and then cut it out by hand.
Not my ideas – I learned them from the UK equivalent of Becca – Sue Wilson, who is in fact also American!! :)
Have a great week. I will watching out for your every post as usual – you are my favourite crafter. xx
Haven’t tried the 2 duplicates for matting but I will – great idea and great card – thanks for sharing.
I too, (like Chelsea) am a Becca addict and feel cheated if I cant get my fix for the day. Stunning card again as usual. Thanks so much for sharing. Any chance the tutorial for the cards and boxes will be in time to make some Christmas gifts Becca ?
Coffee and cream and now wedgewood and natural white. Okay. Had my ‘Becca’ fix for the day. And nobody will know if I sneak back later for a second viewing ;o) Oh wait……
Did I just give the game away….
Hugs
Anne (UK) x
Good grief! Cutting out all those layers, embossing, embellishing, adhering everything together; Becca, that IS fussing!
I just love your work!!!!! It is absolutely gorgeous!!!!!! You are so talented!!!! Keep the projects coming!!!!!!
Absolutely beautiful!!!
Thank you for sharing. It is such a lovely card, and I’m sure lots of colour combinations will be just as striking.Love Helen
Thanks for sharing those specials hints to help us to create our own card beauties.
This is so pretty Becca! I’m one of the ones that reads all your posts, but rarely comment. Sorry – I must try harder! You should know though that I really appreciate every single post, as your creations are always gorgeous and very inspiring – so thank you!
so very cool, just love your layering!! pretty color and love the embossed background!
Do you make cards that are of a normal size 5 1/2 by 4 1/4? The larger size are to expensive to mail. Thanks.
I so love your card designs and save all of them or pin them to pinterest. Grateful for all your wonderful tips.
WOW is all I can say on this one, I just love it!! The colors well everything about it calls my name. I am putting all of this on my big want list. Thank you for sharing this awesome card with us
Hi Becca, such a stunning card as always from you, the colours are really beautiful and I adore the sentiment with the little bird. Thank you so much for all the inspiration. Hugs May xx
As you know I am one of your #1 fans. Nothing that you do is missed by my eyes. Love, love, love all your work and the tips you give are totally awesome. Am going to try this tip. Guess I am a little dislectit when it comes to thinking outside the box on little things like the 2 duplicates. I am definitely going to try it as I have to make a “fussy” looking card for my granddaughter (23) in early October. Keep all these tips coming ~ look for them everyday!!
Hugs
Mstgane
Ann
Thank you for sharing the products you love and inspiring all of us. Have a great day. Kathie
Becca: Why didn’t I think of this. A much easier way to layer than tracing the outside of the die and hand cutting and much more accurate. Your card is beautiful and I am sure this technique will work with most of the Spellbinders label dies.
What an ingenious idea, who “woulda thunk it?” I remember a long while back where you showed cutting with your knife along the outside of the die to make the thin layer. Whew, that was not for me, almost cut my finger off. LOL. But this I can handle, thanks for showing, dense me would have never thought of that! We appreciate you dear Becca, continue to inspire us!
Hi Becca,
Your cards are impeccably beautiful but your instructions are easy to follow. I really appreciate all those ‘secrets’ you shre to make things work. It speaks to your generous nature. Even if your cards were not exquisite I would still visit your site daily for your uplifting thoughts and positive approach to life–its highs and lows. You are a blessing to me. Thank you so much.
Just wanted to say, I still love all your works of art and your use of Quietfire Design sentiments.
This is such an elegant card. Thanks for the directions, but for me as a ver y ‘visual’ learner, this would make a terrific video – when you have time! Not been commenting lately, but I always look. Life just gets in the way sometimes. Hugs & Blessings.
Gorgeous card! You make your cards look so elegant, but from the directions sound so ‘just do it’. I love the fact that you care about us bloggers so, that you take the time to share ALL your secrets, for that I thank you from the bottom of my heart. I have learned so much paper crafting from you and wisdoms of life, may you continue to be Blessed by God.
Thanks so much for sharing not only your gorgeous cards but the mechanics and measurements to make it easier for us to follow. You also generously share all the tips and tricks that make your creations so special. I hope that Spellbinders appreciates you because my collection as well as my wish list continues to grow with each sample you share with us and you are without a doubt their greatest embassador. TFS
Just wanted to say I have been making an album with all your card samples with dimensions and list of dies used. Now when I need a card I can quickly browse through all the cards till one speaks to me. Thanks again for your generous talent and sharing.
You never cease to amaze! This is just another of your marvelous cards. So clever with the “thin matting” idea. I can’t wait to try this one out! Though I don’t yet own all of the dies you used, I believe I can come up with something similar with the stash I do have! Thank you once again for all of your inspiration.
Help! i need a card for my four-year-old granddaughter. I’am out of inspiration.
Please consider giving a tutorial on what you probably think of as a simple thing USING BLING correctly, more precisely how do you get swirls, shapes, etc to go where you want them without stretching out of shape, sticking to itself in all the wrong places until you end up a beautiful but useless ball of bling??? can’t tell you how many gorgeous swirls and shapes I have utterly ruined. please help
Beautifully done Becca!!! TFS how you made it – your tips and tricks really help, and I will certainly give this a try!
Paper Hugs,
Jan
Thank you, for the wonderful tips and, as usual, your creation is gorgeous!
Thank you so much for sharing this seemingly simple card with us! When friends and I first started card making, one of my friends commented that the right papers and a little bit of layering really made a huge difference to the look of a card . . . i.e. made the card look more polished and elegant. I’ve tried to keep that in mind ever since and very happily came upon your blog which shows us the most elegant cards ever!! Thank you for always sharing your abundant talents with us!
Beautifully done Becca! Great fit of the stamp on the SB die! Love the colours, love the layers. Nothing is so nerve-wracking to me as “gluing” down those assembled layers. Thanks so much for using the stamp and sharing your creativity! <3
Another beauty, As always I am in awe of your wonderful talent. As I’ve said before….I have card making envy. I, too, am addicted to your blog. But it is a good addiction. How can admiring so much beauty and talent be bad? Have a blessed Sunday.
This is gorgeous. Love the colors and embossing.
I remember that a couple of years ago you said you cut around the edge of a die to give a layer just slightly larger than the die itself cuts. I’ve done that several times, but this sounds way easier! See! I am listening! :o) Thank you, as always, for being you and being a great teacher!
WOW…Stunning. You are so talented. Thanks for sharing.
This is Beautiful Becca, All the Layers certainly do make it look like a massive amount of work has gone into it. You certainty Inspire us to try these things. Thank you so much for sharing. I visit every chance I get and always look back if I have missed a post. I have learnt so much from you Becca, Thank you.
Hugs Mau xx
Gorgeous card! Thanks for the tutorial!
Quite gorgeous!!! Love everything about it–the color, design and of course the bling!!!
Gorgeous layering!!!
Hi Becca,
It’s a lovely card – I, too, am a layers fan.
Hugs, Rose (in Chester, UK)
I am another Becca Addict and very proud of it. Your lovely creations are so inspirational and just beautiful to look at. I would come back for every post just because your creations are just amazing! Thank you!
I am one of those who comes to read your every post. And each and every time I am amazed at your talent. You also have cost me some $ as I first started ordering Just Rite Stamps and then went on to Spellbinders :) And I am a demonstrator for another company! But you continue to be an inspire with cards and in life lessons. Thank you, Becca, for always sharing.
Bernie
You inspire me with every post you make. I love the items you craft and they are even more beautiful in person. Thank you for my card!
Morning Becca, Gorgeous card, and fantastic tip about the matts, I love a card that looks as if it took ages to create, and in fact it hasn’t !! yeah.
Lots of love from Patricia xx
How beautiful Becca. I’m loving all the layers whilst keeping to two colours. I’ll certainly be trying this out. tfs
Hugs
Heather (UK)
x
Well I too must try harder to comment every time I look at your work. It truly is another beautiful card. Thank you for sharing so much work and time with us. Blessings, Lisa
It’s lovely and thanks for the detailed instruction. Always wow’d by your creations.
Stunning! You’re absolutely right about using the die cuts and layering. Since I’m ‘space-challenged’ in my home, I have to drag out my gear to the kitchen table so I end up doing a marathon die-cutting session. I was able to put together two very elegant cards in a short while just by combining several of the elements and adding a bit of bling.
Becca, Thanks for the layout of your card. It is beautiful. I will need to try
making one when I feel better.
Thanks again
Vicky
Can you please do a tutorial on the blue card with the layers.
Thanks
VERY PRETTY BECCA!!!!!!!!!! MAKES ME THINK OF YOUR LOGO!!!!!!!!;)
Hi Becca!! Just poppin in to say hi and let you know I have been thinking of you. Miss you!!
Your card is gorgeous as always with the elegant layering of dies, your colors and your signature bow!!
hugs,
Chris
Another BEAUTIFUL card Becca
Love From Marion x (UK)
Becca
What a clever way to make it look richer and complete. I didn’t even think of that. But we all know you’re a paper engineer. I always loved what you did with your mandalas.
I’ve learned a lot from you Becca and I so happy for your success.
pat
Thank you for sharing how you did the blue layers. I wouldn’t have thought of doing it that way. Very clever! Love the little bird and saying.
Such a beautiful card. Love the layers and the colors you used.
I am one that stops by every day just to see what beautiful card you have crafted and I am never disappointed. You are a true artist.
Such amazing depth on this card. The layers look they keep on going on, and on and on!
I am amazed -I come from England and Create and Craft I have watched since it first aired – I spent all my time watching it and videoing the parts I liked of interest to me -Then we moved to Australia and I seem trapped
I cant get craft easily and have many US websites I go too Yours is the exception I really love but cannot get your products because they dont send to Oz ? Now I am to miss out on your products being sold in UK . . Owwww?
I am so unhappy for me -but delighted for you !! They will be like ‘magic’ to the Brits honestly . . . I wish you well kindest regards Rita x