
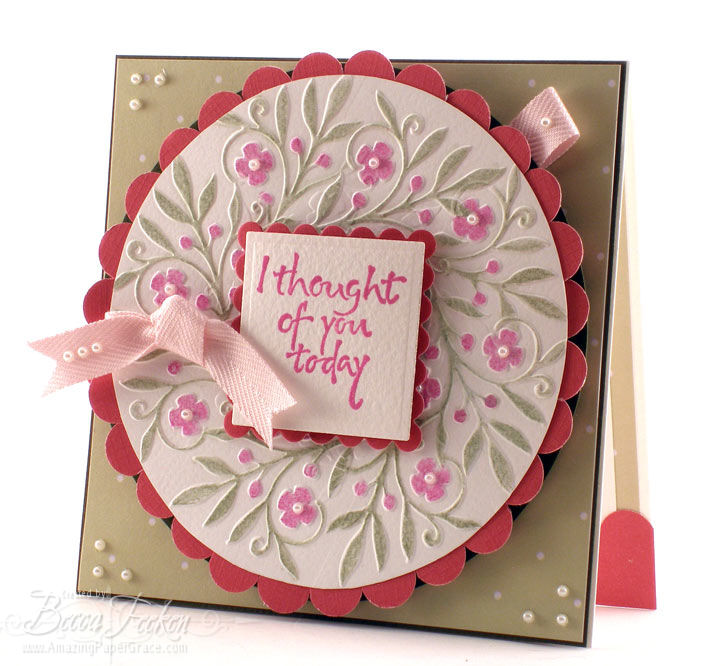
How many of you purchased those small Cuttlebug embossing folders and then were disappointed that their use was limited? Yeah, me too. It seems that you couldn’t really bite in far enough to get the image where you wanted it and some of them have an orientation that limits their use as well. I’ve been toying around with the templates and came up with a slightly different way to use them that allows you to get around some of those limitations. Here’s one of my first samples:

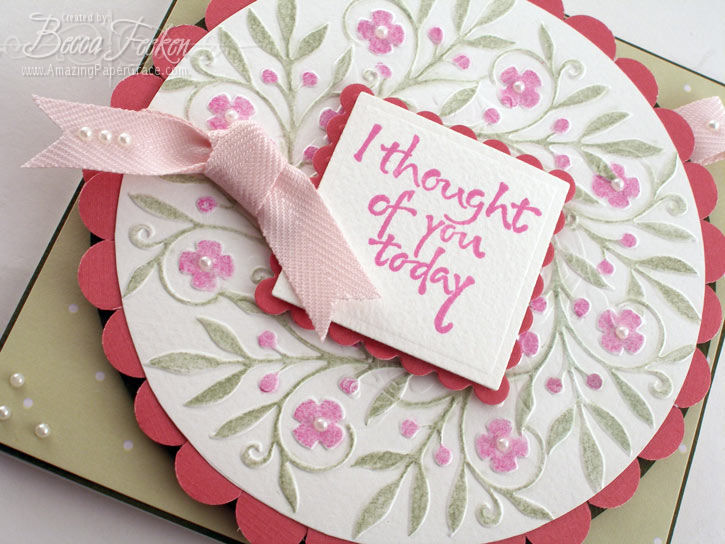
Here is a closer look . . .
In a nutshell what I did was figure out how to do circular embossing. By placing a hole in the center of the paper and inserting my template into the hole, I was able to pivot around the circle from the inside and emboss in enough locations to fill in my circle and make a complete background. Once finished, I was able to camoflage the opening with my stamped sentiment. I played around with varying the number of embossed images on each circle and found you can do as few as four and as many as eight.
For this card, after I finished the embossing I colored the image with chalks and embellished with pearls. I cut a scalloped border and chopped up the border in order to fit it around the circle. I cut a Nestability scalloped square and a Nestability square with my sentiment to cover the hole used for embossing. The cute little feature of the three pearls sitting on the ribbon is a great idea I snagged from my friend Janine of 2BKrafty – you can see the card she made here where she floored me with that idea. Here is a diagram showing how I tackled this card.
Step 1
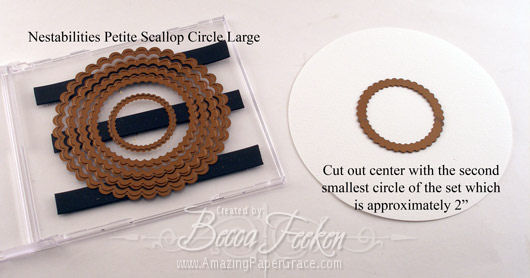
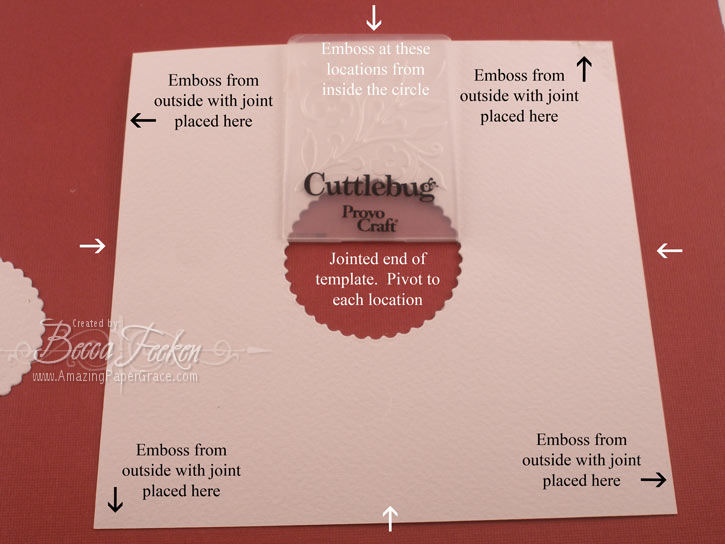
Cut a large circle about 5½” in diameter. I used my EK Success Circle Cutter, but you could easily cut one by hand using a plate as a template. Using the second smallest circle from the Nestabilities Petite Scallop Circle Large Set, cut a circle in the center of your paper.
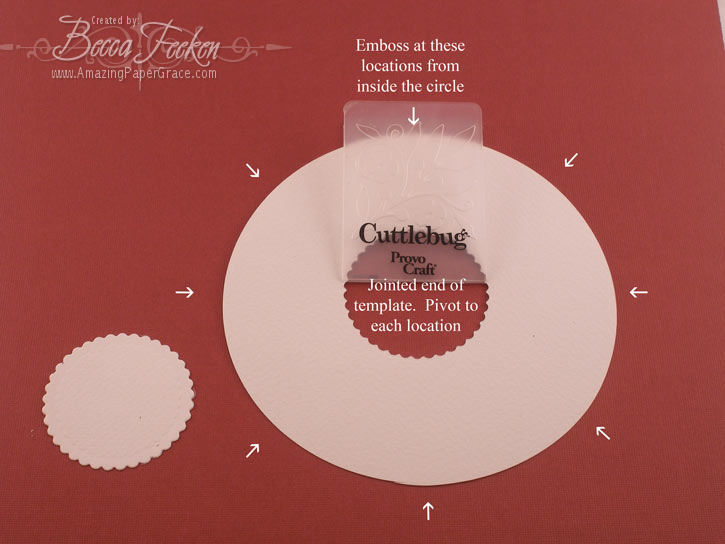
Step 2
Note the eight locations with arrows. I embossed at each of these locations with one of the Fancy Corners Small Embossing Folders. The joint of the folder is placed on the inside of the circle and then the folder is pivoted through to embossing at each of the noted arrows. On this particular folder there was some overlap so as I embossed, my current embossing smashed part of what I had already embossed. I didn’t really worry about it. This will vary depending on which template you use – some will look good overlapped and others will not.
Step 3
Complete the embossing then leave plain for texture or color as you will!
Optional:
You don’t have to start out with circle, it can be a square as with my card from yesterday.
![]()
Here’s how I did circular embossing on the Cuttlebug to make the background for this card:
Using the same Nestability circle, I cut out the center of my paper which measures 5½”.x5½” On this particular card I embossed four positions to start out with – North, South, East and West with the joined edge of the template on the inside. Then I embossed on each corner with the joined edge of the template on the outside with the arrow showing where the join should be positioned.
I hope this gives you many ideas on how to stretch your templates! If you share this idea, I would appreciate a link to this post so that folks can see exactly how to work through the embossing step.
Thanks so much for stopping by!!


What an awesome tutorial! Thanks for sharing.
Becky,
I start my morning with your blog and I’m never disappointed!! What a great idea! I hardly ever use those small folders, but now I will. Thanks so much for your ideas and inspiration! I know I’ve said it before, but “You rock!”
Becca, I love this. There I was yesterday wondering how you did the cuttlebug backgound and was it a folder that had escaped me. Now all is clear. Thanks for a wonderful blog.
How very clever and wonderful that you have shared this tutorial with us. I have some of these folders and just don’t use them that much. I will now however, thanks to this tutorial and your beautiful cards!
What a great idea! Thanks for sharing!
Becca: You never cease to amaze me. You really think outside the box and come up with wonderful cards that are outstanding in design! Provocraft should have you on retainer for breathing new life into their Cuttlebug products!!! God bless…………
Mary
http://www.primitiveseasons.blogspot.com
I have a few of those folders Becca, thanks for the great ideas. Love your cards so pretty.
gorgeous Becca! I have trimmed around my plastic folders so I can place them closer together w/out squashing the previous embossed areas…I’ve only done squares from the outside but I LOVE, LOVE this from the inside too!!! woohoo!
TFS!!!!!!!!
I have a few of those folders that have gotten very limited use…not anymore! Thanks for the great tutorial! Your card is gorgeous, as always!
Once again, AMAZING! After everyone is out the door in the morning, this is my second stop, first being coffee ;) I’m wish you could see how many times, I just sit here and smile, shaking my head in amazement!
What a terrific idea! You showed me how to use my corner punches in a new way and now the embossing folders. Thank you.
Ahhhh…finally a way to use these little buggers! And you have done absolute wonders with them! Gorgeous!!
hugs, Jami
This is creative genius at work! What a fabulous way to get the best use out of these great little embossing folders! TFS your fabulous idea!! Your cards are just stunning!
Hi Becca, just found your amazing site. Thanks for sharing the cuttlebug ides. I will certainly go and give it a bash
I have that embossing folder great to have another great use for that die. I wondered how you had done the background on that card. Thanks so much for sharing. Ann Lind
I agree Provocraft needs to put you on retainer….I know I for one am going to run out today and pick up some of these small “pesky” embossing folders! I’ve been looking for a way to go bigger than the a2 size and this just might be the solution…
Thanks for the inspiration!
Teri
You are amazing! This is fabulous, off to look at my CB embossing folders now…….- the little ones……… I hope that company has you on their people to know list!!! They should if they don’t already! Thanks for sharing your talent!!!
Becca,
Awesome idea! Thnaks so much for sharing and coming up with those great directions. The card is beautiful by the way. I would love to give you credit when I use your ideas, I send people to your blog even when I am not casing your work! You are a very creative crafter, I love referring people to your blog. Keep the pretty stuff coming, we love ya!
Lisa A.
P.S. Thanks for your sweet comments on my blog, they make me smile!
Absolute genius idea. Thanks so much for the great tutorial!
thanks becca, you are so smart, and barb f is right absolute genius idea but of course you are a genius!!!! i would have never thought of that.! do you know if there is a place for a cuttlebug message board? i cant find just the cuttlebug site like cricut. if not ask on your blog if u dont mind and see if anyone knows of one. thanks again for sharing such a wonderful idea.
kay
wow! This is a wonderful way to get use out of the little ones! tfs
WOW! WOW! WOW!!!! What a great idea! Thanks for sharing your awesome tip.
You certainly live up to Your name! you Truly are AMAZING! Thanks for your wonderful tip
You are so clever Becca! I love this idea. I’m new to the Cuttlebug but you make everything look so easy I’m anxious to try this. I love how you have it colored and accented with pearls.
Good afternoon, Becca – thank you so much for such a superb tutorial. I have quite a few of these small folders and have to confess I rarely use them because of their (I assumed) limited use – not any more! I absolutely love how you always think outside the box. This tutorial will now add another technique to my crafting armoury.
Now may I ask, pretty please, if we might also have a tutorial on how you used the Word Window Punch to such great effect on your card of 28 August ?- absolutely awesome- and I still can’t figure out where the folds would be (if there are any) – Many, many thanks.
This is so beautiful Becca. Thank you for sharing. I visit your blog every single day and I am never disappointed, you inspire me no end and I would like to also say a great big thank you for your turorials.
Thank you !!
hi becca
i have been looking at your blog for a short while and I am “amazed” by your lovely cards and your talent.such clever ideas.I find myself everytime I switch the computer on going straight to your blog to see whats new.
i want to say thank you big time for giving myself and I am sure many others loads of inspiration and ideas.
carmel x
OOH, I can’t wait to try it! I have that set and have never used it- now I will.
Wow Becca…thanks for the tutorial
So smart! Thanks for sharing!
Oh my what a wonderful idea Becca!!! Thanks so much! Hope all is well with you …
Gorgeous!! Fabulous tutorial too!
Becca, this is just beautiful and such a cool idea. Love your blog and the beautiful things you do. Hope you don’t mind that I posted a link on Gingerwood so everyone could check it out.
You are brilliant!!!!!!
You were the Tutorial of the Week at Card of the Week.com. You can see the original post here: http://www.cardoftheweek.com/2008/10/paper-craftin-1.html.
I did use a picture from your post, with links back to the site and the original post. I hope that is OK. Please feel free to email me if you need me to change anything.
I also have an “I was featured” on badge for you if you want it :D
This is awesome. I have some of those and have only used them once, now I know I’ll use them very often! Thank you.
I am going to link your post on my Resources category so other readers can see this and other great ideas you have because you have so many!
Becca, Becca, Becca,
Aren’t you the smarty pants. I LOVE that!!!!! I have sooooo many of
those small Cuttlebug embossing folders and hardly use them. Now on the other hand……………..Watch Out.
Thanks so much for sharing. You’re a real doll.
~~Diane~~
I agree – Provocraft needs to put you on retainer!!!! If anyone could figure this out it would have to be YOU!!!! Course you know too that it is all because of you that I have purchased more Cuttlebug Embossing folders and stamps from Our Daily Bread Designs. You are such a talented designer – I’m afraid my cards will never live up to yours, but I can dream. You are the BEST!!!!! I have found VERY FEW other sites that even come close to yours……….
And so folks we again know why Becca is Amazing Paper Grace.. you are the Queen of paper crafting.. Thank you , now those little guys wont have to sit in the box being lonely anymore.. You never cease to amaze me..
Hugs and Blessings to you.
Awesome idea! Beautiful cards.
What a gifted paper crafter you are. I’m like many out there, have these small folders and yes hardly used because of their limitations. Your tutorials are so easy to follow, thank you, thank you for your talent and your willingness to share with everyone.
very coooooooooooooool!!!!
This is so pretty! You did a great job!
Wow what awesome cards and tutorial. Thanks so much, I wil definitely try this techniques.
Your cards are simply amazing!!!
TFS
Well, I’ll be!! This is a fabulous idea and such a pretty card! I don’t have any of these small folders but you make me wish I did. I love the tiny pearls on the ribbon. Thank you so much for sharing how you did this!
What a clever idea! I’m going to have to try this. TFS.
Thank you for another truly creative card and a really easy to follow, well done, tutorial. You never disappoint, no wonder you are the first site of the day for so many of us.
You’re a flippin’ genius! I wanna be you when I grow up! :)
I liked this idea so much, I had to try for myself. Thankyou so much!!! what a motivator! I just love learning new techniques and also a new application for tools I already have. = )
You must have THE most innovative mind on the planet! This is sheer brilliance. I can’t get over how gorgeous it looks and how COOooooL it is! WOWzers. Hope it’s ok that I linked you up. Thanks so much for the amazing inspiration! :O)
You are truly a genius! Thanks so much for sharing this wonderful technique with us. ~chris
Another gorgeous creation! Your work is exquiste!
Great idea! Thank you so much for sharing it. I was looking all over to find the embossing folder you used for the Christmas card, now I see it was one of the little ones that I have. I am trying this for sure!!
You are my hero – this is just amazing!! I love all the work you do – you are such an inspirational person. Thank you so much for this tutorial – it is just so clever.
Ann xxxx
Becca, what a great idea and your photos help to see exactly what you are talking about. Great job!
Joan
What an awesome idea! Thanks for the tutorial! You are just so full of creativity! :D
I have to agree that this is awesome – thanks heaps for sharing this great tutorial.
you are amazing!!!!!!!!!!!!!!!!
Absolutely brilliant way to use these Becca! Thanks for the tutorial!
This is such a fabulous idea!!! I just tried this- I need suggestions, when I put the next section through the CB, if kind of flattens the adjacent image. Any ideas???
Thanks so much!
Shelly
Well, aren’t you the clever crafter! I would never have thought to do that. What a way to use your supplies to the max! TFS!
Cindy
I haven’t received your blog posts for nearly a week so hope you aren’t still having problems with the feed. I was delighted to see you spotlighted on the CArd of the Week today, which reminded me to click on your post so I could leave a note about it. I was so thrilled to see your tutorial on the small CB folders — I, too, have wondered what else could be done with them. They look lonely in my box and haven’t been used for some time — but NOW they will get a new lease on life! Thank you for the awesome technique you shared with us!
That is really clever – well done you – will give this a try – your amazing!
Becca.
Girl! You never cease to amaze me with all your ideas. I love how your creative mind works and showing us how to get more usage out of our supplies we have i.e., the CB and the punches, who would have thought to do these amazing designs with the tools most of us own. You truly are a inspirational and talented and amazing woman. Praise the Lord for him giving you so much talent and helping us less talented ones try to be as creative as you!
I always check your blog everyday with anticipation to see what beautiful creation you have made to share with us. Please keep up the beautiful work.
WOW…the rest of my email is now on hold so I can get out CB and start playing. Ty so much for sharing this .
Oh wow just beautiful. Thank you so much for another way to use those cute little folders.
Ter:)
Becca! You are brilliant~~as always! Very cool. I am back from the cruise and trying to catch up on all the blog posts I missed while away and there was alot! Hope you are having a great day missy!!
What an awesome idea and the tutorial was easy to follow.
Thank you so much for sharing this marvelous idea.
You have blessed me this day, Marilyn
Thank you Becca! Absolutely fabulous! Thank you for sharing your tutorial with us, I know it takes a lot of work to put those together and I am so appreciative of your generosity! Your card is stunning, I love the use of the small pearls and am off to check out sweet Janine’s blog.
Talk about flooring someone with your creativity! This was a stroke of genius!!!
So gracious of you to share your creativity with us.
Heheheh I have these little embossing folders and haven’t even attempted to use them yet. Now, when I get around to it, you have given me great way to use them. THANKS!
Becca,
Love, love, love this idea. I can’t wait to try it! I also ran out and bought the cross punch after seeing your beautiful work. I think the card I copied from you is the prettiest card I have ever made. Thank you so much for the inspiration!
Brilliant!
Brilliant! I WILL be trying this! You’re so smart!
Oh Becca, This is an awesome tutorial. I love my Cuttlebug and learning new ways to use it is a wonderful thing. Your cards are so beautiful and inspiring. Thank you for sharing your talents.
Thank you for sharing your embossing tutorial. Your cards are just beautiful. I can’t wait to try it.
BECCA!!!!! You are something else. I do have a few of these small embossing templates and have wondered what the heck to do with them once I got them home. I can not thank you enough for this wonderful idea and tutorial. You truly areAMAZING!!! TFS.
Debbie/Phx AZ
I have a couple of these and have never used them! You make it look so easy and I love the cards you’ve done with this technique. TSMFS…I might have to dig mine out now!
how big was the card? 6×6?
Beautiful cards , thanks for the great tutorials !
Girl, you are so smart! You amaze me with the way you look at your tools! This is beautiful!
Becca,
Another absolutely genius creation. The good Lord has certainly blessed you with creativity that goes to the heavens and back.
As always, your inspiration goes beyond words!!!
Cathy
Thanks so very much for sharing this wonderful tip on using those itty bitty embossing folders that we don’t use too much! Wonderful idea!
Huggies to you!
HOLY COWS…this is awesome! You are sooo smart!
Truly this is the tutorial of the day I’ve needed so badly!
Thank You! Thank You! Thank You!
I love the way your mind works Becca – you are a true inspirationalist!!
This is my first visit to your site (referred by cricut.com) and I am amazed with your talent! I have bookmarked you for future visits. Thank you for sharing your awesome talent! WOW……
OMG, that is FAB
I really hadn’t thought of that before, you are one very talented lady : )
a stunning idea.thankyou for the tutorial
Becca, you’re the best! This is such a great idea an tutorial!
I’m always blown away with your ideas
I wish I had your creative juice. Blessings for your wonderful heart to share your talent with us.
Cinnie
Becca,
Honestly, your imagination never stops!! You are so blessed with graciouness! Thanks for always sharing and giving of yourself to others!
Gay
qyofsg6xi402y4cz
Wow I was Blog hopping today and found your blog…. You are truly inspiring! Your stuff is just amazing! TFS….
I really enjoyed this tutorial. I’m going to make some of these as Valentine’s cards. What are the dimensions of the card you made? What do you use to carry your Cuttlebug in when you travel?
Thanks,
Evonne
I love this tutorial also and would love to see MORE tutorials. I try to figure out the dimensions of these beautiful cards, but unfortunatley I’m just not all that creative. I need inspiration which I find here! I also have the small folders and in fact just bought more the other day for Valentines day…what a wonderful way to get more use out of them!
Love all techniques using the CuttleBug. This one is fantastic. Well done!
[…] finish off….. have a look at some great other techniques here and here and here. I especially love the circle technique and will be giving it ago […]
Read the post when you first posted it but never got round to trying it until today. And wanted to say thank for the instructions, so simple to follow.
Woa!! You are amazingly creative. I’d never imagine that ever! I’d love to see that one done live/filmed, (only because I need to see to get it lol). Thank you, I am wow’d!
[…] Circular Embossing with the Cuttlebug by Becca […]
I am a new fan of yours! I love this technique. I am going to try this one right away. I really like the embellishment with the pearls. I need to go to Michael’s or Hobby Lobby to get some of my own.
Way cool…Thanks for shareing and the explaination is perfectly clear…Thanks Juanita
You are a genius! What a great idea.
I just tried this tutorial. It doesn’t work. Please let me know if you’ve discovered a booboo.
Thank you,
Maureen
fantastic……you do beautiful work. I especially love the soft colors you use….thank you for sharing your art.
WOW – This is an excellent tut – I hope mine will work out as your did when I can find a few minutes to try it.
Thanks for sharing your work so freely, it is gratefully appreciated.
Kindest regards.
I going to try this and maybe with a square too. Thanks for this idea, I have quite a few of these small dies.
What a great idea!!! Thank you very much for sharing!!
Great idea!! Am new at this so this will be great fun to try. Thanks!
What a great idea! Thanks for the step by step instructions. I know I can do this now.
WOW! this is great! thanks so much for figuring this out and for posting such detailed instructions. i am so excited to try this. thanks again!
What a GREAT idea!!! I’ve never visited your blog, but now it will be a regular stop! Thanks for sharing!
Hello!!!
I have these little embossing folders and haven’t even attempted to use them yet. Now, when I get around to it, you have given me great way to use them.
THANKS!
All you do is fantastic and the talent is always so beautiful. Wish i lived close to you. I need to use more of the tools that i have. Now maybe i will as i am thru my chemo. Have a great day. And Thanks for all the wonderful ideas.
Wow!! No wonder why there are so many comments. This technique is perfect. A great tool for any scrapbooker to have.
Cuttlebug Embossing Folders
This is definitely a Wow! Thanks so much for the tutorial on how to do this.
Wonderful card, I bought the leaves and was a little dissapointed in myself for buying it. did not know how to use it properly. Your card opened new ideas for me – thank you for sharing your idea.