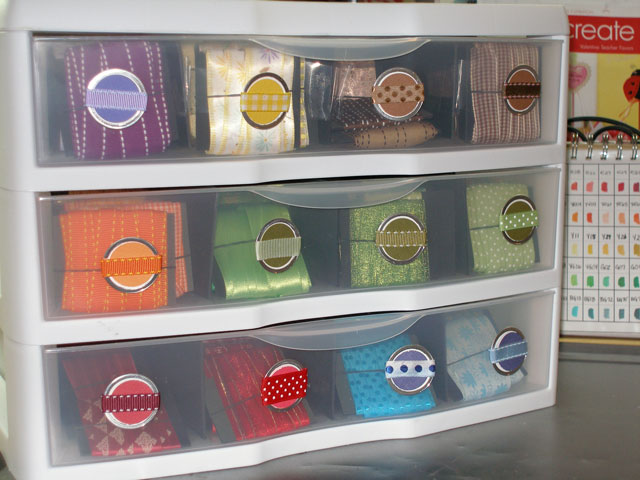
Hi all, I received a couple of questions through email and comments on the ribbon storage.  Rather than send the answers by email, I decided to post it here in case anyone else was curious. 

Size of the Drawers: The drawers are designed to hold 12 x 12 paper so the dimensions are just a little bit larger.  The unit of three drawers can be purchased at Walmart for about $10.00.  They also sell drawers to hold 8.5 x 11 paper, so the one is used is the larger of the two.

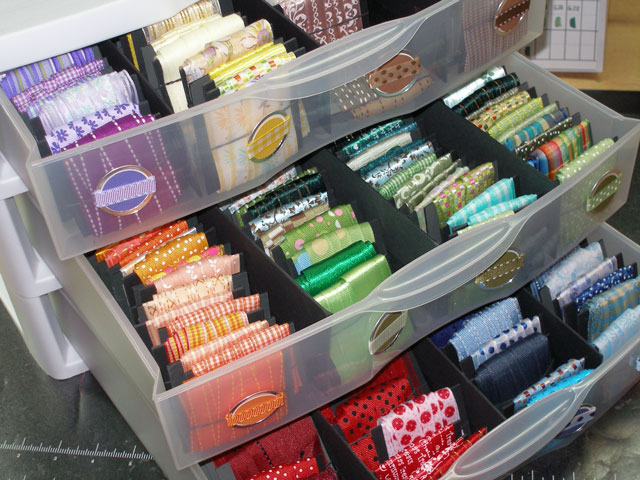
The Dividers: Ok, the dividers almost hold themselves in place and some people could get away with just putting a piece of mat board (12-13”X2”) in without anchoring it.  Me?  I’m a little bit too anal so what I did was tape the divider down on three sides.  It’s not a perfect science and I didn’t try to get to pretty with it because you really never see it, especially if you use clear packing tape.  So, what I mean by three sides is if you hold the mat board just like it sits when you are going to put it in the drawer, I taped the front edge on the left and right, the bottom edge on the left and right and the back edge on the left and right.  You could probably get away with only taping the bottom edge.  Does that make sense?   I divided the drawers into four equal sections, so I needed three dividers.

Matboard: I purchased full black matboard sheets from Hobby Lobby, they are 32″ x 40″.  I have a heavy duty 25″ Carl Cutter that cuts matboard like butter, but believe it or not, my older Fiskars Rotary Cutter for 12X12 paper worked fine as well.  It’s a pretty big board, so if you want it cut down to a more manageable size, I think HL will do it for $.50 a cut.   Depending on how efficient you are when you cut, you ought to be able to get about 220 – 240 bobbins out of one sheet of matboard.

The Rubber Bands: The rubber bands I picked up at Walmart in the hair section.  They are really small, about the size of a ring on your finger.  The ones I found were black but I understand that they exist in other colors and clear although I’ve never been lucky enough to come upon other cool colors.

I hope this helps, but feel free to send me any other questions you have!

pinTHIS SHAREthis TWEETTHIS EMAILthis
  • Dagmar MerrittFebruary 15, 2009 - 5:38 pm

    I too sometimes feel like I never have the right match of ribbon for my project. So, I just tended to buy more and more. Many times now, what I do is, I select a ribbon that I really want to use and I design my project around it instead of vice-versa.
    Just a hint, that I thought might help.
    DagmarReplyCancel

  • Tomi JoApril 21, 2010 - 1:25 pm

    Dear Becca, Well I will start winding ribbons soon—-got my foam board at Hobby Lobby, it’s 20×30 and cost 1.99—then I found all sorts of colors of rubber bands at The Dollar Tree—-500 for 1.00—can’t beat that with a stick.
    Thanks for all you wonderful cards and great tips.
    A Daily Reader, Tomi Jo, Moore, Ok.(just between so. OKC and NormanReplyCancel

  • Kathy OJune 26, 2010 - 11:26 am

    Thanks, Becca. I simply love this method of ribbon organization! No more searching, no ribbons ends hanging down, no more dust….it’s all there at a my fingertips…ready to see, choose, and use!ReplyCancel

Can I tell you that I am a ribbon-aholic?  I don’t know what it is, but when I see it, I just have to have more.  Even worse when I’m working on a project I don’t always feel like I have just the right ribbon.  Yup,…never fear, I’ll just get more.  Then, just how to store it?  Well, I have tried everything….rain gutters, tossing all in a big jar, ribbon rolls on cafe rods…and I found that my collection was just too unwieldy.  After thinking about, I decided that it’s the round rolls that make up all the bulk so I took the plunge and decided to get rid of that bulk.

To begin I purchased one of these three drawer units from Michaels for around $10.00, a package of small black hair rubber bands and purchased a sheet of mat board which I cut down into pieces measuring 2.5″ wide by 2″ high.  I decided on the matboard because I found cardboard bobbins you can purchase at the craft store to be too small and too flimsy.  I divided the drawers into four sections by putting in three 13″ pieces of matboard and anchoring them with tape.  I rolled all my ribbon that were lengths of 5 yards and less onto the bobbins that I had cut.  Now, just a warning, the rolling of the ribbon takes a little bit of time.  I saved it by rolling when I was watching TV and even carried a small bag of ribbon and bobbins in the car to roll while I was waiting in the car or at the doctor office.

But here’s the thing…..it’s amazing the amount of ribbon one three drawer unit will store!  In the picture below, 1 drawer can hold 140 rolls of ribbon; this particular unit is storing more than 400 rolls of ribbon!!  I love this storage because I can pull a drawer or the entire unit and set it on the edge of my workspace


Here are the drawers opened up to show how easy it is to pack and stack the ribbons inside the drawer.


Here is what one of the individual bobbins looks like.  It is simply a piece of matboard cut to 2.5″ x 2″ secured with a rubber band.


I have three of these units all together.  The top drawers are devoted to my American Crafts Ribbons.  Those are not stored on bobbins.  The rolls are smaller and since they come packaged in sets of six, I wanted to keep each mini palette together (shown below).


Even storing the American Crafts as full ribbons, I can get a whopping 88 rolls in one drawer!


I think this system will keep me for a while, I have a little bit of room to grow in each drawer and I can stack another unit on top if needed.  I also wanted to show a picture of the system that I’m leaving behind. Although it was portable, it was still too bulky for me.  Each unit was capable of storing around 80 rolls of ribbon but when  I got everything loaded I had 5 containers and over 400 rolls and it still felt a little bit too unwieldy.  It would work for someone with a smaller ribbon collection.


I hope this helps someone….it took me loads of time to brainstorm what I wanted to do and I’m really pleased with the results.

pinTHIS SHAREthis TWEETTHIS EMAILthis
  • i_heart_ribbonFebruary 23, 2008 - 5:46 pm

    We must be long-lost sisters because I have a ribbon addiction too! I came up with a different solution… I hang my ribbon. I can get 60-75 ribbons in a ribbon ring and I have one ribbon ring for each color. When I need pink, I just get my pink ribbon ring and bring it to my workspace. When not in use, my ribbon rings hang on a coat rack. You can take a look on my website. I have used these for about a year. Scrapbooking friends loved them so much they encouraged me to manufacture them, which I did. If you ever want to try one, email me and I will send you a free sample.ReplyCancel

  • Charlene Austin (Willow01)February 23, 2008 - 6:40 pm

    I am in true and utter awe! This is so wonderful! I am just developing my basement to make a craft space and thought I would do the eavestrough gutter thing but I think I like this much better. Really really gorgeous ribbon! Great job.ReplyCancel

  • Kay McBrideFebruary 24, 2008 - 10:09 pm

    hey I am so glad u showed this I remember u talking about it at our rubber ladies mtg. and wanted to know more.. now i do. first let me know how u anchored the dividers a little more in detail. are the black rubber bands those bands that girls use to hold their hair in pony tails? did u use the 12X12 or smaller drawers 81/2 /x 11.ReplyCancel

  • CasieFebruary 26, 2008 - 9:20 am

    Could you tell me what size drawers you used? I have a ribbon problem too and really need to get it organized. This looks like a great solution! Thanks for sharing!!ReplyCancel

  • nancy bFebruary 26, 2008 - 5:34 pm

    400 ribbons….Oh my goodness……that is truly amazing. I believe you do have a thing for ribbon!!! It looks great and I am sure it is so easy to work with this system you have. Thanks so much for sharing.ReplyCancel

  • HeatherFebruary 27, 2008 - 1:10 pm

    I’m so jealous and so bowing down to you and so copying you! :)

    Hubby is in Europe for the week. I’m going to Michael’s TONIGHT and sitting me arse in front of the Lifetime Movie Network and spooling away.

    I love your drawer ID’s too – so cute and original.

    You rock!ReplyCancel

  • HeatherFebruary 27, 2008 - 1:16 pm

    Can you give more details about size of mat board purchased and how many you needed for the 3-drawer unit?ReplyCancel

  • April HallFebruary 27, 2008 - 2:09 pm

    WOW, this is truly amazing! I am going to attempt this immediately! One question, when you mentioned that you anchored down the 3 divider pieces, how did you anchor them down in the drawer? Thanks so much for sharing your idea!!!ReplyCancel

  • BethFebruary 27, 2008 - 6:22 pm

    Unbelievable, love the idea and the pictures make me want to get organized….thanks for the info…ReplyCancel

  • Jan SchollFebruary 28, 2008 - 3:28 pm

    Here was my solution from a year ago-a rep from Making Memories used my idea in their corporate flyer too.
    ReplyCancel

  • Heather the MooseLoverFebruary 29, 2008 - 8:33 pm

    I’m curious- do the ribbons kink from being wound round the matte board or having the ponytail holder wrapped around them? I hate kinks in my ribbon so I am still on spools but in 3 weeks I’m moving 10 minutes away from the Offray outlet store… I don’t want to think about how much ribbon I’ll buy!

    Heather
    ReplyCancel

  • nancy bMarch 1, 2008 - 12:22 am

    You’ll be so proud of me….I made up my mind and sat down tonight and did exactly what you showed. I rewound all my 33 rolls of ribbon. Haha. It looks so much neater! thanks for sharing Becca. Any more way cool organizational tips I can copy?
    nancy bReplyCancel

  • GinaMarch 6, 2008 - 1:18 pm

    Great idea! I think I might try that but keep the rain gutter. I have limited space and very tiny fraction of the ribbon you have but that may work for me! My gutter sits at the back edge of my table (a recycled solid wood door with folding legs) up against the wall. the spools drive me nuts because the ribbon loosens on it and flops all over. it doesn’t stay neat. But the flat cards you have just may do the trick! thanks for the inspiration!ReplyCancel

  • gailMarch 11, 2008 - 4:57 pm

    Wow…… what a great idea….. and for very little cost!ReplyCancel

  • JackieMarch 21, 2008 - 3:59 pm

    You and I can go to Ribbon-hab together! Hi, my name is Jackie and I am a ribbonholic. Hi, Jackie :-) I love your storage ideas, very creative.ReplyCancel

  • MistyMarch 28, 2008 - 8:55 am

    You inspired me to post on my blog about my ribbon storage. I had a similar dilemma, but I used the cardboard spools and plastic tackle boxes from the fishing section in Walmart. Follow the link for photos! ReplyCancel

  • PokeMarch 30, 2008 - 7:27 am

    So simple and elegant – another summer project for me!ReplyCancel

  • MoniqueApril 1, 2008 - 9:24 pm

    I love the ribbon storage idea and was wondering where you got the mat board? I am going to look for some but would like to know what kind of place to go to. I have an enourmous amount of ribbon and like this idea to store it all.
    MoniqueReplyCancel

  • ChrisJune 15, 2008 - 7:02 pm

    I am wondering how you made the ribbon box that was your ‘old’ storage solution. I do not have nearly the ribbon you have and this solution I think would work perfectly for me.ReplyCancel

  • Victoria MartinJuly 3, 2008 - 11:27 am

    wow the ribbon thing is awesome
    thanks for postingReplyCancel

  • joy knorrJuly 30, 2008 - 1:16 pm

    wow for me also always struggling to stay
    organized. this is genius—–especially
    since i already use this same size organizer
    ….i hate having a mishmash of different
    size drawers.ReplyCancel

  • Mary AnnAugust 8, 2008 - 7:46 am

    Hi Becca,

    I love your ribbon storage idea. I’m thinking about adopting your method, but I do have a question. Do you find that the ribbon gets creased after it’s been wrapped around the card for some time? I’m not sure I would like having to iron it before I use it.

    Thanks for your help.
    Mary AnnReplyCancel

  • Sharon HarnistAugust 13, 2008 - 10:13 pm

    Wow, what a great, relatively inexpensive storage solution! Very innovative — thanks for sharing!ReplyCancel

  • rachelOctober 6, 2008 - 9:38 pm

    I really love your idea. I need to organize my stamps better. Would yo u be willing to sell me one of the ribbon holders you don’t need anymore? If so email me.ReplyCancel

  • […] it onto matboard thimbles so that I could decrease the huge storage space that rolls command.  (Check out this post to see what I mean. ) Well as I re-rolled the ribbon, I had many empty spools left over and the thought of throwing them […]ReplyCancel

  • janisluNovember 7, 2008 - 8:44 pm

    I love your idea.ReplyCancel

  • evetteNovember 13, 2008 - 10:12 am

    It is amazing how many addicted ribbbon people are out there. I too can not get out of a store that has ribbon without buying several (sometimes more!) spools. Oh my!!! Thanks for the GREAT suggestion. I am sure many of us will surely try it.ReplyCancel

  • KathleenNovember 18, 2008 - 9:02 pm

    A great idea but can I ask if the ribbon creases when wrapped around the mat board?
    KathleenReplyCancel

  • Sherry107December 7, 2008 - 1:49 pm

    GREAT idea Becca- I also found that the spools the ribbon comes on takes up-way too much space. I have been using Cropper Hopper long /narrow frosted storage boxes with the plastic bobbins- BUTTT am really liking what you have done here. The am using the plastic clips with the bobbins-but they don’t seem to hold- thanks (again) for great inspiration!!! Love your cards-and have made/copied two so far—they are sooo awesome! I’m afraid I am becoming a card snob-when comparing others to yours!! Have a great week! I am signed up for your daiky blogmail—makes my day when I see one !! God Bless!ReplyCancel

  • Charlene H.January 31, 2009 - 10:24 am

    I love this idea. What I really like is the idea of using a rubber band to secure the ribbon. I have purchased the plastic ribbon boards before and the little plastic ribbon clips. They look pretty but if you have too much ribbon the clip pops right off. I have a lot of loose ribbon and I think I will give your idea a try.ReplyCancel

  • EmilyFebruary 11, 2009 - 9:50 am

    This looks awesome! I am so jealous of your ribbon collection!! I started doing something very similar to this, but I’ve been using stick pins which I hate because they leave a little hole in the ribbon. Why didn’t I think of a rubber band?! Great idea!ReplyCancel

  • melissaFebruary 11, 2009 - 9:53 am

    OMG you are so organzied! I wish I was so organized.

    I may have to case this idea. How do you store your paper, your scraps?

    Thank you for sharing.ReplyCancel

  • KathiFebruary 15, 2009 - 3:18 pm

    Love your idea. My corner is in a constant state of flux. If I spent as much time stamping as reorganizing….I have a 3 drawer, and went to Michaels to get mat board. I was talking to the girl at framing, about what I wanted to do (your wonderful idea) and she just gave me a piece of mat board! Of course, they do get alot of my dollars.
    Thanks for the inspiration!ReplyCancel

  • Sharon LovoyFebruary 27, 2009 - 1:57 pm

    I saw your method linked to the Triple the Scraps site. Loved it. The only thing I did differently, was I used the plastic dividers from Cropper Hopper and chopped them down to the same size. I had tons of them and they worked better than the mat board. The other thing I did was to order the dial desk organization holders. I bought the 2x3x12 inch size for 1.80 each. I can fit 4 into a drawer and pull out the plastic holder when working on a project. For the first time, thanks to you, I can see my stash!! Blessings!!ReplyCancel

  • Karen BorehamApril 21, 2009 - 11:27 am

    You have my vote for “Ribbon Queen”!!!! Hail the Queen!ReplyCancel

  • Connie in NMMay 5, 2009 - 12:25 am

    You know.. I used to store all my “laces” on cardboard “bobbins” similar to this, though they were larger, because the lace is large. I never thought to store my ribbons this way… what a clever idea!! I even had embroidery floss stored like this and didn’t think of putting the ribbons like this!! TFS!!ReplyCancel

  • Debmom4caMay 8, 2009 - 11:35 am

    I have a wooden library card box that my Dad got for me. It currently holds my robbons but they are a mess. This will work great. I am going to put a little slit in the card to keep the elactic stuck to it. I am glad that my clothes steamer is in the same room so I can smooth out the ribbons, that way I will not need a ribbon iron and can get more ribbon instead :-)ReplyCancel

  • Jo4HimMay 16, 2009 - 12:09 pm

    I loved this idea for ribbon storage. It took me a little while to get around to actually doing it, but now that I have to looks wonderful and is so organized. I even enlisted by DH to help cut the mat board. He didn’t always cut straight lines (LOL), but it was a big help and who cares — noone sees it but me! Thanks for sharing so many wonderful ideas and cards. I love your cards.ReplyCancel

  • Savor the JourneyMay 19, 2009 - 2:53 pm

    BINGO!
    Becca, you are a genius!!
    I have been searching & searching for the “just right” solution for my ribbon hoarding. I have gorgeous jars of colorful ribbon across storage cabinets, plus way too many rubbermaid containers of all sizes of spools, plus SU ribbon holders, and even ziplock bags of more ribbon. ACCCKKKKKK!
    You are an angel & genius altogether!

    Tickled in Texas!
    BevReplyCancel

  • AvanticaJune 30, 2009 - 7:02 am

    OMG…this is freaky because I have almost a similar system I’ve been using for a long time now! Only yours looks gorgeous! Great Job!

    Where I live, its almost impossible to get plastic see-thru drawers so I just have some small, inexpensive plastic boxes in which I store them. Each colour has its own box! Easy and portable! Love how you stored yours! Heart!

    Would love to know where you got your drawer set from (pun unintentional !) and what dimensions does it have?

    Thanks,ReplyCancel

  • KimmeAugust 24, 2009 - 11:03 pm

    This is such a great idea. I made a trip to the ribbon outlets about 2 months ago and much of the ribbon is unspooled so it needed to be wrapped any way. This keeps it all neat and all the spools are the same size no matter when and where I got the ribbon. ReplyCancel

  • SheriOctober 27, 2009 - 3:51 pm

    Love the ribbon idea. Can I get some exact measurements of the 3 drawer container.

    SheriReplyCancel

  • GailNovember 8, 2009 - 7:44 pm

    Thank you thank you thank you thank you thank you thank you thank you!!

    Love this solution!ReplyCancel

  • […] Ribbon Storage #1 […]ReplyCancel

  • TawnyaNovember 27, 2009 - 5:36 pm

    I stumbled across your site and ribbon idea few months ago and thought this was PERFECT for me!! I was so excited. I started cutting and winding ribbon right away. I had SOOOO very much of it also. This is the greatest system for ribbon I have came across so far and thank you so much for sharing it with us.
    God Bless~ReplyCancel

  • Mary GuikemaApril 7, 2010 - 5:40 pm

    I took an online organization class and was referred to your website for your ribbon storage system. I was only mildly interested in reorganizing some of my scraproom areas, but when I saw your ribbon storage I fell in love with it. It took me about 3 weeks to cut, wrap and label my ribbons – I too needed 3 of the 3 drawer storage units to hold all my ribbon. Once I was done it looked so great that I realized I needed to reorganize the rest of my craftroom before I put my ribbon back in my room. 4 months later and I’m almost done!
    Thank you for sharing your wonderful ideas. I only wish I could come up with 1/2 as many fabulous ideas.

    MaryReplyCancel

  • Jenny PrudenApril 22, 2010 - 3:49 pm

    I love it I have a good friend who just ask how I stored my ribbon ,I just shook my head I,ve tried different method but YECK!!!!This looks awesome I think I’ll Make her one for her birthday while I’m making mine….Thanks for sharing…ReplyCancel

  • LizJune 6, 2010 - 10:23 pm

    Sounds like a great system! My ribbon is going to drive me crazy if I don’t get it under control shortly.

    The only concern that has kept me from doing this is the potential creasing the bands might/would cause.

    Have experienced this?
    Why did you pick hair bands over pins?

    Thanks in advance for your feedback!
    LizReplyCancel

  • BarbJune 17, 2010 - 9:19 am

    Thanks so much for the tip on the ribbon rolling!!! IT IS amazing HOW much less space it takes and I won’t have the ribbon flying out at me when I open the drawer!!!! Really appreciate your braintstorming idea!!!! THANKS!!!!ReplyCancel

  • WendyJune 21, 2010 - 10:20 am

    I saw this when you first posted it back in 2008 and I am wondering if you still like this storage method? I desperately need to come up with a new way to store my ribbons (previously have had them hanging on rings, but I now have 2 little boys who like to get into them!!). Also, do you find the ribbon creases and what do you do about it?
    Thanks!ReplyCancel

  • DebraJune 26, 2010 - 3:33 pm

    I also have a ribbon addiction, and I am constantly buying it. I presently have plastic baskets from the $ store with the spools lined up in them. The problem is, when I’m working on something, I pull out several spools and then the basket is a mess, and I have to clean that up too. I also have 4 large pickle jars – they sit up on my shelf and that’s not too bad. I have them organized into separate colors – one is for pink, brown, and red, one for white, one for green, blue, and black, and one empty. Problem is, I put all of what I currently use into the baskets and end up having to do too much searching to find what I want. Your system sounds much cleaner and more organized and one of the best methods I’ve seen.ReplyCancel

  • Cindy LouAugust 12, 2010 - 5:35 pm

    Hey Becca, I enjoy going through back “issues” of blog and found this one on your ribbon storage a couple of years ago. Do you still use this system? I need to do something, and just need to look at a few options. If this is still working for you, then I might give it a go ;) Thanks!ReplyCancel

  • WrinkleFreeDivaAugust 18, 2010 - 1:01 am

    This is an awesome idea! Thank you so much.ReplyCancel

  • JessicaAugust 20, 2010 - 11:43 am

    Wow Becca, thanks so much for showing this! And a great job of making it very clear too. I think I’m going to get a set of drawers and get started, as my ribbon is beginning to get the best of me! lol Thanks for sharing.ReplyCancel

  • VictoriaSeptember 28, 2010 - 7:58 pm

    WOW! This is just the solution I have been looking for. Best part is I already have several of these types of drawers. All I need to buy is the mat board. Just wondering how you cut it and if it kinks? Off to the craft store….ReplyCancel

  • […] had a look around. Is this what you mean? I'm guessing the problem is that the finished roll doesn't fit with the others. To […]ReplyCancel

It became difficult to remember what I had in the way of punches so from time to time I would purchase one only to get home and find out that I already had it.

One rainy day, I sat down and took on the task of creating samples of each punch and die cut as a reference.  These samples are kept in a notebook small enough that I can tuck it under my arm and carry it to the craft store.  Honestly, the punches and die cuts come to life when you actually cut them out.  This book has saved me time and time again from purchasing duplicates.  In addition, it has helped me figure out what punches I want to add to my collection and which ones will layer with others as well as which nested shapes I want.

The book worked out so well for me that I added samples of all the Cuttlebug embossing folders including the small sets of four.  Here again, all these templates come alive when you press them out .  I can carry the notebook to my table and flip through it at my leisure instead of having to rummage through the many drawers that currently store my punches.

pinTHIS SHAREthis TWEETTHIS EMAILthis
  • Kay McBrideFebruary 21, 2008 - 3:41 pm

    you have a really good supply, I really love some of those corner punches, if u ever get tired of any let me know!!
    kayReplyCancel

  • PaulaFebruary 29, 2008 - 4:00 am

    Great idea, I can not remember half the time what I have
    And I keep getting more.
    Looks like I will be busy for a few days or weeks.[LOL]
    Many thanks for showingReplyCancel

  • MarvMarch 14, 2008 - 6:54 pm

    I just love this idea. Maybe I can get my act together and do one for me.ReplyCancel

  • Nelda DeakinsJuly 26, 2008 - 12:25 pm

    Your organization of “everything” is what I need and after seeing your expert ways in the big “O” field, I do believe I’ll have to copy some of your ideas – especially the Sizzix dies! Wow! I am so glad I found your
    blog today, thru another one on Gingerwood. You are a fantastic card artist also, and it seems we both share the same likes in stamps, dies and supplies! Thanks for sharing your “everythings” with the public!
    Nelda in TNReplyCancel

  • GinaAugust 9, 2008 - 4:36 am

    What a fantastic idea…

    the amount of duplicate punches I have bought! luckily they get a new home with my niece but I could have bought others that I wanted instead and just let her borrow them allReplyCancel

  • Debi NicolNovember 6, 2008 - 9:54 pm

    WHOA! you are out of control girl! I cannot believe how organized you are…are you ocd???
    great ideas, if I loved to organize stuff. I love it organized but get too side tracked to do it!
    I want to create once I sit in my craft room!
    but this could also be the wonderful reason that you are soooo effective in your awesome creativity.
    great job!
    Debi Nicol at yahoo dot comReplyCancel

  • MarianJanuary 10, 2009 - 9:42 am

    What a fabulous idea! I’m going to start this now, before I am out of control as I’m heading there very quickly. I LOVE this craft and am finding that I’m addicted to the local store where I have left a huge portion of my pay checks…lol
    Thanks for a great idea!!!
    Your cards are beautiful…you are so very creative :)ReplyCancel

  • Michelle PagoneJuly 29, 2009 - 4:57 pm

    Thanks for your GREAT ideas. I buy so many repeats of punches

    and stencils. I am going to get off this computer and make a punch

    and stencil book! I love your cards you make !

    Thanks, MichelleReplyCancel

  • Maria L. (Canada)January 31, 2010 - 10:16 am

    It was so funny to see these pictures…..because it is exactlly the way I have my punches, die cuts and embossing folders samples organized, (and I have even a stamps sample book), everytime I buy something new I will get a sample in my books; sometimes when I am struggling for ideas I just open up my books and the ideas start coming to me. It is very difficult to remember all the things I have because not eveything is on sight … ‘out of sight out of mind’. Thank you for sharing your amazing talent with us. I wonder if you ever struggle for ideas like some of us.ReplyCancel

  • KEITH SMITHApril 8, 2010 - 1:26 pm

    Hi Becca!!!
    What can i say this is a fantastic way of a quick referance guide to all your punches, embossing folders and sizzix dies. I have lots of punches, folders and dies myself and will start some books of my own and also pass the ideas on to my fellow crafters here in the UK. Your card designs are just AMAZING thank you for sharing your talent with every one!!!

    Best Wishes
    Keith Smith UKReplyCancel

  • DeeMay 18, 2010 - 5:54 pm

    These are the best examples of organizing supplies that I’ve come across. Thanks so much for sharing them. I’d like to know what size the notebooks are and where you bought them?

    Thanks,

    Dee…FLReplyCancel

  • mlouJuly 2, 2010 - 3:16 pm

    Hi Becca,

    I’ve just found your website and I’m in heaven! Not only are there cards calling to me to make them, but I may have finally found a way out of the chaos in my craft room!

    One small request – please tell us more about the binders you use for organizing your supply lists:

    It’s hard to tell if you use letter size binders or the smaller half sheet ones, or some other size. Also, are they 1″ rings, or smaller? If you recall the brand and/or where you bought them, that would be a big help, too.

    Did you cut your own cardstock for the pages (or is it oaktag?) – or did you find the pages in a store?

    Thanks for sharing –
    MlouReplyCancel

  • JessicaDecember 19, 2010 - 1:21 pm

    Wow Becca, Thanks for this. I tried something like that a while back, but I needed the space for something else. The folder I used was way to big. Ilike this better. So next time I’m out and about, with scrapping dollars, I’ll check out the smaller size ones.
    Thanks
    JessicaReplyCancel

I N F O