Another card to share — isn’t the ribbon gorgeous?  The ribbon is where I got my inspiration from and I built the card and picked my colors from there.  It’s a pretty straight forward card and is one of my first attempts at coloring with my Copics.  I’m still in the infancy stages with them, but I love working with them and it’s unlikely that I’ll get bored with them.

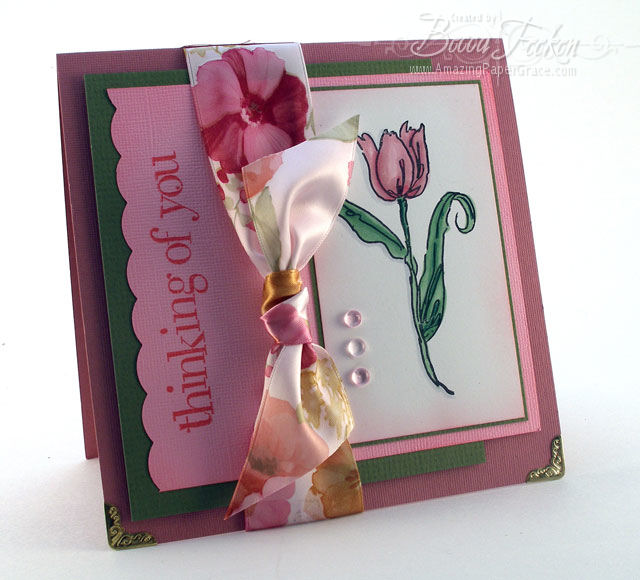
Oh, and the little gold thingies on the bottom corners of the card are embellishments that are pressed into place with a HomePro LR tool by American Tag Company.  I’ve had mine for several years and used it for setting eyelets – it functions much like the Big Bite.   Not too long ago, they came out with a new attachment to the tool that helps apply the corners and then presses them flat while holding them in place.  

Supplies:

Stamps:  Printworks, Heidi Grace; Paper – Bazzill; Ribbon – $1 bin at Michaels; Ink: Black Brilliance, SU Pixie Pink; Dew Drops, Decorative Corners for the HomePro LR; Accessories:  Copics

pinTHIS SHAREthis TWEETTHIS EMAILthis
  • nancy bMarch 17, 2008 - 7:05 am

    I love that ribbon also. You did great building the card around it. Thanks for sharing. It is beautiful.ReplyCancel

  • Kay McBrideMarch 17, 2008 - 2:19 pm

    well I love your site so much i have made it my home page!! dont want to miss anything. love those photo corners, and good job with the copics. show us some more organizing ideas, the ribbon drawers was such a big hit u should patent it!!
    kayReplyCancel

  • Kay McBrideMarch 17, 2008 - 2:20 pm

    oh i forgot dont u just love that dollar bin at michaels???
    kayReplyCancel

  • Charlene Austin (Willow01)March 17, 2008 - 11:49 pm

    Wow! That ribbon is gorgeous. It’s going to make me look at the ribbon in that bargain bin in a whole new way. Beautiful card.ReplyCancel

  • debMarch 18, 2008 - 3:44 pm

    LOVE THIS CARD !!! It is so me. Now all I need is your talent.

    Absolutely love the ribbon and Love the gold edge things.

    Another tool I’ve never heard of …….. Oh My Gosh … it’s never ending.

    I love that look – it’s kind of Victorian – which I adore.

    I nominate you for “American Idol of Scrapbooking and all other clever and crafy things”.

    debuReplyCancel

  • gill70June 14, 2010 - 9:48 am

    I have just found your site and what beautiful work you do . I love your attitude to life and christian values . I shall visit you often

    Best wishes from Gill U.KReplyCancel

Have you seen the amazing Easter creations out on the blogs?  Well, it inspired me to get on the ball and make something.   I needed some cards for a swap, and my stash of Easter stuff is rather small, but I did have this Inky Antics stamp on hand; I’ve wanted to use it for years and finally it saw ink!

The pocket is 4.75 inches wide by 6 inches tall.  With the tag tucked inside, it’s more like 8" tall.  I cut a strip of 12×12 double-sided pattern paper to 4.75 inches and scored 1" from one end and then scored 6" from the same end and used red sticky tape along the edges to create the pocket.  Out of contrasting double-sided pattern paper I cut two 1.5 inches strips – 12" wide and 4.75" wide.  The short 4.75" piece is trimmed with scallop scissors and glued into place on the flap while the 12" piece is wrapped around the pocket and  and then a ribbon tied around it.  For the tag, the sentiment is mounted on a 5.75" x 4.5" panel made from double-sided pattern paper.  Finished by cutting the largest circle scallop Nestability and gluing it to the top of the tag.  It was a sweet, sweet project  to make – and I cranked out 10 of them – assembly style.

Supplies:

Stamps:  Inky Antics, CTMH; Paper:  American Crafts; Inks: Black Brilliance, SU Pixie Pink, SU Lovely Lilac; Ribbon: White Grosgrain – Walmart; Accessories: Scallop Scissors, Nestabilities, Copic Markers and IKandee Chalks.

pinTHIS SHAREthis TWEETTHIS EMAILthis
  • HelenMarch 16, 2008 - 6:32 am

    This is very, very cute. And, spookily, I have that paper – was looking at it last night and wondering what to do with it!ReplyCancel

  • PearlMarch 16, 2008 - 7:48 am

    o my ! just darling ! this project is sooo sweeet ! Somebunnies are gonna be so pleased to receive them ! lolReplyCancel

  • debMarch 18, 2008 - 4:11 pm

    I want the bunnie !ReplyCancel


Ah yes, a much calmer evening.  I stole away to my studio after an early dinner and tinkered around with a couple of new things that I have laying out for inspiration.  The first thing I pulled out for this card was the cardstock and the rest of the elements fell into place.  Once I knew the cardstock, I found the design paper and picked my inks.  I have it say that it almost never happens this way for me, but I’m glad it did.  More often than not, I start out with the stamp.  I’m always curious to hear how people start the design process….if you care to share – leave me a comment telling me how it usually works for you.

The card is a simple one, I started with a dark gold card base topped with a lighter gold panel and design paper.  The sentiment, one of my favorites, is popped up on a dark gold and lighter gold panel which is sponged with SU – Really Rust.   The sentiment is stamped in SU – More Mustard with the edges of the stamped rolled with SU – More Mustard.  Two Nestabilities scalloped circles back a Nestabilities circle embossed with a Cuttlebug plate.  The circles are punched with a word slot and threaded with grosgrain ribbon held by a slide.  Incidentally I could not find the right color ribbon to save my life, so I colored the white grosgrain ribbon with Copic Marker Y26.  The last embellishments were a scallop punch cut to form a photo corner, the round tab added to the top of the sentiment and rhinestone bling.

Supplies:

Stamps: Wordsworth; Paper:  Bazzill, NRN Designs; Inks: SU Really Rust, SU More Mustard; Ribbon:  Michaels White Grosgrain; Accessories: SU Round Tab Punch, SU Scallop Punch, SU Spiral Punch; Nestabilities; Paper Studio Gems; Copic Marker Y26;

pinTHIS SHAREthis TWEETTHIS EMAILthis
  • nancy bMarch 14, 2008 - 7:22 pm

    very nice….I love the colors and that is a great sentiment. See you tomorrow.ReplyCancel

  • PearlMarch 15, 2008 - 2:16 am

    Hi Just discovered your Blog today ! i’M SOOO INSpIRED BY YOUR BEAUTIFUL CARD CREATIONS . makes me want to go make more ! lol just gorgeous !ReplyCancel

  • Kay McBrideMarch 15, 2008 - 8:18 pm

    I have got to try the circle with the cuttlebug emb. dye. I have that one and just love it. hope u dont mind if I use your idea. pretty card.
    kayReplyCancel

  • EliMarch 21, 2008 - 4:19 pm

    HI

    I take a look in your blog and you give me a lot of inspiration. You have so many nice works here. I`m from Norway, but I like to see another card and scrapbooking. I have been in US for two years since and you have so much more rubberstamp and another things we like to use in US. Here is all of this things werry expensive.

    I like all of your things, you are so greate.

    EliReplyCancel

  • Julia TilleyAugust 15, 2008 - 8:10 am

    I have just found your web sight and boy it is wonderful. You have one of the very best. One of my friends and I stayed on the phone with each other yesterday and looked at this sight and talked and talked. You have blown us away.ReplyCancel

  • EileenAugust 11, 2010 - 12:47 pm

    I have just subscribed to your blog and WOW….what a fantastic blog….you are definately AMAZING!!! You are soooo clever and very inspirational. Thank you for sharing all your work with us. I can see I am going to be popping in here often for inspiration.ReplyCancel

I N F O