


Hi there blog friends, I’m posting part three of the Pop Up Birdcage tutorial!! To keep the picture count down I integrated most of the pictures with text instruction. If you follow along step by step, you will be just fine. I’m curious to know if you are going to try it. If you think it’s way too hard, I’d appreciate that feedback as well. I love this type of project and hope to do more if I can successfully lead readers through getting it together!!

| S5-033 Spellbinders Bird Sanctuary | Lace |
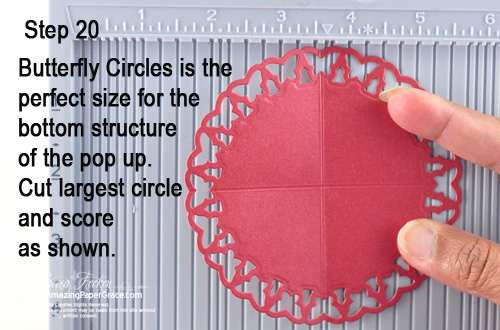
| S4-329 Spellbinders Butterfly Circles | Seam Binding (Hug Snug) |
| LF-127 Spellbinders Grand Scalloped Square | Felt – Green and Burgundy |
| S4-328 Spellbinders Foliage | Pearls – Recollections (Michaels) |
| S4-114 Spellbinders Standard Circles LG | Pearl Stick Pin – (Joann’s) |
| My Minds Eye – Adore Fly Away Paper (HL) | Prima Lace |
| My Minds Eye – Lovely Shabby Chic Paper (HL) | Scor- Pal |
| Antique Linen Distress Ink | Scor-Tape – 1/8″, 1/4″, Sheet Tape |
| Vintage Photo Distress Ink | Velcro Dot |
| Coredinations Tan Pearl | Colorbok Metallic Paper – Gold Foil |
| Coredinations Lavender Pearl | Strathmore Linen Canvas |
| Coredinations Scarlet Pearl | Sewing Machine |
A couple of tips to start:
- There are a lot of pictures here. What you see on the screen are thumbnails. Click on the picture to see the full text on each step.
- Heavy cardstock is important. I’ve used Strathmore Linen Canvas Paper. You could also use a 140lb Watercolor Paper.
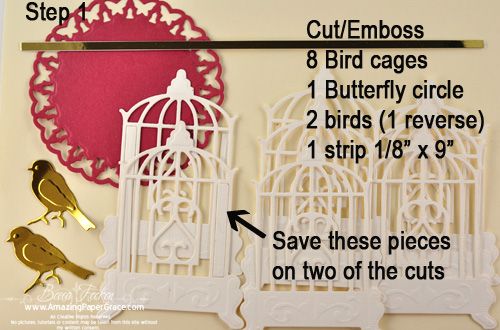
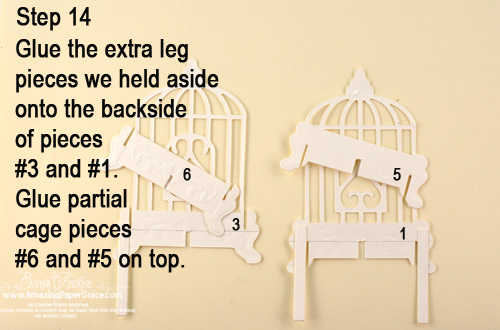
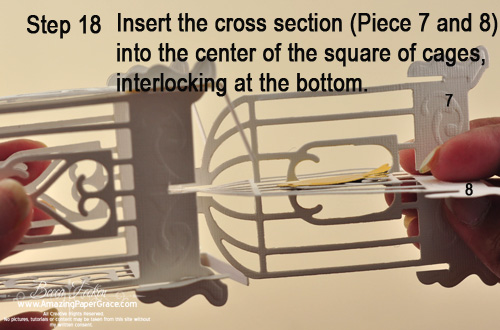
- Pay attention to the the pieces – I’ve numbered them.
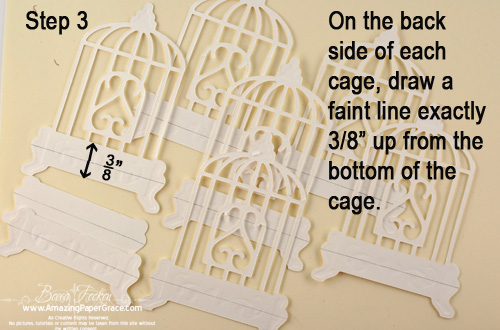
- I’ll ask you to make light pencil marks on the backs of the cages. Before assembly is finished, erase the pencil marks.
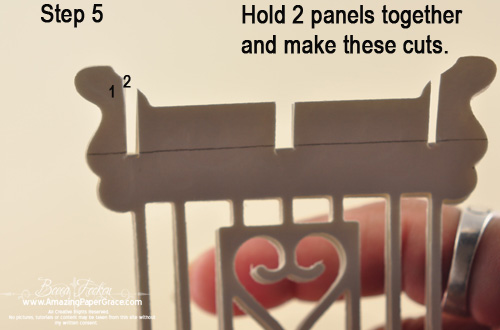
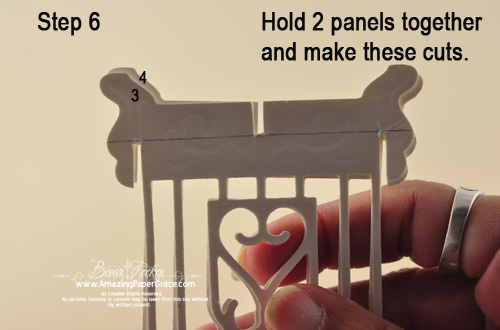
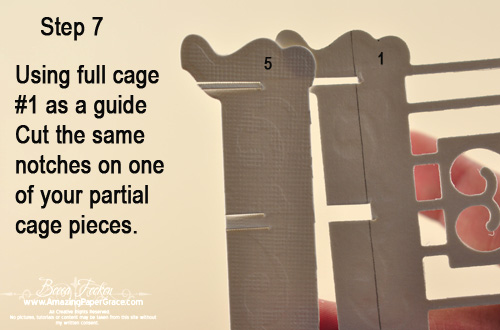
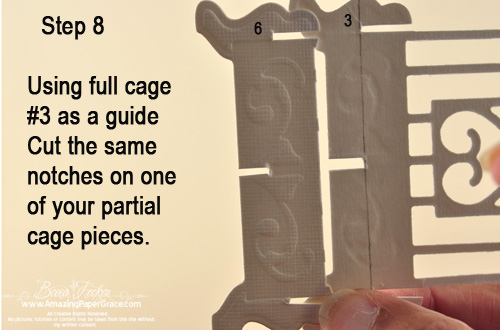
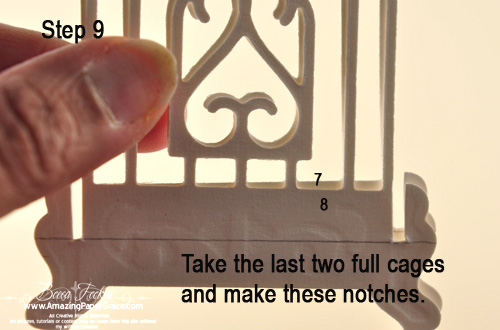
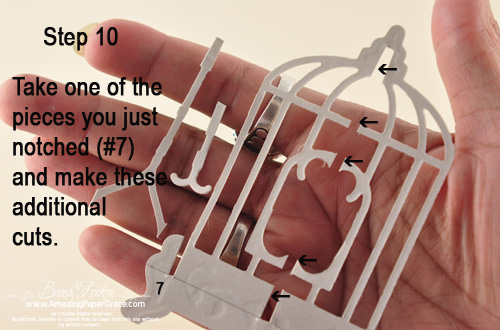
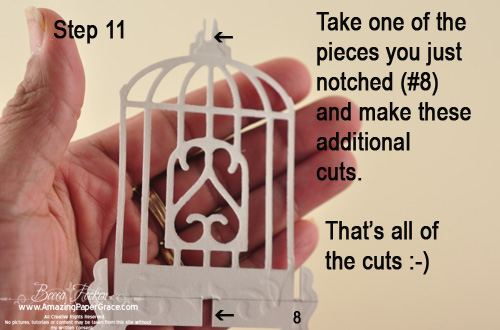
- There are eight birdcage panels and pairs of them have notches cut in them. Don’t stress about the notches!! The most important thing to know is that you have to cut all the way to the line. If you cut short, your birdcage will not sit level, if you cut a tiny bit too long, no one will know but you.
- Breathe! Okay, let’s get started :-)


Here is a full size of my reference picture. Depending on your computer, you may be able to print it out so that you can reference it as you step through the tutorial.

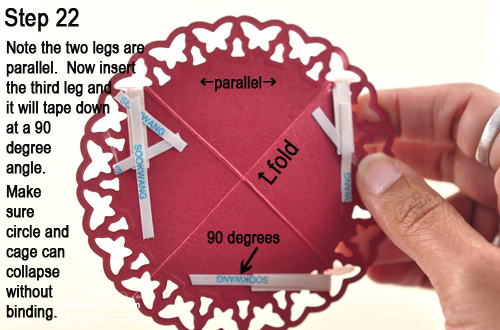
Below is a picture of what the cage looks like when it’s collasping. It should collapse easily and open up easily. Remember, you don’t absolutely have to do this as a pop up. You can make a nice 3-D decorated gift if you like!

Well that’s all folks! Once I get done with my deadlines, I think I’ll make some more of these. In the mean time, happy crafting!!


Wow, amazing!!!! What a work of art and thank you again for all the time and trouble you put into this tutorial (and all your other tutorials) for us all. You truely are an inspiration (it was your blog that influenced me into making my own. And yours is the standard I am working hard to meet…if I ever will :) ). Fantastic!!!!! Hugs Debbi xxx
Becca! WoW1 Another great tutorial on Part 3, the birdcage and the fold-up part of this stunning box-card. Thank you so much for all the time and hard work that you’ve put into this wonderful creation and tutorial for us. You’re so kind and such a star.
Love Sheila xx
This is gorgeous, Becca! How do you come up with these ideas ? Most of us would see a one-dimensional die. I’ve got the die on order and would love to try this project when I get the die…. though I must say I’m a bit intimidated by all the steps! Thank you for taking the time to provide such detailed instructions. You are wonderful.
HI! I am a new follower introduced to your amazing work by a fellow card maker. Every thing you do is truly amazing! Thanks so much for sharing.
WOW!!!
I am constantly amazed and inspired by you Becca. Everything, and I do mean everything, you do is absolutely elegant and beyond words. You are so willing to share you knowledge and discoveries with all of us and we are so very blessed to have you as part of our lives. Thank you for all your beautiful creations, meanderings and friendship.
Cheers for the Great North,
Janet
Hi Becca,
I don’t know how you come up with all the things you do with the Nesties, it must have taken you some time to figure out how to do the bird cage. I would love to try it ,for Ilike doing things like that but won’t go out and buy the die just for that. Thanks for going to so much work to put this all together. I love all the things you do, some are a little to busy for me but they sure look good how you put it all together.
Oh wow that is gorgeous! WOW WOW WOW!!!
So much hard work on the step-outs Becca, it is greatly appreciated. The finished project is stunning. I may try this some day. At least I know that I can come here for the directions. as always Becca, TFS!!! :-D
Hi Becca, Thank you so much for the info: on this Bird cage project, I have done each step on the day you posted it so I would be ready for the next step , ladies it really isn’t that bad, I didn’t have the LF-127 Spellbinders Grand Scalloped Square so I used a punch for my scallopeds and it worked fine, I used the inks and papers I had on hand and stamped the bird cage and bird on the front, I will be using this as a pop up for a special Birthday and then as decor on a table with two doves sitting in the cage for my daughters wedding shower ( might end up on the tables at the wedding too.)
Thanks again Becca and give it a try ladies
liz
WOW! Absolutely beautiful! I am not sure I am brave enough to try it, but I might some day. Thank you so much for the wonderful instructions.
Becca, thank you for taking the time to create the videos for this lovely & imaginative project.
As for my fav color palette, I like them all, some more than others. I have a container of color ideas & when totally stumped, pull a color idea out & use it.
~C8>
Oh! WOW!! as Patty says.
I agree with all the above.
What a great project.
Thanks Becca, for sharing this one.
mary.l.
Way toooooo cool. I guess if I made this the person better not pitch it ever. Love it and thanks for sharing the idea with us all.
Looks pretty easy. I for one am going to try it as soon as I can get the die. Thanks for taking the time for the tutorials. Enjoy your Sunday!
Wow, you make it look so easy. This is an awesome series, card, tutorial. etc., etc., etc. I love everything about it. How do you come up with these ideas? There is no way that I could have ever figured out the mechanics of this card. I would love to make this set, it is so gorgeous and I am totally into birdcages now. You have really made this doable, it does not in the least intimidate me. All I have to do now is buy the birdcage die and I will get started making this. Thanks so much for taking the time to provide us with such in depth tutorials, you are incredible. I look forward to all of your posts, you never cease to amaze me.
PS- Your cards are not all busy, I love your style and the time and love you put into making these projects. I also love your attention to detail and perfection, my type of artist!
Good Heavens Becca It’s simply stunning. I can see this at a lot of weddings. It amazes me not only how you can figure out all the individual steps for something like this but your willingness to put so much work into sharing it with the world.
I think you could become a rich woman if you put all your tutorials into a book. I’d bet it would sell like hot cakes. I don’t buy craft books but as often as I refer to your Becca Bits and Becca Bows I know I’d buy your book and keep it on my work table at all times.
Blessings Bernie
Gosh Becca have I ever told told you, you are a talented, patient, generous, genius? That is a marathon tutorial and does appear to be very clear – unfortunately I’d eat it before I’d venture into making it! Perhaps I can blame the fact that I don’t have a dedicated ‘craft space’ but… Thank You, Thank You, Thank You.
WOW! Absolutely beautiful! This is an awesome series, card, tutorial good work Becca i love your blog it is just amazing thanks.
Wow, that is amazing! You are one talented lady and yes as someone commented you really should publish a book with all your Becca Bits.
WOOOOOOWWWWWWW!!!!!!!!!!!!!!! This is WONDERFUL Becca!!!!!!!!!!!!!!!!! I don’t have this die, but your tutorial SURELY makes me want it!!!!!!!!!!!!!!!!!!! Thank you for showing us!!!!!!!! All those little cuts…..I WOULD BE intimidated, if it weren’t for YOU showing us!!!!!!!! THANK YOU!!!!!!!!! :)
Whew! Lots of hard work went into this tutorial, for sure! I don’t have these dies yet, but I do plan to purchase them and try your tutorial. Thank you for breaking down the steps for us! I can’t even imagine the time you put in to figuring this all out!
Thanks again!
Donna G
This is the most beautiful card I have seen… Each step is a step of love. Now I need to get the supplies and try this…thanks so much!
Ur awesome!
Becca,
You slammed this one out of the ball park!!! WOW, I can’t say enough about this Birdcage Popup Card and Giftbox, it is absolutely gorgeous. I am going to try this one. Thank you for the step by step instructions. Not sure if it will ever look like yours, and it may take me a year or two, but I am going to give it a try anyway..
Thank you so much…
This was a fabulous tutorial… I do not have the birdcage, but i am thinking about other die cuts until I can acquire it….. I didn’t see how wide the notches were suppose to be.. noticing that the center one was twice as wide as the rest.
I am looking forward to more of your tutorials… this one was fabulous!!! You did an outstanding job…thank you for all of your hard work!
Fabulous pop-up card tutorials. Thanks so much for the detailed tutorials. I am on my way out to buy the heavy duty paper to make the bird cage. I love pop-up cards and have made several but your’s is over the top and I’m loving it. Thanks so much
I am so impressed by the inner workings of your mind! Thanks for giving us a peek inside!
Becca, I must applaud you and say THANK-YOU! This bird cage pop-up card/box is just awesome.. Daily you bless me with your wonderful creativity and sharing of your knowledge. I’m always learning something from you. I totally appreciate the time you have taken to put this very detailed outstanding tutorial together. It’s the best tutorial I’ve ever seen. This project is on my to do list, can’t wait until I get the die templates (August ship date/not easily found). Again, Thanks-so-much & have an awesome Sunday! Hugs & Blessings…
WOW! Simply fabulous. I love 3D projects too, but, I do not think I will try this as cutting with scissors won’t be an easy task at all. I do not own any crafting tools yet nor are they available here.
Wow, how beautiful! Thanks for sharing your creative talents with the awesome tutorial :)
~Rachel in Sacramento
Thank you so much Becca for doing this awesome tutorial for us here. I know, how much work goes into making them, so I really apreciate it, I can tell you.
I just have one question, Am I the only one, who´s only getting half of the text on the pictures onhere? For some reason I only get either the first or the last of the text, depending on which side it´s on??? It doesn´t really make any sense here on the third part? The first 2 were just perfect, but this third part, seems to miss half of the text on all the pictures??? I hope, I´ll be able to figure it out thoug, when I´m geting on with it, as it might be logic then.
Thanks so very much again hun for all your stnning work and for always sharing it sooo generously with all of us.
Have a wonderful week-end here and take good care hun.
Hi Becca,
I love that you provided us with every little detail for this GORGEOUS birdcage…I definitely need that! I would love to try this, but need to buy some of the Spellbinders dies, so I’m bookmarking this tutorial…thank you so much!
Oh, and my fave colors are the same as yesterday (LOL) ~ Pink, Black and White! Thanks again for all that you do to inspire us…you are AMAZING!!!
Have a great day, Barb
BECCA FIRST OF ALL,. THANK YOU FOR TAKING ALL THAT TIME TO
PUT THE DIRECTION DOWN SO WE COULD MAKE THE BEAUTIFUL
BIRD CAGE AND CARD. I CANNOT WAIT UNTIL I CAN PURCHASE THE
BIRDCAGE DIE SO I CAN GET TO WORK.
I REALLY APPRECIATE ALL THE TIME MAKING THE CARDS, AND THEN YOUR MAKING A TUTORIAL WITH PICTURES. NOT MANY OF
THE ARTISTS WILL DO THAT. BUT THEN AGAIN, YOU ARE SO VERY
SPECIAL IN MY MIND.
CYNTHIA
This is truly amazing! I love the step by step- I just don’t own the dies yet so I will reference for another day.
You did a fabulous job!
blessings to you,
Wow, when you said pop-up I thought you meant it was mult-dimensional, but you really meant “pop-up”. How ever did you come to this intricate design. Do you ever sleep? I’ve said it before, you are a genius when it comes to creating outside the box. Thank you from the bottom of my heart for all the time and energy you put into making it possible for others to benefit and enjoy your creative spirit. You seem to have boundless energy, creativity and generosity. Thank you Becca.
You have put so much work into this beautiful project and thank you for it! I will have to wait till I get the bird cage die to do it though. My next favorite color is blues and to Maryann who wondered if anyone else was having problems seeing the words around the pictures in the 3rd tutorial, it is doing it on my computer also. Should still be able to figure it out I think.
Thanks Becca.
Becca
Your Pop up Bird cage tutorial is magnificent, I will try at some point when I feel I have lots of patience!
Becca, Your Pop up bird cage tutorial is magnificent; thank you! I will try it when I feel I have lots of patience! Also thank you for the opportunity to win the beautiful Prima papers
Maryann, try clicking on the first picture in the step by step instructions. When I did this it opened a new enlarged screen with complete instructions visible.
Thank you so much for your “ever so detailed” instructions. We in the card making world, are so fortunate that you are willing to share your “how to” on your card projects.
I don’ remember the exact words to the quotation, but it goes something like this …”Who we are is God’s gift to us,what we do with our talents/abilities is our gift to God”. Becca, each time you create one of your beautiful cards and share it with others, you glorify God. Thank you.
We are so fortunate to have you as our teacher for such a beautiful project. Lucky is the person who receives this birdcage! I love working with blues, but my next favorite color would be the purple and pinks.
Amazing! I just love it!
Today I went shopping and decided I love all paper color combinations.
Wow! What a project! Although I like ornate cards, I don’t think I will make this birdcage card. Your instructions are very clear, and the end result is fabulous! Thanks for taking the time to make this process so clear!
Thank you so much, Becca, for taking all the time necessary to make this wonderful tutorial. I greatly appreciate your detailed instructions as I know I would need them to help me create this gorgeous 3-D project.
I love, love this type of project. Please continue to do more of this type of tutorial. My best friend, Susan, would call this a Bert project.
You are so awesome. Thanks for all the work you did just so we could make this marvelous bird cage!
OMG . . . that’s all I can say! OMG! Please just let me crawl into your brain and sleep there for a little bit. I love, love, love this project. Can’t wait to try it. Thank you Becca
Becca oh wow this is awsome and so well worth waiting for.
Thank you for your inspiration.
Hugs Trish.
Thankyou Becca for the huge amount of time and effort you have put into these tutorials! I love it and keep going back to look at the pictures of the project, it is so amazing. I would love to give it a go, I guess it will depend if the dies ever become available in NZ. They mostly do around six months or so after they are in the US.
Hugs and Blessings Becca, you are amazing.
This is just incredible! You are so talented! Hugs, antonella :-)
WOW – beautiful, and your detailed tutorial is amazing. Thanks, Becca!
I agree WOW. The project itself is beyond stunning, creative, imaginative and more. Your tutorials are always so helpful and easy for others to follow. Becca Thank You for being such a good teacher.
Great card and so beautiful. Thanks for sharing your talent so we can make a beautiful card too. By the way, I am new to your site and I love the name of your site!
I wish I could write THANK YOU a million times, I cant wait to make this,
since I started reading your blog I have to get the packages at the door before my family sees them from buying so many spellbinders dies LOL.
Thank you for doing this, Becca! I loved the project that you made and soooo wanted to win it. I don’t own the dies for this yet… yet being the operative word! They are def. on the list. I think that I could re-create your pop up bird cage using your directions.
Hugs,
R/
Hi Becca……it is absolutely beautiful and if it were offered in a class format with an Instructor going over it bit by bit with me I would love to do it…..however it looks a little difficult…….stunning though.
Gorgeous and wonderful instructions….might have to give this a go!!!
Wow! How do you come up with these ideas? Are you an engineer? Thank you for the tutorial.
Gorgeous!!! Love this project!!!
I love pop up cards and this is completely amazing!!! Oh my gosh!!
Wait! I just checked…I can’t get the die until Aug? I want it NOW so I can try this. : ( Thanks for all the inspiration you provide!
How do you make your crochet rose…..luv it!
You are amazing!
as always…love your creativity!!!! Say!!! can you post the instructions for the crocheted rose? I too love to crochet!!!! as well as make cards!!! Thanks so much for all your inspiration!!
The goodie candy looks yummy! Thanks for the chance to win!
I find your tutorials easy to follow. I don’t have this die, at least not yet, so I don’t have plans to make it, but I’m sure I could now that you’ve spelled it all out. Thanks for being such a good and generous teacher!
Wow,wow , wow!! It may be more time consuming & a little more difficult but for that once in a lifetime special card? it can’t be beat! It would be worth every moment spent!!! Thanks so much for sharing.
Awesome, awesome, awesome! Such a fab card, so many details and time went into it and the tutorial…and it shows!
Wow, what an awesome, AWESOME project. I just don’t know how you think through something like this and make it work, unless maybe you’ve got a civil engineering degree. You are one of those kind of people that write craft books on how to make all sorts of creavtive things that the rest of us buy and wonder where they came up with all those fantastic ideas. You have just an amazing talent!! I’m tempted to draw something like it and cut it out just so I can try it. If I ever get a die similar to it, I definitely will make one.
Oh, yeah, btw I agree with so many others…the tutorial was great and very easy to follow!
Becca, I don’t usually comment on blogs but I feel I have to Comment on the Birdcage card. I LOVE your site for the elaborate, the unique and the special techniques. PLEASE do not “dumb down” your work. I want to praise and thank you for your tutorials and bits and your willingness to share your art. These are the things that make you and your site so wonderful. I have peeked in on your work for just over a year now and look forward to your words of faith and wisdom as much as all the rest. I find most of the cards on the web to be silly or juvenile or just plain ugly, but you, ODB and flourishes are my go to inspiration sites. I also enjoy the bring-back-beautiful cards. love and prayers; Renie
Becca – thank you so much for taking the trouble to produce such detailed tutorials. This is an amazing project and I suspect there will be birdcages popping up (pardon the pun) all over the place!
Hugs
Anne (UK) x
This is an incredible card. I can never get over how gifted you are. All my stamping friends think you are their #1 go-to person for card ideas! Me too, of course!
Hi Becca, This is awesome. I can’t wait until mine arrives from Spellbinders. Thanks for sharing kendell
Becca,
You most certainly put a lot of hard work into this tutorial.
This is surely a labor of love:) I think you put a little bit of
yourself and a whole lot of love into everything you create.
Amazing Instructions Becca! I was able to follow them with little difficulty and made the birdcage — and it popped just as it was supposed to! Much to my amazement! I only tried with practice paper, but am ready now to do one with “real” paper — you inspire me everyday. Thank you so much for the endless time and effort you put into your blog and cards and projects and for sharing them!
What a faboulous card!.Didnt think I could make it but followed your detailed instructions and I am sat looking at the birdcage now and i am so happy with it.Your card making is in a league of its own- just the best.Thanks for all the inpiration.