

Hi there! I’ve received so many requests to share the equipment that I use to photograph cards and today I finally pulled everything together. I think I procrastinated on this because I was a little bit embarrassed but hey, the equipment I’m going to show you served me well for over a year and a half and just this past year I purchased new. I’ll show you both and let you judge for yourself.
This is the first light tent I used to photograph cards. I didn’t want to make an investment in expensive equipment until I learned how to photograph cards and I wanted to make sure I would stay at it for a while. (By clicking on any of the pictures below a larger picture will pop up).
 |
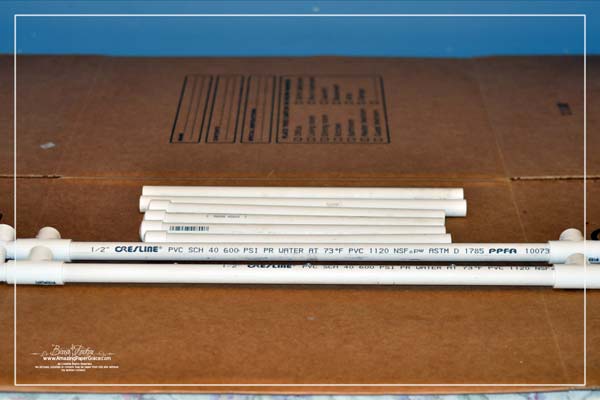
Shown here: Initial materials were less than $30.00 at the time I constructed this. |
 |
This light tent was very easy to build. I was lucky enough to have the hardware store cut the pieces for me. The instructions and supplies list can be found HERE. |
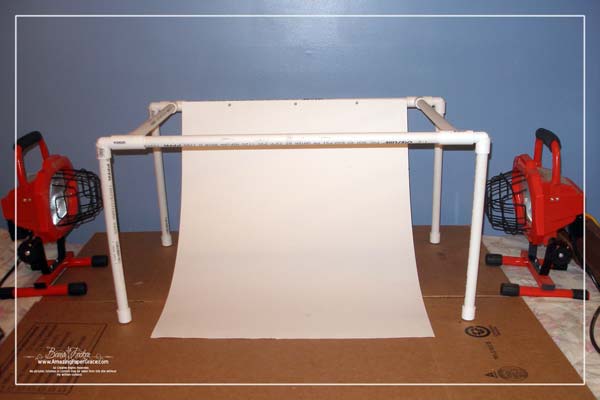 |
Here’s what the tent looks like once assembled. There are three screws across the back horizontal beam. The poster board has three holes punched at the top so that it can hang there. The end result is that you have a backdrop with no creases, seams or folds. |
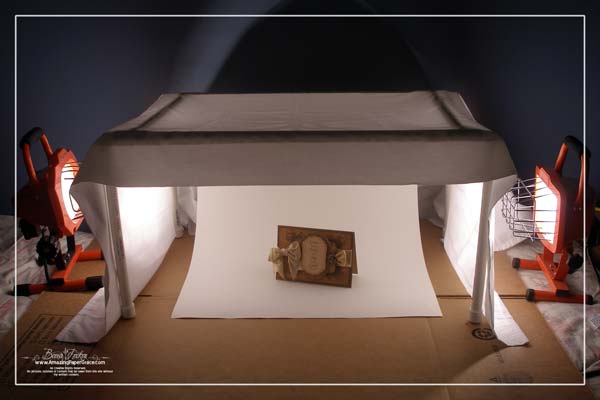 |
Here is the tent at work. I have a spare bedroom and this is always up and ready to go. Just for a level surface I have corrugated cardboard laying on the mattress of the bed. Needless to say, the lights are on only long enough to snap a picture and are never unattended. |
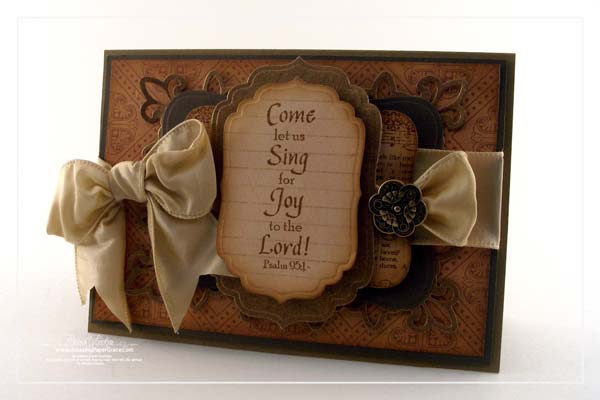 |
I snapped the picture as it was set up above and this is the result that I achieved with the PVC Tent after editing. As I mentioned, I used this for a good year and a half of my blog. This past year I moved to the system below. |
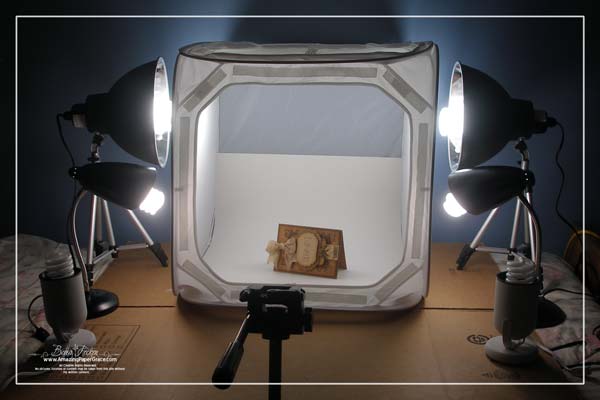 |
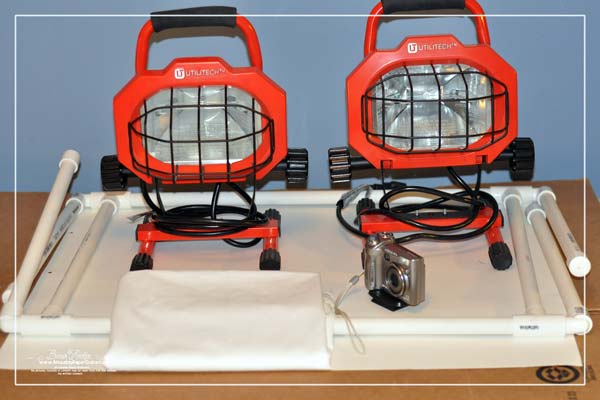
My dear friend Debbie Olson published a post with a fabulous lighting solution that she was very pleased with – you can see that post HERE. I purchased the exact same thing however I added two additional lights because I’m working in a dark blue room and I photograph a lot at night. I seated poster board inside the tent to camoflage the seam. Also, I always use a tripod. |
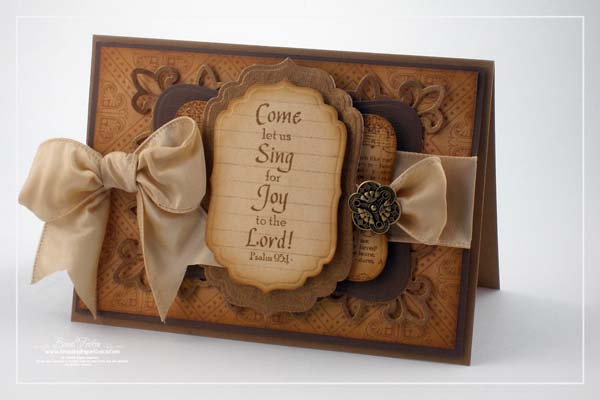 |
I snapped the picture as it was set up above and this is the result that I achieved with the “real” light tent after editing. Both pictures were taken with the same camera. |
Not much mystery to it is there? I hope this is helpful to all those who have asked. I do have to say that one piece missing from the equation here is editing software. I use Photoshop however many I know use Photoshop Elements. On the first light tent above, the lights give off a slightly red cast – since I knew this, I was able to compensate in my editing software by balancing the colors. I’m not an expert on this but setting white balance on my camera took a lot of the work out of editing and color balance as well. The second set of lights give off a blue cast and was easily corrected by resetting the white balance on my camera.
All was done with an Olympus SP-310 Point and Shoot Camera, although any small simple point and shoot should give you the same results. (The only reason I’ve listed the name here is because many of you have asked specifically for the camera name and brand). The key is in the lighting and knowing how to expose to get your best shot before you sit down to edit with your editing software. I have another camera that I have not used yet because this camera is so easy and gets a great shot when I need it.
So what made me want to move from one solution to the other? Well the first tent was truly a “budget solution” and I found I had to be so careful around the lights. Which leads me to share this disclaimer — use work lights at your own risk. They are extremely hot and are not intended to be turned on for an extended amount of time and should not be used around small children due to burn risk. Because of the heat of the lights, they cannot be left unattended ever.
If you are interested in further seeing the difference between the two solutions I used – you can go back through my posts and tell the difference. I used the first light tent from the beginning of my blog until January 2009 – from January 2009 forward I used the newer lights and tent. I hope this is helpful!


That looks incredible, but don’t think I’ll give it a try…..I’m too accident prone!
My husband has a job for the day…He has to go shopping. Thank you so many times for the idea.
Have a really nice day. Take care,
Thanks so much for the info, Becca! I was just talking to my hubby about this recently!!! Thanks for sharing all of your tips with us….you’re the best!!! God Bless!!
Thanks for the info. Maybe one of these days when I become an independently wealthy woman and can stay at home and not work, I will be able to craft and post to my heart’s desire. In the meantime, I will thoroughly enjoy and appreciate those of you who do it for me. Thanks bunches for all you do –
You are such a sweet heart for sharing this. I just mentioned something the other day to my hubby that he needed to make me something along this line.
This will also be great for taking pictures of my flowers as well.
Love All your ‘Becca bits’. They are most helpful
Thank you
Colleen
WOW!!!!! Your cards have ALWAYS looked GREAT!!!!! It is VERY nice to see how you’ve done this!!!!! Gets ones mind a thinking…… Thank you for sharing!!!! :)
Thanks Becca..
Fabulous! Thank you SO much for sharing this!
Thanks Becca for this infor. U have given it will help a lot of people went on ebay and saw this equipment before it run about $30.00 including the tripod so that was not bad at all was looking into buying one myself my things can U also give tips on how to set up a blog I don’t know how and have ask but in my circles no one know please help would like to enter into contests but they want you to have a blog and link it to something. and I would like to show some cards that I have made to friend in a different state so they can go to see them since I am not there anymore thanks I know you are busy so when ever you can.
Thanks Becca. I tried your solution but, in Canada, it cost almost $70.00 just for the fittings. I ended up using the cardboard box route and I found two cheap desk lamps at Canadian Tire. I changed the light bulbs to Daylight fluorescent and I am quite happy with the results….though, I would like to pick up two more clamp-on lamps to give just a touch more light.
Great post Becca. A light tent has been my saviour. We all have problems taking photos of our creations, particularly in winter and this is so useful.
Great post! Many of us struggle with photographing our work! Thanks so much!
Thanks so much for sharing. I think this will work much better than a blanket thrown over my laptop!
Thanks so much for the information. I gave the print out to my DH – it’s his next project for me.
When you take the picture, are the lights in the room turned off, except for the two lamps? In other words, does the room need to be in the dark?
Thanks again!
Carmen
cal8007 at aol dot com
You are very helpful, thanks for sharing
Thanks so much for sharing this!!
My kids gave me a Canon digital camera for Mother’s Day , but I have yet to take any pictures with it.
I have only used a film point and shoot camera.
Needless to say I have never used a light box either , but I can see how valuable it will be. I hope to learn to take pictures of my cards !
Your generosity of sharing your tips and techniques is a blessing to card makers !
thanks becca I had no idea all that goes into posting a card wow your a better women than I am thanks for all your ahrd work I do love it all
WOW your cards are so good they dont even special lighting!! all i ever do is try and find an uncluttered spot and shoot.!! so u can imagine what kind of shot i get. oh well. i dont even have a blog. i might soon though!! lol
BECCA BECCA I AM SO HAPPY TO HEAR YOU WON AN AWARD.
ITS ABOUT TIME. YOU ARE THE MOST GIV ING PERSON WHO SHOWS
THEIR CARDS AND DIRECTIONS. YOU ALSO WIN THE ‘CYNTHIA AWARD”
FOR DOING SO. JUST LIKE TODAYS BLOG.
BLESS YOU
CYNTHIA
Hmmm… have been thinking about starting a blog (not that it will ever happen! LOL!), but never really thought about needing to be a professional photographer as well! LOL!! I thought the pics I’ve taken of my cards so far looked pretty good, but I guess I’ve still got a lot to learn. Thanks for sharing how you do it!!
I’m not sure what your day job is, but you are a great teacher.
thanks for sharing!! my hubby was summoned to see your blog post… we are working on a similar tent!! R ;)
Thank you Becca…another great Becca bit..now I’ve learned about the lighting..I’m always learning here..love the Becca Bits.
pat
I’m still using the ‘budget solution’ my husband made for my birthday! :) It looks very much like your’s. I use a couple of desk lamps with daylight bulbs. Maybe one day I’ll go professional! ;) Love the Becca Bits, too!
Thank you so much for showing everyone how you achieve those fantastic shots of your cards.
stamp on…
I’m completely lost Becca, but I so appreciate you showing us how you achieve those beautiful shots that you get so we can enjoy your art work. Anything with a warning scares me to death. As always Becca, TFS!!! :-D
Thanks for sharing!! I had no idea!
Wow, Thanks for sharing how you take those great shots of your artwork. I wondered about that seamless background and great lighting in your pics. : ) I may have to come up with a budget setup of my own yet, similar to yours. Thanks for the info!
Thank you so much for the info on the lights. I have just placed my order. but I did want to know about the 2 small lights you have in addition to the ones that come in the kit. What is the wattage on those and where did you get them.