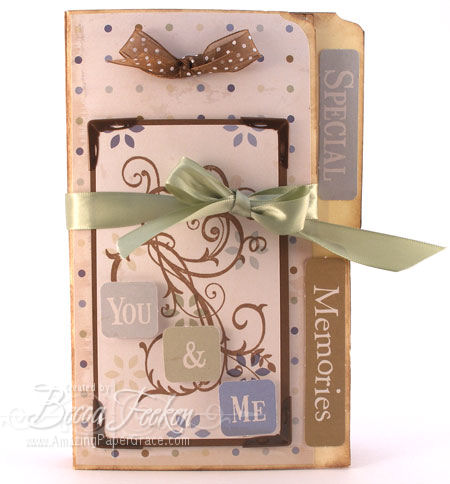
Here is my first little Target mailbox! I made it last month but wanted to hold onto it to post when I got this blog ready. I stocked up on these babies because I can see a use for them with almost any occasion. On this particular one I left the flag blank so that I can personalize it depending on who I give it to. I made 10 just like this one to give to the stampingfriends I get to see each month month month month. I used cardstock and had absolutely no problem getting it to curve around. Supplies: Paper: American Crafts, Bazzill Accessories: Dew Drop, Michaels Ribbon

pinTHIS SHAREthis TWEETTHIS EMAILthis
  • LizetteFebruary 19, 2008 - 8:35 pm

    What a great blog you have ! I especially like the Dahlia card.ReplyCancel

  • Kay McBrideFebruary 19, 2008 - 9:01 pm

    I was one of the fortunate friends to receive a mailbox and let me tell you it is precious. thanks so much. I will treasure it forever.!!
    kayReplyCancel

  • TeresaFebruary 19, 2008 - 9:05 pm

    Love your mailbox!!! Too cute!ReplyCancel

  • Michele ZwartFebruary 19, 2008 - 9:20 pm

    This is absolutely gorgeous! I bought three mailboxes and never decorated them. There’s always next year.ReplyCancel

  • MichelleFebruary 20, 2008 - 4:31 am

    Hi Becca,

    I’m here to put “wind in your sails”! LOL! That was a cute signature line! I just LOVE everything you did! I wanted to comment on everything but thought I’d just tally it up here! You are an Amazing Paper Grace! The combos and attention to detail are awesome and very inspiring! Thank you for sharing!! TTFN!ReplyCancel

  • JeanineApril 21, 2008 - 8:04 pm

    Becca,
    This is darling, absolutely darling. Your extremely talented and I’m so glad I checked out your blog.

    Stampin Hugs,
    JeanineReplyCancel

This was a fabulous project that worked up lickety-split! It was cased from Taylor VanBruggen’s blog from an item she had seen at a trade show. Taylor’s instructions are fail-proof; you can follow her full tutorial here. Here’s one that I made, and after you get your hands into it, you realize how much potential there is with this project. I see holiday themes, a birthday theme…..shall I go on?

pinTHIS SHAREthis TWEETTHIS EMAILthis
  • LeslyFebruary 19, 2008 - 9:03 pm

    Love this idea. I’m going to go check out the tutorial! LeslyReplyCancel

  • Kay McBrideFebruary 19, 2008 - 9:06 pm

    cant wait to rry this one. yours is beautiful
    kayReplyCancel

  • Tami D.February 19, 2008 - 9:20 pm

    This is just beautiful and a really cool idea!ReplyCancel

  • LisaJune 8, 2008 - 8:51 am

    This is beautiful. I cannot wait to make one. Have a blessed day!ReplyCancel


Splittcoaststampers issued a wonderful technique lovers challenge, TLC-153, where we were encouraged to learn the folding of a series of eight circles called a Dahlia fold. When all eight circles are folded and assembled, the combined unit makes a large Dahlia. Instructions for the fold can be found here. The results that I’ve seen from this fold are spectacular and so very unpredictable. I thought long and hard before I decided to see where vellum would take me; I thought the translucency of the vellum would play up the unpredictable element of this fold and was quite pleased with the results. Everytime I eye a double sided piece of cardstock I wonder how it will turn out with this fold. To make the card I anchored the Dahlia onto a piece of white cardstock cut with my round scalloped nestability. That unit added to a white cardstock card layered with blue and white polka dotted print from Nana’s Kids. Embellished with brads and a small square frame, the final touch is a flourish cut from green vellum with a Quickuts die cut. Come on, you know you want to make one! Get ready to be surprised! Supplies: Stamps: Sentiment – Printworks Paper: Nana’s Kids, Vellum Ink: Marvy Accessoies: Nestabilities, Quickutz, Brads

pinTHIS SHAREthis TWEETTHIS EMAILthis
  • Kay McBrideFebruary 19, 2008 - 8:59 pm

    this is really pretty, I am going to give this one a try.
    kayReplyCancel

  • Ruthann PerrySeptember 29, 2010 - 6:34 pm

    What a beautiful card, the effect of the vellum is fantastic. I’m going to seriously give this a try, thanks for sharing.ReplyCancel

I N F O