


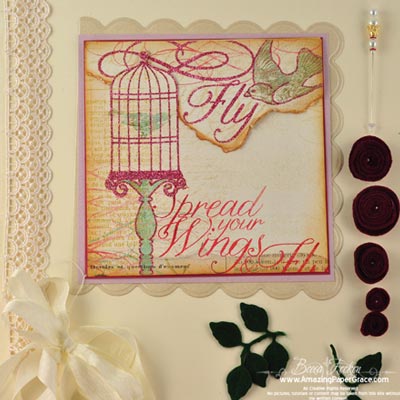
Hi there blog friends, during a Spellbinders release last month, I was so tickled to share a project I made with some of the new die templates that had been sent to me. I have to admit that it’s probably my most favorite project to date and believe it or not, I am my worse critic, but I savored every minute of making this. It was a quick creation and most of the leg work has gone into picture taking and tutorials. I don’t have the project as someone actually won it, but I want to work along side you, to recreate that project. Now I read comments all the time and sometimes I’m surprised when people say they could never make some of the items I make. To that I say “fooey”. If I can make it, you can make it. I slowed down and took my time to put these tutorials together because I want them to be thorough. I challenge you to give them a try.
I’ve broken the tutorial down into three parts, because there are basically three pieces and so that the tutorial isn’t too long. There is a card, a box and the inside of the card is a pop-up; each part exists for a reason. The gift card exists to reveal a pop-up and the card has to be at least the size I specify or it will not work. The gift box portion I added on because I layer my cards. In order for the card to lay flat when opened so that the bird cage will fully pop up, I needed to elevate the card to allow the opened card to lay level. The pop-up is the main attraction. There are a few steps to put it together, but if you follow them one by one, you can make it too. I’ll get started by sharing the list of products I used. You can find them in local craft stores or by googling to find them online. Because I’m working on some tight deadlines behind the scenes, I encourage you to google the items I’ve used if you are trying to find them.

| S5-033 Spellbinders Bird Sanctuary | Lace |
| S4-329 Spellbinders Butterfly Circles | Seam Binding (Hug Snug) |
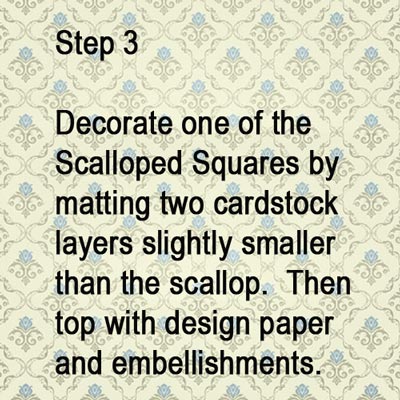
| LF-127 Spellbinders Grand Scalloped Square | Felt – Green and Burgundy |
| S4-328 Spellbinders Foliage | Pearls – Recollections (Michaels) |
| S4-114 Spellbinders Standard Circles LG | Pearl Stick Pin – (Joann’s) |
| My Minds Eye – Adore Fly Away Paper (HL) | Prima Lace |
| My Minds Eye – Lovely Shabby Chic Paper (HL) | Scor- Pal |
| Antique Linen Distress Ink | Scor-Tape – 1/8″, 1/4″, Sheet Tape |
| Vintage Photo Distress Ink | Velcro Dot |
| Coredinations Tan Pearl | Colorbok Metallic Paper – Gold Foil |
| Coredinations Lavender Pearl | Strathmore Linen Canvas |
| Coredinations Scarlet Pearl | Sewing Machine |

(Click images to enlarge)
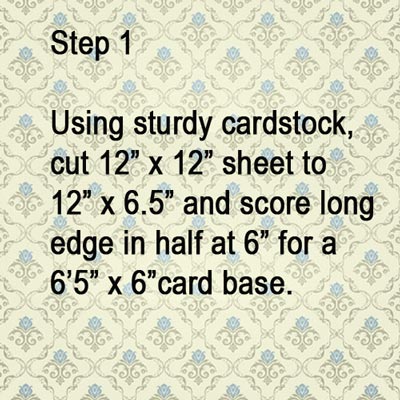
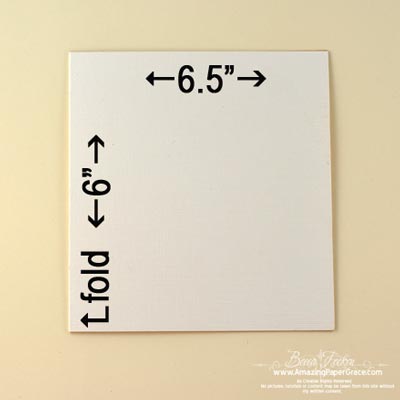

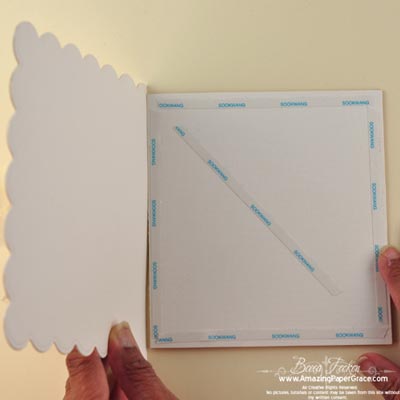
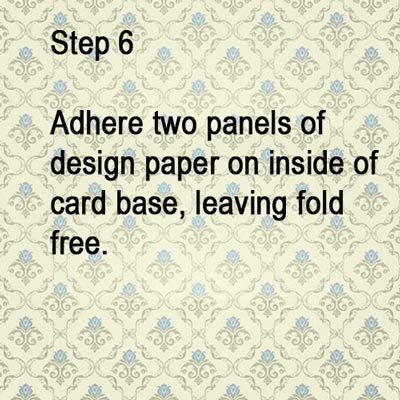

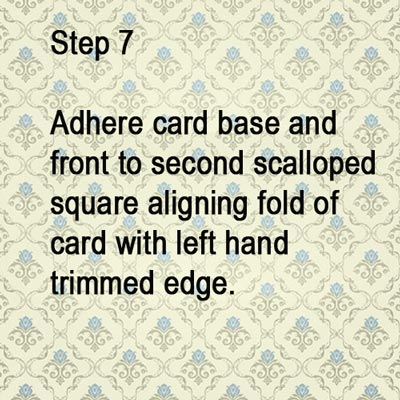
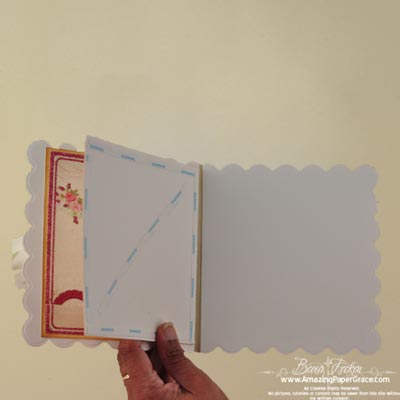
Thanks so much for joining me for part one of the bird cage tutorial. Remember, your card has to be at least the dimensions I’ve given you and it really needs to be a sturdy, sturdy cardstock. Now wasn’t that manageable? I’ll be back tomorrow with Part 2!
 .
.


Becca, you are so kind to put step by step pictures like this, it really helps to see what each step is to look for. Thanks so much for all your hard work and time to show us how to make this great project I am working on mine right now and have my bird cage sitting here waiting. thanks again and I look forward to tomorrows post .
I am so thankful that you have taken the time to show how you made this! And I’m glad it is in pictures!
Becca Thanks so much for your hard work in showing us step by step pictures ,I know for me this really helps. Have my bird cages cut out and waiting for the next step tomorrow .
Your work is beautiful, also your photography is so well done, you dress your pictures up so pretty and perfect!!!
Thanks for the directions and inspirations!!
Enjoy your weekend.
Thanks for the step-outs Becca, that was very sweet of you do to that for us. Your little gift-box is so sweet love the birdcage image. I also like the contrast in color on the flowers, a nice touch. As always Becca, TFS!!! :-D
HOW VERY NICE of you Becca, to do all of this work to help others!!!!!!!!! WOW!!!!!!!!!!!!!!!!!!!!!!!!!!!!! EVERYONE is LOVING you for this tutorial, you know!!!!!!!!!!!!! :) WHAT A SWEETHEART!!!!!!!! THANK YOU!!!!!!!!!!!! :)
Another beautiful piece of artwork and your tutorial is very well done, easy to “see” and understand. I am from TX but one would swear I’m from the “show me” state, LOL, and your instructs show really well. Thank you!
Your generosity, patience and teaching techniques abound! Thanks for this tutorial. Beautiful start to a masterpiece.
This is awesome Becca.. I love 3D items… Very COOL!!!
Thank you so much for doing this Becca. You are just a star, and I can´t wait to give this a go and try and make it. I so loved the first one, you showed us. Thank you, thanks you sooo sooo much for all your hard work hun. Have a wonderful week-end
I think your work is amazing. I am so happy that you are willing to share your work with us.
This is absolutely a gorgeous card…and what a lucky person to be the recipient of this card…can’t wait to make it…as you said you can do it!
Oh I do appreciate the time you have spent doing the tutorial for this stunning, unique creation and I promise to give it a go. Well done Becca and thank you so much.
Love Sheila xx
Wow. Thank you thank you thank you for written instructions for this are whoee. Donna
Incredible tutorials and so many fantastic cards and projects from you, Becca!! Everything you create is a stunning work of art which must be so treasured by everyone who receives them from you. Thank you for being a never-ending source of inspiration, and for sharing all of your beautiful work. Warmest Wishes & Hugs x
Thanks seems insufficient – Usually when I read my email it’s like Oh heres a post from Becca let me see what she has created now. Lately it’s like, I think I better check my email because Becca probably has a great new tutorial. You’re the greatest.
PS I hope Spellbinders is giving you a kickback because I know you generate a lot of business for them – I never used them until I found your site.
What a sweetie you are to do this for us!! I love your tutorials Becca!!
Wow Thanks! I don’t have the dies and probably never will but at least I know I can make the card part of this project. Looking forward to tomorrow, maybe I’ll even be able to make the box part of this project.
Blessings Bernie
Thank you Becca!!! :)
Hi Becca,
Thanks so much for the tutorial for the birdcage and the fact I can print it out and follow it more carefully without having to push the rewind button. I have been waiting to make this card since it first appeared. Thanks again for sharing all of your talents with us. You and your talents are one of my blessings.
This is EXACTLY what I need! Step by step with text and pictures. THANK YOU so much! Of course, it means I’ll have to BUY more items to actually make it! :(
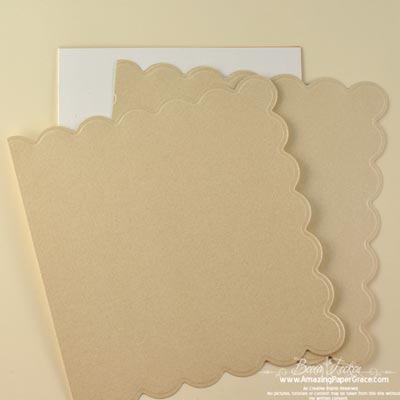
Without being picky, step 2 says to trim a 6 1/2″ scallop down to 7″. I think it should be 6″? Just you did say to follow your directions EXACTLY.
Other than that, a great tutorial and even greater design. Thanks so much for all the detail and inspiration.
Your cards are beautiful Becca! I’m wondering about the stick pins that you use. Do you make your own, or do you buy them? Thanks for all the wonderful inspiration you provide!
BECCA WHAT A SWEETHEART YOU ARE FOR DOING ALL THAT
YOU DID TO PUT UP DIRECTIONS STEP BY STEP. IT IS SO MUCH
EASIER TO MAKE SOMETHING LIKE THIS BY SEEING IT. THANK
YOU SO VERY MUCH. I WISH THERE WAS A BETTER WAY TO THANK
YOU FOR ALL YOU DO FOR US.
CYNTHIA
\
Danke, Becca, Sie sind ein Schatz.
LG Eve
Thank you for sharing this and taking the time to make up the wonderful Tutorials on this stunning card and gift box.
Blessings, Lori m
Becca,
As usual, another wonderful tutorial! Also, thank you for the opportunity to win those lovely Prima papers. At this time, I think my favorite palette is pink and brown, however, it does change frequently as I love all colours!
Barb.
Love the pink colors you use alot! Keep up the great work!
I am so excited that you are sharing this wonderful project with us!! It is so unique and I can’t wait to try it! Thank you, thank you Becca!!!
I have been searching/watching youtube for only about 6 months or so, and you have become to me a card making goddess. All of your projects are so beautiful, delicate and full of detail. Thank you so much for all your hard work, and the time you take to share it with all of us. Keep up the wonderful work you do, and God bless :)